
61MP1
Page 4
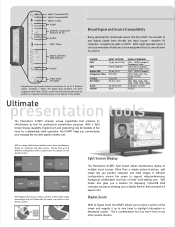
..., 1035i, 1080i Assignable via OSM RS232C Upltirmeatesentation tools The PlasmaSync 61MP1 includes unique capabilities that you would want to connect. NEC has unique Split Screen capability which allows simultaneous display of multiple input sources. Choose from virtually any source equipment that enhance its... Digital Zoom the 61MP1 allows you won't find on the remote control. Split Screen also gives you a solution for displaying 1024x768 XGA computer sources by allowing you can accommodate virtually any ...
..., 1035i, 1080i Assignable via OSM RS232C Upltirmeatesentation tools The PlasmaSync 61MP1 includes unique capabilities that you would want to connect. NEC has unique Split Screen capability which allows simultaneous display of multiple input sources. Choose from virtually any source equipment that enhance its... Digital Zoom the 61MP1 allows you won't find on the remote control. Split Screen also gives you a solution for displaying 1024x768 XGA computer sources by allowing you can accommodate virtually any ...
61MP1
Page 5
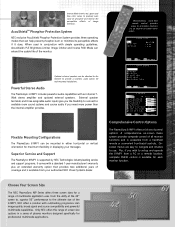
...be mounted in a series of control options. Only NEC offers this range of screen size options in either horizontal or vertical orientation for professional multimedia applications. Wired/wireless hand-held remote control provides access to set of plasma monitors designed ...outstanding progressive scan image quality, broad signal and source compatibility and powerful multimedia capabilities. AccuShield™ Phosphor Protection System NEC exclusive AccuShield Phosphor Protection System provides three operating modes that provides two additional years of all monitor functions via an...
...be mounted in a series of control options. Only NEC offers this range of screen size options in either horizontal or vertical orientation for professional multimedia applications. Wired/wireless hand-held remote control provides access to set of plasma monitors designed ...outstanding progressive scan image quality, broad signal and source compatibility and powerful multimedia capabilities. AccuShield™ Phosphor Protection System NEC exclusive AccuShield Phosphor Protection System provides three operating modes that provides two additional years of all monitor functions via an...
61MP1
Page 6
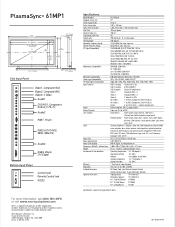
... power 9-pin mini D-Sub, RS232 Direct Access Power on/off, input selection, OSM access, (Control Lock Switch located on input panel) Remote Control Power on/off, input select, volume, mute, wide, display, off-timer, OSM control, cursor, pointer, zoom, split screen, auto...x 890 x 119mm, 58.3 x 35 x 4.7 inches 61 kg, 134.5 lbs. (without notice. NEC Solutions (America), Inc. without base Weight Environmental Considerations Warranty Regulatory Included Accessories Optional Accessories PX-61XM1A 61" 16 to 9 1351 x 760 mm 1365 vertical dots x 768 horizontal rows .99 mm square 700...
... power 9-pin mini D-Sub, RS232 Direct Access Power on/off, input selection, OSM access, (Control Lock Switch located on input panel) Remote Control Power on/off, input select, volume, mute, wide, display, off-timer, OSM control, cursor, pointer, zoom, split screen, auto...x 890 x 119mm, 58.3 x 35 x 4.7 inches 61 kg, 134.5 lbs. (without notice. NEC Solutions (America), Inc. without base Weight Environmental Considerations Warranty Regulatory Included Accessories Optional Accessories PX-61XM1A 61" 16 to 9 1351 x 760 mm 1365 vertical dots x 768 horizontal rows .99 mm square 700...
61MP1
Page 7
...'ll enjoy include 2 Contents of the Package 2 Options 2 Part Names and Function 3 Front View 3 Rear View / Terminal Board 4 Remote Control 5 Battery Installation and Replacement 6 Using the wired remote control mode 7 Operating Range 7 Handling the remote control 7 Installation 8 Connecting Your PC or Macintosh Computer 9 Connections with Equipment that has a Digital Interface ... 9 Connecting Your Document...
...'ll enjoy include 2 Contents of the Package 2 Options 2 Part Names and Function 3 Front View 3 Rear View / Terminal Board 4 Remote Control 5 Battery Installation and Replacement 6 Using the wired remote control mode 7 Operating Range 7 Handling the remote control 7 Installation 8 Connecting Your PC or Macintosh Computer 9 Connections with Equipment that has a Digital Interface ... 9 Connecting Your Document...
61MP1
Page 9
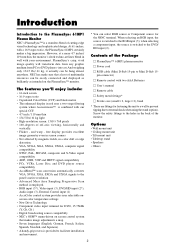
...™ 61MP1 plasma monitor Ⅺ Power cord Ⅺ RGB cable (Mini D-Sub 15-pin to Mini D-Sub 15pin connector) Ⅺ Remote control with a 16:9 aspect ratio, the PlasmaSync 61MP1 certainly makes a big impression. PlasmaSync's crisp, vivid image quality will transform data from ... installation and movement. * You can select RGB source or Component source for the 5BNC terminal. Introduction Introduction to the PlasmaSync 61MP1 Plasma Monitor NEC's PlasmaSync™ is employed. • RGB input (3*), Video input (3), DVD/HD input (2*), Audio input (3), External Control input (1) •...
...™ 61MP1 plasma monitor Ⅺ Power cord Ⅺ RGB cable (Mini D-Sub 15-pin to Mini D-Sub 15pin connector) Ⅺ Remote control with a 16:9 aspect ratio, the PlasmaSync 61MP1 certainly makes a big impression. PlasmaSync's crisp, vivid image quality will transform data from ... installation and movement. * You can select RGB source or Component source for the 5BNC terminal. Introduction Introduction to the PlasmaSync 61MP1 Plasma Monitor NEC's PlasmaSync™ is employed. • RGB input (3*), Video input (3), DVD/HD input (2*), Audio input (3), External Control input (1) •...
61MP1
Page 10
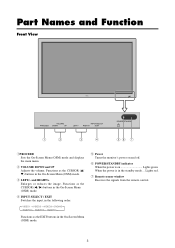
... buttons in the On-Screen Menu (OSM) mode. y POWER/STANDBY indicator When the power is in the On-Screen Menu (OSM) mode. u Remote sensor window Receives the signals from the remote control. 3 w VOLUME DOWN and UP Adjusts the volume. e LEFT/- Part Names and Function Front View PROCEED VOLUME DOWN UP LEFT/- and...
... buttons in the On-Screen Menu (OSM) mode. y POWER/STANDBY indicator When the power is in the On-Screen Menu (OSM) mode. u Remote sensor window Receives the signals from the remote control. 3 w VOLUME DOWN and UP Adjusts the volume. e LEFT/- Part Names and Function Front View PROCEED VOLUME DOWN UP LEFT/- and...
61MP1
Page 11
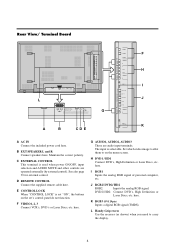
... HD VD L(MONO) R RGB 3 (Digital RGB) RGB2 / DVD2/ HD2 AUDIO 3 AC IN RIGHT LEFT SPEAKERS MUST HAVE MORE THAN 7WATT RATING IMPEDANCE 6 OHM EXTERNAL CONTROL REMOTE CONTROL CONTROL LOCK ON / OFF L AC IN RIGHT LEFT SPEAKERS MUST HAVE MORE THAN 7WATT RATING IMPEDANCE 6 OHM EXTERNAL CONTROL... REMOTE CONTROL CONTROL LOCK ON / OFF G A B CDE AUDIO 3 RGB2 / DVD2 / HD2 AUDIO 2 DVD1 /HD1 AUDIO 1 VIDEO 1 VIDEO 2 VIDEO 3 L(MONO) R Y CB/PB CR/PR L(MONO) R RGB 1 R/CR...
... HD VD L(MONO) R RGB 3 (Digital RGB) RGB2 / DVD2/ HD2 AUDIO 3 AC IN RIGHT LEFT SPEAKERS MUST HAVE MORE THAN 7WATT RATING IMPEDANCE 6 OHM EXTERNAL CONTROL REMOTE CONTROL CONTROL LOCK ON / OFF L AC IN RIGHT LEFT SPEAKERS MUST HAVE MORE THAN 7WATT RATING IMPEDANCE 6 OHM EXTERNAL CONTROL... REMOTE CONTROL CONTROL LOCK ON / OFF G A B CDE AUDIO 3 RGB2 / DVD2 / HD2 AUDIO 2 DVD1 /HD1 AUDIO 1 VIDEO 1 VIDEO 2 VIDEO 3 L(MONO) R Y CB/PB CR/PR L(MONO) R RGB 1 R/CR...
61MP1
Page 12
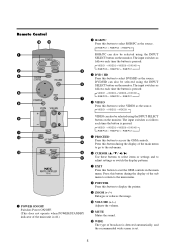
... → VIDEO2→ VIDEO3→ DVD/HD RGB/PC3 ← RGB/PC2 ← RGB/PC1 ← e DVD / HD Press this button to the main menu. Remote Control q POWER ON/OFF Switches Power ON/OFF. (This does not operate when POWER/STANDBY indicator of the main unit is off.) w RGB/PC Press...
... → VIDEO2→ VIDEO3→ DVD/HD RGB/PC3 ← RGB/PC2 ← RGB/PC1 ← e DVD / HD Press this button to the main menu. Remote Control q POWER ON/OFF Switches Power ON/OFF. (This does not operate when POWER/STANDBY indicator of the main unit is off.) w RGB/PC Press...
61MP1
Page 13
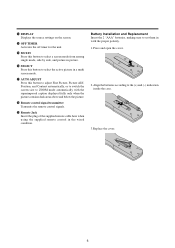
... caption displayed fully only when the picture contains dark areas above and below the picture. !8 Remote control signal transmitter Transmits the remote control signals. !9 Remote Jack Insert the plug of the supplied remote cable here when using the supplied remote control in with the proper polarity. 1.Press and open the cover. 2. Align the batteries according...
... caption displayed fully only when the picture contains dark areas above and below the picture. !8 Remote control signal transmitter Transmits the remote control signals. !9 Remote Jack Insert the plug of the supplied remote cable here when using the supplied remote control in with the proper polarity. 1.Press and open the cover. 2. Align the batteries according...
61MP1
Page 14
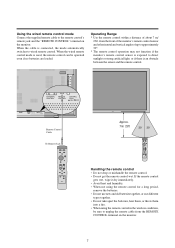
... MUST HAVE MORE THAN 7WATT RATING IMPEDANCE 6 OHM EXTERNAL CONTROL REMOTE CONTROL CONTROL LOCK ON / OFF Remote Control Cable To Remote Jack VOLUME PROCEED DOWN UP INPUT SELECT LEFT/- When the cable is used, the remote control can be sure to direct sunlight or strong artificial light,...23ft. RIGHT/+ /EXIT POWER/STANDBY Approx. 7m/ 23ft 30˚ 30˚ Handling the remote control • Do not drop or mishandle the remote control. • Do not get the remote control wet. If the remote control gets wet, wipe it dry immediately. • Avoid heat and humidity. • ...
... MUST HAVE MORE THAN 7WATT RATING IMPEDANCE 6 OHM EXTERNAL CONTROL REMOTE CONTROL CONTROL LOCK ON / OFF Remote Control Cable To Remote Jack VOLUME PROCEED DOWN UP INPUT SELECT LEFT/- When the cable is used, the remote control can be sure to direct sunlight or strong artificial light,...23ft. RIGHT/+ /EXIT POWER/STANDBY Approx. 7m/ 23ft 30˚ 30˚ Handling the remote control • Do not drop or mishandle the remote control. • Do not get the remote control wet. If the remote control gets wet, wipe it dry immediately. • Avoid heat and humidity. • ...

61MP1
Page 17
... ends of 7 watts or more. External Speaker Connections RIGHT LEFT AC IN RIGHT LEFT SPEAKERS MUST HAVE MORE THAN 7WATT RATING IMPEDANCE 6 OHM EXTERNAL CONTROL REMOTE CONTROL CONTROL LOCK ON / OFF AUDIO 3 RGB2 / DVD2 / HD2 AUDIO 2 DVD1 / HD1 AUDIO 1 VIDEO 1 VIDEO 2 VIDEO 3 L(MONO) R Y CB/PB CR/PR L(MONO) R RGB 1 R/CR/PR...
... ends of 7 watts or more. External Speaker Connections RIGHT LEFT AC IN RIGHT LEFT SPEAKERS MUST HAVE MORE THAN 7WATT RATING IMPEDANCE 6 OHM EXTERNAL CONTROL REMOTE CONTROL CONTROL LOCK ON / OFF AUDIO 3 RGB2 / DVD2 / HD2 AUDIO 2 DVD1 / HD1 AUDIO 1 VIDEO 1 VIDEO 2 VIDEO 3 L(MONO) R Y CB/PB CR/PR L(MONO) R RGB 1 R/CR/PR...

61MP1
Page 19
... input is selected ...... DIGITAL ZOOM Digital zoom specifies the picture position and enlarges the picture. 1. Press the POWER ON button (on the remote control) to turn the unit ON and OFF: 1. Press the POINTER button to restore. Fine Picture, Picture ADJ, Position, and Contrast ... Press the ZOOM+ button and enlarge the picture. The screen size switches to the desired level. Press and hold the VOLUME button (on the remote control to resemble a magnifying glass. ( ) A press of the picture automatically: Press the AUTO ADJUST button. Press the POINTER button to display...
... input is selected ...... DIGITAL ZOOM Digital zoom specifies the picture position and enlarges the picture. 1. Press the POWER ON button (on the remote control) to turn the unit ON and OFF: 1. Press the POINTER button to restore. Fine Picture, Picture ADJ, Position, and Contrast ... Press the ZOOM+ button and enlarge the picture. The screen size switches to the desired level. Press and hold the VOLUME button (on the remote control to resemble a magnifying glass. ( ) A press of the picture automatically: Press the AUTO ADJUST button. Press the POINTER button to display...
61MP1
Page 21
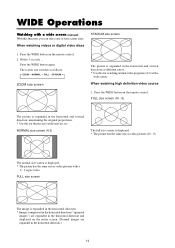
... 9) The picture is displayed. * The picture has the same size as video pictures (16 : 9). Press the WIDE button on the remote control. Within 3 seconds ... NORMAL size screen (4:3) The full size screen is expanded in the horizontal and vertical direction, maintaining the original ... for watching normal video programs (4:3) with a wide screen. WIDE Operations Watching with a 4 : 3 aspect ratio. Press the WIDE button on the remote control. 2. When watching high definition video source 1. The normal size screen is displayed. * The picture has the same size as follows: →...
... 9) The picture is displayed. * The picture has the same size as video pictures (16 : 9). Press the WIDE button on the remote control. Within 3 seconds ... NORMAL size screen (4:3) The full size screen is expanded in the horizontal and vertical direction, maintaining the original ... for watching normal video programs (4:3) with a wide screen. WIDE Operations Watching with a 4 : 3 aspect ratio. Press the WIDE button on the remote control. 2. When watching high definition video source 1. The normal size screen is displayed. * The picture has the same size as follows: →...

61MP1
Page 22
... TRUE size screen (VGA, SVGA 4:3) Information Ⅵ Supported resolution See page 52 for RGB SELECT mode referring to the"Table of Signals Supported" on the remote control. 2. When wide signals are input. FULL size screen The image is expanded in the horizontal direction. The image is expanded in the horizontal and...
... TRUE size screen (VGA, SVGA 4:3) Information Ⅵ Supported resolution See page 52 for RGB SELECT mode referring to the"Table of Signals Supported" on the remote control. 2. When wide signals are input. FULL size screen The image is expanded in the horizontal direction. The image is expanded in the horizontal and...
61MP1
Page 23
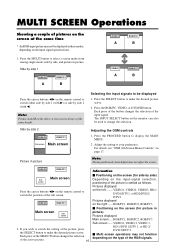
... picture active. Side by side 1 VIDEO1 A RGB/PC1 B VIDEO1 A RGB/PC1 B VIDEO1 A RGB/PC1 B Press the cursor buttons ᮤ ᮣ on the remote control to switch either side by side 1 (with ᮤ). Press the RGB/PC, VIDEO, or DVD/HD button. Press the PROCEED button to be displayed...multi mode, Auto Adjust does not affect the screen. VIDEO1 RGB/PC1 Sub screen Main screen Press the cursor buttons ᮤ ᮣ on the remote control to switch the position of the RGB signals. VIDEO1, VIDEO2, VIDEO3, HD1/ DVD1/DTV1, or HD2/DVD2/ DTV2 Pictures displayed on the ...
... picture active. Side by side 1 VIDEO1 A RGB/PC1 B VIDEO1 A RGB/PC1 B VIDEO1 A RGB/PC1 B Press the cursor buttons ᮤ ᮣ on the remote control to switch either side by side 1 (with ᮤ). Press the RGB/PC, VIDEO, or DVD/HD button. Press the PROCEED button to be displayed...multi mode, Auto Adjust does not affect the screen. VIDEO1 RGB/PC1 Sub screen Main screen Press the cursor buttons ᮤ ᮣ on the remote control to switch the position of the RGB signals. VIDEO1, VIDEO2, VIDEO3, HD1/ DVD1/DTV1, or HD2/DVD2/ DTV2 Pictures displayed on the ...
61MP1
Page 24
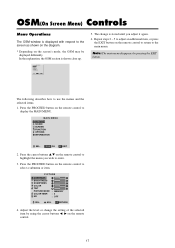
...OPTIONS INFORMATION SEL. PROCEED OK EXIT EXIT 5. ADJ. Note: The main menu disappears by using the cursor buttons ᮤ ᮣ on the remote control to display the MAIN MENU. The following describes how to highlight the menu you adjust it again. 6. EXIT RETURN 4. OSM(On Screen... OK EXIT EXIT 2. Adjust the level or change is displayed with respect to the screen as shown on the diagram. * Depending on the remote control to use the menus and the selected items. 1. MAIN MENU PICTURE SOUND SCREEN FUNCTION OPTIONS INFORMATION SEL. Press the cursor buttons L M...
...OPTIONS INFORMATION SEL. PROCEED OK EXIT EXIT 5. ADJ. Note: The main menu disappears by using the cursor buttons ᮤ ᮣ on the remote control to display the MAIN MENU. The following describes how to highlight the menu you adjust it again. 6. EXIT RETURN 4. OSM(On Screen... OK EXIT EXIT 2. Adjust the level or change is displayed with respect to the screen as shown on the diagram. * Depending on the remote control to use the menus and the selected items. 1. MAIN MENU PICTURE SOUND SCREEN FUNCTION OPTIONS INFORMATION SEL. Press the cursor buttons L M...
61MP1
Page 26
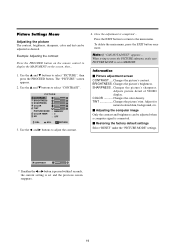
Use the L and M buttons to display the MAIN MENU on the remote control to select "CONTRAST". BRIGHTNESS . Changes the picture's sharpness. Picture Settings Menu Adjusting the picture The contrast, brightness, sharpness, color and tint can be adjusted ...
Use the L and M buttons to display the MAIN MENU on the remote control to select "CONTRAST". BRIGHTNESS . Changes the picture's sharpness. Picture Settings Menu Adjusting the picture The contrast, brightness, sharpness, color and tint can be adjusted ...
61MP1
Page 27
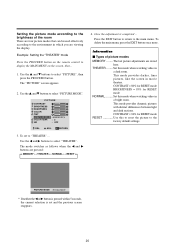
... screen, then... 1. This mode provides darker, finer pictures, like the screen in a dark room. Example: Setting the "THEATER" mode Press the PROCEED button on the remote control to the main menu. EXIT RETURN 3. Use the ᮤ and ᮣ buttons to select "PICTURE", then press the PROCEED button. THEATER ........ This mode provides...
... screen, then... 1. This mode provides darker, finer pictures, like the screen in a dark room. Example: Setting the "THEATER" mode Press the PROCEED button on the remote control to the main menu. EXIT RETURN 3. Use the ᮤ and ᮣ buttons to select "PICTURE", then press the PROCEED button. THEATER ........ This mode provides...
61MP1
Page 28
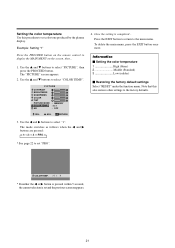
... temperature Use this also restores other settings to the factory defaults. * See page 22 to set "PRO". Example: Setting "1" Press the PROCEED button on the remote control to select "COLOR TEMP.". PICTURE CONTRAST BRIGHTNESS SHARPNESS COLOR TINT R G PICTURE MODE : MEMORY COLOR TEMP. : 2 NR : OFF SEL. Information Ⅵ Setting the color temperature...
... temperature Use this also restores other settings to the factory defaults. * See page 22 to set "PRO". Example: Setting "1" Press the PROCEED button on the remote control to select "COLOR TEMP.". PICTURE CONTRAST BRIGHTNESS SHARPNESS COLOR TINT R G PICTURE MODE : MEMORY COLOR TEMP. : 2 NR : OFF SEL. Information Ⅵ Setting the color temperature...
61MP1
Page 29
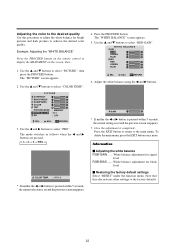
... the ᮤ or ᮣ button is pressed within 5 seconds, the current selection is completed... Example: Adjusting the "WHITE BALANCE" Press the PROCEED button on the remote control to select "COLOR TEMP.". Use the ᮤ and ᮣ buttons to the main menu. Adjust the white balance using the ᮤ and ᮣ buttons...
... the ᮤ or ᮣ button is pressed within 5 seconds, the current selection is completed... Example: Adjusting the "WHITE BALANCE" Press the PROCEED button on the remote control to select "COLOR TEMP.". Use the ᮤ and ᮣ buttons to the main menu. Adjust the white balance using the ᮤ and ᮣ buttons...


