
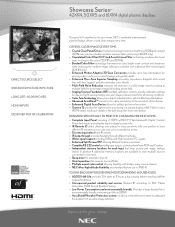
42XR4/50XR5/61XR4 spec sheet
Page 1
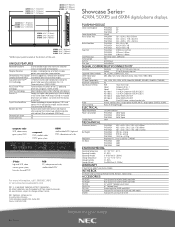
...operation (fan noise as low as 20db). ° Multiple aspect ratio control allowing flexibility with today's many source choices. ° NEC offers high altitude flexibility as 285W. ° AccuShield Phosphor Protection system provides a comprehensive toolset to PAC Media Associates 2004 Annual Resellers ... Input Panel including 2 HDMI w/HDCP (High-bandwidth Digital Content Protection) inputs providing the latest in digital connectivity. ° IR Remote ID select allowing units placed in close proximity with less "jaggies" and also eliminates color bleeds. ° Multi-Field Noise Reduction...
...operation (fan noise as low as 20db). ° Multiple aspect ratio control allowing flexibility with today's many source choices. ° NEC offers high altitude flexibility as 285W. ° AccuShield Phosphor Protection system provides a comprehensive toolset to PAC Media Associates 2004 Annual Resellers ... Input Panel including 2 HDMI w/HDCP (High-bandwidth Digital Content Protection) inputs providing the latest in digital connectivity. ° IR Remote ID select allowing units placed in close proximity with less "jaggies" and also eliminates color bleeds. ° Multi-Field Noise Reduction...
42XR4/50XR5/61XR4 spec sheet
Page 2
... the effects of NEC Corporation. All other trademarks are connected to 9840 feet (0 - 3000m) 3 Years Parts & Labor/1 year plasma module IN THE BOX AC Power Cord, User Manual, Remote Control, Batteries, Cable Clamps ACCESSORIES PX-SP2U/S PX-SP2U/B PX-ST2U PX-61ST2U PX-CV2U 4250WMK 61WMK Silver...Area PX-42XR4A 36.1 x 20.4 in, 918 x 518 mm PX-50XR5A 43.5 x 24.5 in, 1106 x 622 mm PX-61XR4A 53.2 x 29.9 in, 1351 x 760 mm Native Resolution PX-42XR4A XGA 1024 x 768 PX-50XR5A WXGA 1365 x 768 PX-61XR4A WXGA 1365 x 768 Pixel Pitch PX-42XR4A 0.900mm x 0.671mm PX-50XR5A 0.81mm x 0.81mm PX-...
... the effects of NEC Corporation. All other trademarks are connected to 9840 feet (0 - 3000m) 3 Years Parts & Labor/1 year plasma module IN THE BOX AC Power Cord, User Manual, Remote Control, Batteries, Cable Clamps ACCESSORIES PX-SP2U/S PX-SP2U/B PX-ST2U PX-61ST2U PX-CV2U 4250WMK 61WMK Silver...Area PX-42XR4A 36.1 x 20.4 in, 918 x 518 mm PX-50XR5A 43.5 x 24.5 in, 1106 x 622 mm PX-61XR4A 53.2 x 29.9 in, 1351 x 760 mm Native Resolution PX-42XR4A XGA 1024 x 768 PX-50XR5A WXGA 1365 x 768 PX-61XR4A WXGA 1365 x 768 Pixel Pitch PX-42XR4A 0.900mm x 0.671mm PX-50XR5A 0.81mm x 0.81mm PX-...
42XR4/50XR5/61XR4 UM
Page 6
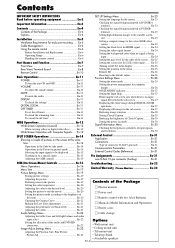
... high definition images to the suitable screen size En-23 Setting a computer image to the brightness of the room En-20 Ⅺ Power cord Ⅺ Remote control with Computer Signals ..... En-12 Wide Screen Operation with two AAA Batteries Changing the Gamma Curve En-21 Making the Low Tone adjustments En...-11 To check the remaining time En-11 To cancel the off the menu display En-25 Setting the position of the menu En-25 Remote ID En-26 Resetting to the default values En-26 Function Settings Menu En-26 Setting the menu mode En-26 Setting the power management...
... high definition images to the suitable screen size En-23 Setting a computer image to the brightness of the room En-20 Ⅺ Power cord Ⅺ Remote control with Computer Signals ..... En-12 Wide Screen Operation with two AAA Batteries Changing the Gamma Curve En-21 Making the Low Tone adjustments En...-11 To check the remaining time En-11 To cancel the off the menu display En-25 Setting the position of the menu En-25 Remote ID En-26 Resetting to the default values En-26 Function Settings Menu En-26 Setting the menu mode En-26 Setting the power management...
42XR4/50XR5/61XR4 UM
Page 8
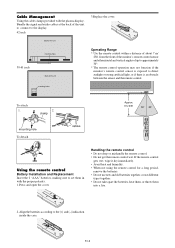
...• Do not take apart the batteries, heat them, or throw them in with the plasma display; from the front of the monitor's remote control sensor and at the back of the unit to connect to set them into a fire. 2. Bundle the signal and audio cables at ...horizontal and vertical angles of about 7 m/ 23ft. En-6 clamp Approx. 7m / 23ft mounting hole To detach cables Using the remote control Battery Installation and Replacement Insert the 2 "AAA" batteries, making sure to the display. 42 inch 3.Replace the cover. Align the batteries according ...
...• Do not take apart the batteries, heat them, or throw them in with the plasma display; from the front of the monitor's remote control sensor and at the back of the unit to connect to set them into a fire. 2. Bundle the signal and audio cables at ...horizontal and vertical angles of about 7 m/ 23ft. En-6 clamp Approx. 7m / 23ft mounting hole To detach cables Using the remote control Battery Installation and Replacement Insert the 2 "AAA" batteries, making sure to the display. 42 inch 3.Replace the cover. Align the batteries according ...
42XR4/50XR5/61XR4 UM
Page 9
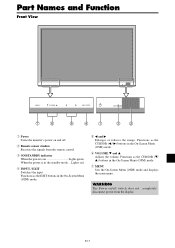
... When the power is in the On-Screen Menu (OSM) mode. Functions as the EXIT buttons in the standby mode ... WARNING The Power on/off . w Remote sensor window Receives the signals from the display. r INPUT / EXIT Switches the input. Functions as the CURSOR (w/ v) buttons in the On-Screen Menu (OSM) mode... /EXIT ON/STANDBY MENU VOLUME INPUT/ EXIT ON/STANDBY 7 6 5 4 1 3 2 q Power Turns the monitor's power on and off switch does not completely disconnect power from the remote control.
... When the power is in the On-Screen Menu (OSM) mode. Functions as the EXIT buttons in the standby mode ... WARNING The Power on/off . w Remote sensor window Receives the signals from the display. r INPUT / EXIT Switches the input. Functions as the CURSOR (w/ v) buttons in the On-Screen Menu (OSM) mode... /EXIT ON/STANDBY MENU VOLUME INPUT/ EXIT ON/STANDBY 7 6 5 4 1 3 2 q Power Turns the monitor's power on and off switch does not completely disconnect power from the remote control.
42XR4/50XR5/61XR4 UM
Page 10
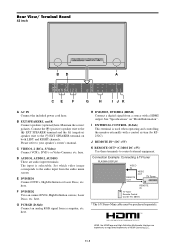
... SPEAKER L and R Connect speakers (optional) here. here. Connection Example: Connecting a TV tuner PLASMA DISPLAY VIDEO IN REMOTE OUT VIDEO OUT TV Tuner REMOTE IN TV Tuner Remote Control Carrier fHz: 38kHz * The 1/8 Stereo Mini cable must be purchased separately. Please refer to the EXT SPEAKER terminal... signal from the audio menu screen. C VIDEO1, 2 (RCA, S-Video) Connect VCR's, DVD's or Video Cameras, etc. here. J REMOTE IN* (DC +5V) K REMOTE OUT* (C-MOS DC +5V) Use these terminals to the audio input from a computer, etc. Maintain the correct polarity. Set which video...
... SPEAKER L and R Connect speakers (optional) here. here. Connection Example: Connecting a TV tuner PLASMA DISPLAY VIDEO IN REMOTE OUT VIDEO OUT TV Tuner REMOTE IN TV Tuner Remote Control Carrier fHz: 38kHz * The 1/8 Stereo Mini cable must be purchased separately. Please refer to the EXT SPEAKER terminal... signal from the audio menu screen. C VIDEO1, 2 (RCA, S-Video) Connect VCR's, DVD's or Video Cameras, etc. here. J REMOTE IN* (DC +5V) K REMOTE OUT* (C-MOS DC +5V) Use these terminals to the audio input from a computer, etc. Maintain the correct polarity. Set which video...

42XR4/50XR5/61XR4 UM
Page 11
... can connect DVDs, High Definition sources, Laser Discs, etc. Connection Example: Connecting a TV tuner PLASMA DISPLAY VIDEO IN REMOTE OUT VIDEO OUT TV Tuner REMOTE IN TV Tuner Remote Control Carrier fHz: 38kHz * The 1/8 Stereo Mini cable must be purchased separately. Maintain the correct polarity. D AUDIO1,... the (positive) speaker wire to the EXT SPEAKER terminal and the (negative) speaker wire to your speaker's owner's manual. J REMOTE IN* (DC +5V) K REMOTE OUT* (C-MOS DC +5V) Use these terminals to the audio input from the audio menu screen. En-9 G PC/RGB (D-...
... can connect DVDs, High Definition sources, Laser Discs, etc. Connection Example: Connecting a TV tuner PLASMA DISPLAY VIDEO IN REMOTE OUT VIDEO OUT TV Tuner REMOTE IN TV Tuner Remote Control Carrier fHz: 38kHz * The 1/8 Stereo Mini cable must be purchased separately. Maintain the correct polarity. D AUDIO1,... the (positive) speaker wire to the EXT SPEAKER terminal and the (negative) speaker wire to your speaker's owner's manual. J REMOTE IN* (DC +5V) K REMOTE OUT* (C-MOS DC +5V) Use these terminals to the audio input from the audio menu screen. En-9 G PC/RGB (D-...
42XR4/50XR5/61XR4 UM
Page 12
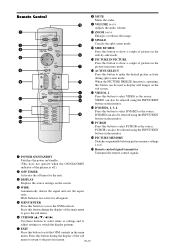
... selected using the INPUT/EXIT button on the sub screen. !5 VIDEO1, 2 Press this button to 6. !9 Remote control signal transmitter Transmits the remote control signals. En-10 r WIDE Automatically detects the signal and sets the aspect ratio. Remote Control i MUTE Mutes the audio. q POWER ON/STANDBY Switches the power on the monitor. !8 PICTURE MEMORY...
... selected using the INPUT/EXIT button on the sub screen. !5 VIDEO1, 2 Press this button to 6. !9 Remote control signal transmitter Transmits the remote control signals. En-10 r WIDE Automatically detects the signal and sets the aspect ratio. Remote Control i MUTE Mutes the audio. q POWER ON/STANDBY Switches the power on the monitor. !8 PICTURE MEMORY...
42XR4/50XR5/61XR4 UM
Page 13
... supplied to display magnifying glass. ( ) To change the picture position: Select the position with the off the unit with the remote control). Press the POWER ON button (on the remote control) to turn on the unit). Press and hold the VOLUME button (on the unit) to turn off after a few ...seconds. 3. MUTE To mute the audio: Press the MUTE button on the remote control or the unit) to decrease to turn the unit ON and OFF: 1. press again to start the timer at 30 minutes. 2. The timer starts...
... supplied to display magnifying glass. ( ) To change the picture position: Select the position with the off the unit with the remote control). Press the POWER ON button (on the remote control) to turn on the unit). Press and hold the VOLUME button (on the unit) to turn off after a few ...seconds. 3. MUTE To mute the audio: Press the MUTE button on the remote control or the unit) to decrease to turn the unit ON and OFF: 1. press again to start the timer at 30 minutes. 2. The timer starts...
42XR4/50XR5/61XR4 UM
Page 14
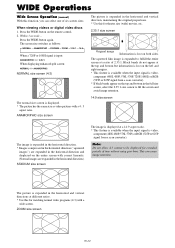
The picture is expanded in the horizontal direction and displayed on the remote control. 2. Within 3 seconds ... Press the WIDE button again. Black bands do not appear at different ratios. * Use this for watching normal video programs (4:3) with a 4 : 3 aspect ...
The picture is expanded in the horizontal direction and displayed on the remote control. 2. Within 3 seconds ... Press the WIDE button again. Black bands do not appear at different ratios. * Use this for watching normal video programs (4:3) with a 4 : 3 aspect ...
42XR4/50XR5/61XR4 UM
Page 15
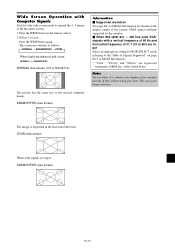
... again. The image is expanded in the horizontal direction. ZOOM size screen When wide signals are input Select an appropriate setting for details on the remote control. 2. Press the WIDE button on the display output of the various VESA signal standards supported by the monitor. Ⅵ When 852 (848) dot ...
... again. The image is expanded in the horizontal direction. ZOOM size screen When wide signals are input Select an appropriate setting for details on the remote control. 2. Press the WIDE button on the display output of the various VESA signal standards supported by the monitor. Ⅵ When 852 (848) dot ...
42XR4/50XR5/61XR4 UM
Page 18
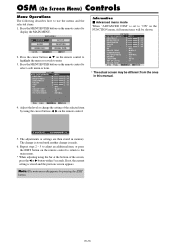
.... Repeat steps 2 - 5 to adjust an additional item, or press the EXIT button on the remote control to the main menu. * When adjusting using the cursor buttons ᮤ ᮣ on the remote control. OSM (On Screen Menu) Controls Menu Operations The following describes how to "ON" in this... manual. Press the MENU/ENTER button on the remote control to return to select a sub menu or item. PICTURE PICTURE MEMORY : OFF CONTRAST : 52 BRIGHTNESS : 32 SHARPNESS : 16 COLOR : 32 TINT R...
.... Repeat steps 2 - 5 to adjust an additional item, or press the EXIT button on the remote control to the main menu. * When adjusting using the cursor buttons ᮤ ᮣ on the remote control. OSM (On Screen Menu) Controls Menu Operations The following describes how to "ON" in this... manual. Press the MENU/ENTER button on the remote control to return to select a sub menu or item. PICTURE PICTURE MEMORY : OFF CONTRAST : 52 BRIGHTNESS : 32 SHARPNESS : 16 COLOR : 32 TINT R...
42XR4/50XR5/61XR4 UM
Page 19
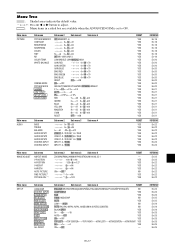
...:1 64←0→+64 128←0→+127 0←→64 0←→64 ON←→OFF*2 2 0←→64 2 0←→128 RESET - REMOTE ID ALL RESET Sub menu 2 Sub menu 3 Sub menu 4 RESET ENGLISH/DEUTSCH/FRANÇAIS/ESPAÑOL/ITALIANO/SVENSKA/ У /PORTUGUÊS NO COMPONENT...
...:1 64←0→+64 128←0→+127 0←→64 0←→64 ON←→OFF*2 2 0←→64 2 0←→128 RESET - REMOTE ID ALL RESET Sub menu 2 Sub menu 3 Sub menu 4 RESET ENGLISH/DEUTSCH/FRANÇAIS/ESPAÑOL/ITALIANO/SVENSKA/ У /PORTUGUÊS NO COMPONENT...
42XR4/50XR5/61XR4 UM
Page 24
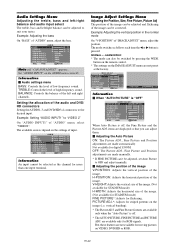
... tastes. Example: Adjusting the vertical position in the normal mode On "V-POSITION" of the image can be switched by pressing the WIDE button on the remote control. * The settings on the AUDIO menu correctly. IMAGE ADJUST ASPECT MODE : NORMAL V-POSITION H-POSITION V-HEIGHT H-WIDTH AUTO PICTURE : OFF FINE PICTURE PICTURE ADJ. ADJ...
... tastes. Example: Adjusting the vertical position in the normal mode On "V-POSITION" of the image can be switched by pressing the WIDE button on the remote control. * The settings on the AUDIO menu correctly. IMAGE ADJUST ASPECT MODE : NORMAL V-POSITION H-POSITION V-HEIGHT H-WIDTH AUTO PICTURE : OFF FINE PICTURE PICTURE ADJ. ADJ...
42XR4/50XR5/61XR4 UM
Page 25
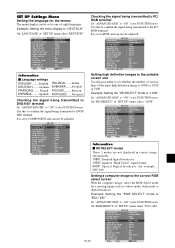
...SET UP : HIGH COLOR SYSTEM : AUTO BACK GROUND : GRAY GRAY LEVEL : 3 S1/S2 : OFF DISPLAY OSM : ON OSM ADJ. : TOP LEFT REMOTE ID : ALL ALL RESET : OFF CAN NOT ADJUST Information Ⅵ Language settings ENGLISH ........ Italian SVENSKA ...... ADJ. EXIT RETURN Information Ⅵ HD SELECT ...SET UP : HIGH COLOR SYSTEM : AUTO BACK GROUND : GRAY GRAY LEVEL : 3 S1/S2 : OFF DISPLAY OSM : ON OSM ADJ. : TOP LEFT REMOTE ID : ALL ALL RESET : OFF SEL. En-23 SET UP LANGUAGE : ENGLISH DVD/HD1 INPUT : COMPONENT D-SUB INPUT : RGB HD SELECT : 1080I...
...SET UP : HIGH COLOR SYSTEM : AUTO BACK GROUND : GRAY GRAY LEVEL : 3 S1/S2 : OFF DISPLAY OSM : ON OSM ADJ. : TOP LEFT REMOTE ID : ALL ALL RESET : OFF CAN NOT ADJUST Information Ⅵ Language settings ENGLISH ........ Italian SVENSKA ...... ADJ. EXIT RETURN Information Ⅵ HD SELECT ...SET UP : HIGH COLOR SYSTEM : AUTO BACK GROUND : GRAY GRAY LEVEL : 3 S1/S2 : OFF DISPLAY OSM : ON OSM ADJ. : TOP LEFT REMOTE ID : ALL ALL RESET : OFF SEL. En-23 SET UP LANGUAGE : ENGLISH DVD/HD1 INPUT : COMPONENT D-SUB INPUT : RGB HD SELECT : 1080I...
42XR4/50XR5/61XR4 UM
Page 26
...AUTO HDMI SET UP : HIGH COLOR SYSTEM : AUTO BACK GROUND : BLACK GRAY LEVEL : 3 S1/S2 : OFF DISPLAY OSM : ON OSM ADJ. : TOP LEFT REMOTE ID : ALL ALL RESET : OFF SEL. SET UP LANGUAGE : ENGLISH DVD/HD1 INPUT : COMPONENT D-SUB INPUT : RGB HD SELECT : 1080I RGB SELECT : AUTO ... SET UP : HIGH COLOR SYSTEM : 3.58NTSC BACK GROUND : GRAY GRAY LEVEL : 3 S1/S2 : OFF DISPLAY OSM : ON OSM ADJ. : TOP LEFT REMOTE ID : ALL ALL RESET : OFF SEL. PAL: This is the standard format used mainly in Argentina. ADJ. See page En-3 of the above settings. Setting...
...AUTO HDMI SET UP : HIGH COLOR SYSTEM : AUTO BACK GROUND : BLACK GRAY LEVEL : 3 S1/S2 : OFF DISPLAY OSM : ON OSM ADJ. : TOP LEFT REMOTE ID : ALL ALL RESET : OFF SEL. SET UP LANGUAGE : ENGLISH DVD/HD1 INPUT : COMPONENT D-SUB INPUT : RGB HD SELECT : 1080I RGB SELECT : AUTO ... SET UP : HIGH COLOR SYSTEM : 3.58NTSC BACK GROUND : GRAY GRAY LEVEL : 3 S1/S2 : OFF DISPLAY OSM : ON OSM ADJ. : TOP LEFT REMOTE ID : ALL ALL RESET : OFF SEL. PAL: This is the standard format used mainly in Argentina. ADJ. See page En-3 of the above settings. Setting...
42XR4/50XR5/61XR4 UM
Page 27
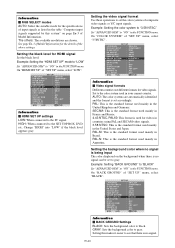
...SET UP : HIGH COLOR SYSTEM : AUTO BACK GROUND : GRAY GRAY LEVEL : 3 S1/S2 : AUTO DISPLAY OSM : ON OSM ADJ. : TOP LEFT REMOTE ID : ALL ALL RESET : OFF SEL. EXIT RETURN Information Ⅵ S1/S2 settings AUTO: Adjusts the screen size automatically according to 15. On "DISPLAY OSM...AUTO HDMI SET UP : HIGH COLOR SYSTEM : AUTO BACK GROUND : GRAY GRAY LEVEL : 3 S1/S2 : OFF DISPLAY OSM : ON OSM ADJ. : TOP CENTER REMOTE ID : ALL ALL RESET : OFF SEL. On "S1/S2" of "SET UP" menu, select "TOP CENTER". SET UP LANGUAGE : ENGLISH DVD/HD1 INPUT : ...
...SET UP : HIGH COLOR SYSTEM : AUTO BACK GROUND : GRAY GRAY LEVEL : 3 S1/S2 : AUTO DISPLAY OSM : ON OSM ADJ. : TOP LEFT REMOTE ID : ALL ALL RESET : OFF SEL. EXIT RETURN Information Ⅵ S1/S2 settings AUTO: Adjusts the screen size automatically according to 15. On "DISPLAY OSM...AUTO HDMI SET UP : HIGH COLOR SYSTEM : AUTO BACK GROUND : GRAY GRAY LEVEL : 3 S1/S2 : OFF DISPLAY OSM : ON OSM ADJ. : TOP CENTER REMOTE ID : ALL ALL RESET : OFF SEL. On "S1/S2" of "SET UP" menu, select "TOP CENTER". SET UP LANGUAGE : ENGLISH DVD/HD1 INPUT : ...
42XR4/50XR5/61XR4 UM
Page 28
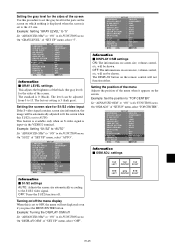
... HDMI SET UP : HIGH COLOR SYSTEM : AUTO BACK GROUND : GRAY GRAY LEVEL : 3 S1/S2 : OFF DISPLAY OSM : ON OSM ADJ. : TOP LEFT REMOTE ID : ALL ALL RESET : ON SEL. Example: Setting to "1" Set "ADVANCED OSM" to the factory default values. SET UP LANGUAGE : ENGLISH DVD/HD1 INPUT ...HDMI SET UP : HIGH COLOR SYSTEM : AUTO BACK GROUND : GRAY GRAY LEVEL : 3 S1/S2 : OFF DISPLAY OSM : ON OSM ADJ. : TOP LEFT REMOTE ID : 1 ALL RESET : OFF SEL. EXIT RETURN ALL RESET SETTING NOW When the "SETTING NOW" screen disappears, then all the settings (PICTURE, AUDIO, IMAGE...
... HDMI SET UP : HIGH COLOR SYSTEM : AUTO BACK GROUND : GRAY GRAY LEVEL : 3 S1/S2 : OFF DISPLAY OSM : ON OSM ADJ. : TOP LEFT REMOTE ID : ALL ALL RESET : ON SEL. Example: Setting to "1" Set "ADVANCED OSM" to the factory default values. SET UP LANGUAGE : ENGLISH DVD/HD1 INPUT ...HDMI SET UP : HIGH COLOR SYSTEM : AUTO BACK GROUND : GRAY GRAY LEVEL : 3 S1/S2 : OFF DISPLAY OSM : ON OSM ADJ. : TOP LEFT REMOTE ID : 1 ALL RESET : OFF SEL. EXIT RETURN ALL RESET SETTING NOW When the "SETTING NOW" screen disappears, then all the settings (PICTURE, AUDIO, IMAGE...
42XR4/50XR5/61XR4 UM
Page 34
...remove the obstacle. • Eliminate the light by the cabinet reacting to changes in green and red, or green. • Is the remote control pointed at • Leave some other problem, check the adjustments, operations, etc., before requesting service. Check pin assignments and connections....; Replace both batteries with new ones. Troubleshooting If the picture quality is poor or there is unstable. connected components. • Are the remote control's batteries worn out? • Is the monitor's power cord plugged into a power outlet? • Are all connections are pressed....
...remove the obstacle. • Eliminate the light by the cabinet reacting to changes in green and red, or green. • Is the remote control pointed at • Leave some other problem, check the adjustments, operations, etc., before requesting service. Check pin assignments and connections....; Replace both batteries with new ones. Troubleshooting If the picture quality is poor or there is unstable. connected components. • Are the remote control's batteries worn out? • Is the monitor's power cord plugged into a power outlet? • Are all connections are pressed....


