
42XM5/50XM6/60XM5 spec sheet
Page 1
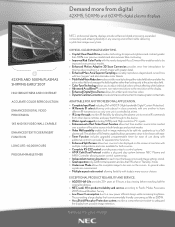
...ADAPTABLE FOR ANY PROFESSIONAL APPLICATION. ° Complete Input Panel including DVI w/HDCP (High-bandwidth Digital Content Protection). ° IR Remote ID select allowing units placed in close proximity with multiple configurations and sizes available for both landscape and portrait modes. °...DIGITAL VIDEO PROCESSING 1X5 AND 5X1 VIDEO WALL CAPABLE ENHANCED TEXT TICKER/INSERT FUNCTION LONG LIFE > 60,000 HOURS PROGRAMMABLE TIMER NEC's professional plasma displays provide enhanced digital processing, expanded connectivity and amazing flexibility in "Stand-by" mode. ° Underscan Mode...
...ADAPTABLE FOR ANY PROFESSIONAL APPLICATION. ° Complete Input Panel including DVI w/HDCP (High-bandwidth Digital Content Protection). ° IR Remote ID select allowing units placed in close proximity with multiple configurations and sizes available for both landscape and portrait modes. °...DIGITAL VIDEO PROCESSING 1X5 AND 5X1 VIDEO WALL CAPABLE ENHANCED TEXT TICKER/INSERT FUNCTION LONG LIFE > 60,000 HOURS PROGRAMMABLE TIMER NEC's professional plasma displays provide enhanced digital processing, expanded connectivity and amazing flexibility in "Stand-by" mode. ° Underscan Mode...
42XM5/50XM6/60XM5 spec sheet
Page 2
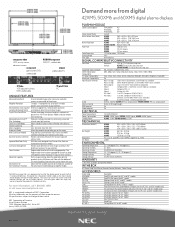
...Rd., Suite 400 Itasca, IL 60143-1248 Demand more information, call 1.800.NEC.INFO or visit www.necvisualsystems.com NEC is based on the screen. NEC 120615 Phosphor Protection 7 modes - NEC Corporation of NEC Corporation. Luminance Management Provides Auto detection of built-in , 1319 X 742... Labor/1 year plasma module IN THE BOX AC Power Cord, User Manual, Remote Control, Batteries, Cable Clamps ACCESSORIES Order Code 4250WMK 61WMK PX-ST3U PX-61ST1U CMK FWMKPC TWMKPC CMKPC PX-42SP3U PX-50SP3U PX-60SP3U PX-CV2U PX-PL1U 61CMK-1 Description Fixed/Tilt wall mount for 42" and 50" models...
...Rd., Suite 400 Itasca, IL 60143-1248 Demand more information, call 1.800.NEC.INFO or visit www.necvisualsystems.com NEC is based on the screen. NEC 120615 Phosphor Protection 7 modes - NEC Corporation of NEC Corporation. Luminance Management Provides Auto detection of built-in , 1319 X 742... Labor/1 year plasma module IN THE BOX AC Power Cord, User Manual, Remote Control, Batteries, Cable Clamps ACCESSORIES Order Code 4250WMK 61WMK PX-ST3U PX-61ST1U CMK FWMKPC TWMKPC CMKPC PX-42SP3U PX-50SP3U PX-60SP3U PX-CV2U PX-PL1U 61CMK-1 Description Fixed/Tilt wall mount for 42" and 50" models...
42XM5/50XM6/60XM5 UM
Page 4
...32 °F to provide reasonable protection against harmful interference in a proper way. If you are reused and recycled in a residential installation. Remote cable (not supplied) WARNING This product equipped with Canadian ICES-003. This effort will not conform to Part 15 of the FCC Rules....must be determined by turning the equipment off and on a circuit different from normal household waste. NOTE: When you use a remote cable (not supplied), use only conventional non-rechageable alkaline or manganese batteries (2). CAUTION When disposing of the cable. This equipment ...
...32 °F to provide reasonable protection against harmful interference in a proper way. If you are reused and recycled in a residential installation. Remote cable (not supplied) WARNING This product equipped with Canadian ICES-003. This effort will not conform to Part 15 of the FCC Rules....must be determined by turning the equipment off and on a circuit different from normal household waste. NOTE: When you use a remote cable (not supplied), use only conventional non-rechageable alkaline or manganese batteries (2). CAUTION When disposing of the cable. This equipment ...

42XM5/50XM6/60XM5 UM
Page 5
...Ⅺ Plasma monitor (ן1) Ⅺ Power cord (ן1, 3 m/9.8 feet) Audio Settings Menu En-23 Ⅺ Remote control (ן1) Adjusting the treble, bass and left/right balance and audio input select En-23 Setting the allocation of the audio connectors...-23 Image Adjust Settings Menu En-23 Adjusting the Position, Size, Fine Picture, Ⅺ AAA Batteries (ן2, Manganese battery for remote control) Ⅺ Manuals (Start up Guide and CD-ROM) Ⅺ Ferrite cores for power cord (ן2), bands for power...
...Ⅺ Plasma monitor (ן1) Ⅺ Power cord (ן1, 3 m/9.8 feet) Audio Settings Menu En-23 Ⅺ Remote control (ן1) Adjusting the treble, bass and left/right balance and audio input select En-23 Setting the allocation of the audio connectors...-23 Image Adjust Settings Menu En-23 Adjusting the Position, Size, Fine Picture, Ⅺ AAA Batteries (ן2, Manganese battery for remote control) Ⅺ Manuals (Start up Guide and CD-ROM) Ⅺ Ferrite cores for power cord (ן2), bands for power...

42XM5/50XM6/60XM5 UM
Page 7
...1503;3, 4ן4, 5ן5, 5ן1, 1ן5) video wall. • Connect signal cables and remote cables as it outward. Do not allow excessive stress to be placed on the ends of q to fix the clamper. Creating a video wall With ... Cr/Pr R/Cr/Pr G/Y B/Cb/Pb HD VD L (MONO) L (MONO) RGB 1 (IN/OUT) AUDIO 3 R RGB 3 DV I ( Digital RGB ) L (MONO) EXTERNAL CONTROL REMOTE IN OUT BNC connector BNC connector VIDEO 2 AUDIO 1 R DVD1 / HD1 AUDIO 2 R RGB2 / DVD2 / HD2 1(IN/OUT) 3 Y Cb/Pb Cr/Pr R/Cr/Pr G/Y B/Cb/Pb ...
...1503;3, 4ן4, 5ן5, 5ן1, 1ן5) video wall. • Connect signal cables and remote cables as it outward. Do not allow excessive stress to be placed on the ends of q to fix the clamper. Creating a video wall With ... Cr/Pr R/Cr/Pr G/Y B/Cb/Pb HD VD L (MONO) L (MONO) RGB 1 (IN/OUT) AUDIO 3 R RGB 3 DV I ( Digital RGB ) L (MONO) EXTERNAL CONTROL REMOTE IN OUT BNC connector BNC connector VIDEO 2 AUDIO 1 R DVD1 / HD1 AUDIO 2 R RGB2 / DVD2 / HD2 1(IN/OUT) 3 Y Cb/Pb Cr/Pr R/Cr/Pr G/Y B/Cb/Pb ...
42XM5/50XM6/60XM5 UM
Page 8
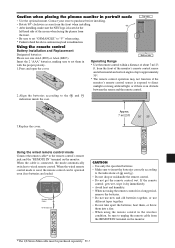
...Bottom side Operating Range * Use the remote control within a distance of the screen when facing the plasma from the front when installing. • After installing, make sure the NEC logo is used, the remote control can be purchased separately. If the remote control gets wet, wipe it dry ...immediately. • Avoid heat and humidity. • When not using the remote control for a long period, remove the batteries....
...Bottom side Operating Range * Use the remote control within a distance of the screen when facing the plasma from the front when installing. • After installing, make sure the NEC logo is used, the remote control can be purchased separately. If the remote control gets wet, wipe it dry ...immediately. • Avoid heat and humidity. • When not using the remote control for a long period, remove the batteries....
42XM5/50XM6/60XM5 UM
Page 9
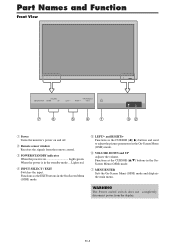
w Remote sensor window Receives the signals from the display. INPUT SELECT RIGHT/ + / EXIT MENU/ ENTER VOLUME DOWN UP LEFT/ - e POWER/STANDBY indicator When the power is ... power is on /off . INPUT SELECT RIGHT/ + / EXIT 7 6 5 4 1 32 q Power Turns the monitor's power on and off switch does not completely disconnect power from the remote control. WARNING The Power on Lights green. En-8 r INPUT SELECT / EXIT Switches the input.
w Remote sensor window Receives the signals from the display. INPUT SELECT RIGHT/ + / EXIT MENU/ ENTER VOLUME DOWN UP LEFT/ - e POWER/STANDBY indicator When the power is ... power is on /off . INPUT SELECT RIGHT/ + / EXIT 7 6 5 4 1 32 q Power Turns the monitor's power on and off switch does not completely disconnect power from the remote control. WARNING The Power on Lights green. En-8 r INPUT SELECT / EXIT Switches the input.
42XM5/50XM6/60XM5 UM
Page 10
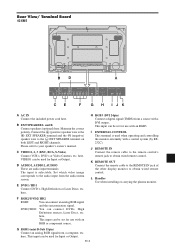
... externally with a DVI output. H RGB3 (DVI 24pin) Connect a digital signal (TMDS) from a computer, etc. J REMOTE IN Connect the remote cable to the remote control's remote jack to the EXT SPEAKER terminal on both LEFT and RIGHT channels. This input can be used for Input or Output. Connect... signal from a source with a control system (by RS232C). here. Set which video image corresponds to obtain wired remote control. K REMOTE OUT Connect the remote cable to the REMOTE IN jack of the other display monitor to the audio input from the audio menu screen. Please refer to your...
... externally with a DVI output. H RGB3 (DVI 24pin) Connect a digital signal (TMDS) from a computer, etc. J REMOTE IN Connect the remote cable to the remote control's remote jack to the EXT SPEAKER terminal on both LEFT and RIGHT channels. This input can be used for Input or Output. Connect... signal from a source with a control system (by RS232C). here. Set which video image corresponds to obtain wired remote control. K REMOTE OUT Connect the remote cable to the REMOTE IN jack of the other display monitor to the audio input from the audio menu screen. Please refer to your...
42XM5/50XM6/60XM5 UM
Page 11
...High Definition or Laser Discs, etc. I JK A AC IN Connect the included power cord here. J REMOTE IN Connect the remote cable to the remote control's remote jack to obtain wired remote control. L Handles Use when installing or carrying the plasma monitor. Connect the (positive) speaker wire to the... HD1 AUDIO 2 RGB2 / DVD2 / HD2 L/R Y Cb/Pb Cr/Pr L/R R/Cr/Pr G/Y B/Cb/Pb HD VD RGB 1 (IN/OUT) AUDIO 3 L/R RGB 3 DV I EXTERNAL CONTROL REMOTE IN OUT B D A VIDEO 2 AUDIO 1 R DVD1 / HD1 AUDIO 2 R RGB2 / DVD2 / HD2 1(IN/OUT) 3 Y Cb/Pb Cr/Pr R/Cr/Pr G/Y B/Cb/Pb HD VD...
...High Definition or Laser Discs, etc. I JK A AC IN Connect the included power cord here. J REMOTE IN Connect the remote cable to the remote control's remote jack to obtain wired remote control. L Handles Use when installing or carrying the plasma monitor. Connect the (positive) speaker wire to the... HD1 AUDIO 2 RGB2 / DVD2 / HD2 L/R Y Cb/Pb Cr/Pr L/R R/Cr/Pr G/Y B/Cb/Pb HD VD RGB 1 (IN/OUT) AUDIO 3 L/R RGB 3 DV I EXTERNAL CONTROL REMOTE IN OUT B D A VIDEO 2 AUDIO 1 R DVD1 / HD1 AUDIO 2 R RGB2 / DVD2 / HD2 1(IN/OUT) 3 Y Cb/Pb Cr/Pr R/Cr/Pr G/Y B/Cb/Pb HD VD...

42XM5/50XM6/60XM5 UM
Page 12
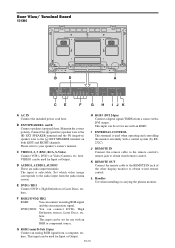
...a DVI output. VIDEO1 can be used for use with an RGB3. D AUDIO1, AUDIO2, AUDIO3 These are audio input terminals. K REMOTE OUT Connect the remote cable to the REMOTE IN jack of the other display monitor to your speaker's owner's manual. here. En-11 C VIDEO1, 2, 3 (BNC, RCA...This input can be used for use with an RGB or component source. Please refer to obtain wired remote control. here. J REMOTE IN Connect the remote cable to the remote control's remote jack to obtain wired remote control. here. Rear View/ Terminal Board 60XM5 L VIDEO AUDIO 1 DVD1 / HD1 AUDIO 2 RGB2 ...
...a DVI output. VIDEO1 can be used for use with an RGB3. D AUDIO1, AUDIO2, AUDIO3 These are audio input terminals. K REMOTE OUT Connect the remote cable to the REMOTE IN jack of the other display monitor to your speaker's owner's manual. here. En-11 C VIDEO1, 2, 3 (BNC, RCA...This input can be used for use with an RGB or component source. Please refer to obtain wired remote control. here. J REMOTE IN Connect the remote cable to the remote control's remote jack to obtain wired remote control. here. Rear View/ Terminal Board 60XM5 L VIDEO AUDIO 1 DVD1 / HD1 AUDIO 2 RGB2 ...
42XM5/50XM6/60XM5 UM
Page 13
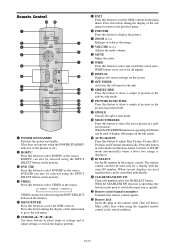
...the source. i POINTER Press this button to ZOOM mode automatically when a letter box image is off timer for a display with the same ID number. Remote Control q POWER ON/STANDBY Switches the power on/standby. (This does not operate when the POWER/STANDBY indicator of the plasma is displayed. @0 ID ...SELECT Set the ID number in the remote control. r VIDEO Press this button to exit the OSM controls in the main menu. RGB/PC can be controlled individually. @1 CLEAR/SEAMLESS SW ...
...the source. i POINTER Press this button to ZOOM mode automatically when a letter box image is off timer for a display with the same ID number. Remote Control q POWER ON/STANDBY Switches the power on/standby. (This does not operate when the POWER/STANDBY indicator of the plasma is displayed. @0 ID ...SELECT Set the ID number in the remote control. r VIDEO Press this button to exit the OSM controls in the main menu. RGB/PC can be controlled individually. @1 CLEAR/SEAMLESS SW ...

42XM5/50XM6/60XM5 UM
Page 14
...once. 2. When five minutes remain the remaining time appears until it to turn the unit ON and OFF: 1. Press the POWER STANDBYbutton (on the remote control) or the Power button (on the unit) to its original size. button will be set . 3. OFF TIMER 28 To cancel the off...→ 90 → 120 → 0 OFF TIMER 30 To check the remaining time: 1. To change the picture position: Select the position with the remote control). Basic Operations POWER To turn off the unit. En-13 Press the POINTER button to resemble a magnifying glass. ( ) A press of the picture ...
...once. 2. When five minutes remain the remaining time appears until it to turn the unit ON and OFF: 1. Press the POWER STANDBYbutton (on the remote control) or the Power button (on the unit) to its original size. button will be set . 3. OFF TIMER 28 To cancel the off...→ 90 → 120 → 0 OFF TIMER 30 To check the remaining time: 1. To change the picture position: Select the position with the remote control). Basic Operations POWER To turn off the unit. En-13 Press the POINTER button to resemble a magnifying glass. ( ) A press of the picture ...
42XM5/50XM6/60XM5 UM
Page 15
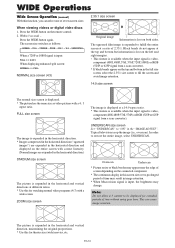
... near the edge of screen depending on the left and right margins. • This feature is available when the input signal is lost on the remote control. 2. UNDERSCAN size screen Set "UNDERSCAN" to restore the entire image, select UNDERSCAN. Overscan Underscan * Picture noise or black border may change...
... near the edge of screen depending on the left and right margins. • This feature is available when the input signal is lost on the remote control. 2. UNDERSCAN size screen Set "UNDERSCAN" to restore the entire image, select UNDERSCAN. Overscan Underscan * Picture noise or black border may change...
42XM5/50XM6/60XM5 UM
Page 16
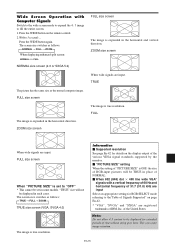
... as follows: → TRUE → FULL → ZOOM TRUE size screen (VGA, SVGA 4:3) The image is set to the"Table of Signals Supported" on the remote control. 2. of time without using gray bars. ZOOM size screen When wide signals are input. FULL size screen When "PICTURE SIZE" is true resolution. This...
... as follows: → TRUE → FULL → ZOOM TRUE size screen (VGA, SVGA 4:3) The image is set to the"Table of Signals Supported" on the remote control. 2. of time without using gray bars. ZOOM size screen When wide signals are input. FULL size screen When "PICTURE SIZE" is true resolution. This...

42XM5/50XM6/60XM5 UM
Page 19
... Adjust the level or change is made. 6. Repeat steps 2 - 5 to adjust an additional item, or press the EXIT button on the remote control to return to select a sub menu or item. ADVANCED OSM : OFF NEXT PAGE SEL. If not, the current setting is shown close ... BRIGHTNESS : 32 SHARPNESS : 16 COLOR : 32 TINT R G : 32 PICTURE MODE : NORMAL NR : OFF NEXT PAGE SEL. Press the MENU/ENTER button on the remote control. 5. MENU/ENTER OK EXIT EXIT The following describes how to display the MAIN MENU. MAIN MENU PICTURE AUDIO IMAGE ADJUST OPTION 1 1 / 2 Note: The main...
... Adjust the level or change is made. 6. Repeat steps 2 - 5 to adjust an additional item, or press the EXIT button on the remote control to return to select a sub menu or item. ADVANCED OSM : OFF NEXT PAGE SEL. If not, the current setting is shown close ... BRIGHTNESS : 32 SHARPNESS : 16 COLOR : 32 TINT R G : 32 PICTURE MODE : NORMAL NR : OFF NEXT PAGE SEL. Press the MENU/ENTER button on the remote control. 5. MENU/ENTER OK EXIT EXIT The following describes how to display the MAIN MENU. MAIN MENU PICTURE AUDIO IMAGE ADJUST OPTION 1 1 / 2 Note: The main...
42XM5/50XM6/60XM5 UM
Page 21
.../ZOOM/2.35:1/14:9/UNDERSCAN/TRUE*3 - Information Ⅵ Restoring the factory default settings Select "ALL RESET" under the OPTION1 menu. ON MODE CONTROL LOCK IR REMOTE LOOP OUT REMOTE ID ID NUMBER VIDEO WALL Sub menu 2 Sub menu 3 Sub menu 4 RESET PRESENT TIME DAYLIGHT SAVING TIME OFF←→ON NO DAY/HOUR...
.../ZOOM/2.35:1/14:9/UNDERSCAN/TRUE*3 - Information Ⅵ Restoring the factory default settings Select "ALL RESET" under the OPTION1 menu. ON MODE CONTROL LOCK IR REMOTE LOOP OUT REMOTE ID ID NUMBER VIDEO WALL Sub menu 2 Sub menu 3 Sub menu 4 RESET PRESENT TIME DAYLIGHT SAVING TIME OFF←→ON NO DAY/HOUR...
42XM5/50XM6/60XM5 UM
Page 24
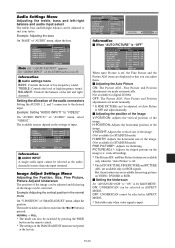
... than one input terminal. Example: Adjusting the bass On "BASS" of the left /right balance can be switched by pressing the WIDE button on the remote control. * The settings on the IMAGE ADJUST menu are not preset at the factory. BASS TREBLE BALANCE AUDIO INPUT 1 AUDIO INPUT 2 AUDIO INPUT 3 AUDIO L : : : VIDEO2...
... than one input terminal. Example: Adjusting the bass On "BASS" of the left /right balance can be switched by pressing the WIDE button on the remote control. * The settings on the IMAGE ADJUST menu are not preset at the factory. BASS TREBLE BALANCE AUDIO INPUT 1 AUDIO INPUT 2 AUDIO INPUT 3 AUDIO L : : : VIDEO2...
42XM5/50XM6/60XM5 UM
Page 25
... HD SELECT : 1080B INPUT SKIP : OFF ALL RESET : OFF NEXT PAGE SEL. Checking the signal being transmitted to RGB1 terminal Use this system" on the remote control will be performed by setting with "V"). AUTO: Select the suitable mode for the specifications of input signals as (video) mode, wide mode or digital...
... HD SELECT : 1080B INPUT SKIP : OFF ALL RESET : OFF NEXT PAGE SEL. Checking the signal being transmitted to RGB1 terminal Use this system" on the remote control will be performed by setting with "V"). AUTO: Select the suitable mode for the specifications of input signals as (video) mode, wide mode or digital...

42XM5/50XM6/60XM5 UM
Page 33
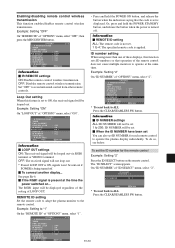
... TIMER : VIDEO WALL 1 DIVIDER : 1 WORK TIME : 00H03M INPUT MODE : VIDEO1 INPUT VOLUME PWR. MULTI: Multi screen mode. ON MODE CONTROL LOCK : ON IR REMOTE : ON LOOP OUT : OFF REMOTE ID : ALL ID NUMBER : ALL VIDEO WALL NEXT PAGE SEL. SEL. INPUT MODE: Set the signal that will be displayed. * Set the DIVIDER...
... TIMER : VIDEO WALL 1 DIVIDER : 1 WORK TIME : 00H03M INPUT MODE : VIDEO1 INPUT VOLUME PWR. MULTI: Multi screen mode. ON MODE CONTROL LOCK : ON IR REMOTE : ON LOOP OUT : OFF REMOTE ID : ALL ID NUMBER : ALL VIDEO WALL NEXT PAGE SEL. SEL. INPUT MODE: Set the signal that will be displayed. * Set the DIVIDER...
42XM5/50XM6/60XM5 UM
Page 34
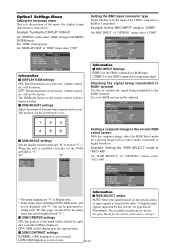
...4 En-33 See page En-6. Ⅵ If the RGB1 signal is being turned off . The RGB1 input will be set ID NUMBER for the remote control Example: Setting "2" Press the ID SELECT button on ... ADJ. EXIT RETURN * To reset back to ALL Press the CLEAR/SEAMLESS SW button... OUT. The "ID SELECT" screen appears. OPTION 3 PREVIOUS PAGE TIMER PWR. Example: Setting to operate at the time the power switched on the remote control. OPTION 3 PREVIOUS PAGE TIMER PWR. EXIT RETURN 3 / 4 Information Ⅵ LOOP OUT settings ON: The received signal will be sent out...
...4 En-33 See page En-6. Ⅵ If the RGB1 signal is being turned off . The RGB1 input will be set ID NUMBER for the remote control Example: Setting "2" Press the ID SELECT button on ... ADJ. EXIT RETURN * To reset back to ALL Press the CLEAR/SEAMLESS SW button... OUT. The "ID SELECT" screen appears. OPTION 3 PREVIOUS PAGE TIMER PWR. Example: Setting to operate at the time the power switched on the remote control. OPTION 3 PREVIOUS PAGE TIMER PWR. EXIT RETURN 3 / 4 Information Ⅵ LOOP OUT settings ON: The received signal will be sent out...


