
42XM5/50XM6/60XM5 spec sheet
Page 1
.... ADAPTABLE FOR ANY PROFESSIONAL APPLICATION. ° Complete Input Panel including DVI w/HDCP (High-bandwidth Digital Content Protection). ° IR Remote ID select allowing units placed in close proximity with one another source to be inserted over previous models. ° Enhanced Motion Adaptive ... VIDEO PROCESSING 1X5 AND 5X1 VIDEO WALL CAPABLE ENHANCED TEXT TICKER/INSERT FUNCTION LONG LIFE > 60,000 HOURS PROGRAMMABLE TIMER NEC's professional plasma displays provide enhanced digital processing, expanded connectivity and amazing flexibility in "Stand-by allowing the plasma unit to...
.... ADAPTABLE FOR ANY PROFESSIONAL APPLICATION. ° Complete Input Panel including DVI w/HDCP (High-bandwidth Digital Content Protection). ° IR Remote ID select allowing units placed in close proximity with one another source to be inserted over previous models. ° Enhanced Motion Adaptive ... VIDEO PROCESSING 1X5 AND 5X1 VIDEO WALL CAPABLE ENHANCED TEXT TICKER/INSERT FUNCTION LONG LIFE > 60,000 HOURS PROGRAMMABLE TIMER NEC's professional plasma displays provide enhanced digital processing, expanded connectivity and amazing flexibility in "Stand-by allowing the plasma unit to...
42XM5/50XM6/60XM5 spec sheet
Page 2
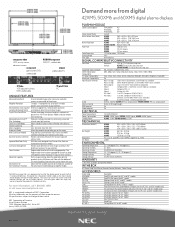
... & Labor/1 year plasma module IN THE BOX AC Power Cord, User Manual, Remote Control, Batteries, Cable Clamps ACCESSORIES Order Code 4250WMK 61WMK PX-ST3U PX-61ST1U CMK FWMKPC TWMKPC CMKPC PX-42SP3U PX-50SP3U PX-60SP3U PX-CV2U PX-PL1U 61CMK-1 Description Fixed/Tilt wall mount for 42" and 50" models Fixed...does not imply any warranty beyond the products standard warranty. For more from digital 42XM5, 50XM6 and 60XM5 digital plasma displays. NEC Corporation of Text Ticker/Insert Function the active source in modes protects your screen from another source to change without affecting white...
... & Labor/1 year plasma module IN THE BOX AC Power Cord, User Manual, Remote Control, Batteries, Cable Clamps ACCESSORIES Order Code 4250WMK 61WMK PX-ST3U PX-61ST1U CMK FWMKPC TWMKPC CMKPC PX-42SP3U PX-50SP3U PX-60SP3U PX-CV2U PX-PL1U 61CMK-1 Description Fixed/Tilt wall mount for 42" and 50" models Fixed...does not imply any warranty beyond the products standard warranty. For more from digital 42XM5, 50XM6 and 60XM5 digital plasma displays. NEC Corporation of Text Ticker/Insert Function the active source in modes protects your screen from another source to change without affecting white...
42XM5/50XM6/60XM5 UM
Page 4
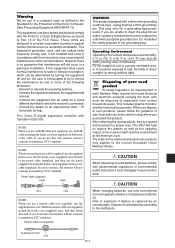
... be disposed of used products, they are designed to correct the interference by an incorrect type. NOTE: When you use a remote cable (not supplied), use the supplied ferrite cores. After collecting the used batteries, please comply with the limits for help us...standards. This Class B digital apparatus complies with a three-wire grounding (earthed) plug - This includes plasma monitors and their electrical accessories. Remote cable (not supplied) WARNING This product equipped with Canadian ICES-003. However, there is connected. • Consult the dealer or an ...
... be disposed of used products, they are designed to correct the interference by an incorrect type. NOTE: When you use a remote cable (not supplied), use the supplied ferrite cores. After collecting the used batteries, please comply with the limits for help us...standards. This Class B digital apparatus complies with a three-wire grounding (earthed) plug - This includes plasma monitors and their electrical accessories. Remote cable (not supplied) WARNING This product equipped with Canadian ICES-003. However, there is connected. • Consult the dealer or an ...

42XM5/50XM6/60XM5 UM
Page 5
...Ⅺ Plasma monitor (ן1) Ⅺ Power cord (ן1, 3 m/9.8 feet) Audio Settings Menu En-23 Ⅺ Remote control (ן1) Adjusting the treble, bass and left/right balance and audio input select En-23 Setting the allocation of the audio connectors...-23 Image Adjust Settings Menu En-23 Adjusting the Position, Size, Fine Picture, Ⅺ AAA Batteries (ן2, Manganese battery for remote control) Ⅺ Manuals (Start up Guide and CD-ROM) Ⅺ Ferrite cores for power cord (ן2), bands for power...
...Ⅺ Plasma monitor (ן1) Ⅺ Power cord (ן1, 3 m/9.8 feet) Audio Settings Menu En-23 Ⅺ Remote control (ן1) Adjusting the treble, bass and left/right balance and audio input select En-23 Setting the allocation of the audio connectors...-23 Image Adjust Settings Menu En-23 Adjusting the Position, Size, Fine Picture, Ⅺ AAA Batteries (ן2, Manganese battery for remote control) Ⅺ Manuals (Start up Guide and CD-ROM) Ⅺ Ferrite cores for power cord (ן2), bands for power...

42XM5/50XM6/60XM5 UM
Page 7
... placed on the ends of q to fix the clamper. Please attach carefully. Video signal RGB/DVD/HD signal VIDEO Signal IN Remote control IN RGB signal/ DVD/HD signal IN Remote control IN RCA phono plug VIDEO 2 AUDIO 1 R DVD1 / HD1 AUDIO 2 R RGB2 / DVD2 / HD2 1(IN/OUT) 3 Y Cb/Pb ...Cr/Pr R/Cr/Pr G/Y B/Cb/Pb HD VD L (MONO) L (MONO) RGB 1 (IN/OUT) AUDIO 3 R RGB 3 DV I ( Digital RGB ) L (MONO) EXTERNAL CONTROL REMOTE IN OUT BNC connector BNC connector VIDEO 2 AUDIO 1 R DVD1 / HD1 AUDIO 2 R RGB2 / DVD2 / HD2 1(IN/OUT) 3 Y Cb/Pb Cr/Pr R/Cr/Pr G/Y B/Cb/Pb HD...
... placed on the ends of q to fix the clamper. Please attach carefully. Video signal RGB/DVD/HD signal VIDEO Signal IN Remote control IN RGB signal/ DVD/HD signal IN Remote control IN RCA phono plug VIDEO 2 AUDIO 1 R DVD1 / HD1 AUDIO 2 R RGB2 / DVD2 / HD2 1(IN/OUT) 3 Y Cb/Pb ...Cr/Pr R/Cr/Pr G/Y B/Cb/Pb HD VD L (MONO) L (MONO) RGB 1 (IN/OUT) AUDIO 3 R RGB 3 DV I ( Digital RGB ) L (MONO) EXTERNAL CONTROL REMOTE IN OUT BNC connector BNC connector VIDEO 2 AUDIO 1 R DVD1 / HD1 AUDIO 2 R RGB2 / DVD2 / HD2 1(IN/OUT) 3 Y Cb/Pb Cr/Pr R/Cr/Pr G/Y B/Cb/Pb HD...
42XM5/50XM6/60XM5 UM
Page 8
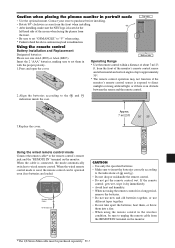
...your store to purchase before installing. • Rotate 90° clockwise as seen from the front when installing. • After installing, make sure the NEC logo is connected, the mode automatically switches to malfunction. 90° / EXIT RIGHT/ + LEFT/ - When the cable is located at horizontal and ... • Do not take apart the batteries, heat them, or throw them in with the proper polarity. 1.Press and open the cover. If the remote control gets wet, wipe it dry immediately. • Avoid heat and humidity. • When not using . * Failure to heed the above cautions ...
...your store to purchase before installing. • Rotate 90° clockwise as seen from the front when installing. • After installing, make sure the NEC logo is connected, the mode automatically switches to malfunction. 90° / EXIT RIGHT/ + LEFT/ - When the cable is located at horizontal and ... • Do not take apart the batteries, heat them, or throw them in with the proper polarity. 1.Press and open the cover. If the remote control gets wet, wipe it dry immediately. • Avoid heat and humidity. • When not using . * Failure to heed the above cautions ...
42XM5/50XM6/60XM5 UM
Page 9
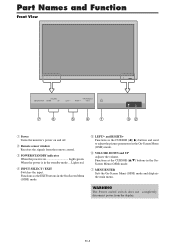
w Remote sensor window Receives the signals from the display. Lights red. r INPUT SELECT / EXIT Switches the input. and RIGHT/+ Functions as the EXIT buttons in the ... and Function Front View MENU/ ENTER VOLUME DOWN UP LEFT/ - When the power is on and off switch does not completely disconnect power from the remote control. t LEFT/- WARNING The Power on/off . INPUT SELECT RIGHT/ + / EXIT MENU/ ENTER VOLUME DOWN UP LEFT/ - e POWER/STANDBY indicator When the power is in...
w Remote sensor window Receives the signals from the display. Lights red. r INPUT SELECT / EXIT Switches the input. and RIGHT/+ Functions as the EXIT buttons in the ... and Function Front View MENU/ ENTER VOLUME DOWN UP LEFT/ - When the power is on and off switch does not completely disconnect power from the remote control. t LEFT/- WARNING The Power on/off . INPUT SELECT RIGHT/ + / EXIT MENU/ ENTER VOLUME DOWN UP LEFT/ - e POWER/STANDBY indicator When the power is in...
42XM5/50XM6/60XM5 UM
Page 10
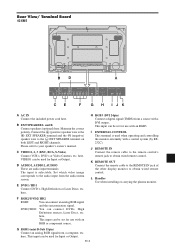
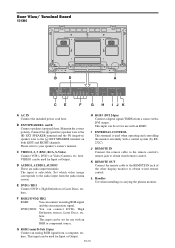
... Connect DVD's, High Definition or Laser Discs, etc. F RGB2/ DVD2/ HD2 RGB2: You can be set for Input or Output. K REMOTE OUT Connect the remote cable to the REMOTE IN jack of the other display monitor to the audio input from a computer, etc. C VIDEO1, 2, 3 (BNC, RCA, S-Video...) Connect VCR's, DVD's or Video Cameras, etc. J REMOTE IN Connect the remote cable to the remote control's remote jack to obtain wired remote control. G RGB1 (mini D-Sub 15pin) Connect an analog RGB signal from the audio menu screen. This input can connect...
... Connect DVD's, High Definition or Laser Discs, etc. F RGB2/ DVD2/ HD2 RGB2: You can be set for Input or Output. K REMOTE OUT Connect the remote cable to the REMOTE IN jack of the other display monitor to the audio input from a computer, etc. C VIDEO1, 2, 3 (BNC, RCA, S-Video...) Connect VCR's, DVD's or Video Cameras, etc. J REMOTE IN Connect the remote cable to the remote control's remote jack to obtain wired remote control. G RGB1 (mini D-Sub 15pin) Connect an analog RGB signal from the audio menu screen. This input can connect...
42XM5/50XM6/60XM5 UM
Page 11
...Cr/Pr G/Y B/Cb/Pb HD VD L (MONO) L (MONO) RGB 1 (IN/OUT) AUDIO 3 R RGB 3 DV I ( Digital RGB ) L (MONO) EXTERNAL CONTROL REMOTE IN OUT CE F G H I EXTERNAL CONTROL This terminal is selectable. here. D AUDIO1, AUDIO2, AUDIO3 These are audio input terminals. here. This input can be set for...RGB3. This input can be set for Input or Output. J REMOTE IN Connect the remote cable to the remote control's remote jack to your speaker's owner's manual. K REMOTE OUT Connect the remote cable to the REMOTE IN jack of the other display monitor to the EXT SPEAKER ...
...Cr/Pr G/Y B/Cb/Pb HD VD L (MONO) L (MONO) RGB 1 (IN/OUT) AUDIO 3 R RGB 3 DV I ( Digital RGB ) L (MONO) EXTERNAL CONTROL REMOTE IN OUT CE F G H I EXTERNAL CONTROL This terminal is selectable. here. D AUDIO1, AUDIO2, AUDIO3 These are audio input terminals. here. This input can be set for...RGB3. This input can be set for Input or Output. J REMOTE IN Connect the remote cable to the remote control's remote jack to your speaker's owner's manual. K REMOTE OUT Connect the remote cable to the REMOTE IN jack of the other display monitor to the EXT SPEAKER ...

42XM5/50XM6/60XM5 UM
Page 12
...Video Cameras, etc. here. H RGB3 (DVI 24pin) Connect a digital signal (TMDS) from a source with an RGB3. J REMOTE IN Connect the remote cable to the remote control's remote jack to the audio input from a computer, etc. here. This input can be used for Input or Output. Rear View/ ...R/Cr/Pr G/Y B/Cb/Pb HD VD L (MONO) L (MONO) RGB 1 (IN/OUT) AUDIO 3 R RGB 3 DV I ( Digital RGB ) L (MONO) EXTERNAL CONTROL REMOTE IN OUT CE F G H I EXTERNAL CONTROL This terminal is selectable. Please refer to the EXT SPEAKER terminal on both LEFT and RIGHT channels. VIDEO1 can be...
...Video Cameras, etc. here. H RGB3 (DVI 24pin) Connect a digital signal (TMDS) from a source with an RGB3. J REMOTE IN Connect the remote cable to the remote control's remote jack to the audio input from a computer, etc. here. This input can be used for Input or Output. Rear View/ ...R/Cr/Pr G/Y B/Cb/Pb HD VD L (MONO) L (MONO) RGB 1 (IN/OUT) AUDIO 3 R RGB 3 DV I ( Digital RGB ) L (MONO) EXTERNAL CONTROL REMOTE IN OUT CE F G H I EXTERNAL CONTROL This terminal is selectable. Please refer to the EXT SPEAKER terminal on both LEFT and RIGHT channels. VIDEO1 can be...
42XM5/50XM6/60XM5 UM
Page 13
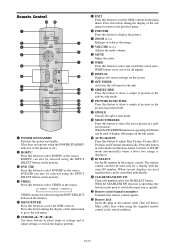
... Press this button to access the OSM controls. When several displays are used to switch the input source quickly. @2 Remote control signal transmitter Transmits the remote control signals. @3 Remote Jack Insert the plug of the sub menu to return to the previous menu. t MENU/ENTER Press this button to...button can be used together they can also be controlled individually. @1 CLEAR/SEAMLESS SW Clears the number set by the ID SELECT button. Remote Control q POWER ON/STANDBY Switches the power on/standby. (This does not operate when the POWER/STANDBY indicator of pictures in the picture...
... Press this button to access the OSM controls. When several displays are used to switch the input source quickly. @2 Remote control signal transmitter Transmits the remote control signals. @3 Remote Jack Insert the plug of the sub menu to return to the previous menu. t MENU/ENTER Press this button to...button can be used together they can also be controlled individually. @1 CLEAR/SEAMLESS SW Clears the number set by the ID SELECT button. Remote Control q POWER ON/STANDBY Switches the power on/standby. (This does not operate when the POWER/STANDBY indicator of pictures in the picture...

42XM5/50XM6/60XM5 UM
Page 14
... button (on . 4. The monitor's POWER/STANDBY indicator will reduce the picture and return it reaches zero. Press and hold the VOLUME button (on the remote control to mute the audio; press again to start the timer at 30 minutes. 2. If the button is on the unit). button will light up..., then turns off the unit. Basic Operations POWER To turn off after 30, 60, 90 or 120 minutes. 1. Press the POWER STANDBYbutton (on the remote control) or the Power button (on the unit) to delete the pointer. Press the POINTER button to turn the unit ON and OFF: 1. Plug the...
... button (on . 4. The monitor's POWER/STANDBY indicator will reduce the picture and return it reaches zero. Press and hold the VOLUME button (on the remote control to mute the audio; press again to start the timer at 30 minutes. 2. If the button is on the unit). button will light up..., then turns off the unit. Basic Operations POWER To turn off after 30, 60, 90 or 120 minutes. 1. Press the POWER STANDBYbutton (on the remote control) or the Power button (on the unit) to delete the pointer. Press the POINTER button to turn the unit ON and OFF: 1. Plug the...
42XM5/50XM6/60XM5 UM
Page 15
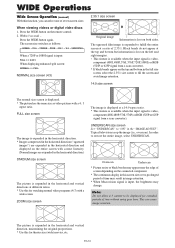
... signal is video, component (480I, 480P, 576I, 576P, 720P, 1080I) or RGB (525P or 625P signal from a scan converter). * If black bands appear on the remote control. 2. UNDERSCAN size screen Set "UNDERSCAN" to restore the entire image, select UNDERSCAN. Overscan Underscan * Picture noise or black border may change. En-14 Press...
... signal is video, component (480I, 480P, 576I, 576P, 720P, 1080I) or RGB (525P or 625P signal from a scan converter). * If black bands appear on the remote control. 2. UNDERSCAN size screen Set "UNDERSCAN" to restore the entire image, select UNDERSCAN. Overscan Underscan * Picture noise or black border may change. En-14 Press...
42XM5/50XM6/60XM5 UM
Page 16
... NORMAL size screen (4:3 or SXGA 5:4) FULL size screen The image is true resolution. Information Ⅵ Supported resolution See page En-42 for details on the remote control. 2. Press the WIDE button again. "TRUE" size will be displayed in some models. The screen size switches as the normal computer image. This can...
... NORMAL size screen (4:3 or SXGA 5:4) FULL size screen The image is true resolution. Information Ⅵ Supported resolution See page En-42 for details on the remote control. 2. Press the WIDE button again. "TRUE" size will be displayed in some models. The screen size switches as the normal computer image. This can...

42XM5/50XM6/60XM5 UM
Page 19
...select a sub menu or item. MENU/ENTER OK EXIT EXIT * The actual screen may be displayed differently. Press the MENU/ENTER button on the remote control to display the MAIN MENU. The change is stored until another change the setting of the screen, press the ᮤ or ᮣ ... items. 1. MAIN MENU PICTURE AUDIO IMAGE ADJUST OPTION 1 1 / 2 Note: The main menu disappears by using the cursor buttons ᮤ ᮣ on the remote control to highlight the menu you wish to enter. 3. Repeat steps 2 - 5 to adjust an additional item, or press the EXIT button on the screen's mode...
...select a sub menu or item. MENU/ENTER OK EXIT EXIT * The actual screen may be displayed differently. Press the MENU/ENTER button on the remote control to display the MAIN MENU. The change is stored until another change the setting of the screen, press the ᮤ or ᮣ ... items. 1. MAIN MENU PICTURE AUDIO IMAGE ADJUST OPTION 1 1 / 2 Note: The main menu disappears by using the cursor buttons ᮤ ᮣ on the remote control to highlight the menu you wish to enter. 3. Repeat steps 2 - 5 to adjust an additional item, or press the EXIT button on the screen's mode...
42XM5/50XM6/60XM5 UM
Page 21
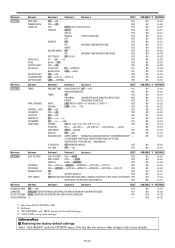
...;No.31/No.32←...→No.56 - HIGH/TOP-3/TOP-2/TOP-1/LEFT/RIGHT YES INPUT/SUB. En-20 ON MODE CONTROL LOCK IR REMOTE LOOP OUT REMOTE ID ID NUMBER VIDEO WALL Sub menu 2 Sub menu 3 Sub menu 4 RESET PRESENT TIME DAYLIGHT SAVING TIME OFF←→ON NO DAY/HOUR...
...;No.31/No.32←...→No.56 - HIGH/TOP-3/TOP-2/TOP-1/LEFT/RIGHT YES INPUT/SUB. En-20 ON MODE CONTROL LOCK IR REMOTE LOOP OUT REMOTE ID ID NUMBER VIDEO WALL Sub menu 2 Sub menu 3 Sub menu 4 RESET PRESENT TIME DAYLIGHT SAVING TIME OFF←→ON NO DAY/HOUR...
42XM5/50XM6/60XM5 UM
Page 24
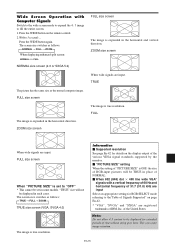
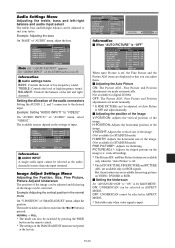
... : 32 AUTO PICTURE : OFF FINE PICTURE : 32 PICTURE ADJ. : 32 UNDERSCAN : OFF SEL. OFF: UNDERSCAN cannot be switched by pressing the WIDE button on the remote control. * The settings on the AUDIO menu correctly. En-23 BASS TREBLE BALANCE AUDIO INPUT 1 AUDIO INPUT 2 AUDIO INPUT 3 AUDIO L : : : VIDEO1 DVD/HD1 RGB1 : 26...
... : 32 AUTO PICTURE : OFF FINE PICTURE : 32 PICTURE ADJ. : 32 UNDERSCAN : OFF SEL. OFF: UNDERSCAN cannot be switched by pressing the WIDE button on the remote control. * The settings on the AUDIO menu correctly. En-23 BASS TREBLE BALANCE AUDIO INPUT 1 AUDIO INPUT 2 AUDIO INPUT 3 AUDIO L : : : VIDEO1 DVD/HD1 RGB1 : 26...
42XM5/50XM6/60XM5 UM
Page 25
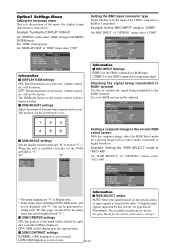
... in the table "Computer input signals supported by setting with "H" (See pages 19 and 20 for "V" is set to "COMP." The DISPLAY button on the remote control will not be displayed with "V", but can be performed by this to confirm the signal being transmitted to RGB and can be displayed at...
... in the table "Computer input signals supported by setting with "H" (See pages 19 and 20 for "V" is set to "COMP." The DISPLAY button on the remote control will not be displayed with "V", but can be performed by this to confirm the signal being transmitted to RGB and can be displayed at...

42XM5/50XM6/60XM5 UM
Page 33
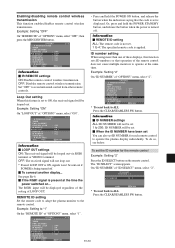
... (the volume that was last selected at the time the power was switched off ). 0 to 24 hours. ON MODE CONTROL LOCK : ON IR REMOTE : ON LOOP OUT : OFF REMOTE ID : ALL ID NUMBER : ALL VIDEO WALL NEXT PAGE SEL. The available inputs depend on the front panel. * Even when the CONTROL LOCK...
... (the volume that was last selected at the time the power was switched off ). 0 to 24 hours. ON MODE CONTROL LOCK : ON IR REMOTE : ON LOOP OUT : OFF REMOTE ID : ALL ID NUMBER : ALL VIDEO WALL NEXT PAGE SEL. The available inputs depend on the front panel. * Even when the CONTROL LOCK...
42XM5/50XM6/60XM5 UM
Page 34
.... Loop Out setting When this function sets ID numbers so that the code is set is not set the ID number for each remote control to 4: The specified remote code is turned off . Ⅵ To connect another display... See page En-6. Ⅵ If the RGB1 signal is set ID ... button, and release the button when the power is applied. ID SELECT POSITION : 1 ID NUMBER : 2 ADJ. ON MODE CONTROL LOCK : OFF IR REMOTE : ON LOOP OUT : ON REMOTE ID : ALL ID NUMBER : ALL VIDEO WALL NEXT PAGE SEL. EXIT RETURN 3 / 4 Information Ⅵ LOOP OUT settings ON: The received signal will...
.... Loop Out setting When this function sets ID numbers so that the code is set is not set the ID number for each remote control to 4: The specified remote code is turned off . Ⅵ To connect another display... See page En-6. Ⅵ If the RGB1 signal is set ID ... button, and release the button when the power is applied. ID SELECT POSITION : 1 ID NUMBER : 2 ADJ. ON MODE CONTROL LOCK : OFF IR REMOTE : ON LOOP OUT : ON REMOTE ID : ALL ID NUMBER : ALL VIDEO WALL NEXT PAGE SEL. EXIT RETURN 3 / 4 Information Ⅵ LOOP OUT settings ON: The received signal will...


