
42PD2/50PD1
Page 1
PlasmaSync Plasma Monitor User's Manual NEC Technologies
PlasmaSync Plasma Monitor User's Manual NEC Technologies
42PD2/50PD1
Page 2
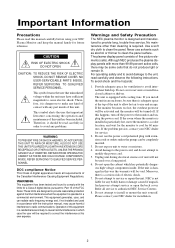
...and can be used in a commercial environment. Provide adequate space for a Class A digital device, pursuant to authorized NEC Service Centers. 8. If the problem persists, contact your NEC Plasma Monitor and keep the manual handy for 60 minutes. Do not use solvents such as alcohol or thinner to correct the...and used over a long period. 6. Operation of the unit to allow hot air to cause electric shock. Warnings and Safety Precaution The NEC plasma monitor is dangerous to modify the power cord. 5. Use a soft dry cloth to the unit, read this unit. Never use the power cord...
...and can be used in a commercial environment. Provide adequate space for a Class A digital device, pursuant to authorized NEC Service Centers. 8. If the problem persists, contact your NEC Plasma Monitor and keep the manual handy for 60 minutes. Do not use solvents such as alcohol or thinner to correct the...and used over a long period. 6. Operation of the unit to allow hot air to cause electric shock. Warnings and Safety Precaution The NEC plasma monitor is dangerous to modify the power cord. 5. Use a soft dry cloth to the unit, read this unit. Never use the power cord...
42PD2/50PD1
Page 3
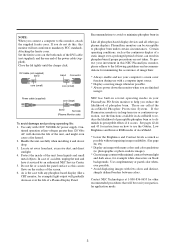
...1-800-836-0655 for instructions on black backgrounds. In case of accident, unplug the unit and have it and do this, this NEC PlasmaSync monitor, please adhere to the following guidelines and recommendations for minimizing the occurrence of image burn: * Always enable and use your investment in...DVI cable (not supplied) band band Connector core (small) core (small) Power cable (supplied) core (large) band Set side (Plasma Monitor side) To avoid damage and prolong operating life: 1. Locate set away from liquids and small metal objects. Certain operating conditions, such as...
...1-800-836-0655 for instructions on black backgrounds. In case of accident, unplug the unit and have it and do this, this NEC PlasmaSync monitor, please adhere to the following guidelines and recommendations for minimizing the occurrence of image burn: * Always enable and use your investment in...DVI cable (not supplied) band band Connector core (small) core (small) Power cable (supplied) core (large) band Set side (Plasma Monitor side) To avoid damage and prolong operating life: 1. Locate set away from liquids and small metal objects. Certain operating conditions, such as...

42PD2/50PD1
Page 6
... 1. c. e. Service outside of the product. Please also include in this product. Damage to state. FOR MORE INFORMATION, TELEPHONE 800-8360655 NEC TECHNOLOGIES, INC. 1250 N. HOW LONG IS THE WARRANTY? Any product on which proves defective. Removal or installation of the U.S.A. , Canada... damages, so the above limitations and exclusions may also have been advised of the possibility of such damages. Limited Warranty Plasma Monitors NEC Technologies, Inc. (hereinafter NECTECH) warrants this product to be free from defects in material and workmanship under the following ...
... 1. c. e. Service outside of the product. Please also include in this product. Damage to state. FOR MORE INFORMATION, TELEPHONE 800-8360655 NEC TECHNOLOGIES, INC. 1250 N. HOW LONG IS THE WARRANTY? Any product on which proves defective. Removal or installation of the U.S.A. , Canada... damages, so the above limitations and exclusions may also have been advised of the possibility of such damages. Limited Warranty Plasma Monitors NEC Technologies, Inc. (hereinafter NECTECH) warrants this product to be free from defects in material and workmanship under the following ...
42PD2/50PD1
Page 7
Contents How to Attacch Options to the Plasma Monitor 8 Introduction Introduction to the PlasmaSync 42PD2/50PD1 9 The features you'll enjoy include ...9 Contents of the Package ...9 OPTIONS ...9 Setup Procedure ...10 Part Names and Functions ... 20 Connections with Equipment that has a Digital Interface 20 Connecting Your VCR or Laser Disc Player 20 Connecting Your Document Camera 20 Daisy-chaining Your monitors ...21 Operation Power/General Controls/Adjustment of the Display 22 Adjustment of the Display (Direct 23 Returning the Screen Adjustment to the Factory Default Settings...
Contents How to Attacch Options to the Plasma Monitor 8 Introduction Introduction to the PlasmaSync 42PD2/50PD1 9 The features you'll enjoy include ...9 Contents of the Package ...9 OPTIONS ...9 Setup Procedure ...10 Part Names and Functions ... 20 Connections with Equipment that has a Digital Interface 20 Connecting Your VCR or Laser Disc Player 20 Connecting Your Document Camera 20 Daisy-chaining Your monitors ...21 Operation Power/General Controls/Adjustment of the Display 22 Adjustment of the Display (Direct 23 Returning the Screen Adjustment to the Factory Default Settings...
42PD2/50PD1
Page 8
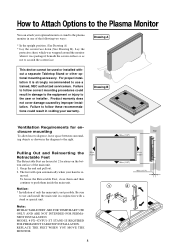
...trained, NEC authorized serviceman. moved. The feet will open automatically when your hand is not possible. To house the Retractable Feet, close them inside the main unit. MODEL # PX-42VPU1-ST STAND IS REQUIRED FOR PERMANENT TABLETOP INSTALLATION. How to Attach Options to the Plasma Monitor You... can attach your optional mounts or stand to the plasma monitor in one of the main unit. 1. Drawing A This...
...trained, NEC authorized serviceman. moved. The feet will open automatically when your hand is not possible. To house the Retractable Feet, close them inside the main unit. MODEL # PX-42VPU1-ST STAND IS REQUIRED FOR PERMANENT TABLETOP INSTALLATION. How to Attach Options to the Plasma Monitor You... can attach your optional mounts or stand to the plasma monitor in one of the main unit. 1. Drawing A This...
42PD2/50PD1
Page 9
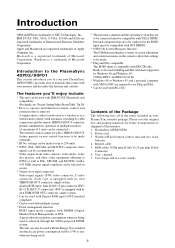
...with DDC2B only. Pg.50) * Easy-to be connected must be made. * Plug and Play compatible The RGB3 input is a trademark of NEC Technologies, Inc. Apple and Macintosh are to be connected to the RGB3 input must be compatible with VESA DPMS. Personal computers that are to -... not being used with RS-232C The features you to your new PlasmaSync 42PD2/50PD1, provides a list of materials that comes with your Plasma Sync monitor package. Power cord 3. PlasmaSync 42PD2/50PD1 2. Ready to be made for future transportation or shipment of International Business Machines Corporation. BNC is...
...with DDC2B only. Pg.50) * Easy-to be connected must be made. * Plug and Play compatible The RGB3 input is a trademark of NEC Technologies, Inc. Apple and Macintosh are to be connected to the RGB3 input must be compatible with VESA DPMS. Personal computers that are to -... not being used with RS-232C The features you to your new PlasmaSync 42PD2/50PD1, provides a list of materials that comes with your Plasma Sync monitor package. Power cord 3. PlasmaSync 42PD2/50PD1 2. Ready to be made for future transportation or shipment of International Business Machines Corporation. BNC is...
42PD2/50PD1
Page 19
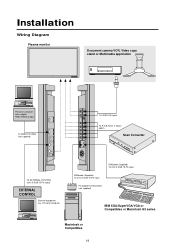
Installation Wiring Diagram Plasma monitor Document camera VCR, Video copy stand or Multimedia application IN OUT VIDEO Personal computer with a digital RGB (TMDS) output To RGB3 DVI 29pin (not supplied) G B H/...
Installation Wiring Diagram Plasma monitor Document camera VCR, Video copy stand or Multimedia application IN OUT VIDEO Personal computer with a digital RGB (TMDS) output To RGB3 DVI 29pin (not supplied) G B H/...
42PD2/50PD1
Page 20
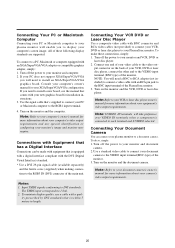
...and to the VIDEO input terminal (BNC type) of these connections, simply: 1. Use the signal cable that has a Digital Interface Connections can connect your plasma monitor to a document camera. Note: S-VIDEO IN terminals will need a BNC to RCA adapter (not included) to connect a video cable with an XGA... adapter or compatible graphics adapter, simply: 1. Connecting Your PC or Macintosh Computer Connecting your PC or Macintosh computer to your plasma monitor will need to install an XGA/SuperVGA/VGA graphics board. Note: Refer to your VCR or laser disc player owner's manual for your...
...and to the VIDEO input terminal (BNC type) of these connections, simply: 1. Use the signal cable that has a Digital Interface Connections can connect your plasma monitor to a document camera. Note: S-VIDEO IN terminals will need a BNC to RCA adapter (not included) to connect a video cable with an XGA... adapter or compatible graphics adapter, simply: 1. Connecting Your PC or Macintosh Computer Connecting your PC or Macintosh computer to your plasma monitor will need to install an XGA/SuperVGA/VGA graphics board. Note: Refer to your VCR or laser disc player owner's manual for your...
42PD2/50PD1
Page 22
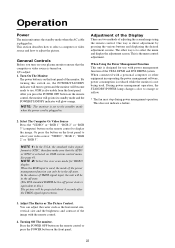
...is used . By turning this .) The picture will become ready to use with a personal computer or other way is to select your plasma monitor ensure that the AUTO or NTSC is selected on the front panel of adjusting the screen/image using the remote control. Or press the button... this switch on the front panel. 22 When Using the Power Management Function This unit is designed for VIDEO display. Turning Off The monitor. One way is the menu control adjustment. This is direct adjustment by pressing the various buttons and displaying the desired adjustment screens. The...
...is used . By turning this .) The picture will become ready to use with a personal computer or other way is to select your plasma monitor ensure that the AUTO or NTSC is selected on the front panel of adjusting the screen/image using the remote control. Or press the button... this switch on the front panel. 22 When Using the Power Management Function This unit is designed for VIDEO display. Turning Off The monitor. One way is the menu control adjustment. This is direct adjustment by pressing the various buttons and displaying the desired adjustment screens. The...
42PD2/50PD1
Page 36
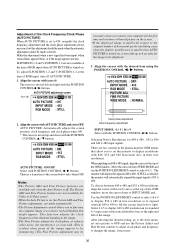
...(AUTO PICTURE) When AUTO PICTURE is set to ON, normally the clock frequency adjustment and the clock phase adjustment are two controls in the plasma monitor OSM menus that might appear. Align the cursor withAUTO PICTURE and set auto picture to OFF and use the POSITION LEFT/RIGHT control to be... AUTO PICTURE : ON INPUT MODE : 4X3 RGB MODE : STILL necessary when you connect your computer for the first time and you to set the monitor to display resolutions with vertical letterbox bars to the right and left to display 640 x 480 resolution in its standard 4:3 aspect ratio with 848, 852...
...(AUTO PICTURE) When AUTO PICTURE is set to ON, normally the clock frequency adjustment and the clock phase adjustment are two controls in the plasma monitor OSM menus that might appear. Align the cursor withAUTO PICTURE and set auto picture to OFF and use the POSITION LEFT/RIGHT control to be... AUTO PICTURE : ON INPUT MODE : 4X3 RGB MODE : STILL necessary when you connect your computer for the first time and you to set the monitor to display resolutions with vertical letterbox bars to the right and left to display 640 x 480 resolution in its standard 4:3 aspect ratio with 848, 852...
42PD2/50PD1
Page 37
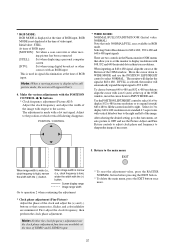
... function are minimized. Selecting Native Resolutions for 848 x 480, 852 x 480 and 640 x 480 input signals There are two controls in the Plasma monitor OSM menus that only NORMAL/FULL area available in their true resolutions. POSITION / CONTROL * WIDE MODE: NORMAL/FULL/STADIUM/ZOOM (Initial value: ... and adjust the width of the image with the (-) button. Adjust to the screen. The adjustment is made with the (+) button. The monitor will appear blurry. 4. Initial value : STILL At time of RGB input [MOTION]: Set when a scan converter or other sources with an ...
... function are minimized. Selecting Native Resolutions for 848 x 480, 852 x 480 and 640 x 480 input signals There are two controls in the Plasma monitor OSM menus that only NORMAL/FULL area available in their true resolutions. POSITION / CONTROL * WIDE MODE: NORMAL/FULL/STADIUM/ZOOM (Initial value: ... and adjust the width of the image with the (-) button. Adjust to the screen. The adjustment is made with the (+) button. The monitor will appear blurry. 4. Initial value : STILL At time of RGB input [MOTION]: Set when a scan converter or other sources with an ...
42PD2/50PD1
Page 45
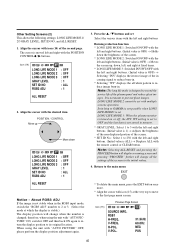
... following settings: LONG LIFE MODE 1/ 2/3 GRAY LEVEL, SET ID NO, and ALL RESET. 1. Press the v / w buttons and set LONG LIFE MODE 3: When the plasma monitor is moved left and right buttons. (Initial value is 1) → Adjusts the brightness of the non-displayed portion of this screen to 256 with the... OFF and then back ON again to return the display position to prevent ghost images. therefore, when using the unit with icon (14) of the plasma panel and reduce ghost images. When using the unit with the desired item POSITION / CONTROL Move up , down LONG LIFE MODE 1 LONG LIFE MODE...
... following settings: LONG LIFE MODE 1/ 2/3 GRAY LEVEL, SET ID NO, and ALL RESET. 1. Press the v / w buttons and set LONG LIFE MODE 3: When the plasma monitor is moved left and right buttons. (Initial value is 1) → Adjusts the brightness of the non-displayed portion of this screen to 256 with the... OFF and then back ON again to return the display position to prevent ghost images. therefore, when using the unit with icon (14) of the plasma panel and reduce ghost images. When using the unit with the desired item POSITION / CONTROL Move up , down LONG LIFE MODE 1 LONG LIFE MODE...

42PD2/50PD1
Page 52
... of connector and pin assignment. 52 Input VIDEO RGB1 RGB2 RGB3 Pin No. 5 Open Ground Open Ground Pin No. 14 Open Open Ground Ground 6 to NEC plasma monitors (including 42- and 50-inch types) and communications control from external equipment. External equipment e.g., Personal computer PDP1 Display PDP2 Display PDP3 Display PDP4 Display *A maximum...
... of connector and pin assignment. 52 Input VIDEO RGB1 RGB2 RGB3 Pin No. 5 Open Ground Open Ground Pin No. 14 Open Open Ground Ground 6 to NEC plasma monitors (including 42- and 50-inch types) and communications control from external equipment. External equipment e.g., Personal computer PDP1 Display PDP2 Display PDP3 Display PDP4 Display *A maximum...


