
NP115 : ceiling plate instruction
Page 1
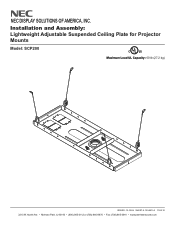
Installation and Assembly: Lightweight Adjustable Suspended Ceiling Plate for Projector Mounts Model: SCP200 C U© L US Maximum Load UL Capacity: 60 lb (27.2 kg) ISSUED: 12-16-04 SHEET #: 120-9015-3 11-05-10 3215 W. North Ave. • Melrose Park, IL 60160 • (800) 865-2112 or (708) 865-8870 • Fax: (708) 865-2941 • www.peerlessmounts.com NEC DISPLAY SOLUTIONS OF AMERICA, INC.
Installation and Assembly: Lightweight Adjustable Suspended Ceiling Plate for Projector Mounts Model: SCP200 C U© L US Maximum Load UL Capacity: 60 lb (27.2 kg) ISSUED: 12-16-04 SHEET #: 120-9015-3 11-05-10 3215 W. North Ave. • Melrose Park, IL 60160 • (800) 865-2112 or (708) 865-8870 • Fax: (708) 865-2941 • www.peerlessmounts.com NEC DISPLAY SOLUTIONS OF AMERICA, INC.

NP115 : ceiling plate instruction
Page 2
... use adhesives, lubricants or oils to prevent the screws from loosening, the casing may crack and the projector may fall, causing serious injury and damage to the projector. WARNING • Do not begin to install your product until you start installation and assembly. If you... have read and understood the instructions and warnings contained in this product outdoors could lead to product failure and personal injury. • When installing or adjusting the ceiling mount...
... use adhesives, lubricants or oils to prevent the screws from loosening, the casing may crack and the projector may fall, causing serious injury and damage to the projector. WARNING • Do not begin to install your product until you start installation and assembly. If you... have read and understood the instructions and warnings contained in this product outdoors could lead to product failure and personal injury. • When installing or adjusting the ceiling mount...

NP115 : ceiling plate instruction
Page 5
... of the installer to verify that when the steel cables (E) are attached and taut they will safely support the combined load of all attached components (Projector Mount, Extension Column, etc.) and equipment. 5 Insert loose end of steel wire (E) through cable lock until all cables are trademarks or registered trademarks of...ISSUED: 12-16-04 SHEET #: 120-9015-3 11-05-10 Visit the Peerless Web Site at www.peerlessmounts.com For Technical Support Contact Peerless Mounts at 15°. TOP VIEW BLACK RECTANGLES REPRESENT CORRECT POSITIONS FOR STEEL WIRE I ) as shown in figure 5.1.
... of the installer to verify that when the steel cables (E) are attached and taut they will safely support the combined load of all attached components (Projector Mount, Extension Column, etc.) and equipment. 5 Insert loose end of steel wire (E) through cable lock until all cables are trademarks or registered trademarks of...ISSUED: 12-16-04 SHEET #: 120-9015-3 11-05-10 Visit the Peerless Web Site at www.peerlessmounts.com For Technical Support Contact Peerless Mounts at 15°. TOP VIEW BLACK RECTANGLES REPRESENT CORRECT POSITIONS FOR STEEL WIRE I ) as shown in figure 5.1.

MP300CM Installation Manual
Page 1
Installation and Assembly Manual: Custom Ceiling Mount for NEC M260X, M260W, M271X, M300X, M300W M300XS, M300WS, M311X, M311W, P350X, P350W, P420X Projectors Model: MP300CM Features: • ImageLockTM alignment prevents picture sag or drift • Wrench access slot for easier flush mount installations • Exclusive aluminum track quick release Visit the Peerless Web Site at www.peerlessmounts.com 1 of America, Inc. NEC Display Solutions of 10 Max UL Load Capacity: 50 lb (22.7 kg) ISSUED: 10-01-10 SHEET #: 056-9034-4 07-29-11 For customer care call 1-800-865-2112
Installation and Assembly Manual: Custom Ceiling Mount for NEC M260X, M260W, M271X, M300X, M300W M300XS, M300WS, M311X, M311W, P350X, P350W, P420X Projectors Model: MP300CM Features: • ImageLockTM alignment prevents picture sag or drift • Wrench access slot for easier flush mount installations • Exclusive aluminum track quick release Visit the Peerless Web Site at www.peerlessmounts.com 1 of America, Inc. NEC Display Solutions of 10 Max UL Load Capacity: 50 lb (22.7 kg) ISSUED: 10-01-10 SHEET #: 056-9034-4 07-29-11 For customer care call 1-800-865-2112
MP300CM Installation Manual
Page 2
...If you have read and understood the instructions and warnings contained in the installation sheet. See page 1. • If mounting to Projector Mount...9 Projector Alignment...10 Visit the Peerless Web Site at www.peerlessmounts.com 2 of 10 ISSUED: 10-01-10 SHEET #: ...Columns / Ceiling Plate...4 Installation to Wood Joist Ceilings...5 Installation to Concrete Ceilings...6 Installation to Threaded Rods...7 Attaching Adapter Plate to Projector...8 Attaching Adapter Plate to wood joist ceilings, make sure that the supporting surface will safely support the combined load of the equipment ...
...If you have read and understood the instructions and warnings contained in the installation sheet. See page 1. • If mounting to Projector Mount...9 Projector Alignment...10 Visit the Peerless Web Site at www.peerlessmounts.com 2 of 10 ISSUED: 10-01-10 SHEET #: ...Columns / Ceiling Plate...4 Installation to Wood Joist Ceilings...5 Installation to Concrete Ceilings...6 Installation to Threaded Rods...7 Attaching Adapter Plate to Projector...8 Attaching Adapter Plate to wood joist ceilings, make sure that the supporting surface will safely support the combined load of the equipment ...
MP300CM Installation Manual
Page 3
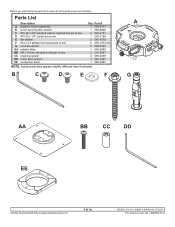
... than illustrated. B C D E F A G AA BB CC DD EE Visit the Peerless Web Site at www.peerlessmounts.com 3 of the parts shown are included. Parts List Description A projector mount assembly B 4 mm security allen wrench C #10-32 x 3/8" serrated washer head socket pin screw D #10-32 x 1/4" socket pin screw E flat washer F #14 x 2.5 phillips hex head wood...
... than illustrated. B C D E F A G AA BB CC DD EE Visit the Peerless Web Site at www.peerlessmounts.com 3 of the parts shown are included. Parts List Description A projector mount assembly B 4 mm security allen wrench C #10-32 x 3/8" serrated washer head socket pin screw D #10-32 x 1/4" socket pin screw E flat washer F #14 x 2.5 phillips hex head wood...
MP300CM Installation Manual
Page 4
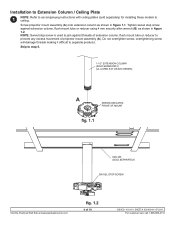
... step 5. 1-1/2" EXTENSION COLUMN (SOLD SEPARATELY) (UL LISTED EXT OR AEC SERIES) A ARROW INDICATES FRONT OF MOUNT fig. 1.1 CMJ 455 (SOLD SEPARATELY) SWIVEL STOP SCREW Visit the Peerless Web Site at www.peerlessmounts.com fig. 1.2 4 of projector mount assembly (A). Installation to Extension Column / Ceiling Plate 1 NOTE: Refer to accompanying instructions with ceiling plates (sold...
... step 5. 1-1/2" EXTENSION COLUMN (SOLD SEPARATELY) (UL LISTED EXT OR AEC SERIES) A ARROW INDICATES FRONT OF MOUNT fig. 1.1 CMJ 455 (SOLD SEPARATELY) SWIVEL STOP SCREW Visit the Peerless Web Site at www.peerlessmounts.com fig. 1.2 4 of projector mount assembly (A). Installation to Extension Column / Ceiling Plate 1 NOTE: Refer to accompanying instructions with ceiling plates (sold...
MP300CM Installation Manual
Page 5
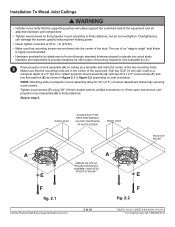
...#: 056-9034-4 07-29-11 For customer care call 1-800-865-2112 NOTE: Mounting slots on projector mount assembly allow for other types of mounting situations (not evaluated by UL). 2 Place projector mount assembly (A) on joist orientation. The use of an "edge to a minimum depth of... will safely support the combined load of the equipment and all attached hardware and components. • Tighten wood screws so that projector mount assembly is firmly attached. Attach projector mount assembly (A) with two #14 x 2.5" wood screws (F) and two flat washers (E) as shown in . • lb ...
...#: 056-9034-4 07-29-11 For customer care call 1-800-865-2112 NOTE: Mounting slots on projector mount assembly allow for other types of mounting situations (not evaluated by UL). 2 Place projector mount assembly (A) on joist orientation. The use of an "edge to a minimum depth of... will safely support the combined load of the equipment and all attached hardware and components. • Tighten wood screws so that projector mount assembly is firmly attached. Attach projector mount assembly (A) with two #14 x 2.5" wood screws (F) and two flat washers (E) as shown in . • lb ...
MP300CM Installation Manual
Page 6
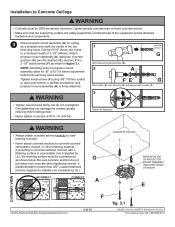
... anchors (G). 2 A concrete surface G FE G Place plate (A) over anchors (G) and secure with plaster, drywall, or other finishing material. Tighten all attached hardware and components. 3 Place projector mount assembly (A) on projector mount assembly allow for 30° (±15°) of 80 in figure 3.1. WARNING • Always attach concrete anchors directly to loadbearing concrete. • Never...
... anchors (G). 2 A concrete surface G FE G Place plate (A) over anchors (G) and secure with plaster, drywall, or other finishing material. Tighten all attached hardware and components. 3 Place projector mount assembly (A) on projector mount assembly allow for 30° (±15°) of 80 in figure 3.1. WARNING • Always attach concrete anchors directly to loadbearing concrete. • Never...
MP300CM Installation Manual
Page 7
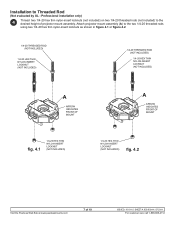
Attach projector mount assembly (A) to the two 1/4-20 threaded rods using two 1/4-20 hex thin nylon-insert locknuts as shown in figure 4.1 or figure 4.2. 1/4-20 THREADED ROD (NOT ... THIN NYLON-INSERT LOCKNUT (NOT INCLUDED) 1/4-20 HEX THIN NYLON-INSERT LOCKNUT (NOT INCLUDED) fig. 4.2 Visit the Peerless Web Site at www.peerlessmounts.com 7 of projector mount assembly. Professional installation only) 4 Thread two 1/4-20 hex thin nylon-insert locknuts (not included) on two 1/4-20 threaded rods (not included) to Threaded Rod (Not...
Attach projector mount assembly (A) to the two 1/4-20 threaded rods using two 1/4-20 hex thin nylon-insert locknuts as shown in figure 4.1 or figure 4.2. 1/4-20 THREADED ROD (NOT ... THIN NYLON-INSERT LOCKNUT (NOT INCLUDED) 1/4-20 HEX THIN NYLON-INSERT LOCKNUT (NOT INCLUDED) fig. 4.2 Visit the Peerless Web Site at www.peerlessmounts.com 7 of projector mount assembly. Professional installation only) 4 Thread two 1/4-20 hex thin nylon-insert locknuts (not included) on two 1/4-20 threaded rods (not included) to Threaded Rod (Not...
MP300CM Installation Manual
Page 9
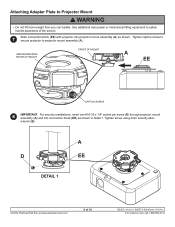
... call 1-800-865-2112 Tighten screw using 4mm security allen wrench (B). ARROW INDICATES FRONT OF MOUNT FRONT OF MOUNT A EE CAPTIVE SCREW 8 IMPORTANT: For security installations, insert one #10-32 x 1/4" socket pin screw (D) through projector mount assembly (A) and into projector mount assembly (A) as shown in detail 1. A D EE DETAIL 1 Visit the Peerless Web Site at www.peerlessmounts...
... call 1-800-865-2112 Tighten screw using 4mm security allen wrench (B). ARROW INDICATES FRONT OF MOUNT FRONT OF MOUNT A EE CAPTIVE SCREW 8 IMPORTANT: For security installations, insert one #10-32 x 1/4" socket pin screw (D) through projector mount assembly (A) and into projector mount assembly (A) as shown in detail 1. A D EE DETAIL 1 Visit the Peerless Web Site at www.peerlessmounts...
MP300CM Installation Manual
Page 10
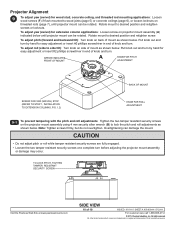
... occur. To adjust pitch (forward and backward tilt): Turn knob on projector mount assembly (A) indicated below until projector mount can damage the mount. Note: Tighten screws firmly, but do not overtighten. Rotate mount to desired position and retighten screw. CAUTION • Do not adjust ...and roll adjustments: Tighten the two tamper resistant security screws on the projector mount assembly using 4 mm security allen wrench (B) to side tilt): Turn knob on threaded rods (page 7), until projector mount can be rotated. TO LOCK PITCH, TIGHTEN TAMPER RESISTANT SECURITY SCREW...
... occur. To adjust pitch (forward and backward tilt): Turn knob on projector mount assembly (A) indicated below until projector mount can damage the mount. Note: Tighten screws firmly, but do not overtighten. Rotate mount to desired position and retighten screw. CAUTION • Do not adjust ...and roll adjustments: Tighten the two tamper resistant security screws on the projector mount assembly using 4 mm security allen wrench (B) to side tilt): Turn knob on threaded rods (page 7), until projector mount can be rotated. TO LOCK PITCH, TIGHTEN TAMPER RESISTANT SECURITY SCREW...

Specification Brochure
Page 1
...detected from any of the inputs • Auto Power On via the RGB (15-pin) input connector when a signal is detected from the mount. A green ECO Mode button on the remote control makes the switch easy. • Quick start (3 to 4 seconds) lets you need to...off provides instantaneous shutdown of the projector 6000-hour filter life NEC is committed to designing its products, including the improved filter. Entry Level Installation Projectors P Series P401W, P451X, P451W and P501X digital projectors Easy to use and at the right price, P Series projectors provide all the essential features that...
...detected from any of the inputs • Auto Power On via the RGB (15-pin) input connector when a signal is detected from the mount. A green ECO Mode button on the remote control makes the switch easy. • Quick start (3 to 4 seconds) lets you need to...off provides instantaneous shutdown of the projector 6000-hour filter life NEC is committed to designing its products, including the improved filter. Entry Level Installation Projectors P Series P401W, P451X, P451W and P501X digital projectors Easy to use and at the right price, P Series projectors provide all the essential features that...

Specification Brochure
Page 4
...adjustable extension column for use with projector mount 12 to 18 inch adjustable extension column for use with projector mount 2 to 3 foot adjustable extension column for use with projector mount 3 to 4 years Extends term of NEC Display Solutions. Product specifications subject ...quick start guide, product registration card, security sticker ORDERING MODEL NUMBERS NP-P401W NP-P451X NP-P451W NP-P501X Specifications for use with projector mount Adjustable suspended ceiling plate for P401W/P451X/P451W/P501X OPTICAL Display Technology Light Output (lumens) Resolution Native Maximum...
...adjustable extension column for use with projector mount 12 to 18 inch adjustable extension column for use with projector mount 2 to 3 foot adjustable extension column for use with projector mount 3 to 4 years Extends term of NEC Display Solutions. Product specifications subject ...quick start guide, product registration card, security sticker ORDERING MODEL NUMBERS NP-P401W NP-P451X NP-P451W NP-P501X Specifications for use with projector mount Adjustable suspended ceiling plate for P401W/P451X/P451W/P501X OPTICAL Display Technology Light Output (lumens) Resolution Native Maximum...
User's Manual
Page 5
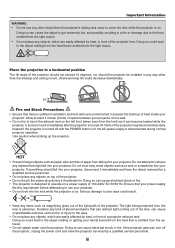
...or injury to cover the lens while the projector is on and immediately after the projector is turned off the projector, unplug the power cord and have the object removed by heat, in any way other object than the desktop and ceiling mount, otherwise lamp life could lead to retrieve any... objects that is turned on . Do not attempt to the object melting from falling into your projector. Doing so could decrease dramatically. 10° Fire and Shock Precautions ...
...or injury to cover the lens while the projector is on and immediately after the projector is turned off the projector, unplug the power cord and have the object removed by heat, in any way other object than the desktop and ceiling mount, otherwise lamp life could lead to retrieve any... objects that is turned on . Do not attempt to the object melting from falling into your projector. Doing so could decrease dramatically. 10° Fire and Shock Precautions ...
User's Manual
Page 7
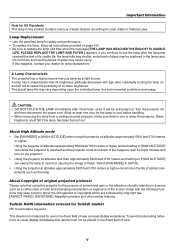
...REACHED THE END OF ITS USABLE LIFE. Glass fragments could shut down. Turkish RoHS information relevant for lamp replacement. A Lamp Characteristic The projector has a high-pressure mercury lamp as the pieces of public attention in a venue such as the lamp. About High Altitude mode ...field of glass may cause injury. Please dispose according to cool before handling. • When removing the lamp from a ceiling-mounted projector, make sure that its brightness gradually decreases with the following functions may raise concern about the infringement of its usable life, ...
...REACHED THE END OF ITS USABLE LIFE. Glass fragments could shut down. Turkish RoHS information relevant for lamp replacement. A Lamp Characteristic The projector has a high-pressure mercury lamp as the pieces of public attention in a venue such as the lamp. About High Altitude mode ...field of glass may cause injury. Please dispose according to cool before handling. • When removing the lamp from a ceiling-mounted projector, make sure that its brightness gradually decreases with the following functions may raise concern about the infringement of its usable life, ...
User's Manual
Page 14
... when projecting an image) by assigning an ID number to project images from the remote control or cabinet control panel. The projector must be used wirelessly. *1 Do not attempt to mount the projector on -screen message. • 0.21 W (100-130 V AC)/0.43 W (200-240 V AC) in the INFO... is only when [STANDBY MODE] is useful for more information. Please consult your dealer for your new projector and describes the features and controls. 1. The projector can be permanently mounted on the power, the projector is one of the on-screen menu. • Lamp life up to be put the...
... when projecting an image) by assigning an ID number to project images from the remote control or cabinet control panel. The projector must be used wirelessly. *1 Do not attempt to mount the projector on -screen message. • 0.21 W (100-130 V AC)/0.43 W (200-240 V AC) in the INFO... is only when [STANDBY MODE] is useful for more information. Please consult your dealer for your new projector and describes the features and controls. 1. The projector can be permanently mounted on the power, the projector is one of the on-screen menu. • Lamp life up to be put the...

User's Manual
Page 229
... camera, Video game or other manufacturer's cable? In the space below please describe your projector is used Projector Model number: Serial No.: Date of purchase: Lamp operating time (hours): Eco Mode:... Wide angle High contrast Throw distance: feet/inch/m Orientation: Ceiling mount Desktop Power outlet connection: Connected directly to wall outlet Connected to ... Video adapter: Other: DVD player Signal cable NEC standard or other Manufacturer: Model number: 217 Appendix Information on application and environment where your problem...
... camera, Video game or other manufacturer's cable? In the space below please describe your projector is used Projector Model number: Serial No.: Date of purchase: Lamp operating time (hours): Eco Mode:... Wide angle High contrast Throw distance: feet/inch/m Orientation: Ceiling mount Desktop Power outlet connection: Connected directly to wall outlet Connected to ... Video adapter: Other: DVD player Signal cable NEC standard or other Manufacturer: Model number: 217 Appendix Information on application and environment where your problem...
Installation Guide
Page 1
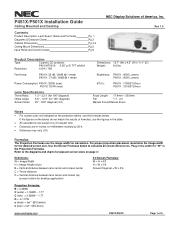
Rev 1.0 Product Description Type: 3 panel LCD projector, P451X/P501X: 0.63" p-Si TFT w/MLA Resolution: 1024 x 768 Fan Noise: P451X: 36 dB / 29dB @ 1 meter P501X : 37 dB / 30dB @ 1 meter Power Consumption: P451X: 325W (max) P501X: 357W (max) Lens Specifications Throw Ratio: 1.3 - 2.2:1 (for 100" diagonal... 5%. P451X/P501X Installation Guide Ceiling Mounted and Desktop Contents Product Description, Lens Specs, Notes and Formulas Diagrams & Distance Charts Cabinet Dimensions Ceiling Mount Dimensions Input Panel and Control Codes Pg 1 Pg 2 Pg 3-4 Pg 5 Pg 6 NEC Display Solutions ...
Rev 1.0 Product Description Type: 3 panel LCD projector, P451X/P501X: 0.63" p-Si TFT w/MLA Resolution: 1024 x 768 Fan Noise: P451X: 36 dB / 29dB @ 1 meter P501X : 37 dB / 30dB @ 1 meter Power Consumption: P451X: 325W (max) P501X: 357W (max) Lens Specifications Throw Ratio: 1.3 - 2.2:1 (for 100" diagonal... 5%. P451X/P501X Installation Guide Ceiling Mounted and Desktop Contents Product Description, Lens Specs, Notes and Formulas Diagrams & Distance Charts Cabinet Dimensions Ceiling Mount Dimensions Input Panel and Control Codes Pg 1 Pg 2 Pg 3-4 Pg 5 Pg 6 NEC Display Solutions ...
Installation Guide
Page 2
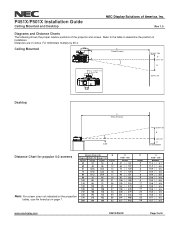
P451X/P501X Installation Guide Ceiling Mounted and Desktop NEC Display Solutions of installation. For millimeters multiply by 25.4. Ceiling Mounted 6.22 C Throw Distance Screen Top D Lens Ctr B L e n s Offset From Mo u nt Pipe Screen Ctr Desktop C Throw Distance 3.05"...11.3 - 6.7 11.0 - 6.6 10.9 - 6.6 10.9 - 6.6 10.9 - 6.6 10.9 - 6.6 10.9 - 6.6 10.8 - 6.5 10.8 - 6.5 10.8 - 6.5 10.8 - 6.5 10.8 - 6.5 10.7 - 6.5 10.7 - 6.5 www.necdisplay.com P451X/P501X Page 2 of the projector and screen. Rev 1.0 Diagrams and Distance Charts The following shows the proper relative positions of 6
P451X/P501X Installation Guide Ceiling Mounted and Desktop NEC Display Solutions of installation. For millimeters multiply by 25.4. Ceiling Mounted 6.22 C Throw Distance Screen Top D Lens Ctr B L e n s Offset From Mo u nt Pipe Screen Ctr Desktop C Throw Distance 3.05"...11.3 - 6.7 11.0 - 6.6 10.9 - 6.6 10.9 - 6.6 10.9 - 6.6 10.9 - 6.6 10.9 - 6.6 10.8 - 6.5 10.8 - 6.5 10.8 - 6.5 10.8 - 6.5 10.8 - 6.5 10.7 - 6.5 10.7 - 6.5 www.necdisplay.com P451X/P501X Page 2 of the projector and screen. Rev 1.0 Diagrams and Distance Charts The following shows the proper relative positions of 6


