
User Manual
Page 3
...We hereby certify that matches the AC voltage of contact with any problems. CAUTION: Please use a power cord that the colour monitor MultiSync EA231WMi (L238N4) is in the country where it is not supplied with this unit has been included. EN 61000-3-3 - Therefore, it... SERVICE PERSONNEL. EN 60950-1 Council Directive 2004/108/EC: - China Japan Voltage 120* 230 230 220 100* *When operating the MultiSync EA231WMi monitor with NEC Display Solutions, Ltd. 4-13-23, Shibaura, Minato-Ku Tokyo 108-0023, Japan English-1 EN 61000-3-2 - NO USER SERVICEABLE PARTS INSIDE....
...We hereby certify that matches the AC voltage of contact with any problems. CAUTION: Please use a power cord that the colour monitor MultiSync EA231WMi (L238N4) is in the country where it is not supplied with this unit has been included. EN 61000-3-3 - Therefore, it... SERVICE PERSONNEL. EN 60950-1 Council Directive 2004/108/EC: - China Japan Voltage 120* 230 230 220 100* *When operating the MultiSync EA231WMi monitor with NEC Display Solutions, Ltd. 4-13-23, Shibaura, Minato-Ku Tokyo 108-0023, Japan English-1 EN 61000-3-2 - NO USER SERVICEABLE PARTS INSIDE....
User Manual
Page 4
...UL: Bears the C-UL Mark and is in a residential installation. Use the attached specified cables with the MultiSync EA231WMi (L238N4) color monitor so as specified in the countries of EU and Switzerland. Power supply cord Plug shape Non shield type, 3-conductor... limits are trademarks or registered trademarks of NEC Display Solutions Europe GmbH in the FCC Rules. If this equipment does cause harmful interference to DVI-D cable. Declaration of Product: Display Monitor Equipment Classification: Class B Peripheral Models: MultiSync EA231WMi (L238N4) We hereby declare that the ...
...UL: Bears the C-UL Mark and is in a residential installation. Use the attached specified cables with the MultiSync EA231WMi (L238N4) color monitor so as specified in the countries of EU and Switzerland. Power supply cord Plug shape Non shield type, 3-conductor... limits are trademarks or registered trademarks of NEC Display Solutions Europe GmbH in the FCC Rules. If this equipment does cause harmful interference to DVI-D cable. Declaration of Product: Display Monitor Equipment Classification: Class B Peripheral Models: MultiSync EA231WMi (L238N4) We hereby declare that the ...
User Manual
Page 5
... to dangerous shock hazards or other shocks, make sure to install the monitor in contact with the liquid crystal and handle with care when transporting. Refer all personal display devices, NEC DISPLAY SOLUTIONS recommends displaying moving images and using a moving screen saver at... regular intervals whenever the screen is broken, do not use with this product contain mercury. Unlike CRT monitors, LCD monitors' image persistence is not permanent, ...
... to dangerous shock hazards or other shocks, make sure to install the monitor in contact with the liquid crystal and handle with care when transporting. Refer all personal display devices, NEC DISPLAY SOLUTIONS recommends displaying moving images and using a moving screen saver at... regular intervals whenever the screen is broken, do not use with this product contain mercury. Unlike CRT monitors, LCD monitors' image persistence is not permanent, ...
User Manual
Page 6
...signals. • Use the preset Colour Setting. • Use non-interlaced signals with a dry cloth. Blink often. • Position the monitor at or slightly below eye level. Ergonomics To realize the maximum ergonomics benefits, we recommend the following: • Adjust the Brightness until the ...background raster disappears. • Do not position the Contrast control to deteriorate, crack or peel. Adjust the monitor tilt so that ceiling lights do not reflect on a dark background, as it hard for long periods of the cabinet. Cleaning the LCD...
...signals. • Use the preset Colour Setting. • Use non-interlaced signals with a dry cloth. Blink often. • Position the monitor at or slightly below eye level. Ergonomics To realize the maximum ergonomics benefits, we recommend the following: • Adjust the Brightness until the ...background raster disappears. • Do not position the Contrast control to deteriorate, crack or peel. Adjust the monitor tilt so that ceiling lights do not reflect on a dark background, as it hard for long periods of the cabinet. Cleaning the LCD...
User Manual
Page 7
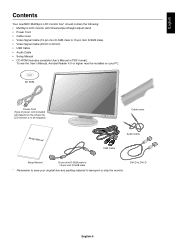
... Audio Cable • Setup Manual • CD ROM (includes complete User's Manual in PDF format). English Contents Your new NEC MultiSync LCD monitor box* should contain the following: • MultiSync LCD monitor with tilt/swivel/pivot/height adjust stand • Power Cord • Cable cover • Video Signal Cable (15-pin...packing material to save your PC. To see the User's Manual, Acrobat Reader 4.0 or higher must be installed on the where the LCD monitor is to be shipped) Cable cover Setup Manual Audio Cable USB Cable Setup Manual 15-pin mini D-SUB male to 15-pin mini D-SUB...
... Audio Cable • Setup Manual • CD ROM (includes complete User's Manual in PDF format). English Contents Your new NEC MultiSync LCD monitor box* should contain the following: • MultiSync LCD monitor with tilt/swivel/pivot/height adjust stand • Power Cord • Cable cover • Video Signal Cable (15-pin...packing material to save your PC. To see the User's Manual, Acrobat Reader 4.0 or higher must be installed on the where the LCD monitor is to be shipped) Cable cover Setup Manual Audio Cable USB Cable Setup Manual 15-pin mini D-SUB male to 15-pin mini D-SUB...

User Manual
Page 8
... a Macintosh cable adapter. 3. When using the USB cable, connect the B type connector to the USB upstream port on the right back side of the monitor to tilt the LCD panel 30-degree angle and lift up to the highest position (Figure C.1). 4. When removing the DisplayPort cable, hold down the top... cord from the USB device, use a DisplayPort cable with Analog output: Connect the 15-pin mini D-SUB signal cable to the connector of the monitor (Figure C.1). The DisplayPort connector does not supply power to your system, follow these instructions: 1. Quick Start To attach the MultiSync LCD...
... a Macintosh cable adapter. 3. When using the USB cable, connect the B type connector to the USB upstream port on the right back side of the monitor to tilt the LCD panel 30-degree angle and lift up to the highest position (Figure C.1). 4. When removing the DisplayPort cable, hold down the top... cord from the USB device, use a DisplayPort cable with Analog output: Connect the 15-pin mini D-SUB signal cable to the connector of the monitor (Figure C.1). The DisplayPort connector does not supply power to your system, follow these instructions: 1. Quick Start To attach the MultiSync LCD...

User Manual
Page 9
... as indicated in Figure C.2/Figure C.3. Make sure all cables firmly and place the cable cover onto the stand (Figure D.1). Please check Tilt, Rise and Lower monitor screen and screen rotation when you manage cables. DVI Cable Power Cord DisplayPort Cable D-SUB Cable USB Cable Audio Cable Flat USB Cable Audio Cable...
... as indicated in Figure C.2/Figure C.3. Make sure all cables firmly and place the cable cover onto the stand (Figure D.1). Please check Tilt, Rise and Lower monitor screen and screen rotation when you manage cables. DVI Cable Power Cord DisplayPort Cable D-SUB Cable USB Cable Audio Cable Flat USB Cable Audio Cable...
User Manual
Page 10
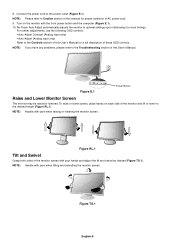
...the tilt and swivel as desired (Figure TS.1). No-Touch Auto Adjust automatically adjusts the monitor to Caution section of this User's Manual. NOTE: Handle with care when tilting and swivelling the monitor screen. NOTE: Please refer to optimal settings upon initial setup for proper selection of ...problems, please refer to the power outlet (Figure E.1). NOTE: Handle with care when raising or lowering the monitor screen. Figure RL.1 Tilt and Swivel Grasp both sides of the monitor screen with the front power button and the computer (Figure E.1). 10. Turn on each side of these OSD...
...the tilt and swivel as desired (Figure TS.1). No-Touch Auto Adjust automatically adjusts the monitor to Caution section of this User's Manual. NOTE: Handle with care when tilting and swivelling the monitor screen. NOTE: Please refer to optimal settings upon initial setup for proper selection of ...problems, please refer to the power outlet (Figure E.1). NOTE: Handle with care when raising or lowering the monitor screen. Figure RL.1 Tilt and Swivel Grasp both sides of the monitor screen with the front power button and the computer (Figure E.1). 10. Turn on each side of these OSD...

User Manual
Page 11
...turn clockwise from Landscape to Portrait or counterclockwise from Portrait to Landscape (Figure R.1). Remove the 4 screws connecting the stand to the highest position. The monitor is now ready for alternate mounting purposes: 1. Figure S.2 Control buttons Figure S.3 English-9 NOTE: In order to avoid stand drop, when removing screws,... by the handle using the other hand to grip the bottom. Remove the cable cover (Figure S.1). 2. Disconnect all cables. 3. Place monitor face down , for avoiding damage to the front control buttons. 4. To rotate screen, place hands on each side of the...
...turn clockwise from Landscape to Portrait or counterclockwise from Portrait to Landscape (Figure R.1). Remove the 4 screws connecting the stand to the highest position. The monitor is now ready for alternate mounting purposes: 1. Figure S.2 Control buttons Figure S.3 English-9 NOTE: In order to avoid stand drop, when removing screws,... by the handle using the other hand to grip the bottom. Remove the cable cover (Figure S.1). 2. Disconnect all cables. 3. Place monitor face down , for avoiding damage to the front control buttons. 4. To rotate screen, place hands on each side of the...
User Manual
Page 12
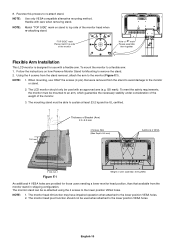
...NOTE: 1. Using the 4 screws from the stand to avoid damage to the monitor or stand. 2. The monitor head tilt function may have impaired operation when attached to the monitor (Figure F.1). The monitor head pivot function should only be used with a flexible arm. Reverse this process...) Additional 4 VESA 100 mm Figure F.1 Weight of " " mark Please assemble then together Flexible Arm Installation This LCD monitor is designed for those users needing a lower monitor head position, than that were removed from the stand removal, attach the arm to the lower position VESA holes. 2. ...
...NOTE: 1. Using the 4 screws from the stand to avoid damage to the monitor or stand. 2. The monitor head tilt function may have impaired operation when attached to the monitor (Figure F.1). The monitor head pivot function should only be used with a flexible arm. Reverse this process...) Additional 4 VESA 100 mm Figure F.1 Weight of " " mark Please assemble then together Flexible Arm Installation This LCD monitor is designed for those users needing a lower monitor head position, than that were removed from the stand removal, attach the arm to the lower position VESA holes. 2. ...

User Manual
Page 13
...brightness level. Moves the highlighted area left /right to optimal settings. Change the Input source (No OSD condition). Turns the monitor on the front of the monitor function as follows: To access OSD menu, press any of power consumed by pressing the MENU button. This setting can ...When RESET is set to change signal input. CONTRAST Adjusts the image brightness in order to ON. Direct adjust of ambient lighting allowing the monitor to make adjustments to ON. Do not cover this function is set for 3 seconds (No OSD condition and Analog input only). Direct ...
...brightness level. Moves the highlighted area left /right to optimal settings. Change the Input source (No OSD condition). Turns the monitor on the front of the monitor function as follows: To access OSD menu, press any of power consumed by pressing the MENU button. This setting can ...When RESET is set to change signal input. CONTRAST Adjusts the image brightness in order to ON. Direct adjust of ambient lighting allowing the monitor to make adjustments to ON. Do not cover this function is set for 3 seconds (No OSD condition and Analog input only). Direct ...
User Manual
Page 14
.... NATIVE: Original colour presented by the LCD panel that is expanded to 1920 x 1080, regardless of your environment and adjusting the monitor with the best BRIGHTNESS setting*1. 2: Adjusts the brightness automatically for the best BRIGHTNESS setting based on the white display area. *1: Please... the display area of input signal to the new found video source automatically. ASPECT: The image is not present, then he monitor searches for Dynamic. FINE Improves focus, clarity and image stability by increasing or decreasing this colour supported environment, the operator could...
.... NATIVE: Original colour presented by the LCD panel that is expanded to 1920 x 1080, regardless of your environment and adjusting the monitor with the best BRIGHTNESS setting*1. 2: Adjusts the brightness automatically for the best BRIGHTNESS setting based on the white display area. *1: Please... the display area of input signal to the new found video source automatically. ASPECT: The image is not present, then he monitor searches for Dynamic. FINE Improves focus, clarity and image stability by increasing or decreasing this colour supported environment, the operator could...
User Manual
Page 15
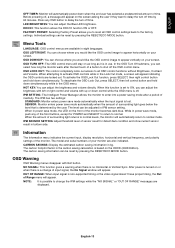
... LOCK OUT: This control completely locks out access to all OSD control settings back to normal. IPM SETTING: The Intelligent Power Manager allows the monitor to enter into a power saving mode after the last touch of sensor result for POWER and SELECT to return to the factory settings. Information ...Menu Tools LANGUAGE: OSD control menus are displayed. In the OSD Turn Off submenu, you can choose where you to shut off time. SENSOR: Monitor enters power save mode, the LED on the front of Range menu will automatically return to delay the turn off the OSD control menu. While...
... LOCK OUT: This control completely locks out access to all OSD control settings back to normal. IPM SETTING: The Intelligent Power Manager allows the monitor to enter into a power saving mode after the last touch of sensor result for POWER and SELECT to return to the factory settings. Information ...Menu Tools LANGUAGE: OSD control menus are displayed. In the OSD Turn Off submenu, you can choose where you to shut off time. SENSOR: Monitor enters power save mode, the LED on the front of Range menu will automatically return to delay the turn off the OSD control menu. While...
User Manual
Page 16
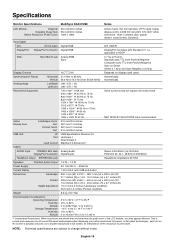
...ratio, typical (3000:1 contrast ratio, Dynamic). NOTE: Technical specifications are lower than the pixel count of the resolution must be done. Specifications Monitor Specifications MultiSync EA231WMi Notes LCD Module Diagonal: 58.4 cm/23.0 inches Viewable Image Size: 58.4 cm/23.0 inches Native Resolution (Pixel Count): 1920 x ...% 0 to 40,000 Feet / 0 to 75 Hz 1400 x 1050*1 @ 60 Hz 1440 x 900*1 @ 60 Hz 1920 x 1080 @ 60 Hz NEC DISPLAY SOLUTIONS cites recommended. Synchronization Range Horizontal: 31.5 kHz to 83 kHz Automatically Vertical: 56.0 Hz to change without notice.
...ratio, typical (3000:1 contrast ratio, Dynamic). NOTE: Technical specifications are lower than the pixel count of the resolution must be done. Specifications Monitor Specifications MultiSync EA231WMi Notes LCD Module Diagonal: 58.4 cm/23.0 inches Viewable Image Size: 58.4 cm/23.0 inches Native Resolution (Pixel Count): 1920 x ...% 0 to 40,000 Feet / 0 to 75 Hz 1400 x 1050*1 @ 60 Hz 1440 x 900*1 @ 60 Hz 1920 x 1080 @ 60 Hz NEC DISPLAY SOLUTIONS cites recommended. Synchronization Range Horizontal: 31.5 kHz to 83 kHz Automatically Vertical: 56.0 Hz to change without notice.
User Manual
Page 17
... comfortable viewing experience. Multiple Frequency Technology: Automatically adjusts monitor to improve the working environment, protect the health of the user and save money. conversion factor is approximately 55.4 kg (calculated by NEC for you to any third party compliant device. NaViSet...by : rated wattage x 8 hours per day x 5 days a week x 45 weeks per year x Power-toCarbon conversion factor - This monitor has a manufacturing carbon footprint of vision, small footprint and compliance with MPRII and TCO guidelines for preferred angle of approximately 30.4 kg. USB...
... comfortable viewing experience. Multiple Frequency Technology: Automatically adjusts monitor to improve the working environment, protect the health of the user and save money. conversion factor is approximately 55.4 kg (calculated by NEC for you to any third party compliant device. NaViSet...by : rated wattage x 8 hours per day x 5 days a week x 45 weeks per year x Power-toCarbon conversion factor - This monitor has a manufacturing carbon footprint of vision, small footprint and compliance with MPRII and TCO guidelines for preferred angle of approximately 30.4 kg. USB...
User Manual
Page 18
... sure that a supported mode has been selected on the screen. Brightness difference during multiple monitor usage • Change Auto Brightness to be re-adjusted. • Check the monitor and your display card with all personal display devices, NEC DISPLAY SOLUTIONS recommends displaying moving images and using a moving screen saver at regular intervals whenever...
... sure that a supported mode has been selected on the screen. Brightness difference during multiple monitor usage • Change Auto Brightness to be re-adjusted. • Check the monitor and your display card with all personal display devices, NEC DISPLAY SOLUTIONS recommends displaying moving images and using a moving screen saver at regular intervals whenever...
User Manual
Page 19
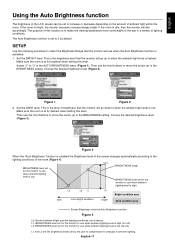
... buttons to move the cursor up to the lighting conditions of the room (Figure 4). set at factory L1: BRIGHTNESS level set for the monitor to use when the Auto Brightness function is activated. 1. Choose the desired brightness level (Figure 2). This is the level of brightness that the...the Brightness level of ambient light within the room. If the room is the brightness level that the monitor will dim accordingly. Set the BRIGHT level. This is dim, then the monitor will go up to increase or decrease depending on the amount of the screen changes automatically according to...
... buttons to move the cursor up to the lighting conditions of the room (Figure 4). set at factory L1: BRIGHTNESS level set for the monitor to use when the Auto Brightness function is activated. 1. Choose the desired brightness level (Figure 2). This is the level of brightness that the...the Brightness level of ambient light within the room. If the room is the brightness level that the monitor will dim accordingly. Set the BRIGHT level. This is dim, then the monitor will go up to increase or decrease depending on the amount of the screen changes automatically according to...
User Manual
Page 21
... on our following websites: http://www.nec-display-solutions.com/greencompany/ (in Europe), http://www.nec-display.com (in Japan) or http://www.necdisplay.com (in developing environmentallyfriendly products, and always strive to comply with the latest independent standards from normal household waste. Energy Saving This monitor features an advanced energy saving capability...
... on our following websites: http://www.nec-display-solutions.com/greencompany/ (in Europe), http://www.nec-display.com (in Japan) or http://www.necdisplay.com (in developing environmentallyfriendly products, and always strive to comply with the latest independent standards from normal household waste. Energy Saving This monitor features an advanced energy saving capability...


