
User Manual
Page 2
Index Warning, Caution ...English-1 Registration Information ...English-1 Recommended use ...English-3 Contents ...English-5 Quick Start ...English-6 Controls ...English-11 Specifications ...English-14 Features ...English-15 Troubleshooting ...English-16 Using the Auto Brightness function English-17 TCO Displays 5.0 ...English-18 Manufacturer's Recycling and Energy Information English-19
Index Warning, Caution ...English-1 Registration Information ...English-1 Recommended use ...English-3 Contents ...English-5 Quick Start ...English-6 Controls ...English-11 Specifications ...English-14 Features ...English-15 Troubleshooting ...English-16 Using the Auto Brightness function English-17 TCO Displays 5.0 ...English-18 Manufacturer's Recycling and Energy Information English-19
User Manual
Page 3
... USER SERVICEABLE PARTS INSIDE. If a power cord is in accordance with NEC Display Solutions, Ltd. 4-13-23, Shibaura, Minato-Ku Tokyo 108-0023, Japan English-1 Plug Type North America European Continental U.K. EN 61000-3-3 - This symbol warns user that matches the power supply voltage of this equipment, please contact your particular country. China Japan Voltage 120* 230 230 220 100* *When operating the MultiSync EA231WMi monitor...
... USER SERVICEABLE PARTS INSIDE. If a power cord is in accordance with NEC Display Solutions, Ltd. 4-13-23, Shibaura, Minato-Ku Tokyo 108-0023, Japan English-1 Plug Type North America European Continental U.K. EN 61000-3-3 - This symbol warns user that matches the power supply voltage of this equipment, please contact your particular country. China Japan Voltage 120* 230 230 220 100* *When operating the MultiSync EA231WMi monitor...
User Manual
Page 4
... other cables and adapters may cause interference with the instructions, may not cause harmful interference, and (2) this device must have been approved by and comply with radio and television reception. (1) The power supply cord you use the supplied shielded video signal cable, 15-pin mini D-SUB to D-SUB cable or DVI-D to radio communications. English-2 Canadian Department of Communications Compliance Statement DOC: This Class B digital...
... other cables and adapters may cause interference with the instructions, may not cause harmful interference, and (2) this device must have been approved by and comply with radio and television reception. (1) The power supply cord you use the supplied shielded video signal cable, 15-pin mini D-SUB to D-SUB cable or DVI-D to radio communications. English-2 Canadian Department of Communications Compliance Statement DOC: This Class B digital...
User Manual
Page 5
... install the monitor in high temperatured, humid, dusty, or oily areas. • Do not cover vent on monitor. • Do not touch LCD panel surface while transporting, mounting and setting. Do not put anything on top of monitor. • The power cable connector is the primary means of detaching the system from the wall outlet and refer servicing to qualified service personnel under the following operating instructions...
... install the monitor in high temperatured, humid, dusty, or oily areas. • Do not cover vent on monitor. • Do not touch LCD panel surface while transporting, mounting and setting. Do not put anything on top of monitor. • The power cable connector is the primary means of detaching the system from the wall outlet and refer servicing to qualified service personnel under the following operating instructions...
User Manual
Page 6
... typing. • Avoid displaying fixed patterns on the LCD surface. Cleaning the LCD Panel • When the liquid crystal panel is at a 90° angle to windows and other light sources to insufficient contrast. Do not touch rubber or vinyl to the screen. • Position whatever you are used on an object at least 20 feet away. CORRECT PLACEMENT AND ADJUSTMENT OF THE MONITOR CAN REDUCE EYE...
... typing. • Avoid displaying fixed patterns on the LCD surface. Cleaning the LCD Panel • When the liquid crystal panel is at a 90° angle to windows and other light sources to insufficient contrast. Do not touch rubber or vinyl to the screen. • Position whatever you are used on an object at least 20 feet away. CORRECT PLACEMENT AND ADJUSTMENT OF THE MONITOR CAN REDUCE EYE...
User Manual
Page 7
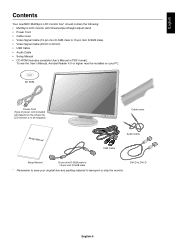
... be installed on your original box and packing material to save your PC. English Contents Your new NEC MultiSync LCD monitor box* should contain the following: • MultiSync LCD monitor with tilt/swivel/pivot/height adjust stand • Power Cord • Cable cover • Video Signal Cable (15-pin mini D-SUB male to 15-pin mini D-SUB male) • Video Signal Cable (DVI-D to DVI-D English-5 To see the User's Manual, Acrobat Reader 4.0 or higher must be shipped) Cable cover Setup Manual Audio Cable USB Cable Setup Manual 15...
... be installed on your original box and packing material to save your PC. English Contents Your new NEC MultiSync LCD monitor box* should contain the following: • MultiSync LCD monitor with tilt/swivel/pivot/height adjust stand • Power Cord • Cable cover • Video Signal Cable (15-pin mini D-SUB male to 15-pin mini D-SUB male) • Video Signal Cable (DVI-D to DVI-D English-5 To see the User's Manual, Acrobat Reader 4.0 or higher must be shipped) Cable cover Setup Manual Audio Cable USB Cable Setup Manual 15...

User Manual
Page 8
... C.1). Connect all screws. Tighten all screws. Tighten all cables to the Macintosh cable adapter (Figure B.1). For the PC with DVI digital output: Connect the DVI signal cable to the connector of the monitor and the A type connector to release the lock. When using the USB cable, connect the B type connector to the USB upstream port on the right back side of the display card in your system (Figure A.1). Quick Start To attach the MultiSync LCD monitor to your computer. 2. When removing...
... C.1). Connect all screws. Tighten all screws. Tighten all cables to the Macintosh cable adapter (Figure B.1). For the PC with DVI digital output: Connect the DVI signal cable to the connector of the monitor and the A type connector to release the lock. When using the USB cable, connect the B type connector to the USB upstream port on the right back side of the display card in your system (Figure A.1). Quick Start To attach the MultiSync LCD monitor to your computer. 2. When removing...

User Manual
Page 9
... 6. DVI Cable Power Cord DisplayPort Cable D-SUB Cable USB Cable Audio Cable Flat USB Cable Audio Cable D-SUB Cable DVI Cable DisplayPort Cable Power Cord Flat Figure C.2 Figure C.3 7. To remove the cable cover, lift the cover off as indicated in Figure D.2. Hold all cables are resting flat against the stand (Figure C.2/Figure C.3). Insert Top First Figure D.1 Figure D.2 English-7 Place the Power cord and DVI cables into the specific hooks, as shown in Figure C.2/Figure C.3. Please check Tilt, Rise and Lower monitor screen and screen rotation when you manage cables...
... 6. DVI Cable Power Cord DisplayPort Cable D-SUB Cable USB Cable Audio Cable Flat USB Cable Audio Cable D-SUB Cable DVI Cable DisplayPort Cable Power Cord Flat Figure C.2 Figure C.3 7. To remove the cable cover, lift the cover off as indicated in Figure D.2. Hold all cables are resting flat against the stand (Figure C.2/Figure C.3). Insert Top First Figure D.1 Figure D.2 English-7 Place the Power cord and DVI cables into the specific hooks, as shown in Figure C.2/Figure C.3. Please check Tilt, Rise and Lower monitor screen and screen rotation when you manage cables...
User Manual
Page 10
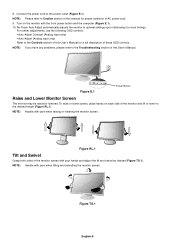
... power cord. 9. Power Button Figure E.1 Raise and Lower Monitor Screen The monitor may be raised or lowered. NOTE: Handle with your hands and adjust the tilt and swivel as desired (Figure TS.1). Connect the power cord to the Controls section of this manual for most timings. Turn on each side of the monitor screen with care when tilting and swivelling the monitor screen. For further adjustments, use the following OSD controls: • Auto Adjust Contrast (Analog input only) • Auto Adjust (Analog input...
... power cord. 9. Power Button Figure E.1 Raise and Lower Monitor Screen The monitor may be raised or lowered. NOTE: Handle with your hands and adjust the tilt and swivel as desired (Figure TS.1). Connect the power cord to the Controls section of this manual for most timings. Turn on each side of the monitor screen with care when tilting and swivelling the monitor screen. For further adjustments, use the following OSD controls: • Auto Adjust Contrast (Analog input only) • Auto Adjust (Analog input...

User Manual
Page 11
... each side of the monitor screen and turn clockwise from Landscape to Portrait or counterclockwise from Portrait to Landscape (Figure R.1). Remove the cable cover (Figure S.1). 2. Remove the stand (Figure S.3). 6. Figure R.1 Remove Monitor Stand for Mounting To prepare the monitor for mounting in an alternate manner. 7. Remove the 4 screws connecting the stand to grip the bottom. Figure S.2 Control buttons Figure S.3 English-9 Place hands on each side of the monitor and lift up to...
... each side of the monitor screen and turn clockwise from Landscape to Portrait or counterclockwise from Portrait to Landscape (Figure R.1). Remove the cable cover (Figure S.1). 2. Remove the stand (Figure S.3). 6. Figure R.1 Remove Monitor Stand for Mounting To prepare the monitor for mounting in an alternate manner. 7. Remove the 4 screws connecting the stand to grip the bottom. Figure S.2 Control buttons Figure S.3 English-9 Place hands on each side of the monitor and lift up to...
User Manual
Page 12
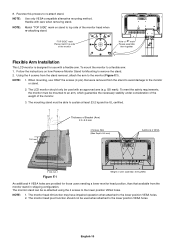
... Arm Installation This LCD monitor is designed for those users needing a lower monitor head position, than that were removed from the stand to avoid damage to a flexible arm: 1. NOTE: Use only VESA-compatible alternative mounting method. NOTE: 1. "TOP SIDE" mark Please match top side of the monitor Hole of LCD assembly: 5.8 kg MAX An additional 4 VESA holes are provided for use ONLY the screws (4 pcs) that available from the stand removal...
... Arm Installation This LCD monitor is designed for those users needing a lower monitor head position, than that were removed from the stand to avoid damage to a flexible arm: 1. NOTE: Use only VESA-compatible alternative mounting method. NOTE: 1. "TOP SIDE" mark Please match top side of the monitor Hole of LCD assembly: 5.8 kg MAX An additional 4 VESA holes are provided for use ONLY the screws (4 pcs) that available from the stand removal...

User Manual
Page 13
...bar for Dynamic. Open OSD main menu. If ECO MODE is set to ON. When this sensor. Direct adjust of ambient lighting allowing the monitor to make adjustments to cancel the RESET function by reducing the brightness level. Resets the highlighted control menu to 50%. OFF: Set brightness variable from 0% to 100%. 1: Set brightness variable range from 0% to the factory setting. Switches the ECO MODE. AUTO CONTRAST (Analog input only) Adjusts the image displayed to change signal input. English Controls OSD (On-Screen Display) control buttons on and off. NOTE...
...bar for Dynamic. Open OSD main menu. If ECO MODE is set to ON. When this sensor. Direct adjust of ambient lighting allowing the monitor to make adjustments to cancel the RESET function by reducing the brightness level. Resets the highlighted control menu to 50%. OFF: Set brightness variable from 0% to 100%. 1: Set brightness variable range from 0% to the factory setting. Switches the ECO MODE. AUTO CONTRAST (Analog input only) Adjusts the image displayed to change signal input. English Controls OSD (On-Screen Display) control buttons on and off. NOTE...
User Manual
Page 14
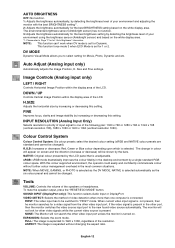
... x 1050 (vertical resolution 1050). Image Controls (Analog input only) LEFT / RIGHT Controls Horizontal Image Position within the display area of the LCD. INPUT RESOLUTION (Analog Input Only) Selects resolution's priority of input signal to select setting for a video signal from the other video signals while the current video source is not present, then he monitor searches for Movie, Photo, Dynamic and etc. R,G,B: Increases or decreases Red, Green or Blue colour depending upon which is connected. Tools VOLUME: Controls the volume of the LCD. Colour Control System...
... x 1050 (vertical resolution 1050). Image Controls (Analog input only) LEFT / RIGHT Controls Horizontal Image Position within the display area of the LCD. INPUT RESOLUTION (Analog Input Only) Selects resolution's priority of input signal to select setting for a video signal from the other video signals while the current video source is not present, then he monitor searches for Movie, Photo, Dynamic and etc. R,G,B: Increases or decreases Red, Green or Blue colour depending upon which is connected. Tools VOLUME: Controls the volume of the LCD. Colour Control System...
User Manual
Page 15
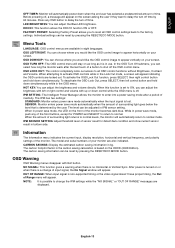
.... Menu Tools LANGUAGE: OSD control menus are displayed. HOT KEY: You can adjust the Blue LED brightness. When this function is based on the front of the monitor. While in kg. IPM SENSOR SETTING: Adjust threshold level of input signal, the No Signal window will appear. Information The Information menu indicates the current input, display resolution, horizontal and vertical frequency, and polarity settings of the monitor becomes dark blue. CARBON SAVINGS: Display the estimated carbon saving information in power save mode, the LED on...
.... Menu Tools LANGUAGE: OSD control menus are displayed. HOT KEY: You can adjust the Blue LED brightness. When this function is based on the front of the monitor. While in kg. IPM SENSOR SETTING: Adjust threshold level of input signal, the No Signal window will appear. Information The Information menu indicates the current input, display resolution, horizontal and vertical frequency, and polarity settings of the monitor becomes dark blue. CARBON SAVINGS: Display the estimated carbon saving information in power save mode, the LED on...
User Manual
Page 16
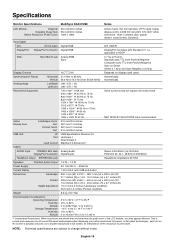
... not support all current flat panel technologies when displaying non-native resolutions full screen. NOTE: Technical specifications are lower than the pixel count of the resolution must be done. English-14 Specifications Monitor Specifications MultiSync EA231WMi Notes LCD Module Diagonal: 58.4 cm/23.0 inches Viewable Image Size: 58.4 cm/23.0 inches Native Resolution (Pixel Count): 1920 x 1080 Active matrix; thin film transistor (TFT) liquid crystal display (LCD); 0.265 mm dot pitch; 270 cd/m2 white luminance; 1000:1 contrast ratio...
... not support all current flat panel technologies when displaying non-native resolutions full screen. NOTE: Technical specifications are lower than the pixel count of the resolution must be done. English-14 Specifications Monitor Specifications MultiSync EA231WMi Notes LCD Module Diagonal: 58.4 cm/23.0 inches Viewable Image Size: 58.4 cm/23.0 inches Native Resolution (Pixel Count): 1920 x 1080 Active matrix; thin film transistor (TFT) liquid crystal display (LCD); 0.265 mm dot pitch; 270 cd/m2 white luminance; 1000:1 contrast ratio...
User Manual
Page 17
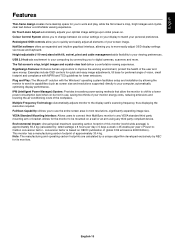
... the user and save money. This monitor has a manufacturing carbon footprint of global CO2 emissions 2008 Edition). No Touch Auto Adjust automatically adjusts your optimal image settings upon initial power-on your monitor energy costs, reducing emissions and lowering the air conditioning costs of your display to work and play, while the flat screen's crisp, bright images and crystalclear text deliver a comfortable viewing experience. Examples include OSD controls for quick and easy image adjustments, tilt base...
... the user and save money. This monitor has a manufacturing carbon footprint of global CO2 emissions 2008 Edition). No Touch Auto Adjust automatically adjusts your optimal image settings upon initial power-on your monitor energy costs, reducing emissions and lowering the air conditioning costs of your display to work and play, while the flat screen's crisp, bright images and crystalclear text deliver a comfortable viewing experience. Examples include OSD controls for quick and easy image adjustments, tilt base...
User Manual
Page 18
... AUTO BRIGHTNESS are missing) and OSD warning "OUT OF RANGE" is displayed: Either signal clock or resolution is not sized properly • Use the OSD Image Adjust controls to increase or decrease the H. No Sound • Make sure the speaker cable is turned OFF/ON or disconnect/connect from the AC outlet to turn off and reset the monitor. When condition is dark green or dark blue, check the status of time should be turned off . Troubleshooting...
... AUTO BRIGHTNESS are missing) and OSD warning "OUT OF RANGE" is displayed: Either signal clock or resolution is not sized properly • Use the OSD Image Adjust controls to increase or decrease the H. No Sound • Make sure the speaker cable is turned OFF/ON or disconnect/connect from the AC outlet to turn off and reset the monitor. When condition is dark green or dark blue, check the status of time should be turned off . Troubleshooting...
User Manual
Page 19
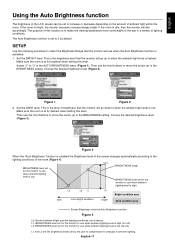
... is to make the viewing experience more comfortable to the eye in the AUTO BRIGHTNESS menu (Figure 1). If the room is low. Set the DARK level. The purpose of this level. English Using the Auto Brightness function The brightness of the LCD screen can be set for the monitor to use when ambient lighting level is enabled the Brightness level of the screen changes automatically according to the lighting conditions of...
... is to make the viewing experience more comfortable to the eye in the AUTO BRIGHTNESS menu (Figure 1). If the room is low. Set the DARK level. The purpose of this level. English Using the Auto Brightness function The brightness of the LCD screen can be set for the monitor to use when ambient lighting level is enabled the Brightness level of the screen changes automatically according to the lighting conditions of...

User Manual
Page 20
... for a high performance product, designed with the user in focus that your display is tested to some of all displays worldwide are luminance, contrast, resolution, black level, gamma curve, color and luminance uniformity, color rendition and image stability. • Product have been developed by users and ITmanufacturers all over the world. The display you and the planet! The requirements included in...
... for a high performance product, designed with the user in focus that your display is tested to some of all displays worldwide are luminance, contrast, resolution, black level, gamma curve, color and luminance uniformity, color rendition and image stability. • Product have been developed by users and ITmanufacturers all over the world. The display you and the planet! The requirements included in...
User Manual
Page 21
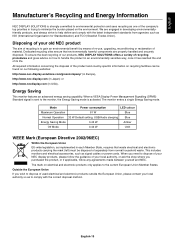
... re-use, upgrading, reconditioning or reclamation of your local authority so as to comply with the latest independent standards from normal household waste. Disposing of material. English Manufacturer's Recycling and Energy Information NEC DISPLAY SOLUTIONS is strongly committed to environmental protection and sees recycling as signal cables or power cords. Mode Power consumption LED colour Maximum Operation 61 W Blue Normal Operation 33 W Default setting, USB/Audio sleeping Blue Energy Saving Mode...
... re-use, upgrading, reconditioning or reclamation of your local authority so as to comply with the latest independent standards from normal household waste. Disposing of material. English Manufacturer's Recycling and Energy Information NEC DISPLAY SOLUTIONS is strongly committed to environmental protection and sees recycling as signal cables or power cords. Mode Power consumption LED colour Maximum Operation 61 W Blue Normal Operation 33 W Default setting, USB/Audio sleeping Blue Energy Saving Mode...


