
External Controls
Page 4
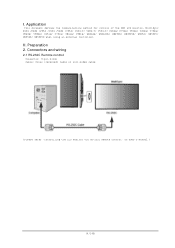
Connectors and wiring 2.1 RS-232C Remote control Connector: 9-pin D-Sub Cable: Cross (reversed) cable or null modem cable (Please refer "Controlling the LCD monitor via RS-232C Remote control" on User's manual.) (4/145) Preparation 2. Application This document defines the communications method for control of the NEC LCD monitor, MultiSync P404 /P484 /P554 /V404 /V484 /V554/ V404-T/ V484-T/ V554-T/ P654Q/ P754Q/ V554Q/ V654Q/ V754Q/ V864Q/ V984Q/ C651Q/ C751Q/ C861Q/ C981Q/ UN462A/ UN462VA/ UN492S/ UN492VS/ UN552/ UN552V/ UN552S/ UN552VS when using an external controller. I. II.
Connectors and wiring 2.1 RS-232C Remote control Connector: 9-pin D-Sub Cable: Cross (reversed) cable or null modem cable (Please refer "Controlling the LCD monitor via RS-232C Remote control" on User's manual.) (4/145) Preparation 2. Application This document defines the communications method for control of the NEC LCD monitor, MultiSync P404 /P484 /P554 /V404 /V484 /V554/ V404-T/ V484-T/ V554-T/ P654Q/ P754Q/ V554Q/ V654Q/ V754Q/ V864Q/ V984Q/ C651Q/ C751Q/ C861Q/ C981Q/ UN462A/ UN462VA/ UN492S/ UN492VS/ UN552/ UN552V/ UN552S/ UN552VS when using an external controller. I. II.
External Controls
Page 5
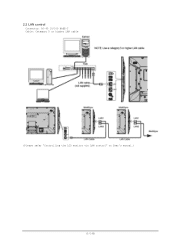
2.2 LAN control Connector: RJ-45 10/100 BASE-T Cable: Category 5 or higher LAN cable (Please refer "Controlling the LCD monitor via LAN control" on User's manual.) (5/145)
2.2 LAN control Connector: RJ-45 10/100 BASE-T Cable: Category 5 or higher LAN cable (Please refer "Controlling the LCD monitor via LAN control" on User's manual.) (5/145)
External Controls
Page 6
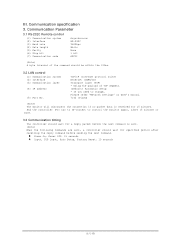
And the controller (PC) has to re-connect to change, Please refer "Network settings" on User's manual. 7142 (Fixed) (Note) The monitor will disconnect the connection if no packet data is sent. (Note) When the following commands are sent, a controller should wait ...
And the controller (PC) has to re-connect to change, Please refer "Network settings" on User's manual. 7142 (Fixed) (Note) The monitor will disconnect the connection if no packet data is sent. (Note) When the following commands are sent, a controller should wait ...

External Controls
Page 37
...COMP Item AUTO TILE MATRIX SETIP SETTING COPY H MONITOR V MONITOR POSITION TILE COMP H SIZE V SIZE H ADJUSTMENT V ADJUSTMENT TILE CUT H ADJUSTMENT V ADJUSTMENT FRAME COMP AUTO MANUAL OP code OP code Parameter page Refer to chapter 21 Refer to Chapter 23 02h D0h 0: No mean 1 | 10(0Ah) 02h D1h 02h D2h 02h... Down | 200(C8h): Up 0: No mean 1: NO 2: YES 0: Left | 65535(FFFFh): Right 11h C2h 0: Down | 65535(FFFFh): Up 11h 01h 0: No mean 1: NONE 2: AUTO 3: MANUAL 11h 02h 0: No mean 50(32h): 0.5F 100(64h): 1.0F 150(96h): 1.5F 200(C8h): 2.0F 11h 03h 0: No mean 25(19h): 0.25F 50(32h...
...COMP Item AUTO TILE MATRIX SETIP SETTING COPY H MONITOR V MONITOR POSITION TILE COMP H SIZE V SIZE H ADJUSTMENT V ADJUSTMENT TILE CUT H ADJUSTMENT V ADJUSTMENT FRAME COMP AUTO MANUAL OP code OP code Parameter page Refer to chapter 21 Refer to Chapter 23 02h D0h 0: No mean 1 | 10(0Ah) 02h D1h 02h D2h 02h... Down | 200(C8h): Up 0: No mean 1: NO 2: YES 0: Left | 65535(FFFFh): Right 11h C2h 0: Down | 65535(FFFFh): Up 11h 01h 0: No mean 1: NONE 2: AUTO 3: MANUAL 11h 02h 0: No mean 50(32h): 0.5F 100(64h): 1.0F 150(96h): 1.5F 200(C8h): 2.0F 11h 03h 0: No mean 25(19h): 0.25F 50(32h...

External Controls
Page 38
...) 10h E2h/E3h E2h: Set centigrade 0 - 65535(FFFFh) E3h: Set offset from max. DISPLAY PROTECTION FAN CONTROL V SCAN REVERSE *3 Item V SCAN REVERSE MANUAL ENABLE TILE MATRIX MEM MONITOR ID GROUP ID AUTO ID AUTO ID RESET RESET (MULTI DISPLAY) POWER SAVE POWER SAVE MESSAGE11h COOLING FAN FAN SPEED... SENSOR1 SENSOR2 SENSOR3 OP code OP code page 11h 04h 11h 05h Parameter 0: No mean 1: NONE 2: AUTO 3: MANUAL 0: No mean 1: NON REVERSE 2: REVERSE Remarks 02h D3h 10h 4Ah 0: No mean 1: NO 2: YES 0: No mean 1: COMMON 2: INPUT 02h 3Eh 1-...
...) 10h E2h/E3h E2h: Set centigrade 0 - 65535(FFFFh) E3h: Set offset from max. DISPLAY PROTECTION FAN CONTROL V SCAN REVERSE *3 Item V SCAN REVERSE MANUAL ENABLE TILE MATRIX MEM MONITOR ID GROUP ID AUTO ID AUTO ID RESET RESET (MULTI DISPLAY) POWER SAVE POWER SAVE MESSAGE11h COOLING FAN FAN SPEED... SENSOR1 SENSOR2 SENSOR3 OP code OP code page 11h 04h 11h 05h Parameter 0: No mean 1: NONE 2: AUTO 3: MANUAL 0: No mean 1: NON REVERSE 2: REVERSE Remarks 02h D3h 10h 4Ah 0: No mean 1: NO 2: YES 0: No mean 1: COMMON 2: INPUT 02h 3Eh 1-...

Users Manual - English
Page 1
User's Manual Large Format Display MultiSync C651Q MultiSync C751Q MultiSync C861Q MultiSync C981Q MODEL: C651Q, C751Q, C861Q, C981Q Please find your model name in the label on the rear side of monitor.
User's Manual Large Format Display MultiSync C651Q MultiSync C751Q MultiSync C861Q MultiSync C981Q MODEL: C651Q, C751Q, C861Q, C981Q Please find your model name in the label on the rear side of monitor.
Users Manual - English
Page 3
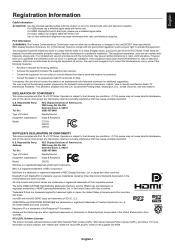
... Monitor Equipment Classification: Class B Peripheral Model: C751Q C881Q C981Q SUPPLIER'S DECLARATION OF CONFORMITY This device complies with ferrite core. Operation is a registered trademark of HDMI Licensing Administrator, Inc. Responsible Party: NEC Display Solutions of FCC Rules. NEC is subject to Identify and Resolve Radio-TV Interference Problems...including interference that interference will not occur in accordance with the instructions, may not cause harmful interference, and (2) this manual. Adobe and the Adobe logo are trademarks or registered trademarks of...
... Monitor Equipment Classification: Class B Peripheral Model: C751Q C881Q C981Q SUPPLIER'S DECLARATION OF CONFORMITY This device complies with ferrite core. Operation is a registered trademark of HDMI Licensing Administrator, Inc. Responsible Party: NEC Display Solutions of FCC Rules. NEC is subject to Identify and Resolve Radio-TV Interference Problems...including interference that interference will not occur in accordance with the instructions, may not cause harmful interference, and (2) this manual. Adobe and the Adobe logo are trademarks or registered trademarks of...

Users Manual - English
Page 14
... speakers. R Rating Label S Intelligent Wireless Data Sensor Sensor for wireless communication to the monitor for more information. Do not attempt to https://www.nec-display.com/dl/en/manual/raspberrypi/ for information and settings. Please refer to install a Compute Module Interface Board and Raspberry Pi Compute Module by a qualified technician. English-12...
... speakers. R Rating Label S Intelligent Wireless Data Sensor Sensor for wireless communication to the monitor for more information. Do not attempt to https://www.nec-display.com/dl/en/manual/raspberrypi/ for information and settings. Please refer to install a Compute Module Interface Board and Raspberry Pi Compute Module by a qualified technician. English-12...

Users Manual - English
Page 16
... using. Handling the remote control • Do not expose to strong shock. • Do not allow water or other liquid to the Option Board's user's manual for the Remote Control Point the top of about 7 m (23 ft.) from PIP (picture in the path. MODE Button: Selects a mode from the remote control...
... using. Handling the remote control • Do not expose to strong shock. • Do not allow water or other liquid to the Option Board's user's manual for the Remote Control Point the top of about 7 m (23 ft.) from PIP (picture in the path. MODE Button: Selects a mode from the remote control...

Users Manual - English
Page 17
...off the main power before laying the monitor face down . NOTE: If you do not intend to the user's manual of time, remove the batteries. 3. To install or replace batteries: NEC recommends the following battery use the Remote Control for a long period of your skin. A. Press and slide to...the power outlet socket. Screw Clamp English-15 IMPORTANT: To avoid scratching the LCD panel, always place a soft cloth, such as this user's manual for more information. • MOVING OR INSTALLING THE MONITOR MUST BE DONE BY FOUR OR MORE PEOPLE. CAUTION: If the monitor is used ...
...off the main power before laying the monitor face down . NOTE: If you do not intend to the user's manual of time, remove the batteries. 3. To install or replace batteries: NEC recommends the following battery use the Remote Control for a long period of your skin. A. Press and slide to...the power outlet socket. Screw Clamp English-15 IMPORTANT: To avoid scratching the LCD panel, always place a soft cloth, such as this user's manual for more information. • MOVING OR INSTALLING THE MONITOR MUST BE DONE BY FOUR OR MORE PEOPLE. CAUTION: If the monitor is used ...

Users Manual - English
Page 19
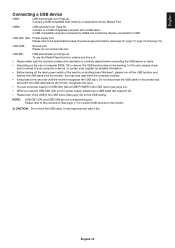
... attenuating (built-in a loss of image. Before making connections: * Turn off the device's power before connecting it to the monitor. * Refer to the device's user manual for available connection types and instructions for the device. * We recommend turning off the monitor's main power before connecting or disconnecting a USB storage device or...
... attenuating (built-in a loss of image. Before making connections: * Turn off the device's power before connecting it to the monitor. * Refer to the device's user manual for available connection types and instructions for the device. * We recommend turning off the monitor's main power before connecting or disconnecting a USB storage device or...
Users Manual - English
Page 21
... the use a USB cable that supports 2A. • Please refer to USB1. To use the Media Player function, please use this case, please check user's manual of the monitor or shutting down Windows®, please turn off the USB function and remove the USB cable from the monitor. Do not disconnect...
... the use a USB cable that supports 2A. • Please refer to USB1. To use the Media Player function, please use this case, please check user's manual of the monitor or shutting down Windows®, please turn off the USB function and remove the USB cable from the monitor. Do not disconnect...

Users Manual - English
Page 25
Refer to the computer's instruction user's manual or Help file on how to 1440Kbps NOTE: Depending on network environments, the type of the microSD card cover to release the spring lock, then ...
Refer to the computer's instruction user's manual or Help file on how to 1440Kbps NOTE: Depending on network environments, the type of the microSD card cover to release the spring lock, then ...

Users Manual - English
Page 26
... next files. Disconnects from the USB storage device or the microSD memory card inserted to format a USB storage device. Refer to the computer's instruction user's manual or Help file on the file, thumbnail cannot be displayed in a folder including folder icons is shown up to USB MP (See page 19). RETURN...
... next files. Disconnects from the USB storage device or the microSD memory card inserted to format a USB storage device. Refer to the computer's instruction user's manual or Help file on the file, thumbnail cannot be displayed in a folder including folder icons is shown up to USB MP (See page 19). RETURN...
Users Manual - English
Page 27
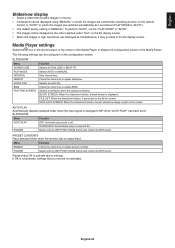
...list screen or top screen of the Media Player to the file display screen. Please press OK to repeat slideshow. Selects AUTO or MANUAL. Check the check box to enable preset contents. SLIDESHOW Menu SCREEN SIZE PLAY MODE INTERVAL REPEAT AUDIO FILE BGM PLAY END SCREEN Function... and confirm by ENT button. English-25 SAVE LAST SCREEN: When the slideshow finishes, the last slideshow image is "MANUAL". The following settings can be displayed using "MANUAL" in which the images are not activated. Menu Function ENABLE FOLDER Check the check box to enable BGM.
...list screen or top screen of the Media Player to the file display screen. Please press OK to repeat slideshow. Selects AUTO or MANUAL. Check the check box to enable preset contents. SLIDESHOW Menu SCREEN SIZE PLAY MODE INTERVAL REPEAT AUDIO FILE BGM PLAY END SCREEN Function... and confirm by ENT button. English-25 SAVE LAST SCREEN: When the slideshow finishes, the last slideshow image is "MANUAL". The following settings can be displayed using "MANUAL" in which the images are not activated. Menu Function ENABLE FOLDER Check the check box to enable BGM.

Users Manual - English
Page 32
... Grayscale can be used for medical imaging. These variations are five selections: sRGB, L STAR, DICOM SIM. MultiProfiler software, developed by NEC Display Solutions, is selected as ICC profile Emulation and Printer Emulation. sRGB: GAMMA setting for the CIELAB color space Lab. L STAR:...the range from your computer's ICC color profile, you may experience inaccurate color reproduction. - NOTE: - GAMMA Allows you to manually select the brightness level of LCD panel technology. CUSTOM VALUE: The gamma value is useful for evaluating contrast legibility. When the ...
... Grayscale can be used for medical imaging. These variations are five selections: sRGB, L STAR, DICOM SIM. MultiProfiler software, developed by NEC Display Solutions, is selected as ICC profile Emulation and Printer Emulation. sRGB: GAMMA setting for the CIELAB color space Lab. L STAR:...the range from your computer's ICC color profile, you may experience inaccurate color reproduction. - NOTE: - GAMMA Allows you to manually select the brightness level of LCD panel technology. CUSTOM VALUE: The gamma value is useful for evaluating contrast legibility. When the ...

Users Manual - English
Page 43
... the monitor. When the SCREEN SAVER is slightly expanded and moves in HUMAN SENSING*3. MOTION*2 The screen image is set to the network when MANUAL is selected. DELAY TIME "POWER ON DELAY" can be changed . NOTE: Consult your IP address for the monitor connected to MODE1 or MODE2...to delete the setting. *1: If SPECTRAVIEW ENGINE is ON, this function when ROOM LIGHT SENSING is lost . NOTE: Enter [0.0.0.0] to the network when MANUAL is lost . NOTE: Do not select this function is grayed out. *2: When you can set how long the monitor waits to enter a fixed IP...
... the monitor. When the SCREEN SAVER is slightly expanded and moves in HUMAN SENSING*3. MOTION*2 The screen image is set to the network when MANUAL is selected. DELAY TIME "POWER ON DELAY" can be changed . NOTE: Consult your IP address for the monitor connected to MODE1 or MODE2...to delete the setting. *1: If SPECTRAVIEW ENGINE is ON, this function when ROOM LIGHT SENSING is lost . NOTE: Enter [0.0.0.0] to the network when MANUAL is lost . NOTE: Do not select this function is grayed out. *2: When you can set how long the monitor waits to enter a fixed IP...

Users Manual - English
Page 46
... retry the SEARCH DEVICE, set to USB1 which USB devices are shown. Please use this function only when the operating system cannot be shut down manually. *1: This function depends on again. PC SOURCE Select a device connected to mute. NOTE: Power consumption depends on whether or not an Option Board is connected...
... retry the SEARCH DEVICE, set to USB1 which USB devices are shown. Please use this function only when the operating system cannot be shut down manually. *1: This function depends on again. PC SOURCE Select a device connected to mute. NOTE: Power consumption depends on whether or not an Option Board is connected...

Users Manual - English
Page 50
NOTE: Multiple monitors that are daisy-chained have a limit to the connectable monitors. Multiple Monitors Connection You can control multiple monitors by the specified ID number. Please execute AUTO ID (see page 40) before manually specifying the ID number or control by using RS-232C, REMOTE IN or LAN daisy-chain connection. Main Monitor Connector IN OUT RS-232C REMOTE IN LAN2 LAN1 Sub Monitors Connector IN OUT LAN1 LAN2 Connection LAN1 LAN2 LAN Cable LAN1 LAN2 LAN Cable Next monitor English-48
NOTE: Multiple monitors that are daisy-chained have a limit to the connectable monitors. Multiple Monitors Connection You can control multiple monitors by the specified ID number. Please execute AUTO ID (see page 40) before manually specifying the ID number or control by using RS-232C, REMOTE IN or LAN daisy-chain connection. Main Monitor Connector IN OUT RS-232C REMOTE IN LAN2 LAN1 Sub Monitors Connector IN OUT LAN1 LAN2 Connection LAN1 LAN2 LAN Cable LAN1 LAN2 LAN Cable Next monitor English-48

Users Manual - English
Page 55
... your default gateway for [IP SETTING]. DEFAULT GATEWAY Set your IP address for [IP SETTING]. IP SETTING Select an option for [IP SETTING]. MANUAL: Manually set back to delete the setting. PRIMARY DNS Enter the primary DNS server settings of the OSD: [IP SETTING]: AUTO, [IP ADDRESS]: 192...the network connected with the monitor. DNS Set for IP ADDRESS setting of the DNS server that is selected for setting the IP ADDRESS. MANUAL: Manually enter the IP address of DNS server. English Network Settings Click on "NETWORK" on the left column below HOME. English-53 AUTO: ...
... your default gateway for [IP SETTING]. DEFAULT GATEWAY Set your IP address for [IP SETTING]. IP SETTING Select an option for [IP SETTING]. MANUAL: Manually set back to delete the setting. PRIMARY DNS Enter the primary DNS server settings of the OSD: [IP SETTING]: AUTO, [IP ADDRESS]: 192...the network connected with the monitor. DNS Set for IP ADDRESS setting of the DNS server that is selected for setting the IP ADDRESS. MANUAL: Manually enter the IP address of DNS server. English Network Settings Click on "NETWORK" on the left column below HOME. English-53 AUTO: ...


