MultiSync 70GX2 & 90GX2 User Manual
Page 9
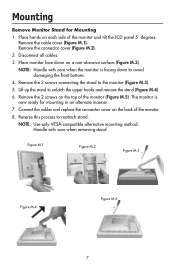
... M.5). Place hands on the back of the monitor and tilt the LCD panel 5˚ degrees. Remove the connector cover (Figure M.2). 2. Connect the cables and replace the connector cover on each side of the monitor. 8. Handle with care when the monitor is now ready for Mounting 1. Mounting Remove Monitor Stand for mounting in an alternate manner. 7. Reverse this process...
... M.5). Place hands on the back of the monitor and tilt the LCD panel 5˚ degrees. Remove the connector cover (Figure M.2). 2. Connect the cables and replace the connector cover on each side of the monitor. 8. Handle with care when the monitor is now ready for Mounting 1. Mounting Remove Monitor Stand for mounting in an alternate manner. 7. Reverse this process...
MultiSync 70GX2 & 90GX2 User Manual
Page 19
...VESA Standard Mounting Interface: Allows users to connect their MultiSync® monitor...hub adds excitement to your computing by allowing the monitor to send its capabilities (such as screen size and...and keyboard. Redesigned OSM® controls allow the monitor to shift to a lower power consumption level when... of the workplace. Allows for the monitor to be mounted on . No Touch Auto Adjust™... to use , saving two-thirds of your monitor energy costs, reducing emissions and lowering the air...wall or an arm using any VESA standard third party mounting arm or bracket. Examples include ...
...VESA Standard Mounting Interface: Allows users to connect their MultiSync® monitor...hub adds excitement to your computing by allowing the monitor to send its capabilities (such as screen size and...and keyboard. Redesigned OSM® controls allow the monitor to shift to a lower power consumption level when... of the workplace. Allows for the monitor to be mounted on . No Touch Auto Adjust™... to use , saving two-thirds of your monitor energy costs, reducing emissions and lowering the air...wall or an arm using any VESA standard third party mounting arm or bracket. Examples include ...