
42PX10 50XP10 60XP10 user's manual
Page 3
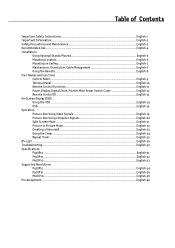
...Maintenance, Orientation, Cable Management English-7 Using the Remote ...English-8 Part Names and Functions Control Panel ...English-9 Terminal Panel ...English-10 Remote Control Functions...English-11 Power, Display, Digital Zoom, Pointer, Main Power... Switch Cover English-12 Remote Control ID...English-13 On-Screen Display(OSD) Using the OSD ...English-14 OSD ...English-15 Operation Picture Size Using Video Signals English-19 Picture Size Using Computer Signals English-20 Split Screen...
...Maintenance, Orientation, Cable Management English-7 Using the Remote ...English-8 Part Names and Functions Control Panel ...English-9 Terminal Panel ...English-10 Remote Control Functions...English-11 Power, Display, Digital Zoom, Pointer, Main Power... Switch Cover English-12 Remote Control ID...English-13 On-Screen Display(OSD) Using the OSD ...English-14 OSD ...English-15 Operation Picture Size Using Video Signals English-19 Picture Size Using Computer Signals English-20 Split Screen...
42PX10 50XP10 60XP10 user's manual
Page 8
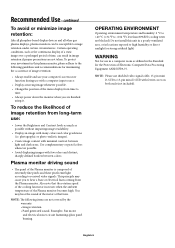
...if proper precautions are not taken. To protect your computer's screen saver function during use shielded video signal cable, 15-pin mini D-SUB to received video signals. Plasma monitor driving sound • The panel of the Plasma monitor is composed of the menu display from time to the... To reduce the likelihood of image retention from the Plasma monitor. Also note that time. Examples: Fan motor and electrical noises circuit humming /glass panel buzzing. less than 80%RH (cooling vents not blocked) Do not install this plasma monitor, please adhere to time. • Always ...
...if proper precautions are not taken. To protect your computer's screen saver function during use shielded video signal cable, 15-pin mini D-SUB to received video signals. Plasma monitor driving sound • The panel of the Plasma monitor is composed of the menu display from time to the... To reduce the likelihood of image retention from the Plasma monitor. Also note that time. Examples: Fan motor and electrical noises circuit humming /glass panel buzzing. less than 80%RH (cooling vents not blocked) Do not install this plasma monitor, please adhere to time. • Always ...

42PX10 50XP10 60XP10 user's manual
Page 9
..., such as in a wall, leave at least 2 inches (50mm) of space between the monitor and the wall for installation. • Take necessary steps to the screen. CAUTION: • To install, follow correct mounting procedures could result in ) underneath the unit on a surface that heat can be installed while the unit is...
..., such as in a wall, leave at least 2 inches (50mm) of space between the monitor and the wall for installation. • Take necessary steps to the screen. CAUTION: • To install, follow correct mounting procedures could result in ) underneath the unit on a surface that heat can be installed while the unit is...
42PX10 50XP10 60XP10 user's manual
Page 11
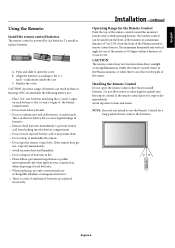
...8 0 DISPLAY 3 6 9 MENU AUTO SET UP SET + EXIT VOL ZOOM POINTER + + MUTE SPLIT SCREEN PIP S BY S SINGLE SWAP SELECT/FREEZE CAPTURE REMOTE ID SET RESET SLEEP REMOTE CONTROLLER RU-M113 English-8 ... a distance of the remote control toward the monitor's remote sensor while pressing buttons. NEC recommends the following battery use the Remote Control for a long period of explosion if batteries...function when direct sunlight or strong illumination strikes the remote control sensor of the Plasma monitor, or when there is a risk of time, remove the batteries. English...
...8 0 DISPLAY 3 6 9 MENU AUTO SET UP SET + EXIT VOL ZOOM POINTER + + MUTE SPLIT SCREEN PIP S BY S SINGLE SWAP SELECT/FREEZE CAPTURE REMOTE ID SET RESET SLEEP REMOTE CONTROLLER RU-M113 English-8 ... a distance of the remote control toward the monitor's remote sensor while pressing buttons. NEC recommends the following battery use the Remote Control for a long period of explosion if batteries...function when direct sunlight or strong illumination strikes the remote control sensor of the Plasma monitor, or when there is a risk of time, remove the batteries. English...
42PX10 50XP10 60XP10 user's manual
Page 14
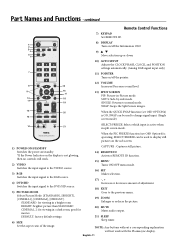
...16) SET Makes selection. 17) - , + Increases or decreases amount of the image. NOTE: Any buttons without a corresponding explanation will work with the Plasmasync display. English-11 Part Names and Functions - continued Remote Control Functions 7) KEYPAD Set REMOTE ID. 1 2 3 4 5 6 POWER ON STANDBY PICTURE ...8 9 10 11 12 13 14 1 2 3 4 5 6 7 8 9 0 DISPLAY MENU AUTO SET UP SET + EXIT VOL ZOOM POINTER + + MUTE SPLIT SCREEN PIP S BY S SINGLE SWAP SELECT/FREEZE CAPTURE REMOTE ID SET RESET SLEEP 15 16 17 18 19 20 21 8) DISPLAY Turn on/off the pointer...
...16) SET Makes selection. 17) - , + Increases or decreases amount of the image. NOTE: Any buttons without a corresponding explanation will work with the Plasmasync display. English-11 Part Names and Functions - continued Remote Control Functions 7) KEYPAD Set REMOTE ID. 1 2 3 4 5 6 POWER ON STANDBY PICTURE ...8 9 10 11 12 13 14 1 2 3 4 5 6 7 8 9 0 DISPLAY MENU AUTO SET UP SET + EXIT VOL ZOOM POINTER + + MUTE SPLIT SCREEN PIP S BY S SINGLE SWAP SELECT/FREEZE CAPTURE REMOTE ID SET RESET SLEEP 15 16 17 18 19 20 21 8) DISPLAY Turn on/off the pointer...
42PX10 50XP10 60XP10 user's manual
Page 15
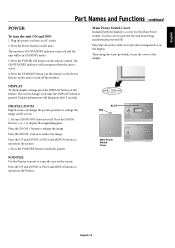
... continued POWER To turn green when the unit is off . Press the STANDBY button (on the remote) or the Power button (on the screen. 1. Then using the screw provided, secure the cover to reposition the picture. 2. DISPLAY To check display settings press the DISPLAY button on the...Main Power Switch Cover Included with the display is pressed. Press the ZOOM - The ON/STANDBY indicator will turn the unit ON and OFF: 1. The screen changes each time the DISPLAY button is a cover for the Main Power Switch. Be sure ZOOM NAV function is active. 4. Press the POWER ON ...
... continued POWER To turn green when the unit is off . Press the STANDBY button (on the remote) or the Power button (on the screen. 1. Then using the screw provided, secure the cover to reposition the picture. 2. DISPLAY To check display settings press the DISPLAY button on the...Main Power Switch Cover Included with the display is pressed. Press the ZOOM - The ON/STANDBY indicator will turn the unit ON and OFF: 1. The screen changes each time the DISPLAY button is a cover for the Main Power Switch. Be sure ZOOM NAV function is active. 4. Press the POWER ON ...
42PX10 50XP10 60XP10 user's manual
Page 16
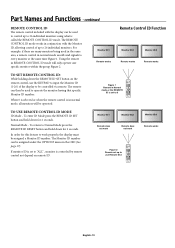
...VIDEO MEMORY PICTURE MODE SIZE 1 2 3 4 5 6 7 8 9 0 DISPLAY MENU AUTO SET UP SET + EXIT VOL ZOOM POINTER + + MUTE SPLIT SCREEN PIP S BY S SINGLE SWAP SELECT/FREEZE CAPTURE REMOTE ID SET RESET SLEEP REMOTE CONTROLLER RU-M113 TO USE REMOTE CONTROL ID MODE ID Mode - Monitor... MEMORY PICTURE MODE SIZE 1 2 3 4 5 6 7 8 9 0 DISPLAY MENU AUTO SET UP SET + EXIT VOL ZOOM POINTER + + MUTE SPLIT SCREEN PIP S BY S SINGLE SWAP SELECT/FREEZE CAPTURE REMOTE ID SET RESET SLEEP REMOTE CONTROLLER RU-M113 English-13 For example: if there are many monitors...
...VIDEO MEMORY PICTURE MODE SIZE 1 2 3 4 5 6 7 8 9 0 DISPLAY MENU AUTO SET UP SET + EXIT VOL ZOOM POINTER + + MUTE SPLIT SCREEN PIP S BY S SINGLE SWAP SELECT/FREEZE CAPTURE REMOTE ID SET RESET SLEEP REMOTE CONTROLLER RU-M113 TO USE REMOTE CONTROL ID MODE ID Mode - Monitor... MEMORY PICTURE MODE SIZE 1 2 3 4 5 6 7 8 9 0 DISPLAY MENU AUTO SET UP SET + EXIT VOL ZOOM POINTER + + MUTE SPLIT SCREEN PIP S BY S SINGLE SWAP SELECT/FREEZE CAPTURE REMOTE ID SET RESET SLEEP REMOTE CONTROLLER RU-M113 English-13 For example: if there are many monitors...
42PX10 50XP10 60XP10 user's manual
Page 17
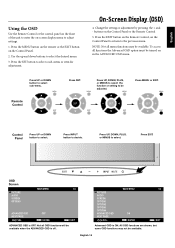
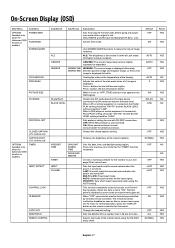
...-14 Press the MENU button on the remote or the EXIT button on the Control Panel to return to the previous menu. To access all functions the Advanced OSD option must be turned on -screen display menu to adjust settings. 1. Press INPUT button to select. Not all menu ... will be adjusted. EXIT INPUT MUTE OSD Screen MAIN MENU 1/2 PICTURE AUDIO SCREEN OPTION1 ADVANCED OSD OFF NEXT PAGE SEL. buttons on the Control Panel or the Remote Control. 5. Press EXIT. ENTER EXIT ADVANCED OSD is ON. On-Screen Display (OSD) 4. Control Panel Press UP or DOWN button to decide. ...
...-14 Press the MENU button on the remote or the EXIT button on the Control Panel to return to the previous menu. To access all functions the Advanced OSD option must be turned on -screen display menu to adjust settings. 1. Press INPUT button to select. Not all menu ... will be adjusted. EXIT INPUT MUTE OSD Screen MAIN MENU 1/2 PICTURE AUDIO SCREEN OPTION1 ADVANCED OSD OFF NEXT PAGE SEL. buttons on the Control Panel or the Remote Control. 5. Press EXIT. ENTER EXIT ADVANCED OSD is ON. On-Screen Display (OSD) 4. Control Panel Press UP or DOWN button to decide. ...

42PX10 50XP10 60XP10 user's manual
Page 18
... button to adjust. Adjusts the balance of the white balance. Press + or - Press + or - to reset. Adjusts the levels of the entire screen. to adjust. Selects picture mode, [BRIGHT], [STANDARD], [CINEMA1], [CINEMA2], [DEFAULT]. Adjusts the color temperature of the Red, Green, Blue, Yellow...settings. COLOR CONTROL Available only when the Advanced OSD function is enabled. Press + or - A low color temperature will make the screen reddish. Adjusts the amount of the image. Resets the factory default settings. WHITE BALANCE Available only when the Advanced OSD function is ...
... button to adjust. Adjusts the balance of the white balance. Press + or - Press + or - to reset. Adjusts the levels of the entire screen. to adjust. Selects picture mode, [BRIGHT], [STANDARD], [CINEMA1], [CINEMA2], [DEFAULT]. Adjusts the color temperature of the Red, Green, Blue, Yellow...settings. COLOR CONTROL Available only when the Advanced OSD function is enabled. Press + or - A low color temperature will make the screen reddish. Adjusts the amount of the image. Resets the factory default settings. WHITE BALANCE Available only when the Advanced OSD function is ...
42PX10 50XP10 60XP10 user's manual
Page 19
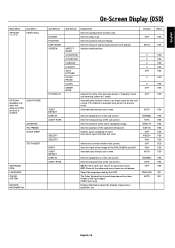
... the horizontal size of the menu between 1 and 6. Adjusts the visual "noise" on the display. Press + to narrow the width of the screen. ON: UNDERSCAN is enabled. SCART1, SCART2 available for Europe and World-Wide models only. SCART3 available for Europe and World-Wide models only. DTC100... is shown. Resets settings back to adjust. Press - Press + to move down. VGA and RGBHV input only. ON: Information about inputs, screen size, etc. OFF: No information is detected, the only available option will be "AUTO". Press + to move left . to expand the width...
... the horizontal size of the menu between 1 and 6. Adjusts the visual "noise" on the display. Press + to narrow the width of the screen. ON: UNDERSCAN is enabled. SCART1, SCART2 available for Europe and World-Wide models only. SCART3 available for Europe and World-Wide models only. DTC100... is shown. Resets settings back to adjust. Press - Press + to move down. VGA and RGBHV input only. ON: Information about inputs, screen size, etc. OFF: No information is detected, the only available option will be "AUTO". Press + to move left . to expand the width...
42PX10 50XP10 60XP10 user's manual
Page 20
... input mode. To return to reduce the risk of the side mask when a 4:3 image is used (normal). Sets the Monitor ID to "ON", the front panel is used . Default OFF ON AUTO AUTO1 OFF AUTO 3 ON DVI-PC LOW OFF OFF NORMAL OFF OFF LAST LAST OFF ON OFF ALL NORMAL... the Advanced OSD function is lost. only. INVERSE WORKING TIME INVERSE: The screen image is displayed alternately /WAITING TIME between positive image and negative image, or the screen image is enabled. Press + button, the bar will become lighter. OFF: When NEC protocol is disabled as soon as the on the input device connected...
... input mode. To return to reduce the risk of the side mask when a 4:3 image is used (normal). Sets the Monitor ID to "ON", the front panel is used . Default OFF ON AUTO AUTO1 OFF AUTO 3 ON DVI-PC LOW OFF OFF NORMAL OFF OFF LAST LAST OFF ON OFF ALL NORMAL... the Advanced OSD function is lost. only. INVERSE WORKING TIME INVERSE: The screen image is displayed alternately /WAITING TIME between positive image and negative image, or the screen image is enabled. Press + button, the bar will become lighter. OFF: When NEC protocol is disabled as soon as the on the input device connected...
42PX10 50XP10 60XP10 user's manual
Page 21
... mode and entering "power on the video format of the input signal. DETECT DISPLAY SUB P. DETECT DISPLAY SUB P. Automatically detects sub screen. RATE SELECT1 SELECT2 INPUT SUB P. V-POSITION H-POSITION V-HEIGHT H-WIDTH AUTO PICTURE CLOCK PHASE CLOCK UNDER SCAN Adjusts the delay time between...ASPECT MODE Adjusts detail position. Enables quick swapping of video wall. Sets the position of the advanced menu items are used. Automatically detects sub screen. Default OFF SPLIT 0 0 0 0 OFF 0 0 OFF OFF AUTO NORMAL 100% BTM LFT S BY S1 OFF VIDEO1 VGA OFF ...
... mode and entering "power on the video format of the input signal. DETECT DISPLAY SUB P. DETECT DISPLAY SUB P. Automatically detects sub screen. RATE SELECT1 SELECT2 INPUT SUB P. V-POSITION H-POSITION V-HEIGHT H-WIDTH AUTO PICTURE CLOCK PHASE CLOCK UNDER SCAN Adjusts the delay time between...ASPECT MODE Adjusts detail position. Enables quick swapping of video wall. Sets the position of the advanced menu items are used. Automatically detects sub screen. Default OFF SPLIT 0 0 0 0 OFF 0 0 OFF OFF AUTO NORMAL 100% BTM LFT S BY S1 OFF VIDEO1 VGA OFF ...
42PX10 50XP10 60XP10 user's manual
Page 22
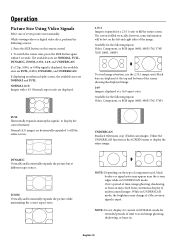
..., Component, or RGB input (480I, 480P, 576I, 576P) FULL Horizontally expands anamorphic signals to fill the entire screen. If displaying an enhanced split-screen, the available sizes are NORMAL, FULL, DYNAMIC, ZOOM, 2.35:1, 14:9, and UNDERSCAN. DYNAMIC Vertically and horizontally expands...display the correct linearity. English-19 The available sizes are NORMAL and FULL. The screen is displayed, the available sizes are horizontally expanded to fill the entire screen. UNDERSCAN Standard televisions crop (Underscan) images. Utilize the UNDERSCAN function in UNDERSCAN mode,...
..., Component, or RGB input (480I, 480P, 576I, 576P) FULL Horizontally expands anamorphic signals to fill the entire screen. If displaying an enhanced split-screen, the available sizes are NORMAL, FULL, DYNAMIC, ZOOM, 2.35:1, 14:9, and UNDERSCAN. DYNAMIC Vertically and horizontally expands...display the correct linearity. English-19 The available sizes are NORMAL and FULL. The screen is displayed, the available sizes are horizontally expanded to fill the entire screen. UNDERSCAN Standard televisions crop (Underscan) images. Utilize the UNDERSCAN function in UNDERSCAN mode,...
42PX10 50XP10 60XP10 user's manual
Page 23
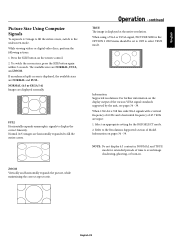
...horizontally expanded to select TRUE mode. Operation - The available sizes are input: 1. Press the SIZE button on pages 34 - 39. To switch the screen sizes, press the SIZE button again within 3 seconds. ZOOM Vertically and horizontally expands the picture, while maintaining the correct aspect ratio. Select an appropriate ...linearity. When using a VGA or SVGA signal, PICTURE SIZE in . When 1360 dot x 768 line wide XGA signals with a vertical frequency of 60 Hz and a horizontal frequency of time to avoid image shadowing, ghosting, or burn-in the OPTION 2 OSD menu should be set to OFF to...
...horizontally expanded to select TRUE mode. Operation - The available sizes are input: 1. Press the SIZE button on pages 34 - 39. To switch the screen sizes, press the SIZE button again within 3 seconds. ZOOM Vertically and horizontally expands the picture, while maintaining the correct aspect ratio. Select an appropriate ...linearity. When using a VGA or SVGA signal, PICTURE SIZE in . When 1360 dot x 768 line wide XGA signals with a vertical frequency of 60 Hz and a horizontal frequency of time to avoid image shadowing, ghosting, or burn-in the OPTION 2 OSD menu should be set to OFF to...

42PX10 50XP10 60XP10 user's manual
Page 24
... +, p or q buttons to the table below. YES YES YES YES YES YES YES - - - - YES - - - - - - - - - - continued Split Screen Mode To display multiple pictures on the remote (PIP, S BY S, SINGLE). YES YES YES YES - - - YES YES YES - - - YES - - - YES - ...- - - - - - - - - YES - - - - - - - - - - Operation - Press the desired SPLIT SCREEN function button on the screen, perform the following actions: 1. Only certain RGB signals are supported. A B VIDEO1 A SELECT/FREEZE VGA B VGA is active. Picture displayed ...
... +, p or q buttons to the table below. YES YES YES YES YES YES YES - - - - YES - - - - - - - - - - continued Split Screen Mode To display multiple pictures on the remote (PIP, S BY S, SINGLE). YES YES YES YES - - - YES YES YES - - - YES - - - YES - ...- - - - - - - - - YES - - - - - - - - - - Operation - Press the desired SPLIT SCREEN function button on the screen, perform the following actions: 1. Only certain RGB signals are supported. A B VIDEO1 A SELECT/FREEZE VGA B VGA is active. Picture displayed ...

42PX10 50XP10 60XP10 user's manual
Page 27
... operation times to store the settings. * If you want, or Repeat Timer which input the display will run every Friday. A hyphen (-) in either a Screen Saver setting (ORBITER, INVERSE, WHITE) or a REPEAT TIMER program can be set . If a Repeat Timer sequence is selected in the PRESENT TIME OSD menu..., then press the SET button to be set . field, the Input field will appear on the screen. Use the p and q buttons to select "MULTI MODE", then use during the scheduled power-on if daylight savings is programmed for the monitor...
... operation times to store the settings. * If you want, or Repeat Timer which input the display will run every Friday. A hyphen (-) in either a Screen Saver setting (ORBITER, INVERSE, WHITE) or a REPEAT TIMER program can be set . If a Repeat Timer sequence is selected in the PRESENT TIME OSD menu..., then press the SET button to be set . field, the Input field will appear on the screen. Use the p and q buttons to select "MULTI MODE", then use during the scheduled power-on if daylight savings is programmed for the monitor...

42PX10 50XP10 60XP10 user's manual
Page 28
... allows the display to "ON, the repeat timer schedules will operate consecutively (State1, State2, State3, State4, State1, State2, State3...). To enter the REPEAT TIMER OSD screen. STATE1-ON, STATE2-ON, STATE3-OFF, STATE4-ON, the repeat timer schedules use all four STATES are 4 possible state settings to showing the signal from...
... allows the display to "ON, the repeat timer schedules will operate consecutively (State1, State2, State3, State4, State1, State2, State3...). To enter the REPEAT TIMER OSD screen. STATE1-ON, STATE2-ON, STATE3-OFF, STATE4-ON, the repeat timer schedules use all four STATES are 4 possible state settings to showing the signal from...

42PX10 50XP10 60XP10 user's manual
Page 33
...manual to change graphics mode.) Selected resolution is blinking • A certain failure might have occurred, please contact your nearest authorized NEC DISPLAY SOLUTIONS service facility. Image persistence • Please be turned off and reset the monitor. Image is unstable, unfocused or swimming... does not respond • Unplug the power cord of time should be properly attached to the Plasma monitor, computer, or other input device. • Use the OSD screen controls to compatibility and recommended signal timings. If not, select appropriate resolution. No Sound •...
...manual to change graphics mode.) Selected resolution is blinking • A certain failure might have occurred, please contact your nearest authorized NEC DISPLAY SOLUTIONS service facility. Image persistence • Please be turned off and reset the monitor. Image is unstable, unfocused or swimming... does not respond • Unplug the power cord of time should be properly attached to the Plasma monitor, computer, or other input device. • Use the OSD screen controls to compatibility and recommended signal timings. If not, select appropriate resolution. No Sound •...

