42PX10 50XP10 60XP10 user's manual
Page 3
..., Orientation, Cable Management English-7 Using the Remote ...English-8 Part Names and Functions Control Panel ...English-9 Terminal Panel ...English-10 Remote Control Functions...English-11 Power, Display, Digital Zoom, Pointer, Main Power Switch Cover English-12 Remote Control ID...English-13 On-Screen Display(OSD) Using the OSD ...English-14 OSD ...English-15 Operation Picture Size Using Video Signals English-19 Picture Size Using Computer Signals English-20 Split Screen Mode ...English-21 Picture in Picture Mode...English-22 Creating a Video Wall...English-23 Using the Timer...English...
..., Orientation, Cable Management English-7 Using the Remote ...English-8 Part Names and Functions Control Panel ...English-9 Terminal Panel ...English-10 Remote Control Functions...English-11 Power, Display, Digital Zoom, Pointer, Main Power Switch Cover English-12 Remote Control ID...English-13 On-Screen Display(OSD) Using the OSD ...English-14 OSD ...English-15 Operation Picture Size Using Video Signals English-19 Picture Size Using Computer Signals English-20 Split Screen Mode ...English-21 Picture in Picture Mode...English-22 Creating a Video Wall...English-23 Using the Timer...English...
42PX10 50XP10 60XP10 user's manual
Page 4
... or exhibits a marked change in wire to avoid injury from the top of the National Electric code. or E. Objects and Liquid Entry - The power supply cord or the plug has been damaged; English-1 Keep these instructions. 2. When a cart is used, use caution when moving the cart or apparatus combination to an antenna-discharge unit, size of grounding connectors, location of the cabinet...
... or exhibits a marked change in wire to avoid injury from the top of the National Electric code. or E. Objects and Liquid Entry - The power supply cord or the plug has been damaged; English-1 Keep these instructions. 2. When a cart is used, use caution when moving the cart or apparatus combination to an antenna-discharge unit, size of grounding connectors, location of the cabinet...
42PX10 50XP10 60XP10 user's manual
Page 5
.... If a power cord is not supplied with this display in a particular installation. China Japan Voltage 120* 230 230 220 100 *When operating the PlasmaSync monitor with its AC 125-240V power supply, use the power cord provided with this unit. Use the attached specified cables with the P426Y0(P42XP10), P506Y1(P50XP10), or P606Y2(P60XP10) color monitor so as not to radio or television reception, which the receiver is...
.... If a power cord is not supplied with this display in a particular installation. China Japan Voltage 120* 230 230 220 100 *When operating the PlasmaSync monitor with its AC 125-240V power supply, use the power cord provided with this unit. Use the attached specified cables with the P426Y0(P42XP10), P506Y1(P50XP10), or P606Y2(P60XP10) color monitor so as not to radio or television reception, which the receiver is...
42PX10 50XP10 60XP10 user's manual
Page 6
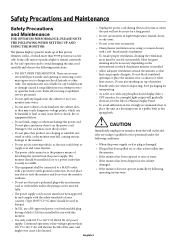
...; When the power supply cord or plug is damaged. • If liquid has been spilled on, or objects have been approved by following instructions. • DO NOT OPEN THE MONITOR. Safety Precautions and Maintenance Safety Precautions and Maintenance FOR OPTIMUM PERFORMANCE, PLEASE NOTE THE FOLLOWING WHEN SETTING UP AND USING THE MONITOR: The plasma display's panel is made up of fine picture elements...
...; When the power supply cord or plug is damaged. • If liquid has been spilled on, or objects have been approved by following instructions. • DO NOT OPEN THE MONITOR. Safety Precautions and Maintenance Safety Precautions and Maintenance FOR OPTIMUM PERFORMANCE, PLEASE NOTE THE FOLLOWING WHEN SETTING UP AND USING THE MONITOR: The plasma display's panel is made up of fine picture elements...
42PX10 50XP10 60XP10 user's manual
Page 10
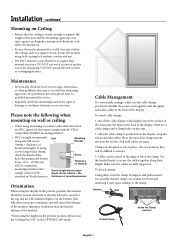
... to bundle the power cord together with UL1678 standard in position, they must comply with the mounting apparatus. If a problem is possible that may occur over time and removing it may occur with the VESAcompatible (FDMlv1) mounting method. • NEC strongly recommends using the display in the portrait position, please turn the Cooling Fan "ON" in length). When using size M8 screws (16mm + thickness...
... to bundle the power cord together with UL1678 standard in position, they must comply with the mounting apparatus. If a problem is possible that may occur over time and removing it may occur with the VESAcompatible (FDMlv1) mounting method. • NEC strongly recommends using the display in the portrait position, please turn the Cooling Fan "ON" in length). When using size M8 screws (16mm + thickness...
42PX10 50XP10 60XP10 user's manual
Page 11
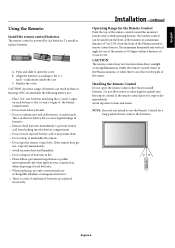
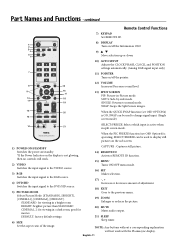
... (-) indications inside the case. EXIT INPUT MUTE 30 30 POWER ON STANDBY PICTURE RGB DVD/HD VIDEO MEMORY PICTURE MODE SIZE 1 2 4 5 7 8 0 DISPLAY 3 6 9 MENU AUTO SET UP SET + EXIT VOL ZOOM POINTER + + MUTE SPLIT SCREEN PIP S BY S SINGLE SWAP SELECT/FREEZE CAPTURE REMOTE ID SET RESET SLEEP REMOTE CONTROLLER RU-M113 English-8 B. The remote control can shorten battery life or cause liquid leakage of time, remove the batteries. The maximum horizontal and vertical angle for a long period...
... (-) indications inside the case. EXIT INPUT MUTE 30 30 POWER ON STANDBY PICTURE RGB DVD/HD VIDEO MEMORY PICTURE MODE SIZE 1 2 4 5 7 8 0 DISPLAY 3 6 9 MENU AUTO SET UP SET + EXIT VOL ZOOM POINTER + + MUTE SPLIT SCREEN PIP S BY S SINGLE SWAP SELECT/FREEZE CAPTURE REMOTE ID SET RESET SLEEP REMOTE CONTROLLER RU-M113 English-8 B. The remote control can shorten battery life or cause liquid leakage of time, remove the batteries. The maximum horizontal and vertical angle for a long period...
42PX10 50XP10 60XP10 user's manual
Page 12
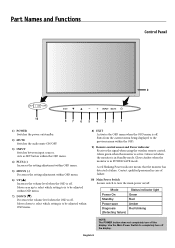
... the display. Exits from the current menu being displayed to be adjusted within the OSD. 9) Remote control sensor and Power indicator Receives the signal when using the wireless remote control. Glows green when the monitor is in Standby mode. Glows Amber when the monitor is active. Mode Power On Standby Power save Diagnosis (Detecting failure) Status indicator light Green Red Amber Red blinking NOTE: The POWER button does not completely turn the main power on /standby. 2) MUTE Switches the audio mute ON/OFF. 3) INPUT Switches between input sources.
... the display. Exits from the current menu being displayed to be adjusted within the OSD. 9) Remote control sensor and Power indicator Receives the signal when using the wireless remote control. Glows green when the monitor is in Standby mode. Glows Amber when the monitor is active. Mode Power On Standby Power save Diagnosis (Detecting failure) Status indicator light Green Red Amber Red blinking NOTE: The POWER button does not completely turn the main power on /standby. 2) MUTE Switches the audio mute ON/OFF. 3) INPUT Switches between input sources.
42PX10 50XP10 60XP10 user's manual
Page 13
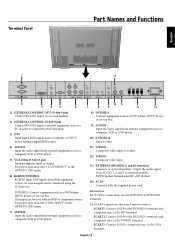
... 8) DVD/HD1 Connect equipment such as a DVD player, HDTV device, or set -top box. SCART3: Connect R/G/B + composite sync. For proper operation select "D-SUB INPUT" in the OPTION1 OSD menu. 6) RGBHV/DVD/HD2 RGBHV: Input RGB signals from external equipment such as a computer, VCR or DVD player. 10) S-VIDEO in Input S-video. 11) VIDEO1 Composite video input or output. 12) VIDEO2 Composite video input. 13) EXTERNAL SPEAKER (L and R) connector Connects to optional speakers. This input can be used with the supplied power cord. For SCART connections...
... 8) DVD/HD1 Connect equipment such as a DVD player, HDTV device, or set -top box. SCART3: Connect R/G/B + composite sync. For proper operation select "D-SUB INPUT" in the OPTION1 OSD menu. 6) RGBHV/DVD/HD2 RGBHV: Input RGB signals from external equipment such as a computer, VCR or DVD player. 10) S-VIDEO in Input S-video. 11) VIDEO1 Composite video input or output. 12) VIDEO2 Composite video input. 13) EXTERNAL SPEAKER (L and R) connector Connects to optional speakers. This input can be used with the supplied power cord. For SCART connections...
42PX10 50XP10 60XP10 user's manual
Page 14
... -Picture mode. SINGLE: Returns to the DVD/HD source. 5) PICTURE MODE Selects Picture Mode: [STANDARD], [BRIGHT], [CINEMA1], [CINEMA2], [DEFAULT]. SWAP: Swaps the Split Screen images. CAPTURE : Captures still picture. 14) REMOTE ID Activates REMOTE ID function. 15) MENU Turns ON/OFF menu mode. 16) SET Makes selection. 17) - , + Increases or decreases amount of the image. continued Remote Control Functions 7) KEYPAD Set REMOTE ID. 1 2 3 4 5 6 POWER ON STANDBY PICTURE RGB DVD/HD VIDEO MEMORY PICTURE MODE SIZE 7 8 9 10 11 12 13 14 1 2 3 4 5 6 7 8 9 0 DISPLAY MENU AUTO SET...
... -Picture mode. SINGLE: Returns to the DVD/HD source. 5) PICTURE MODE Selects Picture Mode: [STANDARD], [BRIGHT], [CINEMA1], [CINEMA2], [DEFAULT]. SWAP: Swaps the Split Screen images. CAPTURE : Captures still picture. 14) REMOTE ID Activates REMOTE ID function. 15) MENU Turns ON/OFF menu mode. 16) SET Makes selection. 17) - , + Increases or decreases amount of the image. continued Remote Control Functions 7) KEYPAD Set REMOTE ID. 1 2 3 4 5 6 POWER ON STANDBY PICTURE RGB DVD/HD VIDEO MEMORY PICTURE MODE SIZE 7 8 9 10 11 12 13 14 1 2 3 4 5 6 7 8 9 0 DISPLAY MENU AUTO SET...
42PX10 50XP10 60XP10 user's manual
Page 16
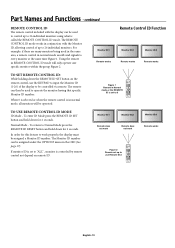
... a Monitor ID number. If monitor ID is set up to work EXIT INPUT MUTE Remote works Figure 2 Remote set to Normal Mode press the REMOTE ID RESET button and hold down for 2 seconds. continued REMOTE CONTROL ID The remote control included with the Monitor ID, allowing control of up to use the KEYPAD to input the Monitor ID (1-26) of the display to 0 POWER ON STANDBY PICTURE RGB DVD/HD VIDEO MEMORY PICTURE MODE SIZE 1 2 3 4 5 6 7 8 9 0 DISPLAY MENU AUTO SET UP SET + EXIT VOL ZOOM POINTER + + MUTE SPLIT SCREEN PIP...
... a Monitor ID number. If monitor ID is set up to work EXIT INPUT MUTE Remote works Figure 2 Remote set to Normal Mode press the REMOTE ID RESET button and hold down for 2 seconds. continued REMOTE CONTROL ID The remote control included with the Monitor ID, allowing control of up to use the KEYPAD to input the Monitor ID (1-26) of the display to 0 POWER ON STANDBY PICTURE RGB DVD/HD VIDEO MEMORY PICTURE MODE SIZE 1 2 3 4 5 6 7 8 9 0 DISPLAY MENU AUTO SET UP SET + EXIT VOL ZOOM POINTER + + MUTE SPLIT SCREEN PIP...

42PX10 50XP10 60XP10 user's manual
Page 18
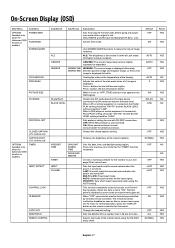
... screen. Resets the factory default settings. Adjusts the high frequency sound. Press + or - to adjust. Adjusts the image brightness in a dark room, especially good for best picture quality. 2.1, 2.2, 2.3, 2.4: The picture becomes darker as the number increases. Press + or - Adjusts the tint of movies. Press + or - The "WHITE BALANCE" appears when the SET button is enabled. GAIN RED/GREEN/BLUE: Adjusts the white level of the image. (S-Curve) These values are approximate. Raises the dark parts...
... screen. Resets the factory default settings. Adjusts the high frequency sound. Press + or - to adjust. Adjusts the image brightness in a dark room, especially good for best picture quality. 2.1, 2.2, 2.3, 2.4: The picture becomes darker as the number increases. Press + or - Adjusts the tint of movies. Press + or - The "WHITE BALANCE" appears when the SET button is enabled. GAIN RED/GREEN/BLUE: Adjusts the white level of the image. (S-Curve) These values are approximate. Raises the dark parts...
42PX10 50XP10 60XP10 user's manual
Page 19
... SCART input. If no problem is not selectable in the ASPECT MODE menu. DTC100). Resets settings back to adjust. Controls the horizontal position of the image within the Display area of the screen. VGA and RGBHV input only. ON: Information about inputs, screen size, etc. Adjusts the transparency level of the menu between 1 and 6. RGB: For RGB input. Adjusts the visual "noise" on the right of the PDP. to factory default values...
... SCART input. If no problem is not selectable in the ASPECT MODE menu. DTC100). Resets settings back to adjust. Controls the horizontal position of the image within the Display area of the screen. VGA and RGBHV input only. ON: Information about inputs, screen size, etc. Adjusts the transparency level of the menu between 1 and 6. RGB: For RGB input. Adjusts the visual "noise" on the right of the PDP. to factory default values...
42PX10 50XP10 60XP10 user's manual
Page 20
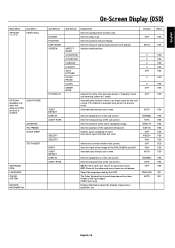
... "DISPLAY" button on . Sets the Monitor ID to a number from being controlled by wireless remote controller. models only CAPTION CONT U.S. VGA, RGBHV, and DVI input and Separate HV Sync. Adjusts the color of the side mask when a 4:3 image is enabled. button, the bar will become darker. When a DVD player or similar equipment is turned on the remote controller for instructions. Creates a working schedule for use . Sets the input mode and the sound volume when the power is connected, PLUG/PLAY setting should be "DVI-HD" and the BLACK...
... "DISPLAY" button on . Sets the Monitor ID to a number from being controlled by wireless remote controller. models only CAPTION CONT U.S. VGA, RGBHV, and DVI input and Separate HV Sync. Adjusts the color of the side mask when a 4:3 image is enabled. button, the bar will become darker. When a DVD player or similar equipment is turned on the remote controller for instructions. Creates a working schedule for use . Sets the input mode and the sound volume when the power is connected, PLUG/PLAY setting should be "DVI-HD" and the BLACK...
42PX10 50XP10 60XP10 user's manual
Page 21
... AUTO PICTURE CLOCK PHASE CLOCK UNDER SCAN Adjusts the delay time between being in -picture mode. English Main Menu OPTION3 (continued) Sub Menu VIDEO WALL OPTION4 Available only when the Advanced OSD function is available only picture-in "standby" mode and entering "power on the video format of the sub screen. Automatically detects if there is used depends on " mode. Automatically detects sub screen. Sets which input terminals are used by the OSD. SUB PICTURE...
... AUTO PICTURE CLOCK PHASE CLOCK UNDER SCAN Adjusts the delay time between being in -picture mode. English Main Menu OPTION3 (continued) Sub Menu VIDEO WALL OPTION4 Available only when the Advanced OSD function is available only picture-in "standby" mode and entering "power on the video format of the sub screen. Automatically detects if there is used depends on " mode. Automatically detects sub screen. Sets which input terminals are used by the OSD. SUB PICTURE...
42PX10 50XP10 60XP10 user's manual
Page 26
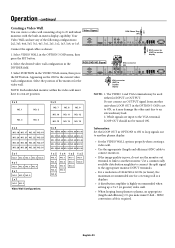
... L(MONO) S-VIDEO IN IN/OUT DVD/HD1 AUDIO1 VIDEO SPEAKER (S) AC IN VGA connector (OUT) to another display NOTE: 1. Your OUT Video Wall can create a video wall consisting of the monitor for INPUT or OUTPUT. IN L(MONO) R/Cr/Pr G/Y B/Cb/pb L(MONO) Y Cr/Pr Cb/Pb L(MONO) S-VIDEO IN IN/OUT EXTERNAL CONTROL DVI AUDIO3 VGA RGBHV / DVD/HD2 AUDIO2 DVD/HD1 AUDIO1 VIDEO SPEAKER (S) AC IN Connect the signal cables as it...
... L(MONO) S-VIDEO IN IN/OUT DVD/HD1 AUDIO1 VIDEO SPEAKER (S) AC IN VGA connector (OUT) to another display NOTE: 1. Your OUT Video Wall can create a video wall consisting of the monitor for INPUT or OUTPUT. IN L(MONO) R/Cr/Pr G/Y B/Cb/pb L(MONO) Y Cr/Pr Cb/Pb L(MONO) S-VIDEO IN IN/OUT EXTERNAL CONTROL DVI AUDIO3 VGA RGBHV / DVD/HD2 AUDIO2 DVD/HD1 AUDIO1 VIDEO SPEAKER (S) AC IN Connect the signal cables as it...
42PX10 50XP10 60XP10 user's manual
Page 31
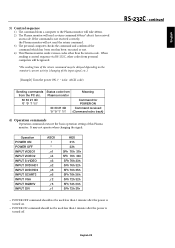
... to the Plasma monitor will take 400ms. 2) The Plasma monitor will be ignored. *The sending time of the return command may not operate when changing the signal: Operation POWER ON POWER OFF INPUT VIDEO1 INPUT VIDEO2 INPUT S-VIDEO INPUT DVD/HD1 INPUT DVD/HD2 INPUT SCART3 INPUT VGA INPUT RGBHV INPUT DVI ASCII ! It may be delayed depending on . • POWER ON command should not be used less than 1 minute after it has received an...
... to the Plasma monitor will take 400ms. 2) The Plasma monitor will be ignored. *The sending time of the return command may not operate when changing the signal: Operation POWER ON POWER OFF INPUT VIDEO1 INPUT VIDEO2 INPUT S-VIDEO INPUT DVD/HD1 INPUT DVD/HD2 INPUT SCART3 INPUT VGA INPUT RGBHV INPUT DVI ASCII ! It may be delayed depending on . • POWER ON command should not be used less than 1 minute after it has received an...

42PX10 50XP10 60XP10 user's manual
Page 33
... green or red color can be seen) • Main Power Switch should be in the ON position and power cord should be readjusted. • Check the monitor and your display card with respect to compatibility and recommended signal timings. Red LED on the screen. NOTE: It is possible to play audio from a source that a supported mode has been selected on the display card or system being used . (Please consult display card or system manual to change graphics mode.) Selected resolution...
... green or red color can be seen) • Main Power Switch should be in the ON position and power cord should be readjusted. • Check the monitor and your display card with respect to compatibility and recommended signal timings. Red LED on the screen. NOTE: It is possible to play audio from a source that a supported mode has been selected on the display card or system being used . (Please consult display card or system manual to change graphics mode.) Selected resolution...

42PX10 50XP10 60XP10 user's manual
Page 34
Specifications P42XP10 PDP Module Frequency Panel Display Size Input Signals Output Signal (VIDEO1 and VGA can also be used as OUTPUT terminals) Audio Speaker Output External Control Power Supply Operational Environment Storage Environment Dimensions Weight (without speaker and stand ) VESA compatible arm mounting interface Complied Regulatory and Guidelines Power Management Plug & Play Accessories *Compressed Image Diagonal: 42 "/1058 mm Pixel Pitch 0.900 mm (W)/0.676 mm (H) Resolution 1024 x 768 Horizontal ANALOG: 15.625/15.734kHz, 31.0kHz - 108.5kHz...
Specifications P42XP10 PDP Module Frequency Panel Display Size Input Signals Output Signal (VIDEO1 and VGA can also be used as OUTPUT terminals) Audio Speaker Output External Control Power Supply Operational Environment Storage Environment Dimensions Weight (without speaker and stand ) VESA compatible arm mounting interface Complied Regulatory and Guidelines Power Management Plug & Play Accessories *Compressed Image Diagonal: 42 "/1058 mm Pixel Pitch 0.900 mm (W)/0.676 mm (H) Resolution 1024 x 768 Horizontal ANALOG: 15.625/15.734kHz, 31.0kHz - 108.5kHz...
42PX10 50XP10 60XP10 user's manual
Page 35
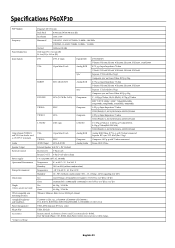
English Specifications P50XP10 PDP Module Frequency Panel Display Size Input Signals Output Signal (VIDEO1 and VGA can also be used as OUTPUT terminals) Audio Speaker Output External Control Power Supply Operational Environment Storage Environment Dimensions Weight (without speaker and stand ) VESA compatible arm mounting interface Complied Regulatory and Guidelines Power Management Plug & Play Accessories *Compressed Image Diagonal: 50"/1269 mm Pixel Pitch 0.81 mm (W)/0.81 mm (H) Resolution 1365 x 768 Horizontal ANALOG: 15.625/15.734kHz, 31.0kHz - 108...
English Specifications P50XP10 PDP Module Frequency Panel Display Size Input Signals Output Signal (VIDEO1 and VGA can also be used as OUTPUT terminals) Audio Speaker Output External Control Power Supply Operational Environment Storage Environment Dimensions Weight (without speaker and stand ) VESA compatible arm mounting interface Complied Regulatory and Guidelines Power Management Plug & Play Accessories *Compressed Image Diagonal: 50"/1269 mm Pixel Pitch 0.81 mm (W)/0.81 mm (H) Resolution 1365 x 768 Horizontal ANALOG: 15.625/15.734kHz, 31.0kHz - 108...
42PX10 50XP10 60XP10 user's manual
Page 36
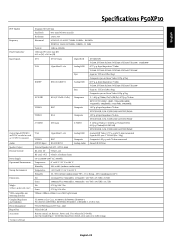
...VESA DDC2B Remote control, AA Batteries, Power cord, Users Manual (CD-ROM), Start Up Guide (Paper / CD-ROM), Main Power Switch cover and screw, Cable clamps English-33 Specifications P60XP10 PDP Module Frequency Panel Display Size Input Signals Output Signal (VIDEO1 and VGA can also be used as OUTPUT terminals) Audio Speaker Output External Control Power Supply Operational Environment Storage Environment Dimensions Weight (without speaker and stand ) VESA compatible arm mounting interface Complied Regulatory and Guidelines Power Management Plug & Play Accessories *Compressed Image...
...VESA DDC2B Remote control, AA Batteries, Power cord, Users Manual (CD-ROM), Start Up Guide (Paper / CD-ROM), Main Power Switch cover and screw, Cable clamps English-33 Specifications P60XP10 PDP Module Frequency Panel Display Size Input Signals Output Signal (VIDEO1 and VGA can also be used as OUTPUT terminals) Audio Speaker Output External Control Power Supply Operational Environment Storage Environment Dimensions Weight (without speaker and stand ) VESA compatible arm mounting interface Complied Regulatory and Guidelines Power Management Plug & Play Accessories *Compressed Image...

