

42VR5/42XR3 IG
Page 1
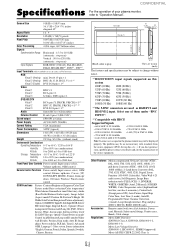
... Ventilation Requirements Display Dimensions Front, Top & Bottom Rear Left & Right Side Display Dimensions w/Optional Speakers and Stand Dimensions w/Optional Flat Wall Mount Dimensions w/Optional Tilt Wall Mount Dimensions w/Optional Ceiling Mount Connections Control Codes Page 1 Page 2 Page 3 Page 4 Page 5 Page 6 Page 7 Page 8 Page 9 Page 10 Page 11 NEC Solutions (America), Inc. Visual Systems v1.3 Product Description Type: Plasma Display Resolution: 42VR5: 853x480 42XR3: 1024x768 Aspect Ratio: 16:9 Color Correction: NEC CCF (Capsulated Color Filter, in panel) and AccuCrimson...
... Ventilation Requirements Display Dimensions Front, Top & Bottom Rear Left & Right Side Display Dimensions w/Optional Speakers and Stand Dimensions w/Optional Flat Wall Mount Dimensions w/Optional Tilt Wall Mount Dimensions w/Optional Ceiling Mount Connections Control Codes Page 1 Page 2 Page 3 Page 4 Page 5 Page 6 Page 7 Page 8 Page 9 Page 10 Page 11 NEC Solutions (America), Inc. Visual Systems v1.3 Product Description Type: Plasma Display Resolution: 42VR5: 853x480 42XR3: 1024x768 Aspect Ratio: 16:9 Color Correction: NEC CCF (Capsulated Color Filter, in panel) and AccuCrimson...
User Manual
Page 2
... mode/ Control lock/IR Remote/Loop out/ID number/Video wall [Divider, Position, Disp. If you do experience such a problem please contact your plasma monitor, refer to 9840 feet Front Panel User Controls Power on/off, Input source select, Volume up/down, OSM control Remote Control Functions Power on/off, Input source select, OSM control,Volume up/down, Cursor (UP, DOWN,LEFT, RIGHT), Pointer, Zoom up ), Option3 (Timer/Power on the plasma monitor may be an inconsistency with HDCP. Screen Size...
... mode/ Control lock/IR Remote/Loop out/ID number/Video wall [Divider, Position, Disp. If you do experience such a problem please contact your plasma monitor, refer to 9840 feet Front Panel User Controls Power on/off, Input source select, Volume up/down, OSM control Remote Control Functions Power on/off, Input source select, OSM control,Volume up/down, Cursor (UP, DOWN,LEFT, RIGHT), Pointer, Zoom up ), Option3 (Timer/Power on the plasma monitor may be an inconsistency with HDCP. Screen Size...

User Manual
Page 4
... preventing illegal copying of video data sent over a Digital Visual Interface (DVI). To view 480I@60Hz (480 interlaced lines, 60Hz refresh rate) or 576I@50Hz (567 interlaced lines, 50Hz refresh rate) when sync polarity is HDCP/HDCP technology? NOTE: • While the input signals comply with the resolution listed in the table above . *6 To connect the monitor to Macintosh computer, use the monitor adapter (D-Sub 15-pin...
... preventing illegal copying of video data sent over a Digital Visual Interface (DVI). To view 480I@60Hz (480 interlaced lines, 60Hz refresh rate) or 576I@50Hz (567 interlaced lines, 50Hz refresh rate) when sync polarity is HDCP/HDCP technology? NOTE: • While the input signals comply with the resolution listed in the table above . *6 To connect the monitor to Macintosh computer, use the monitor adapter (D-Sub 15-pin...

User Manual
Page 6
... picture elements (cells) with minimal contrast between colors. Avoid damage to provide long, trouble-free service. will electric shock. If the unit is designed and manufactured to the power cord, and do not drop. 3. To avoid damage and prolong operating life: 1. Set the unit away from time to time. * Always power down the monitor when you install the unit in a closed cabinet or shelves. Plasma monitor...
... picture elements (cells) with minimal contrast between colors. Avoid damage to provide long, trouble-free service. will electric shock. If the unit is designed and manufactured to the power cord, and do not drop. 3. To avoid damage and prolong operating life: 1. Set the unit away from time to time. * Always power down the monitor when you install the unit in a closed cabinet or shelves. Plasma monitor...
User Manual
Page 7
... audio connectors ........ E-25 Setting the screen size for RGB input signals ........ E-23 POWER/STANDBY indicator E-23 Setting the picture to use the safety metal fittings and the screws for safety metal fittings E-4 Creating a video wall E-5 Cable Management E-5 Caution on mode E-28 Enabling/disabling the front panel controls E-28 Enabling/disabling remote control wireless transmission E-28 Loop Out setting E-28 ID number setting E-29 Video Wall setting E-29 Option4 Settings Menu E-32 Erasing the sub screen image when there is set the off timer...
... audio connectors ........ E-25 Setting the screen size for RGB input signals ........ E-23 POWER/STANDBY indicator E-23 Setting the picture to use the safety metal fittings and the screws for safety metal fittings E-4 Creating a video wall E-5 Cable Management E-5 Caution on mode E-28 Enabling/disabling the front panel controls E-28 Enabling/disabling remote control wireless transmission E-28 Loop Out setting E-28 ID number setting E-29 Video Wall setting E-29 Option4 Settings Menu E-32 Erasing the sub screen image when there is set the off timer...

User Manual
Page 10
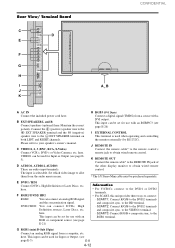
.../ + LEFT/ - MENU/ENTER OK EXIT RETURN Bottom side 2. Approx. 7m / 23ft REMOTE External Control OUT IN Using the wired remote control mode Connect the remote cable* to wired remote control. E-6 4-10 CONFIDENTIAL Caution on the monitor. When the wired remote control mode is connected, the mode automatically switches to the remote control's remote jack and the "REMOTE IN" terminal on when the plasma monitor is an obstacle between the sensor and the remote control. 3.Replace the cover. INPUT SELECT RIGHT...
.../ + LEFT/ - MENU/ENTER OK EXIT RETURN Bottom side 2. Approx. 7m / 23ft REMOTE External Control OUT IN Using the wired remote control mode Connect the remote cable* to wired remote control. E-6 4-10 CONFIDENTIAL Caution on the monitor. When the wired remote control mode is connected, the mode automatically switches to the remote control's remote jack and the "REMOTE IN" terminal on when the plasma monitor is an obstacle between the sensor and the remote control. 3.Replace the cover. INPUT SELECT RIGHT...
User Manual
Page 11
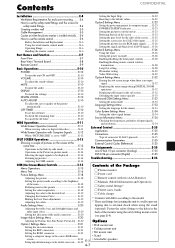
... q Power Turns the monitor's power on -screen manager. Lights red. Functions as the CURSOR buttons in the On-Screen Menu (OSM) mode. Functions as the EXIT buttons in the on and off switch does not disconnect the plasma display completely from the remote control. Functions as for selection of "BNC INPUT", "D-SUB INPUT", "RGB SELECT" and "DVI SET UP". Please refer to use the RGB with composite sync signal. w Remote sensor window Receives the signals from the supply...
... q Power Turns the monitor's power on -screen manager. Lights red. Functions as the CURSOR buttons in the On-Screen Menu (OSM) mode. Functions as the EXIT buttons in the on and off switch does not disconnect the plasma display completely from the remote control. Functions as for selection of "BNC INPUT", "D-SUB INPUT", "RGB SELECT" and "DVI SET UP". Please refer to use the RGB with composite sync signal. w Remote sensor window Receives the signals from the supply...
User Manual
Page 12
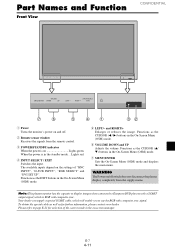
... and RIGHT channels. Connect the (positive) speaker wire to the EXT SPEAKER terminal and the (negative) speaker wire to the VIDEO1 terminal. · SCART3: Connect R/G/B + composite sync. Set which video image to obtain wired remote control. * The 1/8 Stereo Mini cable must be used for Input or Output (see page E-5) E-8 4-12 K REMOTE OUT Connect the remote cable* to the REMOTE IN jack of the other display monitor to allot them from the audio menu screen. to the...
... and RIGHT channels. Connect the (positive) speaker wire to the EXT SPEAKER terminal and the (negative) speaker wire to the VIDEO1 terminal. · SCART3: Connect R/G/B + composite sync. Set which video image to obtain wired remote control. * The 1/8 Stereo Mini cable must be used for Input or Output (see page E-5) E-8 4-12 K REMOTE OUT Connect the remote cable* to the REMOTE IN jack of the other display monitor to allot them from the audio menu screen. to the...

User Manual
Page 14
... the remote control). The monitor's POWER/STANDBY indicator turns red and the standby mode is turned off the unit. DISPLAY To check the settings: 1. OFF TIMER 0 Note: After the power is set (only when turning off the power of the picture: Press the ZOOM+ button and enlarge the picture. When you are leaving the room or do not plan to display the pointer. ( ) To change the size of the monitor. Information Ⅵ AUTO ADJUST ON setting When...
... the remote control). The monitor's POWER/STANDBY indicator turns red and the standby mode is turned off the unit. DISPLAY To check the settings: 1. OFF TIMER 0 Note: After the power is set (only when turning off the power of the picture: Press the ZOOM+ button and enlarge the picture. When you are leaving the room or do not plan to display the pointer. ( ) To change the size of the monitor. Information Ⅵ AUTO ADJUST ON setting When...
User Manual
Page 16
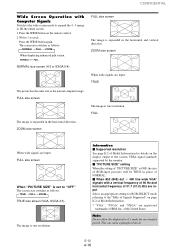
... mode referring to "OFF" The screen size switches as the normal computer image. Press the WIDE button again. FULL The image is true resolution. Within 3 seconds ... ZOOM size screen When wide signals are input. FULL size screen When "PICTURE SIZE" is set to the"Table of Signals Supported" on the remote control. 2. Information Ⅵ Supported resolution See page E-2 of Model Information for details on the display output of the various VESA signal standards supported by the monitor. Ⅵ "PICTURE SIZE" setting When the setting of "PICTURE SIZE...
... mode referring to "OFF" The screen size switches as the normal computer image. Press the WIDE button again. FULL The image is true resolution. Within 3 seconds ... ZOOM size screen When wide signals are input. FULL size screen When "PICTURE SIZE" is set to the"Table of Signals Supported" on the remote control. 2. Information Ⅵ Supported resolution See page E-2 of Model Information for details on the display output of the various VESA signal standards supported by the monitor. Ⅵ "PICTURE SIZE" setting When the setting of "PICTURE SIZE...
User Manual
Page 21
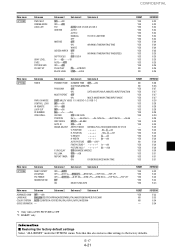
... E-33 E-34 E-34 Information Ⅵ Restoring the factory default settings Select "ALL RESET" under the OPTION1 menu. CINEMA MODE LONG LIFE GRAY LEVEL S1/S2 PICTURE SIZE DVI SET UP Sub menu 2 Sub menu 3 Sub menu 4 OFF←→ON OFF←→ON PLE AUTO/LOCK 1/LOCK 2/LOCK 3 ORBITER AUTO 1 AUTO 2 MANUAL H-DOT/V-LINE/TIME OFF INVERSE OFF ON WORKING TIME/WAITING TIME WHITE SCREEN WIPER OFF ON WORKING TIME/WAITING TIME/SPEED SOFT FOCUS OFF/1/2/3/4 0←...→3←...
... E-33 E-34 E-34 Information Ⅵ Restoring the factory default settings Select "ALL RESET" under the OPTION1 menu. CINEMA MODE LONG LIFE GRAY LEVEL S1/S2 PICTURE SIZE DVI SET UP Sub menu 2 Sub menu 3 Sub menu 4 OFF←→ON OFF←→ON PLE AUTO/LOCK 1/LOCK 2/LOCK 3 ORBITER AUTO 1 AUTO 2 MANUAL H-DOT/V-LINE/TIME OFF INVERSE OFF ON WORKING TIME/WAITING TIME WHITE SCREEN WIPER OFF ON WORKING TIME/WAITING TIME/SPEED SOFT FOCUS OFF/1/2/3/4 0←...→3←...

User Manual
Page 22
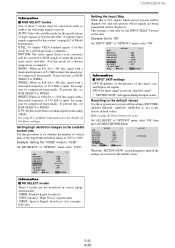
... CONTRAST 52 SEL. Information Ⅵ Picture adjustment screen CONTRAST: Changes the picture's white level. EXIT RETURN Information Ⅵ Setting the color temperature LOW: Redder MID LOW: Slightly red MID: Standard (slightly bluer) HIGH: Bluer Information Ⅵ Types of VIDEO display. EXIT RETURN PICTURE MODE : THEAT. 1 Reducing noise in which the picture quality is connected. Ⅵ Restoring the factory default settings Select "DEFAULT" under the "PICTURE MODE" settings. ADJ. The effect becomes stronger...
... CONTRAST 52 SEL. Information Ⅵ Picture adjustment screen CONTRAST: Changes the picture's white level. EXIT RETURN Information Ⅵ Setting the color temperature LOW: Redder MID LOW: Slightly red MID: Standard (slightly bluer) HIGH: Bluer Information Ⅵ Types of VIDEO display. EXIT RETURN PICTURE MODE : THEAT. 1 Reducing noise in which the picture quality is connected. Ⅵ Restoring the factory default settings Select "DEFAULT" under the "PICTURE MODE" settings. ADJ. The effect becomes stronger...
User Manual
Page 26
..." screen disappears, then all the settings (PICTURE, AUDIO, IMAGE ADJUST, OPTION1~4, etc) to the default values. ADJ. Refer to page E-16 for a still image from a computer.) MOTION: The video signal (from a computer.) WIDE1: When an 852 dot ן480 line signal with a horizontal frequency of the above settings. STILL: To display VESA standard signals. (Use this is input, the image may be compressed horizontally. Example: Setting the "1080B" mode...
..." screen disappears, then all the settings (PICTURE, AUDIO, IMAGE ADJUST, OPTION1~4, etc) to the default values. ADJ. Refer to page E-16 for a still image from a computer.) MOTION: The video signal (from a computer.) WIDE1: When an 852 dot ן480 line signal with a horizontal frequency of the above settings. STILL: To display VESA standard signals. (Use this is input, the image may be compressed horizontally. Example: Setting the "1080B" mode...
User Manual
Page 28
... Use this to set the picture shift. Example: Setting "ORBITER" to "OFF" when these signals are not used. See the following explanation. * When a Video or a DVD/HD/DTV signal is ON. * THE "WORKING TIME" and "WAITING TIME" can set the time by pressing the MENU/ENTER button while "ON" is set to display a white screen. INVERSE/WHITE WORKING TIME : 01H30M WAITING TIME : 02H00M H-DOT V-LINE TIME ORBITER : : : 2 DOT 4 LINE 3 M SEL. Set the hours of 3 minutes. * Ending a WORKING TIME function, the monitor...
... Use this to set the picture shift. Example: Setting "ORBITER" to "OFF" when these signals are not used. See the following explanation. * When a Video or a DVD/HD/DTV signal is ON. * THE "WORKING TIME" and "WAITING TIME" can set the time by pressing the MENU/ENTER button while "ON" is set to display a white screen. INVERSE/WHITE WORKING TIME : 01H30M WAITING TIME : 02H00M H-DOT V-LINE TIME ORBITER : : : 2 DOT 4 LINE 3 M SEL. Set the hours of 3 minutes. * Ending a WORKING TIME function, the monitor...

User Manual
Page 29
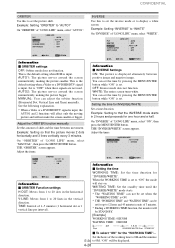
... proceeds for S1/S2 video input If the S-video signal contains screen size information, the image will be adjusted from the left and of the black (the gray level) for SCREEN WIPER Set a time duration and the speed. The factory setting is set to AUTO. Setting the screen size for one and a half hours. MGT. : OFF CINEMA MODE : ON LONG LIFE GRAY LEVEL : 3 S1/S2 : AUTO PICTURE SIZE : ON DVI SET UP NEXT PAGE SEL...
... proceeds for S1/S2 video input If the S-video signal contains screen size information, the image will be adjusted from the left and of the black (the gray level) for SCREEN WIPER Set a time duration and the speed. The factory setting is set to AUTO. Setting the screen size for one and a half hours. MGT. : OFF CINEMA MODE : ON LONG LIFE GRAY LEVEL : 3 S1/S2 : AUTO PICTURE SIZE : ON DVI SET UP NEXT PAGE SEL...

User Manual
Page 30
... connected to turn ON/OFF automatically at a set time. Sunday). Example: Setting "WEDNESDAY", "22:05" On "TIMER" menu, select "PRESENT TIME", then press the MENU/ENTER button. Example: Setting the "PLUG/PLAY" mode to "STB/ DVD" Set "ADVANCED OSM" to "ON" in the 24-hour format (range 00 to "ON" or "OFF". Option3 Settings Menu Using the timer This function sets the monitor to the SET TOP BOX, DVD etc. OPTION2 2 / 4 PREVIOUS PAGE PWR. Setting the picture size for...
... connected to turn ON/OFF automatically at a set time. Sunday). Example: Setting "WEDNESDAY", "22:05" On "TIMER" menu, select "PRESENT TIME", then press the MENU/ENTER button. Example: Setting the "PLUG/PLAY" mode to "STB/ DVD" Set "ADVANCED OSM" to "ON" in the 24-hour format (range 00 to "ON" or "OFF". Option3 Settings Menu Using the timer This function sets the monitor to the SET TOP BOX, DVD etc. OPTION2 2 / 4 PREVIOUS PAGE PWR. Setting the picture size for...

User Manual
Page 31
... PROGRAM TIMER. INPUT MODE: Set the signal that was last selected at the time the power was switched off). Ⅵ To set . • A hyphen "-" in the FUNCTION field A hyphen "-" means last mode (the mode that will be displayed within the selected screen. E-27 4-31 OFF (hour, minutes): Set the time at which the power will be turned off at 8:30 A.M., Monday, displaying RGB2 source, and switched off in the 24-hour format...
... PROGRAM TIMER. INPUT MODE: Set the signal that was last selected at the time the power was switched off). Ⅵ To set . • A hyphen "-" in the FUNCTION field A hyphen "-" means last mode (the mode that will be displayed within the selected screen. E-27 4-31 OFF (hour, minutes): Set the time at which the power will be turned off at 8:30 A.M., Monday, displaying RGB2 source, and switched off in the 24-hour format...
User Manual
Page 33
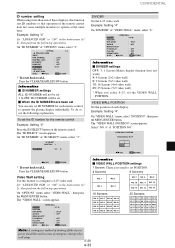
.... MODE : SPLIT AUTO ID : OFF IMAGE ADJUST P. ADJ. VIDEO WALL DIVIDER : 1 POSITION DISP. On "OPTION3" menu, select "VIDEO WALL", then press the MENU/ENTER button. ADJ. EXIT RETURN * To reset back to operate at the same time. The "VIDEO WALL" screen appears. Example: Setting "4" On "DIVIDER" of the remote control does not cause multiple monitors to ALL Press the CLEAR/SEAMLESS SW button Information Ⅵ ID NUMBER settings ALL: ID NUMBER will be used in...
.... MODE : SPLIT AUTO ID : OFF IMAGE ADJUST P. ADJ. VIDEO WALL DIVIDER : 1 POSITION DISP. On "OPTION3" menu, select "VIDEO WALL", then press the MENU/ENTER button. ADJ. EXIT RETURN * To reset back to operate at the same time. The "VIDEO WALL" screen appears. Example: Setting "4" On "DIVIDER" of the remote control does not cause multiple monitors to ALL Press the CLEAR/SEAMLESS SW button Information Ⅵ ID NUMBER settings ALL: ID NUMBER will be used in...

User Manual
Page 35
... unless the IR REMOTE is selected. In the case of "VIDEO WALL" menu, select "ON", then press the MENU/ENTER button. VIDEO WALL DIVIDER : 1 POSITION DISP. Each timer can be displayed. SOURCE: Set the input mode to 4 hours 15 minutes in a video wall. MODE : SPLIT AUTO ID : OFF IMAGE ADJUST P. ADJ. On "REPEAT TIMER" of the Video wall, timer No.1 can use the DIVIDER, SOURCE and WORK TIME. The "REPEAT TIMER" screen appears. ADJ. WORK TIME: Can be set both timers, Timer 1 and Timer 2 run consecutively...
... unless the IR REMOTE is selected. In the case of "VIDEO WALL" menu, select "ON", then press the MENU/ENTER button. VIDEO WALL DIVIDER : 1 POSITION DISP. Each timer can be displayed. SOURCE: Set the input mode to 4 hours 15 minutes in a video wall. MODE : SPLIT AUTO ID : OFF IMAGE ADJUST P. ADJ. On "REPEAT TIMER" of the Video wall, timer No.1 can use the DIVIDER, SOURCE and WORK TIME. The "REPEAT TIMER" screen appears. ADJ. WORK TIME: Can be set both timers, Timer 1 and Timer 2 run consecutively...
User Manual
Page 40
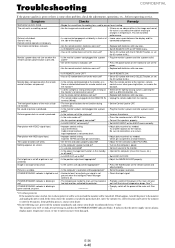
...; Set LOOP OUT OFF. • Adjust the IMAGE ADJUST properly. • Press the WIDE button on and then the POWER/STANDBY indicator blinks. Part of the main unit. Input impedance is disturbed. See*1. • Prompty switch off the power of picture is cut off . If the room where the monitor is installed is plugged into the REMOTE IN terminal (Wired). • The front panel buttons do not function during Control Lock...
...; Set LOOP OUT OFF. • Adjust the IMAGE ADJUST properly. • Press the WIDE button on and then the POWER/STANDBY indicator blinks. Part of the main unit. Input impedance is disturbed. See*1. • Prompty switch off the power of picture is cut off . If the room where the monitor is installed is plugged into the REMOTE IN terminal (Wired). • The front panel buttons do not function during Control Lock...


