
User Manual
Page 4
... adequate space for 60 minutes to the monitor and unplug the power cord. If the problem persists, contact your plasma monitor and keep the manual handy for future reference. Unplug the power cord during electrical storms or if the unit will be turned off the power to cool the monitor... be some cells that uninsulated voltage within the unit may be required to provide long, trouble-free service. If you install the unit in this manual carefully before using your dealer for any part inside . Do not cover rear vents or install the unit in a closed cabinet or shelves. Important...
... adequate space for 60 minutes to the monitor and unplug the power cord. If the problem persists, contact your plasma monitor and keep the manual handy for future reference. Unplug the power cord during electrical storms or if the unit will be turned off the power to cool the monitor... be some cells that uninsulated voltage within the unit may be required to provide long, trouble-free service. If you install the unit in this manual carefully before using your dealer for any part inside . Do not cover rear vents or install the unit in a closed cabinet or shelves. Important...

User Manual
Page 6
... E-13 To set the off timer E-13 To check the remaining time E-13 To cancel the off timer E-13 WIDE Operations E-14 Wide Screen Operation (manual E-14 When viewing videos or digital video discs .......... E-14 Wide Screen Operation with Equipment that have a Digital Interface .... E-32 Option3 Settings Menu E-33 Using the...
... E-13 To set the off timer E-13 To check the remaining time E-13 To cancel the off timer E-13 WIDE Operations E-14 Wide Screen Operation (manual E-14 When viewing videos or digital video discs .......... E-14 Wide Screen Operation with Equipment that have a Digital Interface .... E-32 Option3 Settings Menu E-33 Using the...
User Manual
Page 8
...Flicker - Fasten the safety fittings to DVD players- At 42 inches, with our special CCF. • 42VP4: Installed AR (Anti-Reflection) Filter 42VP4D: Installed AG (Anti-Glare) Filter • 42VP4: Body color is set for component there are fittings for safety metal fittings* Ⅺ Ferrite core... ratio • Capsulated Color Filter (CCF) and black matrix • The enhanced display in well with two AAA Batteries Ⅺ User's manual Ⅺ Safety metal fittings* Ⅺ Screws for fastening the unit to a wall to prevent tipping due to external shock when using the safety...
...Flicker - Fasten the safety fittings to DVD players- At 42 inches, with our special CCF. • 42VP4: Installed AR (Anti-Reflection) Filter 42VP4D: Installed AG (Anti-Glare) Filter • 42VP4: Body color is set for component there are fittings for safety metal fittings* Ⅺ Ferrite core... ratio • Capsulated Color Filter (CCF) and black matrix • The enhanced display in well with two AAA Batteries Ⅺ User's manual Ⅺ Safety metal fittings* Ⅺ Screws for fastening the unit to a wall to prevent tipping due to external shock when using the safety...

User Manual
Page 10
... analog RGB signal from the audio menu screen. here. J REMOTE IN Connect the remote cable* to the remote control's remote jack to your speaker's owner's manual. D AUDIO1, AUDIO2, AUDIO3 These are audio input terminals. This input can connect an analog RGB signal and the syncronization signal. here. This input can be...
... analog RGB signal from the audio menu screen. here. J REMOTE IN Connect the remote cable* to the remote control's remote jack to your speaker's owner's manual. D AUDIO1, AUDIO2, AUDIO3 These are audio input terminals. This input can connect an analog RGB signal and the syncronization signal. here. This input can be...
User Manual
Page 11
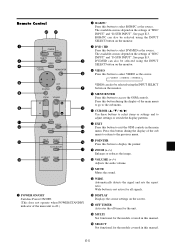
... Press this button during the display of the main menu to go to exit the OSM controls in this manual. u EXIT Press this button to the sub menu. See page E-3. i POINTER Press this manual. !6 SELECT Not functional for the models covered in the main menu. Wide button is off timer for the...
... Press this button during the display of the main menu to go to exit the OSM controls in this manual. u EXIT Press this button to the sub menu. See page E-3. i POINTER Press this manual. !6 SELECT Not functional for the models covered in the main menu. Wide button is off timer for the...

User Manual
Page 15
... PC or Macintosh Computer Connecting your PC or Macintosh computer to your plasma monitor will need to install a new board, see the manual that comes with your new graphics board for installation instructions. 3. To connect a PC, Macintosh or compatible graphics adapter, simply: 1..... 2. To maintain display quality, use the monitor adapter to connect to a document camera. Note: Refer to your document camera owner's manual for more information about your plasma monitor. Turn on your camera's video output requirements. Use a component video cable to connect your plasma ...
... PC or Macintosh Computer Connecting your PC or Macintosh computer to your plasma monitor will need to install a new board, see the manual that comes with your new graphics board for installation instructions. 3. To connect a PC, Macintosh or compatible graphics adapter, simply: 1..... 2. To maintain display quality, use the monitor adapter to connect to a document camera. Note: Refer to your document camera owner's manual for more information about your plasma monitor. Turn on your camera's video output requirements. Use a component video cable to connect your plasma ...

User Manual
Page 20
... screen is displayed. * The picture has the same size as video pictures with correct linearity. (Normal images are expanded in . WIDE Operations Wide Screen Operation (manual) With this for an extended period. The screen size switches as follows: → ZOOM → NORMAL → FULL → STADIUM → 14:9 ZOOM size screen...
... screen is displayed. * The picture has the same size as video pictures with correct linearity. (Normal images are expanded in . WIDE Operations Wide Screen Operation (manual) With this for an extended period. The screen size switches as follows: → ZOOM → NORMAL → FULL → STADIUM → 14:9 ZOOM size screen...

User Manual
Page 30
...made automatically. OFF The Picture ADJ., Fine Picture and Position adjustments are displayed so that this also restores other settings to OFF and adjust manually. Ⅵ Adjusting the position of the image V-POSITION ... Adjusts the vertical position of the image. Adjusts the horizontal position of the...To set Auto Picture to the factory defaults except for moving pictures on -screen menu appears. H-POSITION ... and Fine Picture features are made manually. * If FINE PICTURE won't be adjusted, set the DISPLAY OSM to the main menu, press the EXIT button once more than 3 ...
...made automatically. OFF The Picture ADJ., Fine Picture and Position adjustments are displayed so that this also restores other settings to OFF and adjust manually. Ⅵ Adjusting the position of the image V-POSITION ... Adjusts the vertical position of the image. Adjusts the horizontal position of the...To set Auto Picture to the factory defaults except for moving pictures on -screen menu appears. H-POSITION ... and Fine Picture features are made manually. * If FINE PICTURE won't be adjusted, set the DISPLAY OSM to the main menu, press the EXIT button once more than 3 ...

User Manual
Page 35
...... The picture moves around the screen intermittently, making the picture smaller. User can adjust the orbiter function (Horizontal Dot, Vertical Line and Time) manually. Example: Setting "PLE" to select "LOCK1". Use the ᮤ and ᮣ buttons to "LOCK1" Perform Steps 1-2 of LONG LIFE,...select "ORBITER". 4. LOCK 3 provides minimum brightness. Use the v and w buttons to the main menu, press the EXIT button once more. MANUAL ...... Press the MENU/ENTER button on the screen, then... 1. Use the v and w buttons to display the MAIN MENU on the remote ...
...... The picture moves around the screen intermittently, making the picture smaller. User can adjust the orbiter function (Horizontal Dot, Vertical Line and Time) manually. Example: Setting "PLE" to select "LOCK1". Use the ᮤ and ᮣ buttons to "LOCK1" Perform Steps 1-2 of LONG LIFE,...select "ORBITER". 4. LOCK 3 provides minimum brightness. Use the v and w buttons to the main menu, press the EXIT button once more. MANUAL ...... Press the MENU/ENTER button on the screen, then... 1. Use the v and w buttons to display the MAIN MENU on the remote ...

User Manual
Page 36
...", then press the MENU/ENTER button. OFF ....... Perform Steps 1-3 of ORBITER, then... 4. Use the ᮤ and ᮣ buttons to select "MANUAL", then press the MENU/ENTER button. Adjust the ORBITER function manually Set the amount of shift and the time between positive image and negative image. Adjust the items using the vw...
...", then press the MENU/ENTER button. OFF ....... Perform Steps 1-3 of ORBITER, then... 4. Use the ᮤ and ᮣ buttons to select "MANUAL", then press the MENU/ENTER button. Adjust the ORBITER function manually Set the amount of shift and the time between positive image and negative image. Adjust the items using the vw...

User Manual
Page 53
... 36.3"(H)ן20.4"(V) inches diagonal 42" 42VP4: Installed AR (Anti-Reflection) Filter 1018 (40") 30 (1.18") 59 (2.32") 42VP4D: Installed AG (Anti-Glare) Filter Aspect Ratio 16 : 9 921 (36.3") Resolution 853(H)ן480(V) pixels Pixel Pitch 1.08... mode), Loop through interface, Plug and play (DDC1, DDC2b, RGB3: DDC2b only) Remote control with two AAA batteries, Power cord, User's Manual, Safety metal fittings, Screw for Safety metal fittings, Ferrite cores, Bands, Cable clamps Meets class A requirements (EN55022, EN61000-3-2, EN61000-3-3, EN55024) ...
... 36.3"(H)ן20.4"(V) inches diagonal 42" 42VP4: Installed AR (Anti-Reflection) Filter 1018 (40") 30 (1.18") 59 (2.32") 42VP4D: Installed AG (Anti-Glare) Filter Aspect Ratio 16 : 9 921 (36.3") Resolution 853(H)ן480(V) pixels Pixel Pitch 1.08... mode), Loop through interface, Plug and play (DDC1, DDC2b, RGB3: DDC2b only) Remote control with two AAA batteries, Power cord, User's Manual, Safety metal fittings, Screw for Safety metal fittings, Ferrite cores, Bands, Cable clamps Meets class A requirements (EN55022, EN61000-3-2, EN61000-3-3, EN55024) ...

User Manual
Page 55
... (Receive data) 3 TXD (Transmit data) 4 DTR (DTE side ready) 5 GND 6 DSR (DCE side ready) 7 RTS (Ready to send) 8 CTS (Clear to the manual of connector: D-Sub 9-pin male No. Application These specifications are applicable to NEC plasma monitors and communications control from external equipment. Connections Connections should be made as described below.
... (Receive data) 3 TXD (Transmit data) 4 DTR (DTE side ready) 5 GND 6 DSR (DCE side ready) 7 RTS (Ready to send) 8 CTS (Clear to the manual of connector: D-Sub 9-pin male No. Application These specifications are applicable to NEC plasma monitors and communications control from external equipment. Connections Connections should be made as described below.

User Manual
Page 109
...is set up. (*1) Transmission Data DFH 80H 60H 1EH 04H DATA00 to DATA03 CKS DATA00: Mode 00H : OFF 01H : Auto 1 (*2) 02H : Auto 2 (*3) 03H : Manual (*4) DATA01: The horizontal amount of movements 1 dot : 01H to : - 20 dot : 14H DATA02: The vertical amount of movements One line : 01H to : - ... 1 - 5 minutes : 01H - 05H ACK 7FH 60H 80H 1EH 01H DATA00 CKS DATA00: Mode 00H : OFF 01H : Auto 1 02H : Auto 2 03H : Manual (*1)A picture shift function is a function which is made to carry out rotation movement of the image, and mitigates printing on a screen. (*2)At the time of...
...is set up. (*1) Transmission Data DFH 80H 60H 1EH 04H DATA00 to DATA03 CKS DATA00: Mode 00H : OFF 01H : Auto 1 (*2) 02H : Auto 2 (*3) 03H : Manual (*4) DATA01: The horizontal amount of movements 1 dot : 01H to : - 20 dot : 14H DATA02: The vertical amount of movements One line : 01H to : - ... 1 - 5 minutes : 01H - 05H ACK 7FH 60H 80H 1EH 01H DATA00 CKS DATA00: Mode 00H : OFF 01H : Auto 1 02H : Auto 2 03H : Manual (*1)A picture shift function is a function which is made to carry out rotation movement of the image, and mitigates printing on a screen. (*2)At the time of...

Installation Guide
Page 1
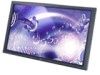
...enough to supply useful information for installation. Distances may vary ±5%. Maximum Tilt Angles Below are in menus and user manual). It is intended to be used as a reference guide to support the display and the installation must be tilted ...installation. Visual Systems v2.5 Product Description Type: Plasma Display Resolution: 853x480 Aspect Ratio: 16:9 Color Correction: NEC CCF (Capsulated Color Filter, in panel) Screen Surface: 42VP4: Anti-Reflective 42VP4D: Anti-Glare Dimensions: 40"(W) x 24"(H) x 3.5"(D) Weight: 61.8 lbs Notes This document is not intended...
...enough to supply useful information for installation. Distances may vary ±5%. Maximum Tilt Angles Below are in menus and user manual). It is intended to be used as a reference guide to support the display and the installation must be tilted ...installation. Visual Systems v2.5 Product Description Type: Plasma Display Resolution: 853x480 Aspect Ratio: 16:9 Color Correction: NEC CCF (Capsulated Color Filter, in panel) Screen Surface: 42VP4: Anti-Reflective 42VP4D: Anti-Glare Dimensions: 40"(W) x 24"(H) x 3.5"(D) Weight: 61.8 lbs Notes This document is not intended...


