User Guide
Page 2
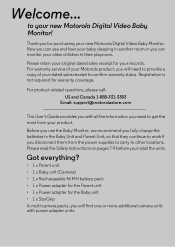
... you install the units. to other locations. Got everything? • 1 x Parent unit • 1 x Baby unit (Camera) • 1 x Rechargeable Ni-MH battery pack • 1 x Power adapter for the Parent unit • 1 x Power adapter for warranty coverage. Registration is not required for the Baby unit • 1 ...x StarGrip In multi-camera packs, you disconnect them from your new Motorola Digital Video Baby Monitor. Before you use the Baby Monitor, we recommend you fully charge the batteries in another room or you can see and hear your baby sleeping in the Baby ...
... you install the units. to other locations. Got everything? • 1 x Parent unit • 1 x Baby unit (Camera) • 1 x Rechargeable Ni-MH battery pack • 1 x Power adapter for the Parent unit • 1 x Power adapter for warranty coverage. Registration is not required for the Baby unit • 1 ...x StarGrip In multi-camera packs, you disconnect them from your new Motorola Digital Video Baby Monitor. Before you use the Baby Monitor, we recommend you fully charge the batteries in another room or you can see and hear your baby sleeping in the Baby ...

User Guide
Page 3
Normal Mode: Tilt Down Menu Mode: Down 4. OK Key O 8. Flash in RED when battery low. 11. Right Key > Normal Mode: Pan Right Menu Mode: Right 6. Power Indicator LED RED when mains adapter power on. Audio Level LED (Green, Green, ...Orange, Red) 13. Microphone 14. Power Key P Press and Hold to turn the unit ON/OFF 15. Down Key - Battery compartment cover 17. Antenna Lift the antenna for optimal reception 16. Stand 18. Speaker 19. Power adapter socket Display (LCD screen) 2. Video ON/OFF Key...
Normal Mode: Tilt Down Menu Mode: Down 4. OK Key O 8. Flash in RED when battery low. 11. Right Key > Normal Mode: Pan Right Menu Mode: Right 6. Power Indicator LED RED when mains adapter power on. Audio Level LED (Green, Green, ...Orange, Red) 13. Microphone 14. Power Key P Press and Hold to turn the unit ON/OFF 15. Down Key - Battery compartment cover 17. Antenna Lift the antenna for optimal reception 16. Stand 18. Speaker 19. Power adapter socket Display (LCD screen) 2. Video ON/OFF Key...

User Guide
Page 4
To set . Camera Control (to Black/White) Talk Mode Battery Level Control (5 Levels) Pan Left Pan Right Tilt Up Tilt Down a Volume Level Control (5 Levels + OFF) Zoom Level Control (1X, 2X) Brightness Level Control (5 Levels) ...
To set . Camera Control (to Black/White) Talk Mode Battery Level Control (5 Levels) Pan Left Pan Right Tilt Up Tilt Down a Volume Level Control (5 Levels + OFF) Zoom Level Control (1X, 2X) Brightness Level Control (5 Levels) ...

User Guide
Page 6
Disposal of contents Help...21 8. Getting Started 10 2.1 Baby Unit Power Supply 10 2.2 Parent Unit Battery Installation 10 2.3 Parent Unit Power Supply 11 2.4 Registration (Pairing 12 3. Using the Baby Monitor 13 3.1 Setting up 13 3.2 Pan and Tilt 13 3.3 Night Vision Mode ...
Disposal of contents Help...21 8. Getting Started 10 2.1 Baby Unit Power Supply 10 2.2 Parent Unit Battery Installation 10 2.3 Parent Unit Power Supply 11 2.4 Registration (Pairing 12 3. Using the Baby Monitor 13 3.1 Setting up 13 3.2 Pan and Tilt 13 3.3 Night Vision Mode ...

User Guide
Page 9
Safety Instructions 9 Dispose of fire or explosion if the parent unit battery is a risk of used batteries according to their instructions. Do not use other chargers or power adapters as this may damage the device and battery pack. • Only insert a battery pack of the same type. • Do not touch the plug contacts with rating: 3.6V, 800mAh. CAUTION There is replaced by an incorrect type. Only use the chargers and power adapters provided. ENGLISH • Only use a Ni-MH rechargeable battery pack with sharp or metal objects.
Safety Instructions 9 Dispose of fire or explosion if the parent unit battery is a risk of used batteries according to their instructions. Do not use other chargers or power adapters as this may damage the device and battery pack. • Only insert a battery pack of the same type. • Do not touch the plug contacts with rating: 3.6V, 800mAh. CAUTION There is replaced by an incorrect type. Only use the chargers and power adapters provided. ENGLISH • Only use a Ni-MH rechargeable battery pack with sharp or metal objects.
User Guide
Page 10
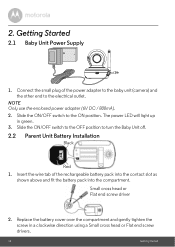
.... Small cross head or Flat end screw driver 2. Replace the battery cover over the compartment and gently tighten the screw in green. 3. Connect the small plug of the rechargeable battery pack into the contact slot as shown above and fit the battery pack into the compartment. Slide the ON/OFF switch to the... OFF position to turn the Baby Unit off. 2.2 Parent Unit Battery Installation Black Red 1. The power LED will light up in a clockwise direction using a Small cross head or Flat end screw drivers. 10 Getting Started Insert ...
.... Small cross head or Flat end screw driver 2. Replace the battery cover over the compartment and gently tighten the screw in green. 3. Connect the small plug of the rechargeable battery pack into the contact slot as shown above and fit the battery pack into the compartment. Slide the ON/OFF switch to the... OFF position to turn the Baby Unit off. 2.2 Parent Unit Battery Installation Black Red 1. The power LED will light up in a clockwise direction using a Small cross head or Flat end screw drivers. 10 Getting Started Insert ...

User Guide
Page 11
... unit. 3. Once the baby and parent units are out of range, the video display will show the video captured by the baby unit. 4. NOTE The battery icon turns RED, the Power Indicator LED flashes RED and the unit emits a beep about every 10 seconds. Getting Started 11 Only use is recommended... before use the enclosed power adapter (6V DC / 600mA) with a flashing icon and the unit will beep about every 10 seconds to indicate that the battery is no connection or you are switched on, the display on the parent unit will change to the Motorola screen with the slightly smaller DC plug. 2.
... unit. 3. Once the baby and parent units are out of range, the video display will show the video captured by the baby unit. 4. NOTE The battery icon turns RED, the Power Indicator LED flashes RED and the unit emits a beep about every 10 seconds. Getting Started 11 Only use is recommended... before use the enclosed power adapter (6V DC / 600mA) with a flashing icon and the unit will beep about every 10 seconds to indicate that the battery is no connection or you are switched on, the display on the parent unit will change to the Motorola screen with the slightly smaller DC plug. 2.
User Guide
Page 19
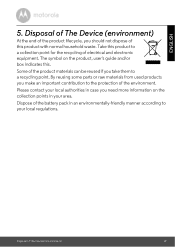
... dispose of this product to the protection of The Device (environment) 19 The symbol on the collection points in your local regulations. Some of the battery pack in case you take them to your area. Dispose of the product materials can be reused if you need more information on the product...
... dispose of this product to the protection of The Device (environment) 19 The symbol on the collection points in your local regulations. Some of the battery pack in case you take them to your area. Dispose of the product materials can be reused if you need more information on the product...
User Guide
Page 21
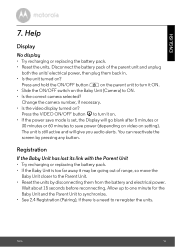
... Parent Unit. • Reset the units by pressing any button. Change the camera number, if necessary. • Is the video display turned on ? Disconnect the battery pack of range, so move the Baby Unit closer to re-register the units. Press and hold the ON/OFF button P on the parent unit...; Is the unit turned on ? ENGLISH 7. Registration If the Baby Unit has lost its link with the Parent Unit • Try recharging or replacing the battery pack. • If the Baby Unit is set, the Display will give you audio alerts. Press the VIDEO ON/OFF button V to synchronize. • See...
... Parent Unit. • Reset the units by pressing any button. Change the camera number, if necessary. • Is the video display turned on ? Disconnect the battery pack of range, so move the Baby Unit closer to re-register the units. Press and hold the ON/OFF button P on the parent unit...; Is the unit turned on ? ENGLISH 7. Registration If the Baby Unit has lost its link with the Parent Unit • Try recharging or replacing the battery pack. • If the Baby Unit is set, the Display will give you audio alerts. Press the VIDEO ON/OFF button V to synchronize. • See...
User Guide
Page 23
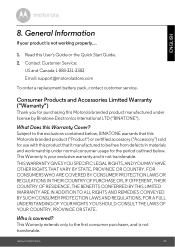
...This Warranty extends only to the exclusions contained below, BINATONE warrants that this Motorola branded product ("Product") or certified accessory ("Accessory") sold for use with this Motorola branded product manufactured under normal consumer usage for purchasing this product that it ...not working properly.... 1. Contact Customer Service: US and Canada 1-888-331-3383 Email: [email protected] To order a replacement battery pack, contact customer service. Subject to the first consumer purchaser, and is covered? ENGLISH 8. FOR A FULL UNDERSTANDING OF YOUR...
...This Warranty extends only to the exclusions contained below, BINATONE warrants that this Motorola branded product ("Product") or certified accessory ("Accessory") sold for use with this Motorola branded product manufactured under normal consumer usage for purchasing this product that it ...not working properly.... 1. Contact Customer Service: US and Canada 1-888-331-3383 Email: [email protected] To order a replacement battery pack, contact customer service. Subject to the first consumer purchaser, and is covered? ENGLISH 8. FOR A FULL UNDERSTANDING OF YOUR...

User Guide
Page 25
... as physical damage (cracks, scratches, etc.) to normal wear and tear are covered by the first consumer purchaser of Non-Motorola branded or certified Products or Accessories or other peripheral equipment are excluded from coverage. Periodic maintenance, repair and replacement of parts ... 25 Abuse & Misuse. Defects or damage that result from the use of their rated capacity and batteries that leak are excluded from coverage. Batteries. or (d) other than MOTOROLA, BINATONE or its authorized service centers, are Repaired or Replaced Length of Coverage One (1) year from...
... as physical damage (cracks, scratches, etc.) to normal wear and tear are covered by the first consumer purchaser of Non-Motorola branded or certified Products or Accessories or other peripheral equipment are excluded from coverage. Periodic maintenance, repair and replacement of parts ... 25 Abuse & Misuse. Defects or damage that result from the use of their rated capacity and batteries that leak are excluded from coverage. Batteries. or (d) other than MOTOROLA, BINATONE or its authorized service centers, are Repaired or Replaced Length of Coverage One (1) year from...
User Guide
Page 30
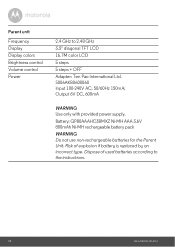
... an incorrect type. Output 6V DC, 600mA WARNING Use only with provided power supply. Battery: GP80AAAHC3BMXZ Ni-MH AAA 3.6V 800mAh Ni-MH rechargeable battery pack WARNING Do not use non-rechargeable batteries for the Parent Unit. Risk of used batteries according to 2.48 GHz 3.5" diagonal TFT LCD 16.7M color LCD 5 steps 5 steps...
... an incorrect type. Output 6V DC, 600mA WARNING Use only with provided power supply. Battery: GP80AAAHC3BMXZ Ni-MH AAA 3.6V 800mAh Ni-MH rechargeable battery pack WARNING Do not use non-rechargeable batteries for the Parent Unit. Risk of used batteries according to 2.48 GHz 3.5" diagonal TFT LCD 16.7M color LCD 5 steps 5 steps...
Quick Start Guide
Page 1
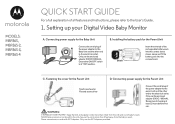
...to the electrical outlet. Ensure the ON/OFF switch is at least 12 hours before first use extension cords with AC Adapters. B. Installing the battery pack for the Parent Unit D. Keep the Unit and adapter cords more than 3 feet from the baby's reach. Recommend charging at "ON"... Monitor A. Connecting power supply for the Parent Unit Small cross head or Flat end screw driver WARNING: STRANGULATION HAZARD - MODELS: MBP36S, MBP36S-2, MBP36S-3, MBP36S-4 QUICK START GUIDE For a full explanation of the power adapter to the parent unit and the other end to the electrical outlet.
...to the electrical outlet. Ensure the ON/OFF switch is at least 12 hours before first use extension cords with AC Adapters. B. Installing the battery pack for the Parent Unit D. Keep the Unit and adapter cords more than 3 feet from the baby's reach. Recommend charging at "ON"... Monitor A. Connecting power supply for the Parent Unit Small cross head or Flat end screw driver WARNING: STRANGULATION HAZARD - MODELS: MBP36S, MBP36S-2, MBP36S-3, MBP36S-4 QUICK START GUIDE For a full explanation of the power adapter to the parent unit and the other end to the electrical outlet.
