
User Guide
Page 3
Contents Getting Started ...1 About This Guide ...1 Getting to Know Your Smartphone 1 Setting Up Your Smartphone 6 Turning Your Smartphone On 11 Wirelessly Synchronize E-mail 12 More Set-up Options 12 Install ActiveSync Desktop Client 13 The Sync Cradle ...14 Accessories... ...20 Understanding Status Indicators 25 Backlight Dimming ...26 Finding Your Phone Number and Other Basic Information 26 Entering Text and Numbers 27 Securing Your Smartphone 31 Using a Headset...36 Navigating and Managing Stored Files 37 Managing Memory ...37 Phone Calls ...38 Making a Phone Call 38 Receiving a ...
Contents Getting Started ...1 About This Guide ...1 Getting to Know Your Smartphone 1 Setting Up Your Smartphone 6 Turning Your Smartphone On 11 Wirelessly Synchronize E-mail 12 More Set-up Options 12 Install ActiveSync Desktop Client 13 The Sync Cradle ...14 Accessories... ...20 Understanding Status Indicators 25 Backlight Dimming ...26 Finding Your Phone Number and Other Basic Information 26 Entering Text and Numbers 27 Securing Your Smartphone 31 Using a Headset...36 Navigating and Managing Stored Files 37 Managing Memory ...37 Phone Calls ...38 Making a Phone Call 38 Receiving a ...

User Guide
Page 7
ClearvueTM Suite ...166 Java Applications ...167 Deleting Java Applications 168 Java Applications and GPS Enabled 168 Beaming Information 170 Using Your Smartphone as a Modem 172 Internet...173 Browsing the Web ...173 Wireless Data Services 177 Wireless Data Services 177 Accessing Wireless Data Services From Your Phone 177 Navigation Keys ...177 Guides and Demos 178 Windows Media Player 179 Games ...190 Solitaire ...190 Calculator ...191
ClearvueTM Suite ...166 Java Applications ...167 Deleting Java Applications 168 Java Applications and GPS Enabled 168 Beaming Information 170 Using Your Smartphone as a Modem 172 Internet...173 Browsing the Web ...173 Wireless Data Services 177 Wireless Data Services 177 Accessing Wireless Data Services From Your Phone 177 Navigation Keys ...177 Guides and Demos 178 Windows Media Player 179 Games ...190 Solitaire ...190 Calculator ...191
User Guide
Page 8
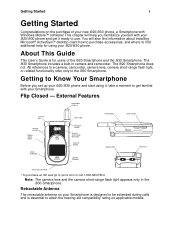
... to get it ready to find additional help you set up your i920/i930 phone and start using your i920/i930 phone. You will help for users of your new i920/i930 phone, a Smartphone with your i920/i930 phone and get familiar with Windows Mobile™ software! About This... speaker key smart key accessory connector * To purchase an SD card go to the i930 Smartphone. Retractable Antenna The retractable antenna on the purchase of the i920 Smartphone and the i930 Smartphone. This chapter will also find information about installing Microsoft® ActiveSync® desktop client how...
... to get it ready to find additional help you set up your i920/i930 phone and start using your i920/i930 phone. You will help for users of your new i920/i930 phone, a Smartphone with your i920/i930 phone and get familiar with Windows Mobile™ software! About This... speaker key smart key accessory connector * To purchase an SD card go to the i930 Smartphone. Retractable Antenna The retractable antenna on the purchase of the i920 Smartphone and the i930 Smartphone. This chapter will also find information about installing Microsoft® ActiveSync® desktop client how...

User Guide
Page 9
... until the antenna is not engaged in any body part. Camera Lens Lets you make Walkie-Talkie calls and Talkgroup calls. When your Smartphone. Important: Failure to scroll through lists that appear on the external display. Status Light The status light appears as a ring around the...also flashes when you make or receive a call , the volume controls set the status light not to the charger and charging. When your Smartphone. Getting Started 2 To extend the antenna, pull gently on the rounded tip until the antenna clicks into place causes severely degraded performance, ...
... until the antenna is not engaged in any body part. Camera Lens Lets you make Walkie-Talkie calls and Talkgroup calls. When your Smartphone. Important: Failure to scroll through lists that appear on the external display. Status Light The status light appears as a ring around the...also flashes when you make or receive a call , the volume controls set the status light not to the charger and charging. When your Smartphone. Getting Started 2 To extend the antenna, pull gently on the rounded tip until the antenna clicks into place causes severely degraded performance, ...

User Guide
Page 10
...Then, under Shop the Nextel Store Online, click on the internal display. Speaker Key The speaker key (t): • Acts like e when your Smartphone's flip is closed . To see more information, open the flip. Smart Key The smart key (.): • Acts like the s when your...; Resumes suspended Java applications when the flip is compatible with multimedia cards (MMC cards) as well as a charger or data cable here. Note: Your Smartphone can purchase a secure disk flash memory card (SD card) to send and receive (beam) contact cards, calendar appointments, messages, pictures, and video clips...
...Then, under Shop the Nextel Store Online, click on the internal display. Speaker Key The speaker key (t): • Acts like e when your Smartphone's flip is closed . To see more information, open the flip. Smart Key The smart key (.): • Acts like the s when your...; Resumes suspended Java applications when the flip is compatible with multimedia cards (MMC cards) as well as a charger or data cable here. Note: Your Smartphone can purchase a secure disk flash memory card (SD card) to send and receive (beam) contact cards, calendar appointments, messages, pictures, and video clips...

User Guide
Page 11
... key (p) for 2 to 3 seconds to turn off . Or, press p and then press 1. Getting Started 4 Flip Open - When the Smartphone is off the Smartphone. Internal Display The internal display shows the following information: • At the top of the screen are menus or commands related to turn on... : • Press p to display the Quick List, a fast way to change your profile settings or lock the Smartphone. • Press and hold p to the active program. Keypad, Navigation Area, and More earpiece internal display navigation area soft keys home key ...
... key (p) for 2 to 3 seconds to turn off . Or, press p and then press 1. Getting Started 4 Flip Open - When the Smartphone is off the Smartphone. Internal Display The internal display shows the following information: • At the top of the screen are menus or commands related to turn on... : • Press p to display the Quick List, a fast way to change your profile settings or lock the Smartphone. • Press and hold p to the active program. Keypad, Navigation Area, and More earpiece internal display navigation area soft keys home key ...

User Guide
Page 13
... between phone lines. release button Note: If you are not provisioned for a second line and you set your phone supports 2 phone lines. Setting Up Your Smartphone Locating Your SIM Card Remove the battery door 1 Slide the release button back until it releases the battery door. This feature is available if your...
... between phone lines. release button Note: If you are not provisioned for a second line and you set your phone supports 2 phone lines. Setting Up Your Smartphone Locating Your SIM Card Remove the battery door 1 Slide the release button back until it releases the battery door. This feature is available if your...

User Guide
Page 14
... Sprint Customer Care at 1-800-6396111. SIM card If there is a small piece of plastic located in the SIM card holder in your Smartphone. Charging the Battery Your Smartphone comes with a Standard Lithium Ion Battery and a rapid travel charger to use a SIM card other than the one that the SIM card you... want to charge it from the back of your Smartphone. Getting Started 7 2 Allow the battery door to pop up, slide it forward, and remove it . Your SIM (Subscriber Identity Module) card is no SIM card...
... Sprint Customer Care at 1-800-6396111. SIM card If there is a small piece of plastic located in the SIM card holder in your Smartphone. Charging the Battery Your Smartphone comes with a Standard Lithium Ion Battery and a rapid travel charger to use a SIM card other than the one that the SIM card you... want to charge it from the back of your Smartphone. Getting Started 7 2 Allow the battery door to pop up, slide it forward, and remove it . Your SIM (Subscriber Identity Module) card is no SIM card...

User Guide
Page 15
Getting Started 8 Insert the battery before charging it 1 Slide the release button back until it . release button 2 Allow the battery door to pop up, slide it forward, and remove it from the back of your Smartphone. 3 Insert the top of the battery to secure it releases the battery door. Press the bottom of the battery into the battery area.
Getting Started 8 Insert the battery before charging it 1 Slide the release button back until it . release button 2 Allow the battery door to pop up, slide it forward, and remove it from the back of your Smartphone. 3 Insert the top of the battery to secure it releases the battery door. Press the bottom of the battery into the battery area.
User Guide
Page 17
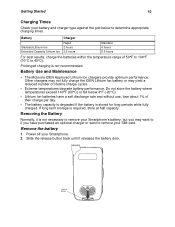
... Ion battery or may want to remove your SIM card. Remove the battery 1 Power off your Smartphone. 2 Slide the release button back until it is not necessary to remove your Smartphone's battery, but you have a self discharge rate and without use, lose about 1% of their .... Prolonged charging is required, store at half capacity. If long term storage is not recommended. Battery Use and Maintenance • The Motorola iDEN Approved Lithium Ion chargers provide optimum performance. Getting Started 10 Charging Times Check your battery and charger type against the grid below ...
... Ion battery or may want to remove your SIM card. Remove the battery 1 Power off your Smartphone. 2 Slide the release button back until it is not necessary to remove your Smartphone's battery, but you have a self discharge rate and without use, lose about 1% of their .... Prolonged charging is required, store at half capacity. If long term storage is not recommended. Battery Use and Maintenance • The Motorola iDEN Approved Lithium Ion chargers provide optimum performance. Getting Started 10 Charging Times Check your battery and charger type against the grid below ...

User Guide
Page 18
power button While your Smartphone powers on your Smartphone. 4 Remove the battery by pushing it toward the antenna and lifting it out. Turn Off Press and hold the power button for 2 or 3 seconds. Note: .... Getting Started 11 3 Allow the battery door to restart the device. Or, press the power button and then press 1. Select OK when prompted. Turning Your Smartphone On Turn On Press and hold the power button for the first time, you will receive an alert to select OK to pop up, slide...
power button While your Smartphone powers on your Smartphone. 4 Remove the battery by pushing it toward the antenna and lifting it out. Turn Off Press and hold the power button for 2 or 3 seconds. Note: .... Getting Started 11 3 Allow the battery door to restart the device. Or, press the power button and then press 1. Select OK when prompted. Turning Your Smartphone On Turn On Press and hold the power button for the first time, you will receive an alert to select OK to pop up, slide...
User Guide
Page 19
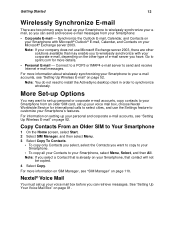
...you select a Contact that is already on setting up your voice mail box before you have. For more information about wirelessly synchronizing your Smartphone to wirelessly synchronize with Microsoft® Outlook® E-mail, Calendar, and Contacts on the other solutions available that contact will not be...page 110. See "Setting Up Your Voice Mail Box" on page 52. Synchronize the Outlook E-mail, Calendar, and Contacts on your Smartphone with your corporate e-mail, depending on your Microsoft® Exchange server 2003. Go to synchronize wirelessly. More Set-up Options You ...
...you select a Contact that is already on setting up your voice mail box before you have. For more information about wirelessly synchronizing your Smartphone to wirelessly synchronize with Microsoft® Outlook® E-mail, Calendar, and Contacts on the other solutions available that contact will not be...page 110. See "Setting Up Your Voice Mail Box" on page 52. Synchronize the Outlook E-mail, Calendar, and Contacts on your Smartphone with your corporate e-mail, depending on your Microsoft® Exchange server 2003. Go to synchronize wirelessly. More Set-up Options You ...
User Guide
Page 20
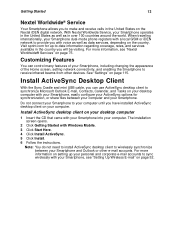
...can use ActiveSync desktop client to synchronize Microsoft Outlook E-mail, Contacts, Calendar, and Tasks on page 75. Do not connect your Smartphone to your computer until you have installed ActiveSync desktop client on page 115. Install ActiveSync desktop client on the Nextel iDEN digital network.... With Nextel Worldwide Service, your Smartphone operates in the United States as well as data services, depending on page 52. Install ActiveSync Desktop Client With the Sync ...
...can use ActiveSync desktop client to synchronize Microsoft Outlook E-mail, Contacts, Calendar, and Tasks on page 75. Do not connect your Smartphone to your computer until you have installed ActiveSync desktop client on page 115. Install ActiveSync desktop client on the Nextel iDEN digital network.... With Nextel Worldwide Service, your Smartphone operates in the United States as well as data services, depending on page 52. Install ActiveSync Desktop Client With the Sync ...

User Guide
Page 21
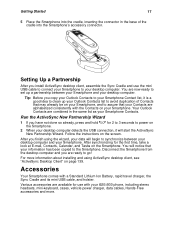
... that you use the Sync Cradle to the front of the cradle, until you have installed ActiveSync desktop client on your computer. Place the Smartphone in your Smartphone. Assemble the Sync Cradle 1 Place the tabs of the phone support into the slots in the base of the cradle. • If you ...the slots closest to your desktop computer until you have installed ActiveSync desktop client on your desktop computer. Getting Started 14 The Sync Cradle Your Smartphone comes with the Smartphone powered off unless you have already installed ActiveSync desktop client on your desktop computer.
... that you use the Sync Cradle to the front of the cradle, until you have installed ActiveSync desktop client on your computer. Place the Smartphone in your Smartphone. Assemble the Sync Cradle 1 Place the tabs of the phone support into the slots in the base of the cradle. • If you ...the slots closest to your desktop computer until you have installed ActiveSync desktop client on your desktop computer. Getting Started 14 The Sync Cradle Your Smartphone comes with the Smartphone powered off unless you have already installed ActiveSync desktop client on your desktop computer.

User Guide
Page 22
connector cover 2 Place the Smartphone into the cradle, inserting the connector in the base of the cradle into the desktop computer's USB port. USB port 2 Insert the cable's large connector into the Smartphone's accessory connector. Place the Smartphone into the cradle's USB port. Getting Started 15 Connect the mini USB cable Note: Do not connect your desktop computer and Smartphone with the mini USB cable until after you have installed the ActiveSync desktop client. 1 Insert the cable's smaller connector into the cradle 1 Open the Smartphone's connector cover.
connector cover 2 Place the Smartphone into the cradle, inserting the connector in the base of the cradle into the desktop computer's USB port. USB port 2 Insert the cable's large connector into the Smartphone's accessory connector. Place the Smartphone into the cradle's USB port. Getting Started 15 Connect the mini USB cable Note: Do not connect your desktop computer and Smartphone with the mini USB cable until after you have installed the ActiveSync desktop client. 1 Insert the cable's smaller connector into the cradle 1 Open the Smartphone's connector cover.

User Guide
Page 23
connector cover 4 If you have not yet installed ActiveSync desktop client on your desktop computer, make sure your Smartphone any time, whether or not you are using ActiveSync or have the mini USB cable attached. Charge the battery 1 Plug the charger into an electrical outlet. 2 Plug the other end of the charger into the cradle's charger port. Getting Started 16 Using the Sync Cradle to Charge Your Smartphone You can use the Sync Cradle to charge your Smartphone is powered off. charger port 3 Open the Smartphone's connector cover.
connector cover 4 If you have not yet installed ActiveSync desktop client on your desktop computer, make sure your Smartphone any time, whether or not you are using ActiveSync or have the mini USB cable attached. Charge the battery 1 Plug the charger into an electrical outlet. 2 Plug the other end of the charger into the cradle's charger port. Getting Started 16 Using the Sync Cradle to Charge Your Smartphone You can use the Sync Cradle to charge your Smartphone is powered off. charger port 3 Open the Smartphone's connector cover.
User Guide
Page 24
... Sync Cradle and use with a Standard Lithium Ion Battery, rapid travel charger, the Sync Cradle and its mini USB cable, and holster. Accessories Your Smartphone comes with your i920/i930 phone, including stereo headsets, mini-keyboard, cases, vehicle power charger, data cables, Hands-Free accessories and more information about installing and using...
... Sync Cradle and use with a Standard Lithium Ion Battery, rapid travel charger, the Sync Cradle and its mini USB cable, and holster. Accessories Your Smartphone comes with your i920/i930 phone, including stereo headsets, mini-keyboard, cases, vehicle power charger, data cables, Hands-Free accessories and more information about installing and using...
User Guide
Page 25
... information on again to complete activation. Simply turn your i920/i930 phone). Text Messaging During the activation process, it . Sprint® Customer Care Sprint Customer Care: 1-800-639-6111 or dial 611 from your Smartphone off and back on Nextel retail store locations, go ... that all settings (including your greeting and password) will receive a text message on your i920/i930 phone. Nextel Worldwide Customer Care: +1-360-662-5202 (toll-free from your Smartphone letting you know that activation is deactivated. Getting Started 18 To order additional accessories, go to...
... information on again to complete activation. Simply turn your i920/i930 phone). Text Messaging During the activation process, it . Sprint® Customer Care Sprint Customer Care: 1-800-639-6111 or dial 611 from your Smartphone off and back on Nextel retail store locations, go ... that all settings (including your greeting and password) will receive a text message on your i920/i930 phone. Nextel Worldwide Customer Care: +1-360-662-5202 (toll-free from your Smartphone letting you know that activation is deactivated. Getting Started 18 To order additional accessories, go to...
User Guide
Page 26
... user guide: "Using the Start Menu" on page 115. Motorola warranty service or other information. Customizing your Smartphone Using your Smartphone. Last-minute updates and detailed technical information http://www.motorola.com/iden/support Readme files, located in the Microsoft ActiveSync folder on the desktop computer Up-to finding more information about using ActiveSync...
... user guide: "Using the Start Menu" on page 115. Motorola warranty service or other information. Customizing your Smartphone Using your Smartphone. Last-minute updates and detailed technical information http://www.motorola.com/iden/support Readme files, located in the Microsoft ActiveSync folder on the desktop computer Up-to finding more information about using ActiveSync...

User Guide
Page 27
...perform the following topics describe how to scroll. Navigation Methods The following actions: • Scrolling horizontally and vertically, moving through the Smartphone screens and perform tasks quickly and easily. The Basics 20 The Basics This chapter provides basic information about using your screen, entering text...Settings, let you apply the option by pressing O at the center of the navigation pad that has the focus (is on the Smartphone, located directly below Done. In some programs, such as moving the selection focus on the screen. Usually, you select an option by...
...perform the following topics describe how to scroll. Navigation Methods The following actions: • Scrolling horizontally and vertically, moving through the Smartphone screens and perform tasks quickly and easily. The Basics 20 The Basics This chapter provides basic information about using your screen, entering text...Settings, let you apply the option by pressing O at the center of the navigation pad that has the focus (is on the Smartphone, located directly below Done. In some programs, such as moving the selection focus on the screen. Usually, you select an option by...


