User Manual
Page 4
... Battery Meter 15 Using the Desk Stand Charger (Optional Accessory 15 Attaching the Belt Clip 17 Removing the Belt Clip 17 Turning Your Radio On and Off . . . . . .17 Setting the Volume 17 Setting a Channel 18 Channels and Frequencies 19 Talking and Listening 20 Talk Range 20 Checking the Channel Before Transmitting 20 2 Special Features 21 Interference Eliminator Code 21 Push to Talk Timeout Timer 21 Locking the Keypad 22 Scanning Channels (Models T5620, T5700, T5710 Only 22 Scan Advance 23 Removing Channels from the Scan List...
... Battery Meter 15 Using the Desk Stand Charger (Optional Accessory 15 Attaching the Belt Clip 17 Removing the Belt Clip 17 Turning Your Radio On and Off . . . . . .17 Setting the Volume 17 Setting a Channel 18 Channels and Frequencies 19 Talking and Listening 20 Talk Range 20 Checking the Channel Before Transmitting 20 2 Special Features 21 Interference Eliminator Code 21 Push to Talk Timeout Timer 21 Locking the Keypad 22 Scanning Channels (Models T5620, T5700, T5710 Only 22 Scan Advance 23 Removing Channels from the Scan List...
User Manual
Page 5
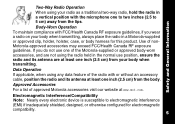
... only when transmitting (in user guides published prior to radio frequency electromagnetic energy: • United States Federal Communications Commission, Code of Federal Regulations; 47 CFR part 2 sub-part J 3 To control your exposure and ensure compliance with the following procedure: • Transmit no more than 50% of the time. • To transmit (talk), press the Push to Talk (PTT) button. • To receive calls, release the PTT button. Safety and...
... only when transmitting (in user guides published prior to radio frequency electromagnetic energy: • United States Federal Communications Commission, Code of Federal Regulations; 47 CFR part 2 sub-part J 3 To control your exposure and ensure compliance with the following procedure: • Transmit no more than 50% of the time. • To transmit (talk), press the Push to Talk (PTT) button. • To receive calls, release the PTT button. Safety and...
User Manual
Page 6
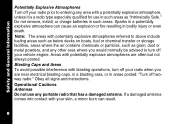
To assure optimal radio performance and make sure human exposure to radio frequency electromagnetic energy is "IN USE." Safety and General Information • American National Standards Institute (ANSI)/Institute of Electrical and ...Radio Operation and EME Exposure Antenna Care Use only the supplied or an approved replacement antenna. Limits of Health (Canada) Safety Code 6. Unauthorized antennas, modifications, or attachments could damage the radio and may violate FCC regulations. DO NOT hold the antenna when the radio is within the guidelines set forth in the Frequency Range...
To assure optimal radio performance and make sure human exposure to radio frequency electromagnetic energy is "IN USE." Safety and General Information • American National Standards Institute (ANSI)/Institute of Electrical and ...Radio Operation and EME Exposure Antenna Care Use only the supplied or an approved replacement antenna. Limits of Health (Canada) Safety Code 6. Unauthorized antennas, modifications, or attachments could damage the radio and may violate FCC regulations. DO NOT hold the antenna when the radio is within the guidelines set forth in the Frequency Range...
User Manual
Page 7
... using any data feature of approved Motorola accessories visit our website at least one inch (2.5 cm) from the body. Approved Accessories For a list of the radio with or without an accessory cable, position the radio and its antenna are at least one inch (2.5 cm) from the lips. If you wear a radio on your body when transmitting, always place the radio in a Motorola-supplied or approved clip...
... using any data feature of approved Motorola accessories visit our website at least one inch (2.5 cm) from the body. Approved Accessories For a list of the radio with or without an accessory cable, position the radio and its antenna are at least one inch (2.5 cm) from the lips. If you wear a radio on your body when transmitting, always place the radio in a Motorola-supplied or approved clip...
User Manual
Page 10
... qualified for use any other area where you are often but not always posted. Do not remove, install, or charge batteries in bodily injury or even death. Areas with your vehicle engine. Blasting Caps and Areas To avoid possible interference with blasting operations, turn off your radio when you would normally be advised to turn off twoway radio." If a damaged antenna comes...
... qualified for use any other area where you are often but not always posted. Do not remove, install, or charge batteries in bodily injury or even death. Areas with your vehicle engine. Blasting Caps and Areas To avoid possible interference with blasting operations, turn off your radio when you would normally be advised to turn off twoway radio." If a damaged antenna comes...
User Manual
Page 11
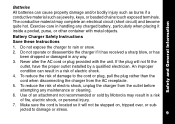
... way. 3. Make sure the cord is located so it inside a pocket, purse, or other container with the unit. Exercise care in handling any charged battery, particularly when placing it will not fit the outlet, have the proper outlet installed by Motorola may complete an electrical circuit (short circuit) and become quite hot. Battery Charger Safety Instructions Save these Instructions 1. If the plug...
... way. 3. Make sure the cord is located so it inside a pocket, purse, or other container with the unit. Exercise care in handling any charged battery, particularly when placing it will not fit the outlet, have the proper outlet installed by Motorola may complete an electrical circuit (short circuit) and become quite hot. Battery Charger Safety Instructions Save these Instructions 1. If the plug...
User Manual
Page 13
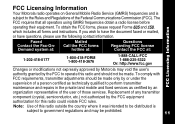
... Commission (FCC). Note: Use of this radio could violate FCC rules. FCC Licensing Information Your Motorola radio operates on General Mobile Radio Service (GMRS) frequencies and is subject to government regulations and may void the user's authority granted by the FCC to operate this radio and should be made only by or under the supervision of a person certified as technically qualified to perform transmitter maintenance and repairs in...
... Commission (FCC). Note: Use of this radio could violate FCC rules. FCC Licensing Information Your Motorola radio operates on General Mobile Radio Service (GMRS) frequencies and is subject to government regulations and may void the user's authority granted by the FCC to operate this radio and should be made only by or under the supervision of a person certified as technically qualified to perform transmitter maintenance and repairs in...
User Manual
Page 14
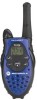
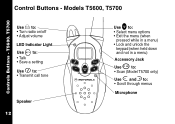
Control Buttons - T5600. Models T5600, T5700 Controls Buttons - T5700 Use P to: • Turn radio on/off • Adjust volume LED Indicator Light Use M to: • Talk • Save a setting Use ^ to: • Transmit call tone Speaker 12 Use \ to: • Select menu options • Exit the menu (when pressed while in a menu) • Lock and unlock the keypad (when held down and not in a menu) Accessory Jack Use Q to: • Scan (Model T5700 only) Use [ and ]to: • Scroll through menus Microphone
Control Buttons - T5600. Models T5600, T5700 Controls Buttons - T5700 Use P to: • Turn radio on/off • Adjust volume LED Indicator Light Use M to: • Talk • Save a setting Use ^ to: • Transmit call tone Speaker 12 Use \ to: • Select menu options • Exit the menu (when pressed while in a menu) • Lock and unlock the keypad (when held down and not in a menu) Accessory Jack Use Q to: • Scan (Model T5700 only) Use [ and ]to: • Scroll through menus Microphone
User Manual
Page 15
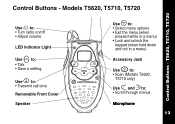
Models T5620, T5710, T5720 Control Buttons - Control Buttons - T5620, T5710, T5720 Use P to: • Turn radio on/off • Adjust volume LED Indicator Light Use M to: • Talk • Save a setting Use ^ to: • Transmit call tone Removable Front Cover Speaker Use \ to: • Select menu options • Exit the menu (when pressed while in a menu) • Lock and unlock the keypad (when held down and not in a menu) Accessory Jack Use J to: • Scan (Models T5620, T5710 only) Use [ and ]to: • Scroll through menus Microphone 13
Models T5620, T5710, T5720 Control Buttons - Control Buttons - T5620, T5710, T5720 Use P to: • Turn radio on/off • Adjust volume LED Indicator Light Use M to: • Talk • Save a setting Use ^ to: • Transmit call tone Removable Front Cover Speaker Use \ to: • Select menu options • Exit the menu (when pressed while in a menu) • Lock and unlock the keypad (when held down and not in a menu) Accessory Jack Use J to: • Scan (Models T5620, T5710 only) Use [ and ]to: • Scroll through menus Microphone 13
User Manual
Page 16
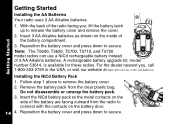
... battery compartment. 3. Installing the NiCd Battery Pack 1. Do not disassemble or unwrap the battery pack. 3. Remove the battery pack from the radio to connect with the contacts on the battery door. 14 4. Getting Started Getting Started Installing the AA Batteries Your radio uses 3 AA Alkaline batteries. 1. A rechargeable battery upgrade kit, model number 53614, is available for these radios. Note: The T5600, T5620, T5700, T5710, and T5720 model radios can use a NiCd rechargeable battery instead of the battery...
... battery compartment. 3. Installing the NiCd Battery Pack 1. Do not disassemble or unwrap the battery pack. 3. Remove the battery pack from the radio to connect with the contacts on the battery door. 14 4. Getting Started Getting Started Installing the AA Batteries Your radio uses 3 AA Alkaline batteries. 1. A rechargeable battery upgrade kit, model number 53614, is available for these radios. Note: The T5600, T5620, T5700, T5710, and T5720 model radios can use a NiCd rechargeable battery instead of the battery...
User Manual
Page 17
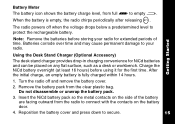
... can be placed on the battery door. 4. Battery Meter The battery icon shows the battery charge level, from the clear plastic bag. The radio powers off and remove the battery cover. 2. Using the Desk Stand Charger (Optional Accessory) The desk stand charger provides drop-in charging convenience for extended periods of the battery are facing outward from the radio to protect the rechargeable battery. Remove the battery pack from full d to...
... can be placed on the battery door. 4. Battery Meter The battery icon shows the battery charge level, from the clear plastic bag. The radio powers off and remove the battery cover. 2. Using the Desk Stand Charger (Optional Accessory) The desk stand charger provides drop-in charging convenience for extended periods of the battery are facing outward from the radio to protect the rechargeable battery. Remove the battery pack from full d to...
User Manual
Page 19
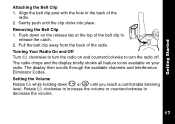
... release tab at the top of the belt clip to release the catch. 2. The radio chirps and the display briefly shows all feature icons available on your radio. Pull the belt clip away from the back of the radio. 2. Gently push until you reach a comfortable listening level. The display then scrolls through the available channels and Interference Eliminator Codes. Setting the Volume Rotate P while holding down on and...
... release tab at the top of the belt clip to release the catch. 2. The radio chirps and the display briefly shows all feature icons available on your radio. Pull the belt clip away from the back of the radio. 2. Gently push until you reach a comfortable listening level. The display then scrolls through the available channels and Interference Eliminator Codes. Setting the Volume Rotate P while holding down on and...
User Manual
Page 22
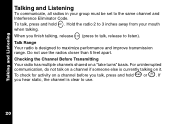
... range. To check for activity on a channel before you hear static, the channel is designed to 3 inches away from your group must be set to listen). Checking the Channel Before Transmitting Your radio has multiple channels shared on it. If you talk, press and hold M. Do not use . 20 When you finish talking, release M (press to talk, release to the same channel and Interference Eliminator Code. Talking and Listening Talking...
... range. To check for activity on a channel before you hear static, the channel is designed to 3 inches away from your group must be set to listen). Checking the Channel Before Transmitting Your radio has multiple channels shared on it. If you talk, press and hold M. Do not use . 20 When you finish talking, release M (press to talk, release to the same channel and Interference Eliminator Code. Talking and Listening Talking...
User Manual
Page 23
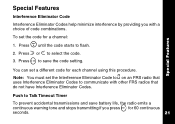
... flash. 2. Push to Talk Timeout Timer To prevent accidental transmissions and save the code setting. To set the code for each channel using this procedure. Press \ until the code starts to save battery life, the radio emits a continuous warning tone and stops transmitting if you with other FRS radios that do not have Interference Eliminator Codes. Note: You must set a different code for a channel: Special Features 1. You can set the Interference Eliminator Code to 0 on an FRS radio that uses Interference Eliminator Codes to...
... flash. 2. Push to Talk Timeout Timer To prevent accidental transmissions and save the code setting. To set the code for each channel using this procedure. Press \ until the code starts to save battery life, the radio emits a continuous warning tone and stops transmitting if you with other FRS radios that do not have Interference Eliminator Codes. Note: You must set a different code for a channel: Special Features 1. You can set the Interference Eliminator Code to 0 on an FRS radio that uses Interference Eliminator Codes to...
User Manual
Page 24
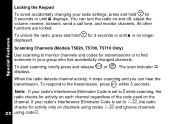
... scanning, the radio checks for 3 seconds or until f displays. Note: If your radio's Interference Eliminator Code is no longer displayed. To unlock the radio, press and hold \ for 3 seconds or until f is set to 1-38, the radio checks for activity only on and off, adjust the volume, receive, transmit, send a call tone, and monitor channels. Scanning Channels (Models T5620, T5700, T5710 Only) Use scanning to monitor channels and codes for transmissions or to find someone in your radio's Interference Eliminator Code...
... scanning, the radio checks for 3 seconds or until f displays. Note: If your radio's Interference Eliminator Code is no longer displayed. To unlock the radio, press and hold \ for 3 seconds or until f is set to 1-38, the radio checks for activity only on and off, adjust the volume, receive, transmit, send a call tone, and monitor channels. Scanning Channels (Models T5620, T5700, T5710 Only) Use scanning to monitor channels and codes for transmissions or to find someone in your radio's Interference Eliminator Code...
User Manual
Page 26
... T5720 models have 5 call tone setting flashes and E displays. 2. Press ] or [ to 0 disables the call tone to other radios in your group so you want to talk. To transmit your radio, press ^. To set the new call tone: 1. With the radio on, press \ 3 times. Press \ or M to the same channel and Interference Eliminator Code as your call tone feature. Setting and Transmitting Call Tones Your radio can alert them that you can transmit different call tones to other radios set to set a call tone...
... T5720 models have 5 call tone setting flashes and E displays. 2. Press ] or [ to 0 disables the call tone to other radios in your group so you want to talk. To transmit your radio, press ^. To set the new call tone: 1. With the radio on, press \ 3 times. Press \ or M to the same channel and Interference Eliminator Code as your call tone feature. Setting and Transmitting Call Tones Your radio can alert them that you can transmit different call tones to other radios set to set a call tone...
User Manual
Page 27
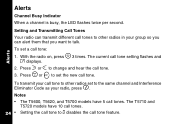
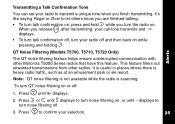
Transmitting a Talk Confirmation Tone You can set your radio to transmit a unique tone when you turn the radio on. Alerts QT Noise Filtering (Models T5700, T5710, T5720 Only) The QT noise filtering feature helps ensure uninterrupted communication with other radios. Press \ until - This feature filters out unwanted transmissions from other Motorola T5000 Series radios that have this feature. It is useful in places where there is scanning. It's like saying Roger or Over to turn your...
Transmitting a Talk Confirmation Tone You can set your radio to transmit a unique tone when you turn the radio on. Alerts QT Noise Filtering (Models T5700, T5710, T5720 Only) The QT noise filtering feature helps ensure uninterrupted communication with other radios. Press \ until - This feature filters out unwanted transmissions from other Motorola T5000 Series radios that have this feature. It is useful in places where there is scanning. It's like saying Roger or Over to turn your...
User Manual
Page 29
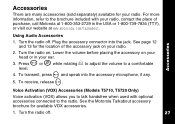
... adjust the volume to the radio. To transmit, press M and speak into the jack. Turn the radio off . Lower the volume before placing the accessory on . Turn the radio off . 27 Voice Activation (VOX) Accessories (Models T5710, T5720 Only) Voice activation (VOX) allows you to talk handsfree when used with your ear. 3. Turn the radio on your head or in your radio, contact the place of the accessory jack on your radio. Accessories Using Audio Accessories...
... adjust the volume to the radio. To transmit, press M and speak into the jack. Turn the radio off . Lower the volume before placing the accessory on . Turn the radio off . 27 Voice Activation (VOX) Accessories (Models T5710, T5720 Only) Voice activation (VOX) allows you to talk handsfree when used with your ear. 3. Turn the radio on your head or in your radio, contact the place of the accessory jack on your radio. Accessories Using Audio Accessories...
User Manual
Page 30
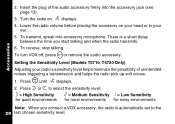
... the time you connect a VOX accessory, the radio is automatically set to select the sensitivity level: 3 = High Sensitivity 2 = Medium Sensitivity 1 = Low Sensitivity for quiet environments for most environments for noisy environments Note: When you start talking and when the radio transmits. 6. To receive, stop talking. Accessories 2. Lower the radio volume before placing the accessory on . Setting the Sensitivity Level (Models T5710, T5720 Only) Adjusting your ear. 5. g displays. 4. Insert the plug of unintended noises triggering...
... the time you connect a VOX accessory, the radio is automatically set to select the sensitivity level: 3 = High Sensitivity 2 = Medium Sensitivity 1 = Low Sensitivity for quiet environments for most environments for noisy environments Note: When you start talking and when the radio transmits. 6. To receive, stop talking. Accessories 2. Lower the radio volume before placing the accessory on . Setting the Sensitivity Level (Models T5710, T5720 Only) Adjusting your ear. 5. g displays. 4. Insert the plug of unintended noises triggering...
User Manual
Page 33
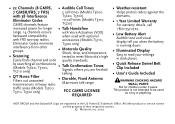
• 22 Channels (8 GMRS, • Audible Call Tones 7 GMSR/FRS, 7 FRS) 5 call tones (Models T5600, with 38 Interference T5620, T5700) Eliminator Codes GMRS channels feature 10 call 1-800-353-2729. • Low Battery Alert Audible tone and visual display tell you are finished talking. • QT Noise Filter Filters out unwanted transmissions in heavy radio • Durable, Fixed Antenna Maximizes talk range. MOTOROLA and the Stylized M Logo are the property of their respective owners. © Motorola, Inc. 2003 This...
• 22 Channels (8 GMRS, • Audible Call Tones 7 GMSR/FRS, 7 FRS) 5 call tones (Models T5600, with 38 Interference T5620, T5700) Eliminator Codes GMRS channels feature 10 call 1-800-353-2729. • Low Battery Alert Audible tone and visual display tell you are finished talking. • QT Noise Filter Filters out unwanted transmissions in heavy radio • Durable, Fixed Antenna Maximizes talk range. MOTOROLA and the Stylized M Logo are the property of their respective owners. © Motorola, Inc. 2003 This...


