User Guide
Page 6
Table of Contents Welcome i Handset Overview ii Handset Charger Overview iii Important Safety Instructions iv Getting Started 1 Battery Safety Instructions 1 Charging the Handsets 3 Setting Up 4 Registering Your Handset 4 Ringer Options 6 Setting the Ring Tone and Ring Volume 7 Setting Key Beeps On or Off 8 Naming a Handset or Base Station 9 Setting Touch Tone or Pulse Dialing 13 iv
Table of Contents Welcome i Handset Overview ii Handset Charger Overview iii Important Safety Instructions iv Getting Started 1 Battery Safety Instructions 1 Charging the Handsets 3 Setting Up 4 Registering Your Handset 4 Ringer Options 6 Setting the Ring Tone and Ring Volume 7 Setting Key Beeps On or Off 8 Naming a Handset or Base Station 9 Setting Touch Tone or Pulse Dialing 13 iv
User Guide
Page 12
... this product must be disposed of explosion if you replace the battery with an incorrect battery type. Getting Started Getting Started Battery Safety Instructions • Do not burn, disassemble, mutilate, or puncture the battery. Contact your battery's label for proper disposal methods. 1 Use only the battery that came with your phone or an authorized replacement recommended...
... this product must be disposed of explosion if you replace the battery with an incorrect battery type. Getting Started Getting Started Battery Safety Instructions • Do not burn, disassemble, mutilate, or puncture the battery. Contact your battery's label for proper disposal methods. 1 Use only the battery that came with your phone or an authorized replacement recommended...
User Guide
Page 13
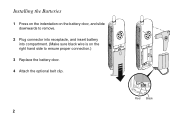
Installing the Batteries 1 Press on the indentation on the battery door, and slide downwards to remove. 2 Plug connector into receptacle, and insert battery into compartment. (Make sure black wire is on the right hand side to ensure proper connection.) 3 Replace the battery door. 4 Attach the optional belt clip. 2 Red Black
Installing the Batteries 1 Press on the indentation on the battery door, and slide downwards to remove. 2 Plug connector into receptacle, and insert battery into compartment. (Make sure black wire is on the right hand side to ensure proper connection.) 3 Replace the battery door. 4 Attach the optional belt clip. 2 Red Black
User Guide
Page 14
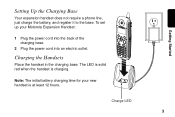
Note: The initial battery charging time for your Motorola Expansion Handset: 1 Plug the power cord into the back of the charging base. 2 Plug the power cord into an electric outlet. Charge LED 3 To set up your new handset is charging. Charging the Handsets Place the handset in the charging base. The LED is solid red when the handset is at least 12 hours. Getting Started Setting Up the Charging Base Your expansion handset does not require a phone line, just charge the battery, and register it to the base.
Note: The initial battery charging time for your Motorola Expansion Handset: 1 Plug the power cord into the back of the charging base. 2 Plug the power cord into an electric outlet. Charge LED 3 To set up your new handset is charging. Charging the Handsets Place the handset in the charging base. The LED is solid red when the handset is at least 12 hours. Getting Started Setting Up the Charging Base Your expansion handset does not require a phone line, just charge the battery, and register it to the base.
User Guide
Page 55
... as follows to the exclusions contained below . Only batteries whose fully charged capacity falls below . warrants its cordless telephones ("Products"), Motorolabranded or certified accessories sold for use with these Products ("Accessories"), and Motorola software contained on CD-ROMs or other tangible media ...for below 80% of their rated capacity and batteries that leak are excluded from the date of parts due to physical defects in the media that transmit mono sound through a wired connection. Warranty Motorola Limited Warranty for Consumer Products, Accessories, and Software...
... as follows to the exclusions contained below . Only batteries whose fully charged capacity falls below . warrants its cordless telephones ("Products"), Motorolabranded or certified accessories sold for use with these Products ("Accessories"), and Motorola software contained on CD-ROMs or other tangible media ...for below 80% of their rated capacity and batteries that leak are excluded from the date of parts due to physical defects in the media that transmit mono sound through a wired connection. Warranty Motorola Limited Warranty for Consumer Products, Accessories, and Software...


