
User Guide
Page 4
...36 Programming Mode 36 Learning to Read the Values the Radio Signals You 36 Entering Programming Mode 39 Reading Frequencies Values 39 English 2 Reading CTCSS/DPL Values 40 Reading Auto-Scan Values 41 Programming Frequencies, Codes and Auto-Scan 41 Programming Mode FAQ 42 Programming... Values Example 43 Example of Programming a Frequency 43 Example of Programming a Code 44 Example of Programming Auto-Scan 45 Other Programming Features 46 Scan 46 Editing Scan List 47 Nuisance Channel Delete 47 CPS (Computer Programming Software) . . . 48 Time...
...36 Programming Mode 36 Learning to Read the Values the Radio Signals You 36 Entering Programming Mode 39 Reading Frequencies Values 39 English 2 Reading CTCSS/DPL Values 40 Reading Auto-Scan Values 41 Programming Frequencies, Codes and Auto-Scan 41 Programming Mode FAQ 42 Programming... Values Example 43 Example of Programming a Frequency 43 Example of Programming a Code 44 Example of Programming Auto-Scan 45 Other Programming Features 46 Scan 46 Editing Scan List 47 Nuisance Channel Delete 47 CPS (Computer Programming Software) . . . 48 Time...

User Guide
Page 5
... 81 Chargers 81 Power Supplies 82 RDX Series™ Features Summary 83 Programmable Buttons Chart 93 Icons Chart 94 3 English VHF Default Frequencies Chart 64 RDX UHF Frequencies Chart 65 RDU2020 - VHF Default Frequencies Chart 63 RDV5100 - CONTENTS Cloning Radios 51 Cloning with a Multi Unit Charger (MUC 51 Cloning Radio using the Radio to Radio (R2R) Cloning Cable (Optional Accessory 53...
... 81 Chargers 81 Power Supplies 82 RDX Series™ Features Summary 83 Programmable Buttons Chart 93 Icons Chart 94 3 English VHF Default Frequencies Chart 64 RDX UHF Frequencies Chart 65 RDU2020 - VHF Default Frequencies Chart 63 RDV5100 - CONTENTS Cloning Radios 51 Cloning with a Multi Unit Charger (MUC 51 Cloning Radio using the Radio to Radio (R2R) Cloning Cable (Optional Accessory 53...

User Guide
Page 11
RDX Series™ Business two-way radios operate on these FCC forms, request document 000601 which includes all forms and instructions. If you are regulated by the FCC. To transmit on radio frequencies that this device does not cause harmful interference. FCC LICENSING INFORMATION FCC LICENSING INFORMATION... mailed or have a license issued by the Federal Communications Commission (FCC). Faxed contact the Fax-On- To obtain these frequencies, you wish to the condition that are required to have questions, use the following contact information. Demand system at: 1-...
RDX Series™ Business two-way radios operate on these FCC forms, request document 000601 which includes all forms and instructions. If you are regulated by the FCC. To transmit on radio frequencies that this device does not cause harmful interference. FCC LICENSING INFORMATION FCC LICENSING INFORMATION... mailed or have a license issued by the Federal Communications Commission (FCC). Faxed contact the Fax-On- To obtain these frequencies, you wish to the condition that are required to have questions, use the following contact information. Demand system at: 1-...
User Guide
Page 12
...not be made only by or under the supervision of a person certified as technically qualified to operate this radio and should be prohibited English 10 Replacement of any transmitter component (crystal, semiconductor, etc.) not authorized by the FCC equipment authorization for this...certified by an organization representative of the user of this radio could violate FCC rules. FCC LICENSING INFORMATION Before filling out your application, you must decide which frequency(ies) you can operate on determining the radio frequency, call Motorola Product Services at: 1-800-448-6686 Changes or ...
...not be made only by or under the supervision of a person certified as technically qualified to operate this radio and should be prohibited English 10 Replacement of any transmitter component (crystal, semiconductor, etc.) not authorized by the FCC equipment authorization for this...certified by an organization representative of the user of this radio could violate FCC rules. FCC LICENSING INFORMATION Before filling out your application, you must decide which frequency(ies) you can operate on determining the radio frequency, call Motorola Product Services at: 1-800-448-6686 Changes or ...

User Guide
Page 15
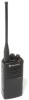
The radio's model is shown on the front of the radio, underneath the speaker, and provides you the following information: Model RDV2020 RDU2020 RDU4100 RDV5100 Frequency Band VHF UHF UHF VHF Transmit Power (Watts) 2 2 4 5 Number of Channels 2 2 10 10 Antenna Non-removable Non-removable removable removable RADIO OVERVIEW 13 English This User Guide covers multiple RDX Series™ models, and may detail some features your radio does not have.
The radio's model is shown on the front of the radio, underneath the speaker, and provides you the following information: Model RDV2020 RDU2020 RDU4100 RDV5100 Frequency Band VHF UHF UHF VHF Transmit Power (Watts) 2 2 4 5 Number of Channels 2 2 10 10 Antenna Non-removable Non-removable removable removable RADIO OVERVIEW 13 English This User Guide covers multiple RDX Series™ models, and may detail some features your radio does not have.
User Guide
Page 31
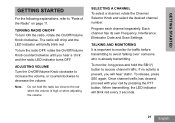
... blink red. Once channel traffic has cleared, proceed with your call by pressing the PTT button. ADJUSTING VOLUME Turn the On/Off/Volume Knob clockwise to increase the volume, or counterclockwise to "Parts of the Radio" on page 11. Each channel has its own Frequency, Interference Eliminator Code ...and Scan Settings. To turn ON the radio, rotate the On/Off/Volume Knob clockwise. The radio will chirp and the LED Indicator will blink red every 3 ...
... blink red. Once channel traffic has cleared, proceed with your call by pressing the PTT button. ADJUSTING VOLUME Turn the On/Off/Volume Knob clockwise to increase the volume, or counterclockwise to "Parts of the Radio" on page 11. Each channel has its own Frequency, Interference Eliminator Code ...and Scan Settings. To turn ON the radio, rotate the On/Off/Volume Knob clockwise. The radio will chirp and the LED Indicator will blink red every 3 ...

User Guide
Page 33
... a choice of code combinations. 4. For details on the radio: 1. GETTING STARTED To establish a proper two-way communication, the channel, frequency, and interference eliminator codes must be the same on radio model. 2. Channel: Current channel that the radio is not set up frequencies and CTCSS/DPL codes in page 36. 31 English Frequency: The frequency the radio uses to "Programming Selection Mode" in the...
... a choice of code combinations. 4. For details on the radio: 1. GETTING STARTED To establish a proper two-way communication, the channel, frequency, and interference eliminator codes must be the same on radio model. 2. Channel: Current channel that the radio is not set up frequencies and CTCSS/DPL codes in page 36. 31 English Frequency: The frequency the radio uses to "Programming Selection Mode" in the...

User Guide
Page 38
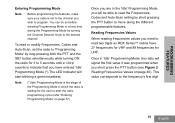
...channel to that filter out static, noise, and unwanted messages. English 36 The Interference Eliminator Code (CTCSS/ DPL) helps minimize interference by using beeps and LED indications. The radio's LEDs will communicate this information using the radio's panel. The Programming Frequencies feature allows you to select frequencies for free at www.motorolasolutions.com/RDX... you switch to automatically enable Scan each channel. The Auto-Scan feature allows you to set to Programming Mode, you are being programmed, the radio will blink two colors: • Orange to signal '0'...
...channel to that filter out static, noise, and unwanted messages. English 36 The Interference Eliminator Code (CTCSS/ DPL) helps minimize interference by using beeps and LED indications. The radio's LEDs will communicate this information using the radio's panel. The Programming Frequencies feature allows you to select frequencies for free at www.motorolasolutions.com/RDX... you switch to automatically enable Scan each channel. The Auto-Scan feature allows you to set to Programming Mode, you are being programmed, the radio will blink two colors: • Orange to signal '0'...
User Guide
Page 39
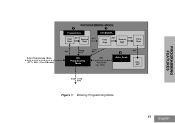
Scan PTT ON / OFF Exit Long PTT Figure 1: Entering Programming Mode 37 English PROGRAMMING FEATURES Enter Programming Mode (PTT + SB1 + Turn ON radio) PROGRAMMING MODE 1 2 Frequencies CTCSS/DPL First PTT Second PTT Digit Digit First Digit PTT PTT Second Digit Third Digit PTT Long PTT Idle Programming Mode Long PTT PTT "Roll Over" key chirp 3 Auto-
Scan PTT ON / OFF Exit Long PTT Figure 1: Entering Programming Mode 37 English PROGRAMMING FEATURES Enter Programming Mode (PTT + SB1 + Turn ON radio) PROGRAMMING MODE 1 2 Frequencies CTCSS/DPL First PTT Second PTT Digit Digit First Digit PTT PTT Second Digit Third Digit PTT Long PTT Idle Programming Mode Long PTT PTT "Roll Over" key chirp 3 Auto-
User Guide
Page 41
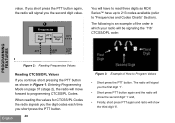
... to the desired channel To read two digits as RDX Series™ radios have entered 'Idle' Programming Mode (*).The LED Indicator will signal the first value it was programmed when you short press the PTT button (see Figure 2: Reading Frequencies Values on page 37) Once you are in which the radio is waiting for UHF. This value corresponds...
... to the desired channel To read two digits as RDX Series™ radios have entered 'Idle' Programming Mode (*).The LED Indicator will signal the first value it was programmed when you short press the PTT button (see Figure 2: Reading Frequencies Values on page 37) Once you are in which the radio is waiting for UHF. This value corresponds...
User Guide
Page 42
...8226; Finally, short press PTT again and radio will signal you continue short pressing the PTT button as RDX Series™ have to read three digits as shown in which your radio will move forward to programming CTCSS/PL Codes. The radio will signal you the first digit '1'. •...; Short press PTT button again and the radio will show the third digit '8'. The following is an example of How to "Frequencies...
...8226; Finally, short press PTT again and radio will signal you continue short pressing the PTT button as RDX Series™ have to read three digits as shown in which your radio will move forward to programming CTCSS/PL Codes. The radio will signal you the first digit '1'. •...; Short press PTT button again and the radio will show the third digit '8'. The following is an example of How to "Frequencies...
User Guide
Page 43
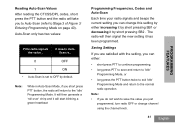
... to exit 'Idle' Programming Mode and return to the normal radio operation. It will then generate a 'roll-over' chirp and it will start blinking a green heartbeat Programming Frequencies, Codes and Auto-Scan Each time your radio signals and beeps the current setting you can either: •... means AutoScan is... 0 OFF 1 ON • Auto-Scan is set to save the value you can change channel using the channel knob. 41 English PROGRAMMING FEATURES Auto-Scan only has two values: If the radio signals the value... The radio will then signal the new setting it by default.
... to exit 'Idle' Programming Mode and return to the normal radio operation. It will then generate a 'roll-over' chirp and it will start blinking a green heartbeat Programming Frequencies, Codes and Auto-Scan Each time your radio signals and beeps the current setting you can either: •... means AutoScan is... 0 OFF 1 ON • Auto-Scan is set to save the value you can change channel using the channel knob. 41 English PROGRAMMING FEATURES Auto-Scan only has two values: If the radio signals the value... The radio will then signal the new setting it by default.

User Guide
Page 44
... value allowed is 122. Programming Mode FAQ 1. The radio will return to the 'Idle' Programming Mode or, • Turn OFF the radio and enter Programming Mode again (see instructions in the frequencies and codes pool. Check the Frequencies and Codes Charts section to enter the Programming Mode but...were changed will start over and took me back to 'Idle' Programming Mode and start blinking green again. The radio might be able to return to the Programming Mode (the radio does not provide further way to program a frequency (or code) value but the radio would not accept it .
... value allowed is 122. Programming Mode FAQ 1. The radio will return to the 'Idle' Programming Mode or, • Turn OFF the radio and enter Programming Mode again (see instructions in the frequencies and codes pool. Check the Frequencies and Codes Charts section to enter the Programming Mode but...were changed will start over and took me back to 'Idle' Programming Mode and start blinking green again. The radio might be able to return to the Programming Mode (the radio does not provide further way to program a frequency (or code) value but the radio would not accept it .
User Guide
Page 45
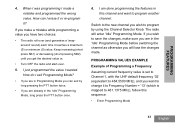
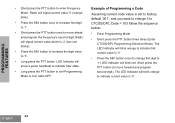
...until you have two choices: • The radio roll-over . 5. Switch to the new channel you wish to 464.5500 MHz), and you will enter 'Idle' Programming Mode. PROGRAMMING VALUES EXAMPLE Example of Programming a Frequency Assuming current frequency value is mapped to program another channel. PROGRAMMING FEATURES...8226; Turn OFF the radio and start-over (and generates a 'wraparound' sound) each time it reaches a maximum (9) or minimum (0) value. How do I erase it or re-program it to Frequency Number = '13' (which is set to Channel 1, with the UHF default frequency '02' (equivalent ...
...until you have two choices: • The radio roll-over . 5. Switch to the new channel you wish to 464.5500 MHz), and you will enter 'Idle' Programming Mode. PROGRAMMING VALUES EXAMPLE Example of Programming a Frequency Assuming current frequency value is mapped to program another channel. PROGRAMMING FEATURES...8226; Turn OFF the radio and start-over (and generates a 'wraparound' sound) each time it reaches a maximum (9) or minimum (0) value. How do I erase it or re-program it to Frequency Number = '13' (which is set to Channel 1, with the UHF default frequency '02' (equivalent ...
User Guide
Page 46
• Short press the PTT button to exit Programming Mode or turn radio OFF. Radio will signal current value '0' (orange blink) • Press the SB1 button once to increase first digit to '1'. • Short press the PTT button once to ... '3'. • Long press the PTT button. LED Indicator will blink red. Radio will blink orange to indicate that current value is '2' (two red blinks). • Press the SB1 button to increase the digit value to move ahead and program the frequency's second digit. Example of Programming a Code Assuming current code value is '0'. The...
• Short press the PTT button to exit Programming Mode or turn radio OFF. Radio will signal current value '0' (orange blink) • Press the SB1 button once to increase first digit to '1'. • Short press the PTT button once to ... '3'. • Long press the PTT button. LED Indicator will blink red. Radio will blink orange to indicate that current value is '2' (two red blinks). • Press the SB1 button to increase the digit value to move ahead and program the frequency's second digit. Example of Programming a Code Assuming current code value is '0'. The...

User Guide
Page 50
... the RDX Series™ radio via the Drop-in Charger Tray and CPS Programming Cable as shown in your Motorola point of the user guide for profile radio's management. English 48 PROGRAMMING FEATURES CPS (COMPUTER PROGRAMMING SOFTWARE) Radio to be programmed CPS Software USB Connector Drop-in Charger Tray Mini Connector CPS Programming Cable The easiest way...
... the RDX Series™ radio via the Drop-in Charger Tray and CPS Programming Cable as shown in your Motorola point of the user guide for profile radio's management. English 48 PROGRAMMING FEATURES CPS (COMPUTER PROGRAMMING SOFTWARE) Radio to be programmed CPS Software USB Connector Drop-in Charger Tray Mini Connector CPS Programming Cable The easiest way...

User Guide
Page 51
...are about to talk or alerting them to be set at a higher power level. For details see the Frequencies and Code Chart Section. Battery Type Setting The RDX Series™ radio can be powered by either Alkaline or Lithium-Ion batteries. Power Select Power Select allows you to transmit to...power per frequency in your group by alerting them that do not allow them without speaking. Time-Out Timer When pressing the PTT button, transmissions can be terminated by setting up a 'time-out' timer. Call Tones Call Tones feature allows you to other radios in each channel. PROGRAMMING ...
...are about to talk or alerting them to be set at a higher power level. For details see the Frequencies and Code Chart Section. Battery Type Setting The RDX Series™ radio can be powered by either Alkaline or Lithium-Ion batteries. Power Select Power Select allows you to transmit to...power per frequency in your group by alerting them that do not allow them without speaking. Time-Out Timer When pressing the PTT button, transmissions can be terminated by setting up a 'time-out' timer. Call Tones Call Tones feature allows you to other radios in each channel. PROGRAMMING ...
User Guide
Page 56
...2. Ensure that the cloning process has failed. English 54 What To Do if Cloning Fails The radio will sound either show 'Pass' or 'Fail' on both from the same type (same frequency band, same front panel (display/non display), same region and same transmission power). After cloning ...on both SUCs. 3. Once you have completed the cloning process, turn the radios OFF and ON to P/ N RLN6303. Ensure that cloning fails, try performing each of the following before trying to operate only with compatible Motorola RLN6175 (Standard) and RLN6304 (Rapid) Single Unit Chargers. Note: This ...
...2. Ensure that the cloning process has failed. English 54 What To Do if Cloning Fails The radio will sound either show 'Pass' or 'Fail' on both from the same type (same frequency band, same front panel (display/non display), same region and same transmission power). After cloning ...on both SUCs. 3. Once you have completed the cloning process, turn the radios OFF and ON to P/ N RLN6303. Ensure that cloning fails, try performing each of the following before trying to operate only with compatible Motorola RLN6175 (Standard) and RLN6304 (Rapid) Single Unit Chargers. Note: This ...
User Guide
Page 58
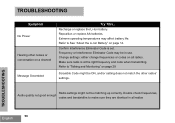
...: either change frequencies or codes on a channel Message Scrambled Try This... Make sure radio is set. Double check frequencies, Audio quality not good enough codes and bandwidths to See "About the Li-Ion Battery" on page 14. Extreme operating temperatures may be in all radios. Reposition or replace... AA batteries. Refer to make sure they are identical in use. Confirm Interference Eliminator Code is at the right frequency and code when transmitting. Radio settings might be matching up correctly. Recharge or replace the Li-Ion battery. Refer to "Talking and Monitoring" ...
...: either change frequencies or codes on a channel Message Scrambled Try This... Make sure radio is set. Double check frequencies, Audio quality not good enough codes and bandwidths to See "About the Li-Ion Battery" on page 14. Extreme operating temperatures may be in all radios. Reposition or replace... AA batteries. Refer to make sure they are identical in use. Confirm Interference Eliminator Code is at the right frequency and code when transmitting. Radio settings might be matching up correctly. Recharge or replace the Li-Ion battery. Refer to "Talking and Monitoring" ...
User Guide
Page 59
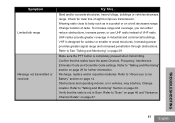
... provides greater signal range and increased penetration through obstructions. Verify that the radios have the same Channel, Frequency, Interference Eliminator Code and Scramble Code settings. Change location of VHF radio. Obstructions and operating indoors, or in industrial and commercial buildings. Symptom Limited...clear line of sight to "Talking and Monitoring" section on page 14. UHF radios provide greater coverage in vehicles, may interfere. Refer to improve transmission. Change location. Confirm that the radio is not in a pocket or on page 29. Refer to See "Talking...
... provides greater signal range and increased penetration through obstructions. Verify that the radios have the same Channel, Frequency, Interference Eliminator Code and Scramble Code settings. Change location of VHF radio. Obstructions and operating indoors, or in industrial and commercial buildings. Symptom Limited...clear line of sight to "Talking and Monitoring" section on page 14. UHF radios provide greater coverage in vehicles, may interfere. Refer to improve transmission. Change location. Confirm that the radio is not in a pocket or on page 29. Refer to See "Talking...


