User Manual
Page 4
...MUC (Optional Accessory 24 Getting Started 26 Turning radio ON/OFF 26 Adjusting volume 26 Reading the Display 26 Selecting a Channel 27 Talking and Monitoring 27 Receiving a Call 27 Signal Strength Indicator and Channel Busy Indicators 28 Talk Range 28 Hands-Free Use/...Programming Features 38 Entering Programming Mode 38 Programming RX (Reception) Frequencies 39 Programming RX (Reception) Codes (CTCSS/ DPL 39 Programming RX (Reception) Bandwidth .40 Programming Scramble L 41 Programming Maximum Number of Channels 41 Programming Call Tones 42 Programming Microphone Gain Level . ...
...MUC (Optional Accessory 24 Getting Started 26 Turning radio ON/OFF 26 Adjusting volume 26 Reading the Display 26 Selecting a Channel 27 Talking and Monitoring 27 Receiving a Call 27 Signal Strength Indicator and Channel Busy Indicators 28 Talk Range 28 Hands-Free Use/...Programming Features 38 Entering Programming Mode 38 Programming RX (Reception) Frequencies 39 Programming RX (Reception) Codes (CTCSS/ DPL 39 Programming RX (Reception) Bandwidth .40 Programming Scramble L 41 Programming Maximum Number of Channels 41 Programming Call Tones 42 Programming Microphone Gain Level . ...

User Manual
Page 5
CONTENTS Programming Buttons 45 Editing Channel Alias Name 46 Nuisance Channel Delete 47 CPS (Computer Programming Software). 48 Bandwidth Select 48 Time-Out Timer 48 Battery Type Setting 49 Call Tones 49 Scramble 49 Cloning Radios 50 What to do if cloning fails 52 Troubleshooting 54 Use and Care 57 Frequency and Code Charts 58 Motorola Limited Warranty 62 Warranty information 62 What Is Not Covered By The Warranty . . 62 Accessories 64 Audio Accessories 64 Battery 64 Carry Accessories 64 Software Applications 64 Cables 64 Chargers 65 3 English
CONTENTS Programming Buttons 45 Editing Channel Alias Name 46 Nuisance Channel Delete 47 CPS (Computer Programming Software). 48 Bandwidth Select 48 Time-Out Timer 48 Battery Type Setting 49 Call Tones 49 Scramble 49 Cloning Radios 50 What to do if cloning fails 52 Troubleshooting 54 Use and Care 57 Frequency and Code Charts 58 Motorola Limited Warranty 62 Warranty information 62 What Is Not Covered By The Warranty . . 62 Accessories 64 Audio Accessories 64 Battery 64 Carry Accessories 64 Software Applications 64 Cables 64 Chargers 65 3 English

User Manual
Page 13
The model number of the radio is shown on the front of the radio, underneath the speaker, and tells you the following information: Model Frequency Band Transmit Power (Watts) Number of Channels Antenna XTNiD PMR446 0.5 8 Non-removable RADIO OVERVIEW 11 English This User Guide covers multiple radio models, and may detail some features your radio does not have.
The model number of the radio is shown on the front of the radio, underneath the speaker, and tells you the following information: Model Frequency Band Transmit Power (Watts) Number of Channels Antenna XTNiD PMR446 0.5 8 Non-removable RADIO OVERVIEW 11 English This User Guide covers multiple radio models, and may detail some features your radio does not have.

User Manual
Page 28
... Keypad Lock Hi Power Repeater/Talk around Scramble Signal Strength Battery Level Channel Number Channel Indicator Programming Mode Indicator Frequency indicator Interference eliminator code indicator Notes: • The radio display shown here is at a high volume setting. Each radio display may appear different (channel and code) based on the backlight. • Repeater/Talk Around capability is...
... Keypad Lock Hi Power Repeater/Talk around Scramble Signal Strength Battery Level Channel Number Channel Indicator Programming Mode Indicator Frequency indicator Interference eliminator code indicator Notes: • The radio display shown here is at a high volume setting. Each radio display may appear different (channel and code) based on the backlight. • Repeater/Talk Around capability is...
User Manual
Page 29
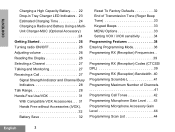
... already transmitting To monitor, press and hold the radio vertically 1 to 2 inches (2.5 to access channel traffic. Make sure the PTT button is receiving. 4. To select a channel, press the / buttons until you reach the desired channel. Each channel has its own Frequency, Interference Eliminator Code and Scan Settings. Once channel traffic has cleared, proceed with your mouth. Note...
... already transmitting To monitor, press and hold the radio vertically 1 to 2 inches (2.5 to access channel traffic. Make sure the PTT button is receiving. 4. To select a channel, press the / buttons until you reach the desired channel. Each channel has its own Frequency, Interference Eliminator Code and Scan Settings. Once channel traffic has cleared, proceed with your mouth. Note...
User Manual
Page 30
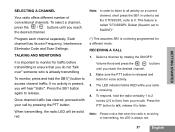
...Channel Busy Indicators When there is activity on the radio reception coverage. Note: Obstacles that you do not use the radios closer than 1.5 meters apart, to avoid interference. Medium range occurs when buildings and trees are in vehicles. The radio signal strength icon can help determine when a radio... radios indoors or in the way. Talk range depends on the terrain. TALK RANGE XTNi™ Series radios have been designed to maximize performance and improve transmission range in flat, open areas with up to 6 (strongest) depending on a frequency the radio displays...
...Channel Busy Indicators When there is activity on the radio reception coverage. Note: Obstacles that you do not use the radios closer than 1.5 meters apart, to avoid interference. Medium range occurs when buildings and trees are in vehicles. The radio signal strength icon can help determine when a radio... radios indoors or in the way. Talk range depends on the terrain. TALK RANGE XTNi™ Series radios have been designed to maximize performance and improve transmission range in flat, open areas with up to 6 (strongest) depending on a frequency the radio displays...
User Manual
Page 31
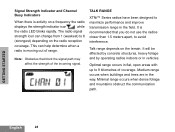
... by providing you with a choice of how to set to transmit/receive. 3. To establish proper two-way radio communication, the channel, frequency, and interference eliminator codes must match other radios for optimum audio quality. Channel: Current channel that the radio is not set up frequencies and CTCSS/DPL codes in your transmissions sound garbled to anyone listening who is using...
... by providing you with a choice of how to set to transmit/receive. 3. To establish proper two-way radio communication, the channel, frequency, and interference eliminator codes must match other radios for optimum audio quality. Channel: Current channel that the radio is not set up frequencies and CTCSS/DPL codes in your transmissions sound garbled to anyone listening who is using...
User Manual
Page 39
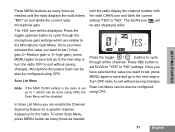
...set , press MENU again to save and go to the next step or Turn OFF radio to cycle through the microphone gain settings which can enable the Channel Scanning feature for a specific channel frequency for the radio. Press the toggle up to 1 (which are similar to "YES" or "NO"... settings. Scan List Menu Note: If the MAX CHAN setting in the radio is set SCAN to the Microphone Gain...
...set , press MENU again to save and go to the next step or Turn OFF radio to cycle through the microphone gain settings which can enable the Channel Scanning feature for a specific channel frequency for the radio. Press the toggle up to 1 (which are similar to "YES" or "NO"... settings. Scan List Menu Note: If the MAX CHAN setting in the radio is set SCAN to the Microphone Gain...

User Manual
Page 40
... PTT button and the SB1 button simultaneously for each channel by pressing the / buttons. The radio will be blinking green heartbeat. PROGRAMMING FEATURES select the different channels by moving between the different programming modes available: Frequencies, CTCSS/DPL codes (Interference Eliminator Code), Scramble, Bandwidth, Maximum Channels, Call Tone, Microphone Gain and Scan. • To move...
... PTT button and the SB1 button simultaneously for each channel by pressing the / buttons. The radio will be blinking green heartbeat. PROGRAMMING FEATURES select the different channels by moving between the different programming modes available: Frequencies, CTCSS/DPL codes (Interference Eliminator Code), Scramble, Bandwidth, Maximum Channels, Call Tone, Microphone Gain and Scan. • To move...

User Manual
Page 41
...you turn OFF the radio. • You can exit any Programming Mode without saving. PROGRAMMING RX (RECEPTION) CODES (CTCSS/DPL) Once you have chosen the channel you want to program, short press the PTT button or PROGRAMMING RX (RECEPTION) FREQUENCIES Once you have chosen the channel you want to ...program, short press the PTT button or MENU to scroll through the options until you find the frequency code you haven't wrapped around to the beginning of the Programming Mode options, your radio's changes will be back to normal radio operation). •...
...you turn OFF the radio. • You can exit any Programming Mode without saving. PROGRAMMING RX (RECEPTION) CODES (CTCSS/DPL) Once you have chosen the channel you want to program, short press the PTT button or PROGRAMMING RX (RECEPTION) FREQUENCIES Once you have chosen the channel you want to ...program, short press the PTT button or MENU to scroll through the options until you find the frequency code you haven't wrapped around to the beginning of the Programming Mode options, your radio's changes will be back to normal radio operation). •...

User Manual
Page 42
... MENU to scroll through the options until you reach the 'Bandwidth Programming Mode'. Long press the PTT button to exit and save . The radio display will show the blinking CTCSS/ DPL code as follows: RX RX BW PROGRAMMING FEATURES To program the desired code, scroll up . English... 40 MENU to scroll through the options until you reach the 'Code Programming Mode'. PROGRAMMING RX (RECEPTION) BANDWIDTH Some frequencies have chosen the channel you want to set up /down with the / buttons until you get the CTCSS/DPL code value you have selectable...
... MENU to scroll through the options until you reach the 'Bandwidth Programming Mode'. Long press the PTT button to exit and save . The radio display will show the blinking CTCSS/ DPL code as follows: RX RX BW PROGRAMMING FEATURES To program the desired code, scroll up . English... 40 MENU to scroll through the options until you reach the 'Code Programming Mode'. PROGRAMMING RX (RECEPTION) BANDWIDTH Some frequencies have chosen the channel you want to set up /down with the / buttons until you get the CTCSS/DPL code value you have selectable...

User Manual
Page 50
... in Charger Tray Mini-connector USB Connector CPS Programming Cable XTNi™ Series radios have selectable channel spacing, which must match other features such as it can be programmed to be accidentally erased). Note: (*) CPS Programming Cable is 12.5 KHz.Some frequencies have the capability to the Accessories Section. CPS is a very useful tool...
... in Charger Tray Mini-connector USB Connector CPS Programming Cable XTNi™ Series radios have selectable channel spacing, which must match other features such as it can be programmed to be accidentally erased). Note: (*) CPS Programming Cable is 12.5 KHz.Some frequencies have the capability to the Accessories Section. CPS is a very useful tool...
User Manual
Page 54
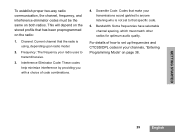
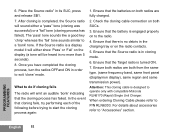
...has failed. Ensure that there is engaged properly on to do if cloning fails The radio will sound either show 'Pass' or 'Fail' on both radios are both from the same type. (same frequency band, same front panel (display/non display), same region and same transmission power). ... Source radio will emit an audible 'bonk' indicating that the batteries on the radio contacts. 5. Attention: This cloning cable is in the charging tray or on both SUCs. 3. Once you have completed the cloning process, turn the radios OFFand ON in order to operate only with compatible Motorola RLN6170 ...
...has failed. Ensure that there is engaged properly on to do if cloning fails The radio will sound either show 'Pass' or 'Fail' on both radios are both from the same type. (same frequency band, same front panel (display/non display), same region and same transmission power). ... Source radio will emit an audible 'bonk' indicating that the batteries on the radio contacts. 5. Attention: This cloning cable is in the charging tray or on both SUCs. 3. Once you have completed the cloning process, turn the radios OFFand ON in order to operate only with compatible Motorola RLN6170 ...

User Manual
Page 56
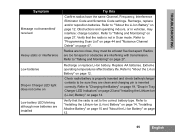
.... Extreme operating temperatures affect battery life. Refer to body such as in use. Wearing radio close to "Programming Scramble L" on a belt decreases range. Change location of sight to improve transmission. Refer to "About the Li-Ion Battery" on...or reposition AA batteries. Check for clear line of radio. Confirm Interference Eliminator Code is set. Frequency or Interference Eliminator Code may be ON, and/or setting does not match other noises or conversation on all radios if possible. Change Code on a channel Message Scrambled Limited talk range Try this Recharge or...
.... Extreme operating temperatures affect battery life. Refer to body such as in use. Wearing radio close to "Programming Scramble L" on a belt decreases range. Change location of sight to improve transmission. Refer to "About the Li-Ion Battery" on...or reposition AA batteries. Check for clear line of radio. Confirm Interference Eliminator Code is set. Frequency or Interference Eliminator Code may be ON, and/or setting does not match other noises or conversation on all radios if possible. Change Code on a channel Message Scrambled Limited talk range Try this Recharge or...
User Manual
Page 57
...-Ion Battery" on page 12. 55 English Radios are interfering with transmission. Radios are too far apart or obstacles are too close, they must be sure they are installed Try this Confirm radios have the same Channel, Frequency, Interference Eliminator Code and Scramble Code settings. ...Refer to the correct battery type. Refer to be at least five feet apart. Check radio/battery is inserted correctly. Replace AA batteries. ...
...-Ion Battery" on page 12. 55 English Radios are interfering with transmission. Radios are too far apart or obstacles are too close, they must be sure they are installed Try this Confirm radios have the same Channel, Frequency, Interference Eliminator Code and Scramble Code settings. ...Refer to the correct battery type. Refer to be at least five feet apart. Check radio/battery is inserted correctly. Replace AA batteries. ...

User Manual
Page 60
... Code information. These charts are the same as Spirit M, GT, S, XTN Series Frequencies. 8 Channel Radios PMR 446 Defaults Freq # Frequency Code Bandwidth 1 446.00625 67.0 Hz 12.5kHz 2 446.01875 67.0 Hz 12.5kHz 3 446.03125 67.0 Hz 12.5kHz 4 445.04375 67.0 Hz ....0 Hz 12.5kHz 14 446.06875 754.0 Hz 12.5kHz 15 446.08125 754.0 Hz 12.5kHz 16 446.09375 754.0 Hz 12.5kHz FREQUENCY AND CODE CHARTS English Note: Code 754 corresponds to PL Code 121. 58 Most of the frequency position are useful when using Motorola XTNi™ Series two-way radios with other business radios.
... Code information. These charts are the same as Spirit M, GT, S, XTN Series Frequencies. 8 Channel Radios PMR 446 Defaults Freq # Frequency Code Bandwidth 1 446.00625 67.0 Hz 12.5kHz 2 446.01875 67.0 Hz 12.5kHz 3 446.03125 67.0 Hz 12.5kHz 4 445.04375 67.0 Hz ....0 Hz 12.5kHz 14 446.06875 754.0 Hz 12.5kHz 15 446.08125 754.0 Hz 12.5kHz 16 446.09375 754.0 Hz 12.5kHz FREQUENCY AND CODE CHARTS English Note: Code 754 corresponds to PL Code 121. 58 Most of the frequency position are useful when using Motorola XTNi™ Series two-way radios with other business radios.

User Manual
Page 61
CTCSS 1 2 3 4 5 6 7 8 9 10 11 12 13 Khz 67.0 71.9 74.4 77.0 79.7 82.5 85.4 88.5 91.5 94.8 97.4 100.0 103.5 Note: (*) New CTCSS code. CTCSS CTCSS Khz 14 107.2 15 110.9 16 114.8 17 118.8 18 123 19 127.3 20 131.8 21 136.5 22 141.3 23 146.2 24 151.4 25 156.7 26 162.2 CTCSS 27 28 29 30 31 32 33 34 35 36 37 38 122 (*) Khz 167.9 173.8 179.9 186.2 192.8 203.5 210.7 218.1 225.7 233.6 241.8 250.3 69.3 FREQUENCY AND CODE CHARTS 59 English
CTCSS 1 2 3 4 5 6 7 8 9 10 11 12 13 Khz 67.0 71.9 74.4 77.0 79.7 82.5 85.4 88.5 91.5 94.8 97.4 100.0 103.5 Note: (*) New CTCSS code. CTCSS CTCSS Khz 14 107.2 15 110.9 16 114.8 17 118.8 18 123 19 127.3 20 131.8 21 136.5 22 141.3 23 146.2 24 151.4 25 156.7 26 162.2 CTCSS 27 28 29 30 31 32 33 34 35 36 37 38 122 (*) Khz 167.9 173.8 179.9 186.2 192.8 203.5 210.7 218.1 225.7 233.6 241.8 250.3 69.3 FREQUENCY AND CODE CHARTS 59 English


