
User Manual
Page 29
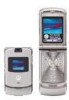
...Replace the battery and the battery door. install Caution: Don't bend or scratch your phone. format Caution: Formatting the memory card will erase all content currently stored on the card. Be sure the card is sold separately. removable memory capability Note: A memory card is not included with your phone ...powered off: 1 Press in the battery door release latch and remove the battery door. 28 main attractions 2 Remove the battery. 3 Slide the memory card into the card slot as songs and photos)....
...Replace the battery and the battery door. install Caution: Don't bend or scratch your phone. format Caution: Formatting the memory card will erase all content currently stored on the card. Be sure the card is sold separately. removable memory capability Note: A memory card is not included with your phone ...powered off: 1 Press in the battery door release latch and remove the battery door. 28 main attractions 2 Remove the battery. 3 Slide the memory card into the card slot as songs and photos)....

User Manual
Page 104
...Headsets. Defects or damage that leak are covered by the first consumer purchaser of parts due to normal wear and tear are Repaired or Replaced. Limited lifetime warranty for ninety (90) days from : (a) improper operation, storage, misuse or abuse, accident or neglect, such as... scratches, etc.) to the consumer, whichever is longer. Periodic maintenance, repair and replacement of the product. Only batteries whose fully charged capacity falls below 80% of their rated capacity and batteries that result from the date returned to the surface of the product. Decorative covers,...
...Headsets. Defects or damage that leak are covered by the first consumer purchaser of parts due to normal wear and tear are Repaired or Replaced. Limited lifetime warranty for ninety (90) days from : (a) improper operation, storage, misuse or abuse, accident or neglect, such as... scratches, etc.) to the consumer, whichever is longer. Periodic maintenance, repair and replacement of the product. Only batteries whose fully charged capacity falls below 80% of their rated capacity and batteries that result from the date returned to the surface of the product. Decorative covers,...
Repair Manual
Page 12
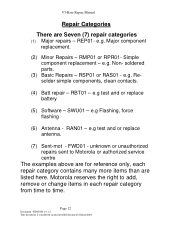
... considered an uncontrolled document when printed Non- RBT01 - e.g test and or replace antenna. (7) Sent-mot - V3-Razr Repair Manual Repair Categories There are listed here. Major component replacement. (2) Minor Repairs - SWU01 - REP01- Simple component replacement - e.g Flashing, force flashing (6) Antenna - e.g test and or replace battery (5) Software - RAN01 - Motorola reserves the right to add, remove or change items in each...
... considered an uncontrolled document when printed Non- RBT01 - e.g test and or replace antenna. (7) Sent-mot - V3-Razr Repair Manual Repair Categories There are listed here. Major component replacement. (2) Minor Repairs - SWU01 - REP01- Simple component replacement - e.g Flashing, force flashing (6) Antenna - e.g test and or replace battery (5) Software - RAN01 - Motorola reserves the right to add, remove or change items in each...

Repair Manual
Page 15
... Document -ED05020 rev.1.2 This document is turned off the phone. 4. Insert the battery, contacts side first, into the battery compartment and push down followed by the opposite edge of the battery first, and then remove it completely off . 2. V3-Razr Repair Manual Disassembly & Assembly -V3 Razor This product contains static-sensitive devices. Removing and Replacing the Battery Housing and Battery 1.
... Document -ED05020 rev.1.2 This document is turned off the phone. 4. Insert the battery, contacts side first, into the battery compartment and push down followed by the opposite edge of the battery first, and then remove it completely off . 2. V3-Razr Repair Manual Disassembly & Assembly -V3 Razor This product contains static-sensitive devices. Removing and Replacing the Battery Housing and Battery 1.

Repair Manual
Page 16
... document is considered an uncontrolled document when printed Slide the SIM card out of the phone as described in the procedures. Removing and Replacing the Rear Housing 1. V3-Razr Repair Manual 7. Insert the bottom edge of the of the battery cover into the rear housing, then push the top edge of the cover down and...
... document is considered an uncontrolled document when printed Slide the SIM card out of the phone as described in the procedures. Removing and Replacing the Rear Housing 1. V3-Razr Repair Manual 7. Insert the bottom edge of the of the battery cover into the rear housing, then push the top edge of the cover down and...

Repair Manual
Page 18
Removing and Replacing the Antenna 1. Fig7 3. V3-Razr Repair Manual 10. Replace the 2 housing screws and tighten to grasp the rubber antenna grommets and carefully remove them from the antenna assembly. Do not over tighten. 11..... Page 18 Document -ED05020 rev.1.2 This document is considered an uncontrolled document when printed Remove the battery cover, battery, SIM, and rear housing assembly as described in the procedures. Replace the antenna, SIM, battery, and battery cover as shown in Figure 8. Use the disassembly tool to release the antenna assembly as described in...
Removing and Replacing the Antenna 1. Fig7 3. V3-Razr Repair Manual 10. Replace the 2 housing screws and tighten to grasp the rubber antenna grommets and carefully remove them from the antenna assembly. Do not over tighten. 11..... Page 18 Document -ED05020 rev.1.2 This document is considered an uncontrolled document when printed Remove the battery cover, battery, SIM, and rear housing assembly as described in the procedures. Replace the antenna, SIM, battery, and battery cover as shown in Figure 8. Use the disassembly tool to release the antenna assembly as described in...

Repair Manual
Page 19
..., battery, and battery cover as described in the procedures. Page 19 Document -ED05020 rev.1.2 This document is uniquely shaped to the phone. 6. Carefully lift the antenna assembly away from the phone. 5. To replace, insert the transceiver board assembly into position. 7. Lift the transceiver board assembly out of the front housing with the metal tweezers. Fig9 3. V3-Razr...
..., battery, and battery cover as described in the procedures. Page 19 Document -ED05020 rev.1.2 This document is uniquely shaped to the phone. 6. Carefully lift the antenna assembly away from the phone. 5. To replace, insert the transceiver board assembly into position. 7. Lift the transceiver board assembly out of the front housing with the metal tweezers. Fig9 3. V3-Razr...

Repair Manual
Page 20
... Remove the battery cover, battery, SIM, antenna, rear housing, and transceiver board assembly as described in the procedures. 2. Fig10 4. Use the disassembly tool to remove the 4 screws from the flip assembly (see Figure 11). Retain the screws for re-assembly. Remove the 4 flip assembly screw caps. 3. V3-Razr Repair Manual Removing and Replacing the Flip...
... Remove the battery cover, battery, SIM, antenna, rear housing, and transceiver board assembly as described in the procedures. 2. Fig10 4. Use the disassembly tool to remove the 4 screws from the flip assembly (see Figure 11). Retain the screws for re-assembly. Remove the 4 flip assembly screw caps. 3. V3-Razr Repair Manual Removing and Replacing the Flip...

Repair Manual
Page 22
... cable. 11. Removing and Replacing the Camera Assembly 1. Unlock the ZIF connector and remove the camera assembly flex connector. 3. Replace the flip assembly cover, transceiver board, rear housing, antenna, SIM, battery, and battery cover as described in the ...phone. Avoid damage to the flip assembly, gently press the flip cover onto the flip assembly until the flip cover latches engage. 10. V3-Razr Repair Manual 8. Insert the end of the flip assembly (see Figure 13). Replace the transceiver board assembly, rear housing, antenna assembly, SIM, battery, and battery...
... cable. 11. Removing and Replacing the Camera Assembly 1. Unlock the ZIF connector and remove the camera assembly flex connector. 3. Replace the flip assembly cover, transceiver board, rear housing, antenna, SIM, battery, and battery cover as described in the ...phone. Avoid damage to the flip assembly, gently press the flip cover onto the flip assembly until the flip cover latches engage. 10. V3-Razr Repair Manual 8. Insert the end of the flip assembly (see Figure 13). Replace the transceiver board assembly, rear housing, antenna assembly, SIM, battery, and battery...

Repair Manual
Page 23
V3-Razr Repair Manual Removing and Replacing the Display Module Assembly 1. Remove the battery cover, battery, SIM, rear housing, antenna, transceiver board assembly, flip assembly cover, and camera assembly, as described in the procedures. 2. Carefully lift the display lens away from ...
V3-Razr Repair Manual Removing and Replacing the Display Module Assembly 1. Remove the battery cover, battery, SIM, rear housing, antenna, transceiver board assembly, flip assembly cover, and camera assembly, as described in the procedures. 2. Carefully lift the display lens away from ...

Repair Manual
Page 24
... display flex to the flip assembly. 7. Carefully lower the display module into the flip assembly. Replace the camera assembly, flip assembly cover, transceiver board, rear housing, antenna, SIM, battery, and battery connector as described in the procedures. To replace, align the display module assembly to the flex connector on the flip display assembly and...
... display flex to the flip assembly. 7. Carefully lower the display module into the flip assembly. Replace the camera assembly, flip assembly cover, transceiver board, rear housing, antenna, SIM, battery, and battery connector as described in the procedures. To replace, align the display module assembly to the flex connector on the flip display assembly and...

Repair Manual
Page 31
V3-Razr Repair Manual Tools and Test Equipment Part Number RSX4043 Purchase from local supplier SPN4716 0180386A82 4280385A59 6680388B67 Purchase from local supplier Purchase from local supplier Purchase from local supplier Purchase from local supplier Description Application Torque Driver Torque Driver Bit T-6 Used to remove and replace... screws Used with torque driver Rapid Charger Used to charge battery and to power Device Antistatic Mat Kit Includes 6680387A95 mat Wrist Band Disassembly...
V3-Razr Repair Manual Tools and Test Equipment Part Number RSX4043 Purchase from local supplier SPN4716 0180386A82 4280385A59 6680388B67 Purchase from local supplier Purchase from local supplier Purchase from local supplier Purchase from local supplier Description Application Torque Driver Torque Driver Bit T-6 Used to remove and replace... screws Used with torque driver Rapid Charger Used to charge battery and to power Device Antistatic Mat Kit Includes 6680387A95 mat Wrist Band Disassembly...


