
User Guide
Page 5
... to make changes in order for you the opportunity to correct the situation; 3. Rights of the Telephone Company Should your equipment cause trouble on your line which may harm the telephone network, the telephone company shall, where practicable, notify you that could affect the operation of this happens, the telephone company will disable alarm equipment, consult your telephone company or a qualified installer...
... to make changes in order for you the opportunity to correct the situation; 3. Rights of the Telephone Company Should your equipment cause trouble on your line which may harm the telephone network, the telephone company shall, where practicable, notify you that could affect the operation of this happens, the telephone company will disable alarm equipment, consult your telephone company or a qualified installer...

User Guide
Page 8
... not set the phone on the power cord. If service or repair work is provided at the installation site. 2. Ensure that proper ventilation is required, contact the Motorola address found in the vicinity of any kind into the product slits as that it will not be walked on. 5. Do not overload wall outlets and extension cords. 9. Important Safety Instructions Important Safety Instructions Follow these...
... not set the phone on the power cord. If service or repair work is provided at the installation site. 2. Ensure that proper ventilation is required, contact the Motorola address found in the vicinity of any kind into the product slits as that it will not be walked on. 5. Do not overload wall outlets and extension cords. 9. Important Safety Instructions Important Safety Instructions Follow these...

User Guide
Page 9
.... 2. Then retrieve the unit by the operating instructions. Do not retrieve the handset or base until after you are covered by the unplugged cords. • The product has been dropped or the cabinet has been damaged. • The product exhibits a distinct change in damage and will often require extensive work to restore the product to clean this phone using only the power source that...
.... 2. Then retrieve the unit by the operating instructions. Do not retrieve the handset or base until after you are covered by the unplugged cords. • The product has been dropped or the cabinet has been damaged. • The product exhibits a distinct change in damage and will often require extensive work to restore the product to clean this phone using only the power source that...
User Guide
Page 10
... incorrect battery type. Use only the battery that power this unit. Refer to be disposed of properly and may damage the unit. 9. Using other power supplies may need to your home that is a risk of the cordless phone on electricity, you replace the battery with the FCC's RF exposure guidelines, place the base unit at least one phone in your battery's label for proper disposal methods. Because cordless phones operate on...
... incorrect battery type. Use only the battery that power this unit. Refer to be disposed of properly and may damage the unit. 9. Using other power supplies may need to your home that is a risk of the cordless phone on electricity, you replace the battery with the FCC's RF exposure guidelines, place the base unit at least one phone in your battery's label for proper disposal methods. Because cordless phones operate on...
User Guide
Page 11
... Started 12 Powering the Base Station and Phone Line Connection 13 Wall Mounting the Base Station 14 Base Station Controls 16 Expansion Handset Controls 16 Using the Soft Keys 17 Using the Navigation Key 17 Using the Displays 18 Base Station Display 18 Expansion Handset Display 18 Setting Up Your Phone and Expansion Handsets . . . 19 Installing Batteries in the Handsets 19 Charging the Expansion Handsets 20 Registering an Expansion Handset 20 Personalizing Your Phone System 21 Setting the Ring Tone and Ring Volume 21 Naming the Base Station or an Expansion Handset 22 Entering...
... Started 12 Powering the Base Station and Phone Line Connection 13 Wall Mounting the Base Station 14 Base Station Controls 16 Expansion Handset Controls 16 Using the Soft Keys 17 Using the Navigation Key 17 Using the Displays 18 Base Station Display 18 Expansion Handset Display 18 Setting Up Your Phone and Expansion Handsets . . . 19 Installing Batteries in the Handsets 19 Charging the Expansion Handsets 20 Registering an Expansion Handset 20 Personalizing Your Phone System 21 Setting the Ring Tone and Ring Volume 21 Naming the Base Station or an Expansion Handset 22 Entering...

User Guide
Page 12
... 32 Calling a Number from the Phonebook 34 Editing a Phonebook Entry 34 Deleting a Phonebook Entry 35 Inserting Pauses in a Number 35 Using Caller ID 35 Reviewing the List of Caller ID Calls 36 Store a Caller ID Number in the Phonebook . . . . . 37 Deleting Caller ID Calls 38 Answering Machine 39 Setting Up the Answering Machine 39 Turning the Answering Machine On or Off 39 Outgoing Message (OGM) Greeting 40 Recording an Outgoing Message (OGM 40 Changing the Outgoing Message 40...
... 32 Calling a Number from the Phonebook 34 Editing a Phonebook Entry 34 Deleting a Phonebook Entry 35 Inserting Pauses in a Number 35 Using Caller ID 35 Reviewing the List of Caller ID Calls 36 Store a Caller ID Number in the Phonebook . . . . . 37 Deleting Caller ID Calls 38 Answering Machine 39 Setting Up the Answering Machine 39 Turning the Answering Machine On or Off 39 Outgoing Message (OGM) Greeting 40 Recording an Outgoing Message (OGM 40 Changing the Outgoing Message 40...

User Guide
Page 13
... the Outgoing Message 41 Setting the Number of Rings Before the Answering Machine Picks Up . . . . . 42 Setting the Security ID Number 42 Setting the Voice Prompts (Canadian models only 43 Recording a Memo 43 Using the Answer Machine 43 Checking Messages from the Base Station . . . . . 43 Checking Messages from an Expansion Handset 44 Checking Messages Remotely from a Touch-Tone Phone 45 Advanced Features 47 Conference Calling 48 Using the Intercom 49 Intercom Setup 49 Handset to Handset Intercom 50 Transferring a Call from One Handset to Another . . . 51 Unannounced Transfer...
... the Outgoing Message 41 Setting the Number of Rings Before the Answering Machine Picks Up . . . . . 42 Setting the Security ID Number 42 Setting the Voice Prompts (Canadian models only 43 Recording a Memo 43 Using the Answer Machine 43 Checking Messages from the Base Station . . . . . 43 Checking Messages from an Expansion Handset 44 Checking Messages Remotely from a Touch-Tone Phone 45 Advanced Features 47 Conference Calling 48 Using the Intercom 49 Intercom Setup 49 Handset to Handset Intercom 50 Transferring a Call from One Handset to Another . . . 51 Unannounced Transfer...
User Guide
Page 14
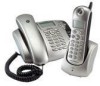
A rechargeable NiCd battery powers each expansion handset. Register expansion handsets to the phone line. 3. Plug in expansion handsets. 5. Place the Base Station: • Away from the microwave or base unit and closer to your handset's base station. 12 Connect the base station to the base station. 7. Charge the battery for expansion handsets. 4. Set the ring tone, date, time, and other features of your Motorola digital cordless phone system: 1. Getting Started Getting Started To set up your expansion handset(s) and base station. Install batteries in charging bases for about...
A rechargeable NiCd battery powers each expansion handset. Register expansion handsets to the phone line. 3. Plug in expansion handsets. 5. Place the Base Station: • Away from the microwave or base unit and closer to your handset's base station. 12 Connect the base station to the base station. 7. Charge the battery for expansion handsets. 4. Set the ring tone, date, time, and other features of your Motorola digital cordless phone system: 1. Getting Started Getting Started To set up your expansion handset(s) and base station. Install batteries in charging bases for about...

User Guide
Page 20
...base station and expansion handsets, when not in use, show the standby screen. Expansion handsets have a display on the base station. Base Station Display Time Date Battery meter Number of Base name 04:26 PM 09/26 Base (1) 9 New Messages Number of 6 Calls 2 Msg Ringer off Caller ID records Answer ON ^ Answering PHONEBK MENU Machine status Left soft key function Right soft key function Expansion Handset Display Time Date Battery meter Number of Handset name 04:26 PM 09/26 9 New Handset (1) Messages Number of them. Getting Started Using the Displays Your phone...
...base station and expansion handsets, when not in use, show the standby screen. Expansion handsets have a display on the base station. Base Station Display Time Date Battery meter Number of Base name 04:26 PM 09/26 Base (1) 9 New Messages Number of 6 Calls 2 Msg Ringer off Caller ID records Answer ON ^ Answering PHONEBK MENU Machine status Left soft key function Right soft key function Expansion Handset Display Time Date Battery meter Number of Handset name 04:26 PM 09/26 9 New Handset (1) Messages Number of them. Getting Started Using the Displays Your phone...
User Guide
Page 22
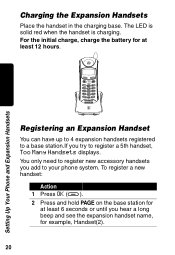
You only need to register new accessory handsets you try to your phone system. Setting Up Your Phone and Expansion Handsets Charging the Expansion Handsets Place the handset in the charging base. charge Registering an Expansion Handset You can have up to 4 expansion handsets registered to a base station.If you add to register a 5th handset, Too Many Handsets displays. To register a new handset: Action 1 Press OK (a). 2 Press and hold PAGE on the base station for example, Handset(2). 20 For the initial charge, charge the battery for at least 6 seconds...
You only need to register new accessory handsets you try to your phone system. Setting Up Your Phone and Expansion Handsets Charging the Expansion Handsets Place the handset in the charging base. charge Registering an Expansion Handset You can have up to 4 expansion handsets registered to a base station.If you add to register a 5th handset, Too Many Handsets displays. To register a new handset: Action 1 Press OK (a). 2 Press and hold PAGE on the base station for example, Handset(2). 20 For the initial charge, charge the battery for at least 6 seconds...

User Guide
Page 23
... distinguish one handset from another. Setting the Ring Tone and Ring Volume Your can personalize the base station and each expansion handset by setting unique ring tones, adjusting the ring tone volume for other incoming calls. Action 1 Press MENU (a). 2 Scroll to caller ID service from your local telephone company. Stop at the volume level you subscribe to Ringer and press SELECT (a). 3 The Day Volume displays. Stop at the volume level you press CHANGE (a). This is the ring sound used for incoming calls. 21
... distinguish one handset from another. Setting the Ring Tone and Ring Volume Your can personalize the base station and each expansion handset by setting unique ring tones, adjusting the ring tone volume for other incoming calls. Action 1 Press MENU (a). 2 Scroll to caller ID service from your local telephone company. Stop at the volume level you subscribe to Ringer and press SELECT (a). 3 The Day Volume displays. Stop at the volume level you press CHANGE (a). This is the ring sound used for incoming calls. 21
User Guide
Page 24
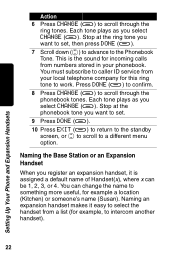
... incoming calls from your phonebook. Naming an expansion handset makes it is the sound for example, to work. You must subscribe to caller ID service from numbers stored in your local telephone company for example a location (Kitchen) or someone's name (Susan). Stop at the ring tone you select CHANGE (a). This is assigned a default name of Handset(x), where x can change the name to something more useful, for this ring tone to intercom...
... incoming calls from your phonebook. Naming an expansion handset makes it is the sound for example, to work. You must subscribe to caller ID service from numbers stored in your local telephone company for example a location (Kitchen) or someone's name (Susan). Stop at the ring tone you select CHANGE (a). This is assigned a default name of Handset(x), where x can change the name to something more useful, for this ring tone to intercom...

User Guide
Page 28
... Phone and Expansion Handsets Setting the Date and Time Note: If you subscribe to switch between am and pm. Action 1 Press MENU (a). 2 Scroll to Date/Time and press SELECT (a). 3 Enter the time (2 digits are required for the hour and 2 digits for the minutes, so use a leading 0 for 1-digit values). 4 Press AM/PM (a) to a caller ID service, the date and time is automatically set after the 2nd ring on an incoming call...
... Phone and Expansion Handsets Setting the Date and Time Note: If you subscribe to switch between am and pm. Action 1 Press MENU (a). 2 Scroll to Date/Time and press SELECT (a). 3 Enter the time (2 digits are required for the hour and 2 digits for the minutes, so use a leading 0 for 1-digit values). 4 Press AM/PM (a) to a caller ID service, the date and time is automatically set after the 2nd ring on an incoming call...

User Guide
Page 31
... call waiting service, press ON to change the day (6 am-9 pm) or night (9 pm-6 am) ringer volume. However, when you are adjusting the day or night volume. The time of the base station. Adjusting the Speakerphone Volume on the Base Station During a Call Press the volume up the handset. del in speakerphone mode and by picking up or volume down key on a call, use / voice mail charge/ page page memo Press to make caller's voice Louder Softer 031388o When you dial...
... call waiting service, press ON to change the day (6 am-9 pm) or night (9 pm-6 am) ringer volume. However, when you are adjusting the day or night volume. The time of the base station. Adjusting the Speakerphone Volume on the Base Station During a Call Press the volume up the handset. del in speakerphone mode and by picking up or volume down key on a call, use / voice mail charge/ page page memo Press to make caller's voice Louder Softer 031388o When you dial...

User Guide
Page 42
... feature. Changing the Outgoing Message Action 1 Go to the Ans mach setup menu. 2 Scroll (c) to Outgoing Msg and press SELECT (a). 3 Scroll (c) to Change OGM and press SELECT (a). 40 Answering Machine Outgoing Message (OGM) Greeting You can record a personal outgoing message greeting that plays when you receive a call . If you receive a call and you do not record a personal greeting, a prerecorded greeting plays when you do not answer the phone.
... feature. Changing the Outgoing Message Action 1 Go to the Ans mach setup menu. 2 Scroll (c) to Outgoing Msg and press SELECT (a). 3 Scroll (c) to Change OGM and press SELECT (a). 40 Answering Machine Outgoing Message (OGM) Greeting You can record a personal outgoing message greeting that plays when you receive a call . If you receive a call and you do not record a personal greeting, a prerecorded greeting plays when you do not answer the phone.

User Guide
Page 44
... Security ID Number The security ID number allows you to a different feature. Answering Machine Setting the Number of Rings Before the Answering Machine Picks Up Action 1 Go to the Ans mach setup menu. 2 Scroll (c) to Ring Number and press SELECT (a). 3 Scroll (c) to select 3, 4, 5, or 6 rings and press DONE (a). 4 Press EXIT (a) twice to return to the standby screen or c to scroll to remotely access your messages from any touch-tone phone. The default...
... Security ID Number The security ID number allows you to a different feature. Answering Machine Setting the Number of Rings Before the Answering Machine Picks Up Action 1 Go to the Ans mach setup menu. 2 Scroll (c) to Ring Number and press SELECT (a). 3 Scroll (c) to select 3, 4, 5, or 6 rings and press DONE (a). 4 Press EXIT (a) twice to return to the standby screen or c to scroll to remotely access your messages from any touch-tone phone. The default...

User Guide
Page 45
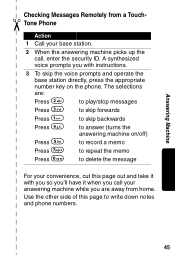
Using the Answer Machine Checking Messages from the Base Station Action Press i Press g Press h Press f to play and stop messages to skip forward to skip backward to a different feature. Action 1 Go to the Ans mach setup menu. 2 Scroll (c) to scroll to Voice prompt and press SELECT (a). 3 Scroll (c) to English or French and press DONE (a). 4 Press EXIT (a) twice to return to the standby screen or...
Using the Answer Machine Checking Messages from the Base Station Action Press i Press g Press h Press f to play and stop messages to skip forward to skip backward to a different feature. Action 1 Go to the Ans mach setup menu. 2 Scroll (c) to scroll to Voice prompt and press SELECT (a). 3 Scroll (c) to English or French and press DONE (a). 4 Press EXIT (a) twice to return to the standby screen or...
User Guide
Page 47
... out and take it with instructions. 3 To skip the voice prompts and operate the base station directly, press the appropriate number key on /off) Press 5 to record a memo Press 7 to repeat the memo Press 0 to write down notes and phone numbers. 45 A synthesized voice prompts you are : Press 2 to play/stop messages Press 3 to skip forwards Press 1 to skip backwards Press 4 to answer (turns the answering machine on the...
... out and take it with instructions. 3 To skip the voice prompts and operate the base station directly, press the appropriate number key on /off) Press 5 to record a memo Press 7 to repeat the memo Press 0 to write down notes and phone numbers. 45 A synthesized voice prompts you are : Press 2 to play/stop messages Press 3 to skip forwards Press 1 to skip backwards Press 4 to answer (turns the answering machine on the...

User Guide
Page 49
... (Text Telephone) On the Web: www.motorola.com/cordless 47 Advanced Features Advanced Features To use some of 4 expansion handsets). You can place the handset and its charging base anywhere a standard electrical outlet is available. You can expand your phone system by adding cordless handsets (up to a total of the advance features, you can: • Conference call • Talk handset to handset on the intercom • Set up handsets to automatically answer intercom calls...
... (Text Telephone) On the Web: www.motorola.com/cordless 47 Advanced Features Advanced Features To use some of 4 expansion handsets). You can place the handset and its charging base anywhere a standard electrical outlet is available. You can expand your phone system by adding cordless handsets (up to a total of the advance features, you can: • Conference call • Talk handset to handset on the intercom • Set up handsets to automatically answer intercom calls...
User Guide
Page 50
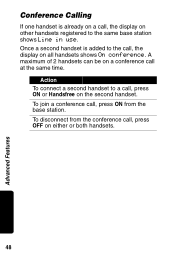
Conference Calling If one handset is added to the call, the display on the second handset. A maximum of 2 handsets can be on other handsets registered to a call, press ON or Handsfree on all handsets shows On conference. Action To connect a second handset to the same base station shows Line in use. To join a conference call, press ON from the conference call at the same time. Once a second handset is already on a call, the display on a conference call , press OFF on either or both handsets. 48 Advanced Features To disconnect from the base station.
Conference Calling If one handset is added to the call, the display on the second handset. A maximum of 2 handsets can be on other handsets registered to a call, press ON or Handsfree on all handsets shows On conference. Action To connect a second handset to the same base station shows Line in use. To join a conference call, press ON from the conference call at the same time. Once a second handset is already on a call, the display on a conference call , press OFF on either or both handsets. 48 Advanced Features To disconnect from the base station.


