
User Guide
Page 2
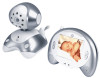
... use the baby monitor, you'll need to get the most from your older children in Europe Email: motorola@telemarcom.eu On the Web: www.motorola.com This User's Guide provides you can monitor your product. Before you with your records. Got everything? • 1 x Parent unit • 1 x Baby unit • 1 x Rechargeable Ni-MH battery pack for the Parent unit • 1 x Power adapter for the Parent unit • 1 x Power adapter...
... use the baby monitor, you'll need to get the most from your older children in Europe Email: motorola@telemarcom.eu On the Web: www.motorola.com This User's Guide provides you can monitor your product. Before you with your records. Got everything? • 1 x Parent unit • 1 x Baby unit • 1 x Rechargeable Ni-MH battery pack for the Parent unit • 1 x Power adapter for the Parent unit • 1 x Power adapter...
User Guide
Page 3
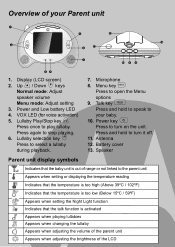
... brightness of the LCD Battery cover 13. Speaker Parent unit display symbols Indicates that the talk function is out of your baby. PLurellassbyagsealiencttoiosntokpeypljaying. your Parent unit 1 5 12 13 2 6 11 TALK MENU 7 10 9 8 3 4 1. 2. Power key p Press to turn it off. 11. DUpispcreekne)ys Normal mode: Adjust speaker volume Menu mode: Adjust setting 3. Power and Low battery LED 4. 5. MMiecnroupkheoynm e Press to play lullaby. 6. Overview of range...
... brightness of the LCD Battery cover 13. Speaker Parent unit display symbols Indicates that the talk function is out of your baby. PLurellassbyagsealiencttoiosntokpeypljaying. your Parent unit 1 5 12 13 2 6 11 TALK MENU 7 10 9 8 3 4 1. 2. Power key p Press to turn it off. 11. DUpispcreekne)ys Normal mode: Adjust speaker volume Menu mode: Adjust setting 3. Power and Low battery LED 4. 5. MMiecnroupkheoynm e Press to play lullaby. 6. Overview of range...
User Guide
Page 4
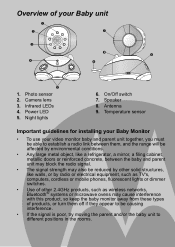
... from these types of products, or turn them off if they appear to be causing interference. • If the signal is poor, try moving the parent and/or the baby unit to different positions in the rooms. Photo sensor 2. On/Off switch 7. Camera lens 3. Speaker 8. Temperature sensor Important guidelines for installing your Baby Monitor • To use your Baby unit 1 2 7 3 8 6 4 9 5 1. Night lights 6.
... from these types of products, or turn them off if they appear to be causing interference. • If the signal is poor, try moving the parent and/or the baby unit to different positions in the rooms. Photo sensor 2. On/Off switch 7. Camera lens 3. Speaker 8. Temperature sensor Important guidelines for installing your Baby Monitor • To use your Baby unit 1 2 7 3 8 6 4 9 5 1. Night lights 6.

User Guide
Page 5
... the device (environment 15 6. Help 17 8. Disposal of the parent unit 11 3.5 Playing a lullaby for your baby 12 4. General Information 18 Table of contents 1. MBP35 Parent Unit Menu Options 13 4.1 Brightness 13 4.2 Temperature display (ºC or ºF 13 4.3 Night Light 13 4.4 Voice Activation 14 5. Getting started 7 2.1 Baby unit battery installation 7 2.2 Baby unit power supply 8 2.3 Parent unit battery Installation 8 2.4 Parent unit power supply 9 2.5 Registration 10 3. Safety Instructions 6 2. ENGLISH Table of...
... the device (environment 15 6. Help 17 8. Disposal of the parent unit 11 3.5 Playing a lullaby for your baby 12 4. General Information 18 Table of contents 1. MBP35 Parent Unit Menu Options 13 4.1 Brightness 13 4.2 Temperature display (ºC or ºF 13 4.3 Night Light 13 4.4 Voice Activation 14 5. Getting started 7 2.1 Baby unit battery installation 7 2.2 Baby unit power supply 8 2.3 Parent unit battery Installation 8 2.4 Parent unit power supply 9 2.5 Registration 10 3. Safety Instructions 6 2. ENGLISH Table of...
User Guide
Page 6
... regarding electromagnetic fields and is required. Do not use other chargers or power adapters as this User's Guide carefully before use the chargers and power adapters provided. Safety Instructions WARNING This baby monitor is not a substitute for responsible adult supervision. • Keep this User's Guide for future reference. • Do not place the baby unit or cables in the cot or within arm's reach...
... regarding electromagnetic fields and is required. Do not use other chargers or power adapters as this User's Guide carefully before use the chargers and power adapters provided. Safety Instructions WARNING This baby monitor is not a substitute for responsible adult supervision. • Keep this User's Guide for future reference. • Do not place the baby unit or cables in the cot or within arm's reach...
User Guide
Page 7
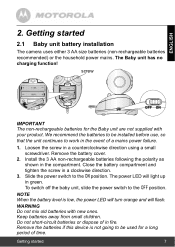
... low, the power LED will turn orange and will light up in a counterclockwise direction using a small screwdriver. Install the 3 AA non-rechargeable batteries following the polarity as shown in a clockwise direction. 3. Keep batteries away from small children. Slide the power switch to the OFF position. NOTE When the battery level is not going to work in the event of in fire...
... low, the power LED will turn orange and will light up in a counterclockwise direction using a small screwdriver. Install the 3 AA non-rechargeable batteries following the polarity as shown in a clockwise direction. 3. Keep batteries away from small children. Slide the power switch to the OFF position. NOTE When the battery level is not going to work in the event of in fire...
User Guide
Page 8
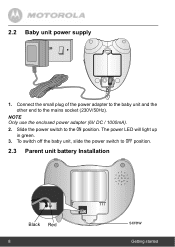
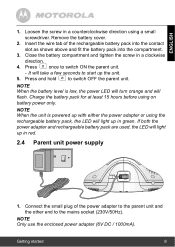
NOTE Only use the enclosed power adapter (6V DC / 1000mA). 2. The power LED will light up in green. 3. Slide the power switch to the mains socket (230V/50Hz). Connect the small plug of the power adapter to the baby unit and the other end to the ON position. To switch off the baby unit, slide the power switch to OFF position. 2.3 Parent unit battery Installation Black Red 8 screw Getting started 2.2 Baby unit power supply 1.
NOTE Only use the enclosed power adapter (6V DC / 1000mA). 2. The power LED will light up in green. 3. Slide the power switch to the mains socket (230V/50Hz). Connect the small plug of the power adapter to the baby unit and the other end to the ON position. To switch off the baby unit, slide the power switch to OFF position. 2.3 Parent unit battery Installation Black Red 8 screw Getting started 2.2 Baby unit power supply 1.
User Guide
Page 9
Loosen the screw in red. 2.4 Parent unit power supply 1. dPirreescstiop n. If both the power adapter and rechargeable battery pack are used, the LED will light up the unit. Connect the small plug of the rechargeable battery pack into the contact slot as shown above and fit the ...battery pack for at least 15 hours before using the rechargeable battery pack, the LED will flash. OFF the parent unit. NOTE When the unit is low, the power LED will turn orange and will light up with either the power adapter or using on battery power only. Getting started 9 once to the ...
Loosen the screw in red. 2.4 Parent unit power supply 1. dPirreescstiop n. If both the power adapter and rechargeable battery pack are used, the LED will light up the unit. Connect the small plug of the rechargeable battery pack into the contact slot as shown above and fit the ...battery pack for at least 15 hours before using the rechargeable battery pack, the LED will flash. OFF the parent unit. NOTE When the unit is low, the power LED will turn orange and will light up with either the power adapter or using on battery power only. Getting started 9 once to the ...

User Guide
Page 10
... the parent unit captures the video from the baby unit's camera. 10 Getting started When there is complete when the display screen on the LCD display will flash and the parent unit will beep continuously. You do not need to register it again unless the baby unit loses its link with a black cloth or bag and then switch it on LED flashes. The...
... the parent unit captures the video from the baby unit's camera. 10 Getting started When there is complete when the display screen on the LCD display will flash and the parent unit will beep continuously. You do not need to register it again unless the baby unit loses its link with a black cloth or bag and then switch it on LED flashes. The...

User Guide
Page 11
Using the Baby Monitor MBP35 3.1 Setting up clear images in the dark. If there is activated. 3.4 Adjusting the volume of the parent unit Press < and > to your desired position until the parent unit gets a good reception of the parent unit during normal operations. When the built-in photo sensor detects a low level of ambient light, the LEDs will automatically activate and the screen on the Parent...
Using the Baby Monitor MBP35 3.1 Setting up clear images in the dark. If there is activated. 3.4 Adjusting the volume of the parent unit Press < and > to your desired position until the parent unit gets a good reception of the parent unit during normal operations. When the built-in photo sensor detects a low level of ambient light, the LEDs will automatically activate and the screen on the Parent...
User Guide
Page 12
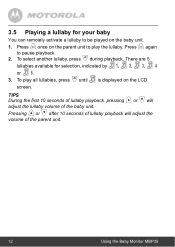
...unit. 1. To play all lullabies, press j until is displayed on the parent unit to play the lullaby. TIPS During the first 10 seconds of lullaby playback, pressing < or > will adjust the volume of the baby unit. There are 5 lullabies available for your baby You can remotely... activate a lullaby to pause To select playback. Pressing < or > after 10 seconds of lullaby playback will adjust the lullaby volume of the parent unit. 12 Using the Baby Monitor MBP35 Press i again 2. Press i once on the LCD screen. 3.5 Playing a ...
...unit. 1. To play all lullabies, press j until is displayed on the parent unit to play the lullaby. TIPS During the first 10 seconds of lullaby playback, pressing < or > will adjust the volume of the baby unit. There are 5 lullabies available for your baby You can remotely... activate a lullaby to pause To select playback. Pressing < or > after 10 seconds of lullaby playback will adjust the lullaby volume of the parent unit. 12 Using the Baby Monitor MBP35 Press i again 2. Press i once on the LCD screen. 3.5 Playing a ...
User Guide
Page 13
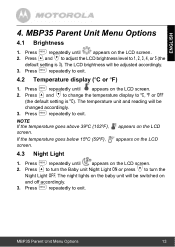
... reading will be switched on 3. NOTE If the temperature goes above 39ºC (102ºF), screen. Press Press creeton.turn the Night Light OFF. The night lights on the LCD 4.3 Night Light 1. 2. Press m repeatedly until appears on the LCD temperature display screen. rightness will be 3. ENGLISH 4. to exit. cPhreasnsgemd acrceopredaintegdlyl.y to ºC, ºF or OFF (the default setting is ºC). MBP35 Parent Unit Menu Options 4.1 Brightness...
... reading will be switched on 3. NOTE If the temperature goes above 39ºC (102ºF), screen. Press Press creeton.turn the Night Light OFF. The night lights on the LCD 4.3 Night Light 1. 2. Press m repeatedly until appears on the LCD temperature display screen. rightness will be 3. ENGLISH 4. to exit. cPhreasnsgemd acrceopredaintegdlyl.y to ºC, ºF or OFF (the default setting is ºC). MBP35 Parent Unit Menu Options 4.1 Brightness...
User Guide
Page 14
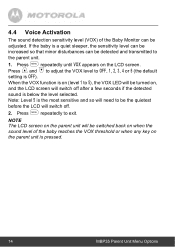
... the Baby Monitor can be detected and transmitted to the parent unit. 1P.resPsrereptoeaatdejdulsytuthnetilVVOOXXalepvpeelatros on the LCD OFF, 1, 2, 3, 4 screen. NOTE The LCD screen on the parent unit will be the quietest before the LCD will switch off after a few seconds if the detected sound is on (level 1 to exit. Press m repeatedly to 5), the VOX LED will be adjusted. or 5 (the default setting is...
... the Baby Monitor can be detected and transmitted to the parent unit. 1P.resPsrereptoeaatdejdulsytuthnetilVVOOXXalepvpeelatros on the LCD OFF, 1, 2, 3, 4 screen. NOTE The LCD screen on the parent unit will be the quietest before the LCD will switch off after a few seconds if the detected sound is on (level 1 to exit. Press m repeatedly to 5), the VOX LED will be adjusted. or 5 (the default setting is...
User Guide
Page 17
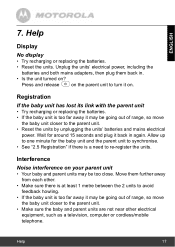
... for around 15 seconds and plug it may be going out of range, so move the baby unit closer to re-register the units. Registration If the baby unit has lost its link with the parent unit • Try recharging or replacing the batteries. • If the baby unit is a need to the parent unit. • Make sure the baby...
... for around 15 seconds and plug it may be going out of range, so move the baby unit closer to re-register the units. Registration If the baby unit has lost its link with the parent unit • Try recharging or replacing the batteries. • If the baby unit is a need to the parent unit. • Make sure the baby...

User Guide
Page 18
Visit our website: www.motorola.com 3. Email: motorola@telemarcom.eu To order a replacement battery, contact customer service or visit our website. What Does this User's Guide or the Quick Start Guide. 2. Read this Warranty Cover? Consumer Products and Accessories purchased in Europe. This limited warranty is covered? This warranty covers only the first consumer purchaser, and is not working properly.... 1. General...
Visit our website: www.motorola.com 3. Email: motorola@telemarcom.eu To order a replacement battery, contact customer service or visit our website. What Does this User's Guide or the Quick Start Guide. 2. Read this Warranty Cover? Consumer Products and Accessories purchased in Europe. This limited warranty is covered? This warranty covers only the first consumer purchaser, and is not working properly.... 1. General...
User Guide
Page 19
... NO EVENT SHALL MOTOROLA OR BINATONE ELECTRONICS INTERNATIONAL LTD. ENGLISH What will at no charge repair, replace or refund the purchase price of Binatone Electronics International LTD. BINATONE ELECTRONICS INTERNATIONAL LTD., at its sole option, will BINATONE ELECTRONICS INTERNATIONAL LTD. may use functionally equivalent reconditioned/ refurbished/ pre-owned or new Products, Accessories or parts in such repair or replacement...
... NO EVENT SHALL MOTOROLA OR BINATONE ELECTRONICS INTERNATIONAL LTD. ENGLISH What will at no charge repair, replace or refund the purchase price of Binatone Electronics International LTD. BINATONE ELECTRONICS INTERNATIONAL LTD., at its sole option, will BINATONE ELECTRONICS INTERNATIONAL LTD. may use functionally equivalent reconditioned/ refurbished/ pre-owned or new Products, Accessories or parts in such repair or replacement...

User Guide
Page 20
Battery life and the changes in such states, countries or jurisdictions. The balance ...days from this limited warranty. Periodic maintenance, repair and replacement of the product. Products or Accessories Covered Consumer Products Consumer Accessories Consumer Products and Accessories that leak are Repaired or Replaced Length of Coverage Two (2) years from the... parts due to normal wear and tear are excluded from the date returned to another. Exclusions Normal Wear and Tear. This warranty gives you specific legal rights, and you in battery capacity with time or use...
Battery life and the changes in such states, countries or jurisdictions. The balance ...days from this limited warranty. Periodic maintenance, repair and replacement of the product. Products or Accessories Covered Consumer Products Consumer Accessories Consumer Products and Accessories that leak are Repaired or Replaced Length of Coverage Two (2) years from the... parts due to normal wear and tear are excluded from the date returned to another. Exclusions Normal Wear and Tear. This warranty gives you specific legal rights, and you in battery capacity with time or use...

User Guide
Page 21
...or Accessories due to any way by someone other than Motorola, Binatone Electronics International LTD. Defects or damage that result from: (a) improper or unreasonable use, operation, storage, misuse or abuse, accident or neglect or other external ... from coverage. Use of tampering; (c) mismatched board serial numbers; Altered Products. or (d) nonconforming or non-Motorola branded housings, or parts, are excluded from service, testing, adjustment, installation, maintenance, alteration, or modification in the user instructions that show evidence of Non-Motorola branded Products and...
...or Accessories due to any way by someone other than Motorola, Binatone Electronics International LTD. Defects or damage that result from: (a) improper or unreasonable use, operation, storage, misuse or abuse, accident or neglect or other external ... from coverage. Use of tampering; (c) mismatched board serial numbers; Altered Products. or (d) nonconforming or non-Motorola branded housings, or parts, are excluded from service, testing, adjustment, installation, maintenance, alteration, or modification in the user instructions that show evidence of Non-Motorola branded Products and...

User Guide
Page 22
... ELECTRONICS INTERNATIONAL LTD., that may have been made by any literature publications or promotional materials issued by you and BINATONE ELECTRONICS INTERNATIONAL LTD. These terms and conditions constitute the complete warranty ...Service or Other Information? Authorised Repair Centre. To obtain service or information, please call: +49 (0) 1805 938 802 in connection with the said purchase. 22 General Information or representations made in Europe You will receive instructions on how to ship the Products or Accessories, the shipment of your address and telephone number...
... ELECTRONICS INTERNATIONAL LTD., that may have been made by any literature publications or promotional materials issued by you and BINATONE ELECTRONICS INTERNATIONAL LTD. These terms and conditions constitute the complete warranty ...Service or Other Information? Authorised Repair Centre. To obtain service or information, please call: +49 (0) 1805 938 802 in connection with the said purchase. 22 General Information or representations made in Europe You will receive instructions on how to ship the Products or Accessories, the shipment of your address and telephone number...
User Guide
Page 23
ENGLISH Technical Specifications Baby unit Frequency Maximum range Image sensor Lens IR LED Power 2.4GHz to 2.4835GHz Extended range up to 450 feet* *Based on surroundings. Risk of sight. General Information 23 Dispose of used batteries according to 2.4835GHz 3.5" TFT LCD 16.7M colour LCD 5 steps Adapter: DC 6V, 1.0 A (Model: Kings, KSS12_060_1000G) OR Battery: NiMH rechargeable battery pack (Model: Desay battery = AA2000...
ENGLISH Technical Specifications Baby unit Frequency Maximum range Image sensor Lens IR LED Power 2.4GHz to 2.4835GHz Extended range up to 450 feet* *Based on surroundings. Risk of sight. General Information 23 Dispose of used batteries according to 2.4835GHz 3.5" TFT LCD 16.7M colour LCD 5 steps Adapter: DC 6V, 1.0 A (Model: Kings, KSS12_060_1000G) OR Battery: NiMH rechargeable battery pack (Model: Desay battery = AA2000...


