User Manual
Page 6
Contents CONTENTS FCC and Interference How to Use 34 Information 6 How to Locate a Lost Safety Instructions 15 Handset 35 Getting Started 20 Storing a Number into Installing the Belt Clip........... 21 Memory 36 Battery Safety Instructions ... 22 Storing a Caller ID Number Charging the Battery 23 into Memory 37 Installing the MA350 Cordless Dialing a Number from Phone on a Desk 26 Memory 38 Installing the MA350 Cordless Storing and Calling Phone On a Wall 27 Emergency Numbers 39 Setting Up the Phone 31
Contents CONTENTS FCC and Interference How to Use 34 Information 6 How to Locate a Lost Safety Instructions 15 Handset 35 Getting Started 20 Storing a Number into Installing the Belt Clip........... 21 Memory 36 Battery Safety Instructions ... 22 Storing a Caller ID Number Charging the Battery 23 into Memory 37 Installing the MA350 Cordless Dialing a Number from Phone on a Desk 26 Memory 38 Installing the MA350 Cordless Storing and Calling Phone On a Wall 27 Emergency Numbers 39 Setting Up the Phone 31
User Manual
Page 24
... local recycling center for battery type. Refer to your phone or an authorized replacement recommended by the manufacturer. • Keep batteries out of the reach of children. • Remove batteries if storing over 30 days. • Do not dispose of batteries in fire, which could be recycled. Use only the battery that could result in explosion...
... local recycling center for battery type. Refer to your phone or an authorized replacement recommended by the manufacturer. • Keep batteries out of the reach of children. • Remove batteries if storing over 30 days. • Do not dispose of batteries in fire, which could be recycled. Use only the battery that could result in explosion...
User Manual
Page 25
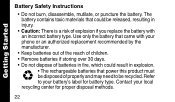
Charging the Battery ➊ Remove the battery door. ➋ Insert the battery into the battery compartment. ➌ Plug the battery connector into the receptacle in the battery compartment and replace the battery door. Getting Started Slide battery door down to remove Red Black 23
Charging the Battery ➊ Remove the battery door. ➋ Insert the battery into the battery compartment. ➌ Plug the battery connector into the receptacle in the battery compartment and replace the battery door. Getting Started Slide battery door down to remove Red Black 23

User Manual
Page 27
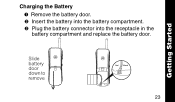
Do not plug the phone into the phone jack until the battery is fully charged. Getting Started ➏ Charge the battery for at least 12 hours. mem mute 123 456 78 9 00 0 25
Do not plug the phone into the phone jack until the battery is fully charged. Getting Started ➏ Charge the battery for at least 12 hours. mem mute 123 456 78 9 00 0 25

User Manual
Page 44
No dial tone • Check the items listed above. • Move closer to do if... Is it at a different phone and power outlet. 42 If you have no dial tone) • Check the power and phone connections. Phone cable? • Check the battery. Is the power cable plugged in at all (no lights, no dial tone on that phone, call your phone company. • Disconnect the phone and reconnect it charged? Does it fit properly? Troubleshooting The phone doesn't work at both ends? Troubleshooting What to the base. • Verify dial tone using another phone.
No dial tone • Check the items listed above. • Move closer to do if... Is it at a different phone and power outlet. 42 If you have no dial tone) • Check the power and phone connections. Phone cable? • Check the battery. Is the power cable plugged in at all (no lights, no dial tone on that phone, call your phone company. • Disconnect the phone and reconnect it charged? Does it fit properly? Troubleshooting The phone doesn't work at both ends? Troubleshooting What to the base. • Verify dial tone using another phone.

User Manual
Page 45
Does it charged? Troubleshooting You can't receive calls • Check the battery. You may have too many phones on . • Move closer to ring. 43 Is it fit properly? • Verify that the handset ringer is turned on your telephone line to allow all of them to the base. • Unplug other phones.
Does it charged? Troubleshooting You can't receive calls • Check the battery. You may have too many phones on . • Move closer to ring. 43 Is it fit properly? • Verify that the handset ringer is turned on your telephone line to allow all of them to the base. • Unplug other phones.

User Manual
Page 46
Place the handset into the base. Troubleshooting The signal is weak or has noise or static You hear other calls on your line • Press chan to select a different channel. • Check the battery and power. • Move closer to the base. • Move the base to a different power outlet (especially if the phone is sharing an outlet with an appliance). • Press chan to select a different channel. • Hang up. Wait 30 seconds then try again. • Disconnect the base from power and phone. 44
Place the handset into the base. Troubleshooting The signal is weak or has noise or static You hear other calls on your line • Press chan to select a different channel. • Check the battery and power. • Move closer to the base. • Move the base to a different power outlet (especially if the phone is sharing an outlet with an appliance). • Press chan to select a different channel. • Hang up. Wait 30 seconds then try again. • Disconnect the base from power and phone. 44

User Manual
Page 47
Make sure the battery is connected properly. • Is it properly connected? Replace the battery. 45 Is it an old battery? A new battery needs to be charged at least 12 hours before use to maintain normal talk time. • Is it a new battery? Are its contacts clean and dry? • Check the battery contacts. Replace the battery. • Is it an old battery? Troubleshooting Troubleshooting The battery won't charge The battery loses charge faster than normal • Check the base.
Make sure the battery is connected properly. • Is it properly connected? Replace the battery. 45 Is it an old battery? A new battery needs to be charged at least 12 hours before use to maintain normal talk time. • Is it a new battery? Are its contacts clean and dry? • Check the battery contacts. Replace the battery. • Is it an old battery? Troubleshooting Troubleshooting The battery won't charge The battery loses charge faster than normal • Check the base.

User Manual
Page 50
... warranty or for ninety (90) days from the date returned to physical defects in the media that leak are covered by this limited warranty. 48 Batteries. Warranty • Products and Accessories that are excluded from coverage. Software. CD-ROM, or floppy disk). Applies only to the consumer, whichever is longer. Exclusions... Normal Wear and Tear. Length of coverage: The balance of parts due to normal wear and tear are Repaired or Replaced. Only batteries whose fully charged capacity falls below 80% of their rated capacity and...
... warranty or for ninety (90) days from the date returned to physical defects in the media that leak are covered by this limited warranty. 48 Batteries. Warranty • Products and Accessories that are excluded from coverage. Software. CD-ROM, or floppy disk). Applies only to the consumer, whichever is longer. Exclusions... Normal Wear and Tear. Length of coverage: The balance of parts due to normal wear and tear are Repaired or Replaced. Only batteries whose fully charged capacity falls below 80% of their rated capacity and...


