User Manual
Page 1
MA350/351/352 Series Cordless Phone Start Here>
MA350/351/352 Series Cordless Phone Start Here>
User Manual
Page 3
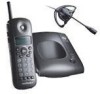
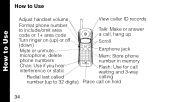
Welcome Congratulations! Experience the freedom of your Motorola MA350 cordless phone. Welcome Adjust handset volume Format phone number to include/omit area code or 1+ area code Turn ringer on (up) or off (down) Mute or unmute microphone, delete phone numbers Chan: Use if you hear interference or static Redial last called number (up to 32 digits) View caller ID records Talk: Make or answer a call, hang up Scroll Earphone jack 6 lmn Mem: Store phone number in memory Flash: Use for call 020124-O waiting and 3-way calling Place call on hold 1
Welcome Congratulations! Experience the freedom of your Motorola MA350 cordless phone. Welcome Adjust handset volume Format phone number to include/omit area code or 1+ area code Turn ringer on (up) or off (down) Mute or unmute microphone, delete phone numbers Chan: Use if you hear interference or static Redial last called number (up to 32 digits) View caller ID records Talk: Make or answer a call, hang up Scroll Earphone jack 6 lmn Mem: Store phone number in memory Flash: Use for call 020124-O waiting and 3-way calling Place call on hold 1
User Manual
Page 6
Contents CONTENTS FCC and Interference How to Use 34 Information 6 How to Locate a Lost Safety Instructions 15 Handset 35 Getting Started 20 Storing a Number into Installing the Belt Clip........... 21 Memory 36 Battery Safety Instructions ... 22 Storing a Caller ID Number Charging the Battery 23 into Memory 37 Installing the MA350 Cordless Dialing a Number from Phone on a Desk 26 Memory 38 Installing the MA350 Cordless Storing and Calling Phone On a Wall 27 Emergency Numbers 39 Setting Up the Phone 31
Contents CONTENTS FCC and Interference How to Use 34 Information 6 How to Locate a Lost Safety Instructions 15 Handset 35 Getting Started 20 Storing a Number into Installing the Belt Clip........... 21 Memory 36 Battery Safety Instructions ... 22 Storing a Caller ID Number Charging the Battery 23 into Memory 37 Installing the MA350 Cordless Dialing a Number from Phone on a Desk 26 Memory 38 Installing the MA350 Cordless Storing and Calling Phone On a Wall 27 Emergency Numbers 39 Setting Up the Phone 31
User Manual
Page 10
... be used on coin service provided by ## are the REN without a decimal point (e.g., 03 is subject to state tariffs. If you have questions about what will disable alarm equipment, consult your alarm equipment. Note: If your home has specially wired alarm equipment connected to party line service is a REN of this cordless phone does not disable your telephone company or a qualified installer...
... be used on coin service provided by ## are the REN without a decimal point (e.g., 03 is subject to state tariffs. If you have questions about what will disable alarm equipment, consult your alarm equipment. Note: If your home has specially wired alarm equipment connected to party line service is a REN of this cordless phone does not disable your telephone company or a qualified installer...
User Manual
Page 17
...Instructions Important Safety Instructions Follow these safety precautions when using your cordless phone to reduce the risk of fire, electric shock and injury to rest on the power cord. Place the power cord so that proper ventilation is provided at the installation site. ➋ Do not use while wet or while standing in water. ➌ Do not use...allow anything to persons or property: Reduce risk of fire and shock by ➊ Keep all slits and openings of the phone unblocked. Do not set the phone on . 15 Ensure that it will not be walked on a heating register or over a radiator.
...Instructions Important Safety Instructions Follow these safety precautions when using your cordless phone to reduce the risk of fire, electric shock and injury to rest on the power cord. Place the power cord so that proper ventilation is provided at the installation site. ➋ Do not use while wet or while standing in water. ➌ Do not use...allow anything to persons or property: Reduce risk of fire and shock by ➊ Keep all slits and openings of the phone unblocked. Do not set the phone on . 15 Ensure that it will not be walked on a heating register or over a radiator.
User Manual
Page 18
... the gas line. 16 Use a damp cloth for cleaning. ➐ Do not disassemble this cordless phone to protect the equipment. ➓ Do not use liquid cleaners or aerosol cleaners. If service or repair work is required, contact the Motorola address found in the back of this product from the wall outlet before cleaning. Do not use this product. Safety Instructions ➎ Never...
... the gas line. 16 Use a damp cloth for cleaning. ➐ Do not disassemble this cordless phone to protect the equipment. ➓ Do not use liquid cleaners or aerosol cleaners. If service or repair work is required, contact the Motorola address found in the back of this product from the wall outlet before cleaning. Do not use this product. Safety Instructions ➎ Never...
User Manual
Page 19
Do not retrieve the handset or base until after you have unplugged the power and phone from an outlet if: • The power cord or plug is damaged or frayed. • Liquid has been spilled into the product. • The product has been exposed to rain or water. Safety Instructions Unplug this cordless phone immediately from the wall. Then retrieve the unit by unplugged cords. • The product has been dropped or the cabinet has been damaged. • The product exhibits a distinct change in performance. 17
Do not retrieve the handset or base until after you have unplugged the power and phone from an outlet if: • The power cord or plug is damaged or frayed. • Liquid has been spilled into the product. • The product has been exposed to rain or water. Safety Instructions Unplug this cordless phone immediately from the wall. Then retrieve the unit by unplugged cords. • The product has been dropped or the cabinet has been damaged. • The product exhibits a distinct change in performance. 17
User Manual
Page 21
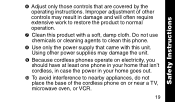
... the base of other power supplies may result in your home that isn't cordless, in case the power in damage and will often require extensive work to restore the product to normal operation. ➐ Clean this unit. Using other controls may damage the unit. ➒ Because cordless phones operate on or near a TV, microwave oven, or VCR. 19 Improper adjustment of the cordless phone on electricity, you...
... the base of other power supplies may result in your home that isn't cordless, in case the power in damage and will often require extensive work to restore the product to normal operation. ➐ Clean this unit. Using other controls may damage the unit. ➒ Because cordless phones operate on or near a TV, microwave oven, or VCR. 19 Improper adjustment of the cordless phone on electricity, you...
User Manual
Page 22
The next few pages walk you need to install and set -up your cordless phone. Getting Started Getting Started Before you can make or answer calls, you through the installation and set up process. 20
The next few pages walk you need to install and set -up your cordless phone. Getting Started Getting Started Before you can make or answer calls, you through the installation and set up process. 20
User Manual
Page 25
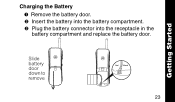
Getting Started Slide battery door down to remove Red Black 23 Charging the Battery ➊ Remove the battery door. ➋ Insert the battery into the battery compartment. ➌ Plug the battery connector into the receptacle in the battery compartment and replace the battery door.
Getting Started Slide battery door down to remove Red Black 23 Charging the Battery ➊ Remove the battery door. ➋ Insert the battery into the battery compartment. ➌ Plug the battery connector into the receptacle in the battery compartment and replace the battery door.
User Manual
Page 29
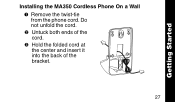
Do not unfold the cord. ➋ Untuck both ends of the cord. ➌ Hold the folded cord at the center and insert it into the back of the bracket. 27 Getting Started Installing the MA350 Cordless Phone On a Wall ➊ Remove the twist-tie from the phone cord.
Do not unfold the cord. ➋ Untuck both ends of the cord. ➌ Hold the folded cord at the center and insert it into the back of the bracket. 27 Getting Started Installing the MA350 Cordless Phone On a Wall ➊ Remove the twist-tie from the phone cord.
User Manual
Page 34
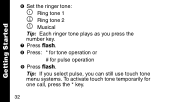
Tip: If you select pulse, you press the number key. ➐ Press flash. ➑ Press: * for tone operation or # for one call, press the * key. 32 Getting Started ➏ Set the ringer tone: \ Ring tone 1 ] Ring tone 2 ^ Musical Tip: Each ringer tone plays as you can still use touch tone menu systems. To activate touch tone temporarily for pulse operation ➒ Press flash.
Tip: If you select pulse, you press the number key. ➐ Press flash. ➑ Press: * for tone operation or # for one call, press the * key. 32 Getting Started ➏ Set the ringer tone: \ Ring tone 1 ] Ring tone 2 ^ Musical Tip: Each ringer tone plays as you can still use touch tone menu systems. To activate touch tone temporarily for pulse operation ➒ Press flash.
User Manual
Page 36
How to Use How to Use Adjust handset volume Format phone number to include/omit area code or 1+ area code Turn ringer on (up) or off (down) Mute or unmute microphone, delete phone numbers Chan: Use if you hear interference or static Redial last called number (up to 32 digits) View caller ID records Talk: Make or answer a call, hang up Scroll Earphone jack 6 lmn Mem: Store phone number in memory Flash: Use for call 020124-O waiting and 3-way calling Place call on hold 34
How to Use How to Use Adjust handset volume Format phone number to include/omit area code or 1+ area code Turn ringer on (up) or off (down) Mute or unmute microphone, delete phone numbers Chan: Use if you hear interference or static Redial last called number (up to 32 digits) View caller ID records Talk: Make or answer a call, hang up Scroll Earphone jack 6 lmn Mem: Store phone number in memory Flash: Use for call 020124-O waiting and 3-way calling Place call on hold 34
User Manual
Page 41
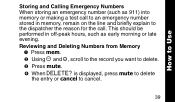
Reviewing and Deleting Numbers from Memory ➊ Press mem. ➋ Using ò and ú, scroll to the record you want to cancel. 39 How to Use Storing and Calling Emergency Numbers When storing an emergency number (such as 911) into memory or making a test call . This should be performed in memory, remain on the line and briefly explain to the dispatcher the reason for the call to an emergency number stored in off-peak hours, such as early morning or late evening. is displayed, press mute to delete the entry or cancel to delete. ➌ Press mute. ➍ When DELETE?
Reviewing and Deleting Numbers from Memory ➊ Press mem. ➋ Using ò and ú, scroll to the record you want to cancel. 39 How to Use Storing and Calling Emergency Numbers When storing an emergency number (such as 911) into memory or making a test call . This should be performed in memory, remain on the line and briefly explain to the dispatcher the reason for the call to an emergency number stored in off-peak hours, such as early morning or late evening. is displayed, press mute to delete the entry or cancel to delete. ➌ Press mute. ➍ When DELETE?
User Manual
Page 42
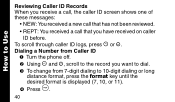
Dialing a Number from 7-digit dialing to the record you have received on caller ID before. To scroll through caller ID logs, press ò or ú. How to Use Reviewing Caller ID Records When you receive a call, the caller ID screen shows one of these messages: • NEW: You received a new call that has not been reviewed. • REPT: You received a call that you want to dial. ➌ To change from Caller ID ➊ Turn the...
Dialing a Number from 7-digit dialing to the record you have received on caller ID before. To scroll through caller ID logs, press ò or ú. How to Use Reviewing Caller ID Records When you receive a call, the caller ID screen shows one of these messages: • NEW: You received a new call that has not been reviewed. • REPT: You received a call that you want to dial. ➌ To change from Caller ID ➊ Turn the...
User Manual
Page 43
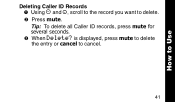
is displayed, press mute to delete the entry or cancel to delete. ➋ Press mute. Tip: To delete all Caller ID records, press mute for several seconds. ➌ When Delete? How to Use Deleting Caller ID Records ➊ Using ò and ú, scroll to the record you want to cancel. 41
is displayed, press mute to delete the entry or cancel to delete. ➋ Press mute. Tip: To delete all Caller ID records, press mute for several seconds. ➌ When Delete? How to Use Deleting Caller ID Records ➊ Using ò and ú, scroll to the record you want to cancel. 41

User Manual
Page 44
Troubleshooting The phone doesn't work at a different phone and power outlet. 42 Is it fit properly? If you have no dial tone on that phone, call your phone company. • Disconnect the phone and reconnect it at all (no lights, no dial tone) • Check the power and phone connections. Troubleshooting What to the base. • Verify dial tone using another phone. Is the power cable plugged in at both ends? No dial tone • Check the items listed above. • Move closer to do if... Phone cable? • Check the battery. Does it charged?
Troubleshooting The phone doesn't work at a different phone and power outlet. 42 Is it fit properly? If you have no dial tone on that phone, call your phone company. • Disconnect the phone and reconnect it at all (no lights, no dial tone) • Check the power and phone connections. Troubleshooting What to the base. • Verify dial tone using another phone. Is the power cable plugged in at both ends? No dial tone • Check the items listed above. • Move closer to do if... Phone cable? • Check the battery. Does it charged?

User Manual
Page 45
Troubleshooting You can't receive calls • Check the battery. You may have too many phones on . • Move closer to ring. 43 Does it charged? Is it fit properly? • Verify that the handset ringer is turned on your telephone line to allow all of them to the base. • Unplug other phones.
Troubleshooting You can't receive calls • Check the battery. You may have too many phones on . • Move closer to ring. 43 Does it charged? Is it fit properly? • Verify that the handset ringer is turned on your telephone line to allow all of them to the base. • Unplug other phones.

User Manual
Page 46
Wait 30 seconds then try again. • Disconnect the base from power and phone. 44 Place the handset into the base. Troubleshooting The signal is weak or has noise or static You hear other calls on your line • Press chan to select a different channel. • Check the battery and power. • Move closer to the base. • Move the base to a different power outlet (especially if the phone is sharing an outlet with an appliance). • Press chan to select a different channel. • Hang up.
Wait 30 seconds then try again. • Disconnect the base from power and phone. 44 Place the handset into the base. Troubleshooting The signal is weak or has noise or static You hear other calls on your line • Press chan to select a different channel. • Check the battery and power. • Move closer to the base. • Move the base to a different power outlet (especially if the phone is sharing an outlet with an appliance). • Press chan to select a different channel. • Hang up.
User Manual
Page 52
Products or Accessories with (a) serial numbers or date tags that have been removed, altered or obliterated; (b) broken seals or that all defects in the software products will be uninterrupted or error free, or that show evidence of the software products will be corrected. 50 Communication Services. No warranty is excluded from coverage. or (d) nonconforming or non-Motorola housings, or parts, are...
Products or Accessories with (a) serial numbers or date tags that have been removed, altered or obliterated; (b) broken seals or that all defects in the software products will be uninterrupted or error free, or that show evidence of the software products will be corrected. 50 Communication Services. No warranty is excluded from coverage. or (d) nonconforming or non-Motorola housings, or parts, are...


