User Guide
Page 1
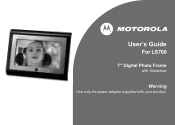
User's Guide For LS700 7" Digital Photo Frame with Slideshow Warning Use only the power adapter supplied with your product.
User's Guide For LS700 7" Digital Photo Frame with Slideshow Warning Use only the power adapter supplied with your product.

User Guide
Page 2
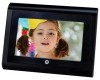
... the information you will need to set up to your Digital Photo Frame. Got everything? • 1 x Digital Photo Frame • 1 x Power adapter • 1 x Stand • 1 x User's Guide • 1 x Quick Start Guide Key features • 2 view modes: Calendar mode and photo mode • 5 slideshow transition effects • Picture zoom (up your original dated sales receipt for warranty coverage. to 16x) • Date and Time settings • Programmable On/Off Time • Supports flash drive, SD, SDHC and MMC memory cards For product related...
... the information you will need to set up to your Digital Photo Frame. Got everything? • 1 x Digital Photo Frame • 1 x Power adapter • 1 x Stand • 1 x User's Guide • 1 x Quick Start Guide Key features • 2 view modes: Calendar mode and photo mode • 5 slideshow transition effects • Picture zoom (up your original dated sales receipt for warranty coverage. to 16x) • Date and Time settings • Programmable On/Off Time • Supports flash drive, SD, SDHC and MMC memory cards For product related...
User Guide
Page 3
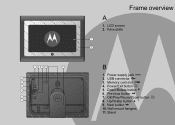
Power/Exit button f 5. Wall mount hangers 11. Stand Power supply jack q 2. Up/Rotate button a 9. USB connector n 3. LCD screen 2. Memory card slot m 4. Previous button c 7. Down/Rotate button b 6. OK/Play/Pause/Zoom button o 8. Next button d 10. Face plate 1 2 B 1. 7 8 9 10 11 6 5 4 3 2 1 Frame overview A 1.
Power/Exit button f 5. Wall mount hangers 11. Stand Power supply jack q 2. Up/Rotate button a 9. USB connector n 3. LCD screen 2. Memory card slot m 4. Previous button c 7. Down/Rotate button b 6. OK/Play/Pause/Zoom button o 8. Next button d 10. Face plate 1 2 B 1. 7 8 9 10 11 6 5 4 3 2 1 Frame overview A 1.
User Guide
Page 4
... your Digital Photo Frame .... 9 2.1 Choose Photo Location 9 2.2 Change View Mode 9 2.3 Photos Mode 9 2.3.1 Display a photo in full-screen 9 2.3.2 Start/Stop automatic transition in full-screen view 9 2.3.3 Changing pictures manually 10 2.3.4 Zoom in 10 2.3.5 Rotate picture 10 2.3.6 Delete picture from Internal Memory ..... 10 2.3.7 Copy picture from Memory Card to Internal Memory 11 2.4 Calendar Mode 11 2.4.1 Pause automatic transition 11 2.4.2 Changing pictures manually 11 2.5 Settings Mode 12 2.5.1 Access settings mode 12 2.5.2 Change slideshow frequency 12 2.5.3 Change show...
... your Digital Photo Frame .... 9 2.1 Choose Photo Location 9 2.2 Change View Mode 9 2.3 Photos Mode 9 2.3.1 Display a photo in full-screen 9 2.3.2 Start/Stop automatic transition in full-screen view 9 2.3.3 Changing pictures manually 10 2.3.4 Zoom in 10 2.3.5 Rotate picture 10 2.3.6 Delete picture from Internal Memory ..... 10 2.3.7 Copy picture from Memory Card to Internal Memory 11 2.4 Calendar Mode 11 2.4.1 Pause automatic transition 11 2.4.2 Changing pictures manually 11 2.5 Settings Mode 12 2.5.1 Access settings mode 12 2.5.2 Change slideshow frequency 12 2.5.3 Change show...
User Guide
Page 5
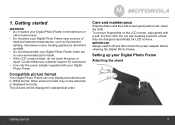
... picture formats may not be displayed in alphabetical order. Setting up your Digital Photo Frame Attaching the stand Getting started WARNING • Do not place your Digital Photo Frame in JPEG format. 1. The pictures will be detected or displayed correctly. there are designed specifically for assistance. • Use only the power adapter supplied with your Digital Photo Frame; Contact Motorola customer support for LCD screens. Do not use cleaning solutions unless they are no user-serviceable parts inside. • If the LCD screen...
... picture formats may not be displayed in alphabetical order. Setting up your Digital Photo Frame Attaching the stand Getting started WARNING • Do not place your Digital Photo Frame in JPEG format. 1. The pictures will be detected or displayed correctly. there are designed specifically for assistance. • Use only the power adapter supplied with your Digital Photo Frame; Contact Motorola customer support for LCD screens. Do not use cleaning solutions unless they are no user-serviceable parts inside. • If the LCD screen...
User Guide
Page 6
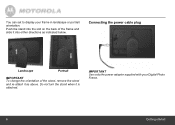
Connecting the power cable plug Landscape Portrait IMPORTANT To change the orientation of the frame and slide it into the slot on the back of the stand, remove the stand and re-attach it is attached. Do not turn the stand when it as indicated below. IMPORTANT Use only the power adapter supplied with your frame in landscape or portrait orientation. Push the stand into either directions as above. You can set to display your Digital Photo Frame. 6 Getting started
Connecting the power cable plug Landscape Portrait IMPORTANT To change the orientation of the frame and slide it into the slot on the back of the stand, remove the stand and re-attach it is attached. Do not turn the stand when it as indicated below. IMPORTANT Use only the power adapter supplied with your frame in landscape or portrait orientation. Push the stand into either directions as above. You can set to display your Digital Photo Frame. 6 Getting started
User Guide
Page 7
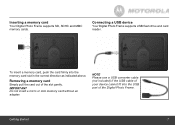
... a micro or mini memory card without an adapter. Inserting a memory card Your Digital Photo Frame supports SD, SDHC and MMC memory cards. Connecting a USB device Your Digital Photo Frame supports USB flash drive and card reader. To insert a memory card, push the card firmly into the USB port of the Digital Photo Frame. Getting started 7 Removing a memory card Simply pull the card out of your device cannot fit into the memory card slot in the correct direction as indicated above. NOTE Please use a USB converter cable (not included) if the USB cable of the...
... a micro or mini memory card without an adapter. Inserting a memory card Your Digital Photo Frame supports SD, SDHC and MMC memory cards. Connecting a USB device Your Digital Photo Frame supports USB flash drive and card reader. To insert a memory card, push the card firmly into the USB port of the Digital Photo Frame. Getting started 7 Removing a memory card Simply pull the card out of your device cannot fit into the memory card slot in the correct direction as indicated above. NOTE Please use a USB converter cable (not included) if the USB cable of the...

User Guide
Page 8
... automatically when the power source is no memory card inserted the first time you switch on your Digital Photo Frame, preloaded photos will be displayed in JPEG format, the slideshow starts automatically when you switch on for 2 seconds. Mounting your Digital Photo Frame. Viewing your first slideshow Use wall mounting screws (not included) to mount your Digital Photo Frame to the wall. Switching your Digital Photo Frame securely to standby mode Press and hold f button for the...
... automatically when the power source is no memory card inserted the first time you switch on your Digital Photo Frame, preloaded photos will be displayed in JPEG format, the slideshow starts automatically when you switch on for 2 seconds. Mounting your Digital Photo Frame. Viewing your first slideshow Use wall mounting screws (not included) to mount your Digital Photo Frame to the wall. Switching your Digital Photo Frame securely to standby mode Press and hold f button for the...
User Guide
Page 9
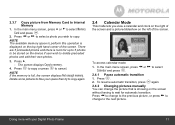
...select Internal Memory, Memory Card or USB drive. 2.2 Change View Mode There are displayed. 2.3.1 Display a photo in your Digital Photo Frame. 2.1 Choose Photo Location 1. Press Press co , d or b to select a photo from the to exit and enter the main menu screen. or d to 8 thumbnail pictures are 2 view modes in full-screen 1. 2. Up to select Photos. - thumbnails. 2.3.2 Start/Stop automatic transition in full-screen or as thumbnails. 2. 3. 2. Now that you have set up your Digital Photo Frame and enjoyed your first slideshow, you view pictures/slideshows...
...select Internal Memory, Memory Card or USB drive. 2.2 Change View Mode There are displayed. 2.3.1 Display a photo in your Digital Photo Frame. 2.1 Choose Photo Location 1. Press Press co , d or b to select a photo from the to exit and enter the main menu screen. or d to 8 thumbnail pictures are 2 view modes in full-screen 1. 2. Up to select Photos. - thumbnails. 2.3.2 Start/Stop automatic transition in full-screen or as thumbnails. 2. 3. 2. Now that you have set up your Digital Photo Frame and enjoyed your first slideshow, you view pictures/slideshows...
User Guide
Page 10
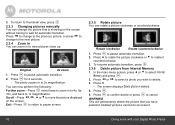
... the picture displayed on memory. 4. Pscreresesnf. r b to pause automatic transition. 2. WARNING This will permanently delete the picture that is showing on the screen wPritehsosuct hatvoincghtaonwgeaittofothr eauptroemviaotuics transition. Press o to confirm delete or press f to select Internal a photo you have selected. The photo zooms in to 2x magnification. Press o. 5. Press o more with your Digital Photo Frame Rotate clockwise Rotate counterclockwise 1. 2. Deleted pictures cannot be recovered. 10 Doing more times...
... the picture displayed on memory. 4. Pscreresesnf. r b to pause automatic transition. 2. WARNING This will permanently delete the picture that is showing on the screen wPritehsosuct hatvoincghtaonwgeaittofothr eauptroemviaotuics transition. Press o to confirm delete or press f to select Internal a photo you have selected. The photo zooms in to 2x magnification. Press o. 5. Press o more with your Digital Photo Frame Rotate clockwise Rotate counterclockwise 1. 2. Deleted pictures cannot be recovered. 10 Doing more times...
User Guide
Page 11
... transition, press o again. 2.4.2 Changing pictures manually You can change to the next picture. In the main menu Calendar and press socre.en, press c or d to cancel. Press o . CIPnarretdhseasnmcdapinroermsdsenoutos.csreeleecnt, press a or b to select Memory a photo you view a calendar and clock on the right of the screen and a picture/slideshow on the left of the screen. To access calendar mode: 1. The screen displays Copy to copy. Delete some pictures to free your Digital Photo Frame 11 Doing more with...
... transition, press o again. 2.4.2 Changing pictures manually You can change to the next picture. In the main menu Calendar and press socre.en, press c or d to cancel. Press o . CIPnarretdhseasnmcdapinroermsdsenoutos.csreeleecnt, press a or b to select Memory a photo you view a calendar and clock on the right of the screen and a picture/slideshow on the left of the screen. To access calendar mode: 1. The screen displays Copy to copy. Delete some pictures to free your Digital Photo Frame 11 Doing more with...

User Guide
Page 12
... can set the date and time format to be displayed on your Digital Photo Frame. 1. 2. en, press c or d to select 2.5.2 Change slideshow frequency You can select the slideshow transition effect. 1. Press f repeatedly to exit. 12 Doing more with your Digital Photo Frame. 2.5.1 Access settings mode 1. In the main Settings and menu press oscre. aPPnrreedssMssinaauteoo)rrabbndttoopsrseeeslelsecccttDaatoesre&tdTtiinmgetos(eYtsteienagrt,taMhnoednvthpa,rleuDseays., o. Press f repeatedly to exit. 2.5.3 Change show transition effect You can control the...
... can set the date and time format to be displayed on your Digital Photo Frame. 1. 2. en, press c or d to select 2.5.2 Change slideshow frequency You can select the slideshow transition effect. 1. Press f repeatedly to exit. 12 Doing more with your Digital Photo Frame. 2.5.1 Access settings mode 1. In the main Settings and menu press oscre. aPPnrreedssMssinaauteoo)rrabbndttoopsrseeeslelsecccttDaatoesre&tdTtiinmgetos(eYtsteienagrt,taMhnoednvthpa,rleuDseays., o. Press f repeatedly to exit. 2.5.3 Change show transition effect You can control the...
User Guide
Page 13
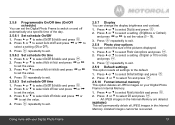
... exit. 2.5.6.2 Set schedule On time 1. 2. Auto off automatically at a specific time of the pictures displayed. 1. 2. Press Press aaoorrbbttoosseeleleccttROeKseat nprdocperdeusres aond.press o. - Fit to or select sdeletcot Display and press o. select Auto on and off minute and press c or 4. PPanrreedsspssreaassoorrcbb to to screen) 3. All JPEG images in the Internal Memory. Doing more with your Digital Photo Frame's Internal Memory. 1. 2. 2.5.6 Programmable On/Off time (On/Off schedule) You can set the Digital Photo Frame to...
... exit. 2.5.6.2 Set schedule On time 1. 2. Auto off automatically at a specific time of the pictures displayed. 1. 2. Press Press aaoorrbbttoosseeleleccttROeKseat nprdocperdeusres aond.press o. - Fit to or select sdeletcot Display and press o. select Auto on and off minute and press c or 4. PPanrreedsspssreaassoorrcbb to to screen) 3. All JPEG images in the Internal Memory. Doing more with your Digital Photo Frame's Internal Memory. 1. 2. 2.5.6 Programmable On/Off time (On/Off schedule) You can set the Digital Photo Frame to...
User Guide
Page 14
... I inserted a memory card or connected a USB device to appear on the LCD screen. 4. Help My Digital Photo Frame does not turn on (page 8). My Digital Photo Frame does not recognize the memory card. • Make sure you have inserted a certified memory card. • Make sure you are in India 14 Help Read this User's Guide or the Quick Start Guide. 2. Note that your pictures are using the power adapter that was included with your product is not working properly.... 1. Contact Customer Service at: 1-888...
... I inserted a memory card or connected a USB device to appear on the LCD screen. 4. Help My Digital Photo Frame does not turn on (page 8). My Digital Photo Frame does not recognize the memory card. • Make sure you have inserted a certified memory card. • Make sure you are in India 14 Help Read this User's Guide or the Quick Start Guide. 2. Note that your pictures are using the power adapter that was included with your product is not working properly.... 1. Contact Customer Service at: 1-888...
User Guide
Page 15
... the first consumer purchaser, and is not transferable. BINATONE ELECTRONICS INTERNATIONAL LTD., at its sole option, will BINATONE ELECTRONICS INTERNATIONAL LTD. Binatone Electronics International LTD. IN NO EVENT SHALL MOTOROLA OR BINATONE ELECTRONICS INTERNATIONAL LTD. Consumer Products and Accessories purchased in such repair or replacement and any Products or Accessories that it manufactures ("Accessories") to new Motorola branded Products and Accessories manufactured by Binatone...
... the first consumer purchaser, and is not transferable. BINATONE ELECTRONICS INTERNATIONAL LTD., at its sole option, will BINATONE ELECTRONICS INTERNATIONAL LTD. Binatone Electronics International LTD. IN NO EVENT SHALL MOTOROLA OR BINATONE ELECTRONICS INTERNATIONAL LTD. Consumer Products and Accessories purchased in such repair or replacement and any Products or Accessories that it manufactures ("Accessories") to new Motorola branded Products and Accessories manufactured by Binatone...

User Guide
Page 16
... FINANCIAL LOSS ARISING OUT OF OR IN CONNECTION WITH THE ABILITY OR INABILITY TO USE THE PRODUCTS OR ACCESSORIES AND BINATONE ELECTRONICS INTERNATIONAL LTD. Exclusions Normal Wear and Tear. Periodic maintenance, repair and replacement of the original warranty or for ninety (90) days from coverage. This warranty gives you specific legal rights, and you may not apply...
... FINANCIAL LOSS ARISING OUT OF OR IN CONNECTION WITH THE ABILITY OR INABILITY TO USE THE PRODUCTS OR ACCESSORIES AND BINATONE ELECTRONICS INTERNATIONAL LTD. Exclusions Normal Wear and Tear. Periodic maintenance, repair and replacement of the original warranty or for ninety (90) days from coverage. This warranty gives you specific legal rights, and you may not apply...
User Guide
Page 17
... Accessory to or use with (a) serial numbers or date tags that have been removed, altered or obliterated; (b) broken seals or that result from the use of Motorola or Binatone Electronics International LTD., are excluded from coverage. Use of the problem; To obtain service, you may subscribe to abnormal usage or conditions; or (d) nonconforming or non-Motorola branded housings, or parts, are excluded...
... Accessory to or use with (a) serial numbers or date tags that have been removed, altered or obliterated; (b) broken seals or that result from the use of Motorola or Binatone Electronics International LTD., are excluded from coverage. Use of the problem; To obtain service, you may subscribe to abnormal usage or conditions; or (d) nonconforming or non-Motorola branded housings, or parts, are excluded...
User Guide
Page 18
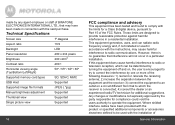
... in connection with the installation of General Information Technical Specifications Screen size 7" diagonal Aspect ratio 16:9 Backlight LED Panel resolution Brightness 480 x 234 pixels 200 cd/m2 Contrast ratio 400:1 Horizontal viewing angle (Top/Bottom/Left/Right) 50º / 55º / 60º / 60º Supported memory card types SD, SDHC, MMC USB Host Supported Supported image file formats JPEG (.*jpg) Manual brightness adjustment Supported Thumbnail view Supported Single picture view Supported...
... in connection with the installation of General Information Technical Specifications Screen size 7" diagonal Aspect ratio 16:9 Backlight LED Panel resolution Brightness 480 x 234 pixels 200 cd/m2 Contrast ratio 400:1 Horizontal viewing angle (Top/Bottom/Left/Right) 50º / 55º / 60º / 60º Supported memory card types SD, SDHC, MMC USB Host Supported Supported image file formats JPEG (.*jpg) Manual brightness adjustment Supported Thumbnail view Supported Single picture view Supported...

User Guide
Page 19
... not be used in compliance with the essential requirements and other relevant provisions of with Industry Canada RSS-210 and FCC Rules. the product, they must accept any interference received, including interference that this device must be disposed of Directive 1999/5/EC. declares that may not cause harmful interference, and (2) this Digital Photo Frame is subject...
... not be used in compliance with the essential requirements and other relevant provisions of with Industry Canada RSS-210 and FCC Rules. the product, they must accept any interference received, including interference that this device must be disposed of Directive 1999/5/EC. declares that may not cause harmful interference, and (2) this Digital Photo Frame is subject...

User Guide
Page 20
Version 2.0 Printed in the US Patent & Trademark Office. Manufactured, distributed or sold by Motorola, Inc. MOTOROLA and the Stylized M Logo are the property of their respective owners. © Motorola, Inc. 2009. All other Motorola trademarks and trade dress are used under license from Motorola, Inc. MOTOROLA and the Stylized M Logo, and other product or service names are registered in China and are owned by Binatone Electronics International LTD., official licensee for this product. All rights reserved.
Version 2.0 Printed in the US Patent & Trademark Office. Manufactured, distributed or sold by Motorola, Inc. MOTOROLA and the Stylized M Logo are the property of their respective owners. © Motorola, Inc. 2009. All other Motorola trademarks and trade dress are used under license from Motorola, Inc. MOTOROLA and the Stylized M Logo, and other product or service names are registered in China and are owned by Binatone Electronics International LTD., official licensee for this product. All rights reserved.


