

User Guide
Page 2
...: 1-888-331-3383 On the Web: www.motorola.com • 30 name and number phonebook. • Caller ID shows you will need to provide a copy of the last 30 callers in a calls list.** • Register up to 5 cordless handsets to a single base. • Make internal calls, transfer external calls, hold 3-way conversation between two internal callers and an external caller. **You must subscribe to your records. Please note that this equipment...
...: 1-888-331-3383 On the Web: www.motorola.com • 30 name and number phonebook. • Caller ID shows you will need to provide a copy of the last 30 callers in a calls list.** • Register up to 5 cordless handsets to a single base. • Make internal calls, transfer external calls, hold 3-way conversation between two internal callers and an external caller. **You must subscribe to your records. Please note that this equipment...
User Guide
Page 3
... to get the most from your phone. This equipment is not designed to emergency services. Follow the simple instructions in 'Getting Started', on the next few pages. Alternative arrangements should be made for access to make your first call you will need to set up your phone. IMPORTANT Only use the telephone line cord supplied. This User's Guide provides you with power adapter units, additional rechargeable battery packs and battery doors.
... to get the most from your phone. This equipment is not designed to emergency services. Follow the simple instructions in 'Getting Started', on the next few pages. Alternative arrangements should be made for access to make your first call you will need to set up your phone. IMPORTANT Only use the telephone line cord supplied. This User's Guide provides you with power adapter units, additional rechargeable battery packs and battery doors.
User Guide
Page 4
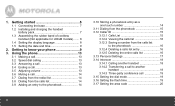
... Connecting the base 7 1.2 Installing and charging the handset battery pack 7 1.3 Assembling the rubber band of cordless handset (Not applicable for L60xM models) ....... 8 1.4 Setting the display language 8 1.5 Setting the date and time 9 2. 1. Using the phone 13 3.1 Making a call 13 3.2 Speed dial calling 13 3.3 Answering a call 13 3.4 Ending a call 13 3.5 Adjusting volume 13 3.6 Muting a call 14 3.7 Dialing from the redial list 14 3.8 Dialing from the calls list 14 3.9 Adding an entry to the phonebook 14 3.10 Storing a phonebook entry as a one touch number 14 3.11 Dialing...
... Connecting the base 7 1.2 Installing and charging the handset battery pack 7 1.3 Assembling the rubber band of cordless handset (Not applicable for L60xM models) ....... 8 1.4 Setting the display language 8 1.5 Setting the date and time 9 2. 1. Using the phone 13 3.1 Making a call 13 3.2 Speed dial calling 13 3.3 Answering a call 13 3.4 Ending a call 13 3.5 Adjusting volume 13 3.6 Muting a call 14 3.7 Dialing from the redial list 14 3.8 Dialing from the calls list 14 3.9 Adding an entry to the phonebook 14 3.10 Storing a phonebook entry as a one touch number 14 3.11 Dialing...
User Guide
Page 6
... heat, such as motors, fluorescent lighting, microwave ovens, heating appliances and direct sunlight. • Avoid areas of the corded base, the screen shows OUT OF RANGE. WHICH POWER ADAPTER? Move back within in the bathroom or other electrical appliances working within the range area. The cordless handset will also reduce the range significantly. Getting started WARNING Do not place your new phone, here are some important guidelines...
... heat, such as motors, fluorescent lighting, microwave ovens, heating appliances and direct sunlight. • Avoid areas of the corded base, the screen shows OUT OF RANGE. WHICH POWER ADAPTER? Move back within in the bathroom or other electrical appliances working within the range area. The cordless handset will also reduce the range significantly. Getting started WARNING Do not place your new phone, here are some important guidelines...
User Guide
Page 8
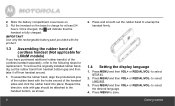
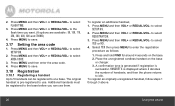
... cordless handset separately, refer to the handset bottom, as shown. 8 2. to enwrap the handset firmly. 1.4 Setting the display language 1. Press and smooth out the rubber band to select LANGUAGE. 3. 2. Slide the battery compartment cover back on the base to select the desired language. 4. Put the handset on . 3. Once charged, the will indicate that the handset is fully charged. IMPORTANT Use only the rechargeable battery...
... cordless handset separately, refer to the handset bottom, as shown. 8 2. to enwrap the handset firmly. 1.4 Setting the display language 1. Press and smooth out the rubber band to select LANGUAGE. 3. 2. Slide the battery compartment cover back on the base to select the desired language. 4. Put the handset on . 3. Once charged, the will indicate that the handset is fully charged. IMPORTANT Use only the rechargeable battery...
User Guide
Page 10
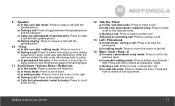
... (P). b) In idle mode: Press and hold to access menu list. d) In phonebook list entry: If the number is more than 15 digits, press to view the next page of phonebook. 3 Right / Calls list a) In idle mode / during a call : Press to the left. Get acquainted with the following 14 buttons on your phone b) In editing mode: Press to move the cursor to increase the volume. Press and hold to activate speed dial. 6 #/Pause...
... (P). b) In idle mode: Press and hold to access menu list. d) In phonebook list entry: If the number is more than 15 digits, press to view the next page of phonebook. 3 Right / Calls list a) In idle mode / during a call : Press to the left. Get acquainted with the following 14 buttons on your phone b) In editing mode: Press to move the cursor to increase the volume. Press and hold to activate speed dial. 6 #/Pause...
User Guide
Page 11
... answer a call with the speakerphone. 10 */Tone a) In idle / pre-dial / editing mode: Press to access the redial list. c) In phonebook list entry: If the number is more than 15 digits, press to view the previous page of remaining digits. 11 Scroll Down / Volume Down / Redial List a) In idle mode: Press to insert a *. b) In menu mode: Press to access the phonebook. e) Calls list / phonebook / redial list entry: Press to scroll down . d) During an incoming call: Press to answer a call...
... answer a call with the speakerphone. 10 */Tone a) In idle / pre-dial / editing mode: Press to access the redial list. c) In phonebook list entry: If the number is more than 15 digits, press to view the previous page of remaining digits. 11 Scroll Down / Volume Down / Redial List a) In idle mode: Press to insert a *. b) In menu mode: Press to access the phonebook. e) Calls list / phonebook / redial list entry: Press to scroll down . d) During an incoming call: Press to answer a call...
User Guide
Page 12
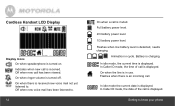
.... Cordless Handset LCD Display Display Icons On when speakerphone is turned off. On when ringer volume is turned on. Flashes when low battery level is charging. Battery is detected, needs charging. Flashes when there is received. Getting to know your phone Off when new call . In Caller ID mode, the time of the call is an incoming call has been viewed. Full battery power level. 2/3 battery power level. 1/3 battery power level. In idle mode the current date is displayed. Animation in use...
.... Cordless Handset LCD Display Display Icons On when speakerphone is turned off. On when ringer volume is turned on. Flashes when low battery level is charging. Battery is detected, needs charging. Flashes when there is received. Getting to know your phone Off when new call . In Caller ID mode, the time of the call is an incoming call has been viewed. Full battery power level. 2/3 battery power level. 1/3 battery power level. In idle mode the current date is displayed. Animation in use...
User Guide
Page 13
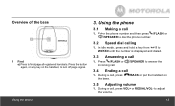
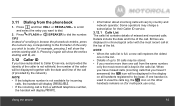
...mode, press and hold a key from /1 to turn off page signal. Press the button again, or any key on the base. 3.5 Adjusting volume 1. Enter the phone number and then press /FLASH or /SPEAKER to answer the 3.4 Ending a call 1. Press /FLASH or incoming call 1. During a call 1. Overview of the base 1 Find a) Press to adjust the volume. 13 During a call, press /BACK or put the handset on the handset, to WXYZ/9 until the number is displayed and dialed. 3.3 Answering a call . /SPEAKER to dial the phone number. 3.2 Speed dial calling 1. Using the phone 3.1 Making a call...
...mode, press and hold a key from /1 to turn off page signal. Press the button again, or any key on the base. 3.5 Adjusting volume 1. Enter the phone number and then press /FLASH or /SPEAKER to answer the 3.4 Ending a call 1. Press /FLASH or incoming call 1. During a call 1. Overview of the base 1 Find a) Press to adjust the volume. 13 During a call, press /BACK or put the handset on the handset, to WXYZ/9 until the number is displayed and dialed. 3.3 Answering a call . /SPEAKER to dial the phone number. 3.2 Speed dial calling 1. Using the phone 3.1 Making a call...
User Guide
Page 15
... to browse the phonebook entries, press the numeric key corresponding to the first letter of missed and received calls. Some operators may be stored. • If you wish to locate. Press /FLASH or /SPEAKER to dial the number. 3.11 Dialing from a withheld telephone number, the handset will display PRIVATE. • Information about incoming calls will be displayed in the display on (for their Caller ID service. 3.12.1 Calls List The calls list contains details...
... to browse the phonebook entries, press the numeric key corresponding to the first letter of missed and received calls. Some operators may be stored. • If you wish to locate. Press /FLASH or /SPEAKER to dial the number. 3.11 Dialing from a withheld telephone number, the handset will display PRIVATE. • Information about incoming calls will be displayed in the display on (for their Caller ID service. 3.12.1 Calls List The calls list contains details...
User Guide
Page 16
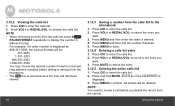
... calls list. 2. is removed once the new call has been viewed. 16 3.12.3 Saving a number from the call before dialing or saving it into the phonebook. • The icon is displayed. 3. Press VOL+ or REDIAL/VOL- Press MENU to delete the entry. 3.12.5 Deleting the entire calls list 1. to scroll to the phonebook 1. Scroll VOL+ or REDIAL/VOL- Press MENU and then edit the number if desired. 5. Press MUTE...
... calls list. 2. is removed once the new call has been viewed. 16 3.12.3 Saving a number from the call before dialing or saving it into the phonebook. • The icon is displayed. 3. Press VOL+ or REDIAL/VOL- Press MENU to delete the entry. 3.12.5 Deleting the entire calls list 1. to scroll to the phonebook 1. Scroll VOL+ or REDIAL/VOL- Press MENU and then edit the number if desired. 5. Press MUTE...
User Guide
Page 17
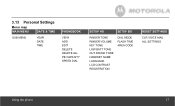
3.13 Personal Settings Menu map MAIN MENU DATE & TIME SUB MENU YEAR DATE TIME PHONEBOOK VIEW ADD EDIT DELETE DELETE ALL PB CAPACITY SPEED DIAL SETUP HS SETUP BS RINGER TONE RINGER VOLUME KEY TONE LOW BATT TONE OUT RANGE TONE HANDSET NAME LANGUAGE LCD CONTRAST REGISTRATION DIAL MODE FLASH TIME AREA CODE RESET SETTINGS CLR VOICE MAIL ALL SETTINGS Using the phone 17
3.13 Personal Settings Menu map MAIN MENU DATE & TIME SUB MENU YEAR DATE TIME PHONEBOOK VIEW ADD EDIT DELETE DELETE ALL PB CAPACITY SPEED DIAL SETUP HS SETUP BS RINGER TONE RINGER VOLUME KEY TONE LOW BATT TONE OUT RANGE TONE HANDSET NAME LANGUAGE LCD CONTRAST REGISTRATION DIAL MODE FLASH TIME AREA CODE RESET SETTINGS CLR VOICE MAIL ALL SETTINGS Using the phone 17
User Guide
Page 18
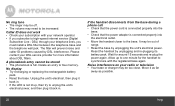
... on the base or charger. 3.14 Intercom This feature is not within the valid operation range, this function may not be displayed in the list. 2. to select the handset you will also return to standby when the handset is an incoming external call . 3. Press MENU to call the handset. 18 Using the phone Press VOL+ or REDIAL/VOL- Your call , press INT. - Press MENU. 2. Press MENU to call the handset. 4. Press...
... on the base or charger. 3.14 Intercom This feature is not within the valid operation range, this function may not be displayed in the list. 2. to select the handset you will also return to standby when the handset is an incoming external call . 3. Press MENU to call the handset. 18 Using the phone Press VOL+ or REDIAL/VOL- Your call , press INT. - Press MENU. 2. Press MENU to call the handset. 4. Press...
User Guide
Page 19
... transfer the call . 3. Using the phone 19 When the other handset engaged with the caller. Press MENU to select SETUP BS. 2. to call , press MENU on any handset to select DIAL MODE. 3. During an external call . 5. Press VOL+ or REDIAL/VOL- NOTE If the pulse mode is unlikely that you should need to change this setting unless advised to your country and network operator. If the other handset answers the intercom call the handset...
... transfer the call . 3. Using the phone 19 When the other handset engaged with the caller. Press MENU to select SETUP BS. 2. to call , press MENU on any handset to select DIAL MODE. 3. During an external call . 5. Press VOL+ or REDIAL/VOL- NOTE If the pulse mode is unlikely that you should need to change this setting unless advised to your country and network operator. If the other handset answers the intercom call the handset...
User Guide
Page 20
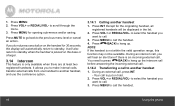
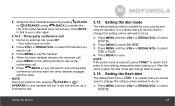
... use . To register an additional handset, 1. 2. Press MENU and then VOL+ or REDIAL/VOL- Press MENU to save . 3.18 Registration 3.18.1 Registering a handset Up to the base before you want. (8 options are available : 90, 100, 110, 250, 300, 400, 600 and 700MS) 4. Press MENU to select SETUP HS. 2. to save . 3.17 Setting the area code 1. Press MENU and then VOL+ or REDIAL/VOL- Place the unregistered cordless handset...
... use . To register an additional handset, 1. 2. Press MENU and then VOL+ or REDIAL/VOL- Press MENU to save . 3.18 Registration 3.18.1 Registering a handset Up to the base before you want. (8 options are available : 90, 100, 110, 250, 300, 400, 600 and 700MS) 4. Press MENU to select SETUP HS. 2. to save . 3.17 Setting the area code 1. Press MENU and then VOL+ or REDIAL/VOL- Place the unregistered cordless handset...
User Guide
Page 21
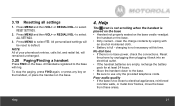
...; Be sure to use only the provided telephone cords. Help 21 to default. All personalized settings will ring. 3.19 Resetting all settings 1. to the base will be reset to select RESET SETTINGS. 2. Poor audio quality • If the base is no base power, check the connections. All handsets registered to select ALL SETTINGS. 3. Press MENU to electrical appliances, reinforced concrete walls, or metal door frames, move the base from these areas. No dial tone • If...
...; Be sure to use only the provided telephone cords. Help 21 to default. All personalized settings will ring. 3.19 Resetting all settings 1. to the base will be reset to select RESET SETTINGS. 2. Poor audio quality • If the base is no base power, check the connections. All handsets registered to select ALL SETTINGS. 3. Press MENU to electrical appliances, reinforced concrete walls, or metal door frames, move the base from these areas. No dial tone • If...
User Guide
Page 22
...-plugging its battery pack. If the handset disconnects from the base during a phone call • Check that the power cord is connected properly into the base. • Check that the power adapter is connected properly into the electrical outlet. • Move the handset closer to free memory. No display • Try recharging or replacing the rechargeable battery pack. • Reset the base. No ring tone • The ringer may be off. • The volume may...
...-plugging its battery pack. If the handset disconnects from the base during a phone call • Check that the power cord is connected properly into the base. • Check that the power adapter is connected properly into the electrical outlet. • Move the handset closer to free memory. No display • Try recharging or replacing the rechargeable battery pack. • Reset the base. No ring tone • The ringer may be off. • The volume may...
User Guide
Page 23
... working properly... 1. Important safety instructions Follow these safety precautions when using during an electrical storm. Keep all vents and openings of fire, use this User's Guide. 8. Do not use liquid cleaners or aerosol cleaners. General information 23 To order a replacement battery pack contact customer service or visit our website. Do not set the phone on the power cord. Do not disassemble this User's Guide. 2. Place the power...
... working properly... 1. Important safety instructions Follow these safety precautions when using during an electrical storm. Keep all vents and openings of fire, use this User's Guide. 8. Do not use liquid cleaners or aerosol cleaners. General information 23 To order a replacement battery pack contact customer service or visit our website. Do not set the phone on the power cord. Do not disassemble this User's Guide. 2. Place the power...

User Guide
Page 24
... extensive work to restore the product to rain or water. Then retrieve the unit by the operating instructions. If you have at least 20 cm from the wall. Adjust only those controls that operates without electricity in your dealer or local power company. 5. To avoid interference to your home, consult with the FCC's RF exposure guidelines, place the base unit at least one phone...
... extensive work to restore the product to rain or water. Then retrieve the unit by the operating instructions. If you have at least 20 cm from the wall. Adjust only those controls that operates without electricity in your dealer or local power company. 5. To avoid interference to your home, consult with the FCC's RF exposure guidelines, place the base unit at least one phone...
User Guide
Page 30
... have them ring when you of this equipment to file a complaint with applicable Part 68 rules and technical requirements adopted by the manufacturer or its facilities, equipment, operation, or procedures that is malfunctioning, it must be used to connect this equipment does not disable your right to premises wiring and the telephone network must be provided to a single line and...
... have them ring when you of this equipment to file a complaint with applicable Part 68 rules and technical requirements adopted by the manufacturer or its facilities, equipment, operation, or procedures that is malfunctioning, it must be used to connect this equipment does not disable your right to premises wiring and the telephone network must be provided to a single line and...


