User Guide
Page 8
Contents GET CONNECTED IN 4 QUICK STEPS BEFORE YOU BEGIN ① CHARGE Your Headset's Battery ② START BLUETOOTH FEATURE Your Phone ③ PAIR Your Headset ③ PAIR Continued Your Phone ④TEST AND USE USING YOUR PORTABLE CHARGER BASE USING HEADSET TURNING ON AND OFF EARTIPS AND YOUR HEADSET INSTALLING EARTIP WEARING HEADSET CHANGING VOLUME BUTTON ORIENTATION MAKING CALLS MAKING CALLS CONTINUED AUDIO TONES AUDIO TONES CONTINUED INDICATOR LIGHTS TROUBLESHOOTING 1 2 3 5 6 7 8 9 10 11 12 13 14 15 16 17 18 19 20 21 7
Contents GET CONNECTED IN 4 QUICK STEPS BEFORE YOU BEGIN ① CHARGE Your Headset's Battery ② START BLUETOOTH FEATURE Your Phone ③ PAIR Your Headset ③ PAIR Continued Your Phone ④TEST AND USE USING YOUR PORTABLE CHARGER BASE USING HEADSET TURNING ON AND OFF EARTIPS AND YOUR HEADSET INSTALLING EARTIP WEARING HEADSET CHANGING VOLUME BUTTON ORIENTATION MAKING CALLS MAKING CALLS CONTINUED AUDIO TONES AUDIO TONES CONTINUED INDICATOR LIGHTS TROUBLESHOOTING 1 2 3 5 6 7 8 9 10 11 12 13 14 15 16 17 18 19 20 21 7
User Guide
Page 12
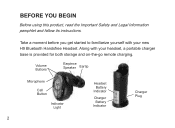
Volume Buttons Earpiece Speaker Eartip Microphone Call Button Indicator Light 2 Headset Battery Indicator Charger Battery Indicator Charger Plug BEFORE YOU BEGIN Before using this product, read the Important Safety and Legal Information pamphlet and follow its instructions. Take a moment before you get started to familiarize yourself with your new H9 Bluetooth Handsfree Headset. Along with your headset, a portable charger base is provided for both storage and on-the-go remote charging.
Volume Buttons Earpiece Speaker Eartip Microphone Call Button Indicator Light 2 Headset Battery Indicator Charger Battery Indicator Charger Plug BEFORE YOU BEGIN Before using this product, read the Important Safety and Legal Information pamphlet and follow its instructions. Take a moment before you get started to familiarize yourself with your new H9 Bluetooth Handsfree Headset. Along with your headset, a portable charger base is provided for both storage and on-the-go remote charging.
User Guide
Page 13
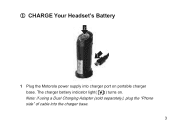
Note: if using a Dual Charging Adapter (sold separately), plug the "Phone side" of cable into charger port on . ① CHARGE Your Headset's Battery 1 Plug the Motorola power supply into the charger base. 3 The charger battery indicator light( ) turns on portable charger base.
Note: if using a Dual Charging Adapter (sold separately), plug the "Phone side" of cable into charger port on . ① CHARGE Your Headset's Battery 1 Plug the Motorola power supply into the charger base. 3 The charger battery indicator light( ) turns on portable charger base.
User Guide
Page 14
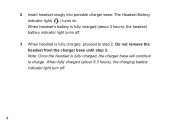
When fully charged (about 3 hours), the headset battery indicator light turns off . 4 Do not remove the headset from the charger base until step 3. 2 Insert headset snugly into portable charger base. When headset's battery is fully charged (about 6.5 hours), the charging battery indicator light turn off . 3 When headset is fully charged, the charger base will continue to step 2. Note: Once the headset is fully charged, proceed to charge. The Headset Battery indicator light( ) turns on.
When fully charged (about 3 hours), the headset battery indicator light turns off . 4 Do not remove the headset from the charger base until step 3. 2 Insert headset snugly into portable charger base. When headset's battery is fully charged (about 6.5 hours), the charging battery indicator light turn off . 3 When headset is fully charged, the charger base will continue to step 2. Note: Once the headset is fully charged, proceed to charge. The Headset Battery indicator light( ) turns on.
User Guide
Page 16
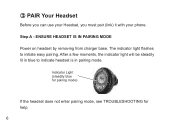
After a few moments, the indicator light will be steadily lit in pairing mode. ENSURE HEADSET IS IN PAIRING MODE Power on headset by removing from charger base. Indicator Light (steadily blue for pairing mode) If the headset does not enter pairing mode, see TROUBLESHOOTING for help. 6 ③ PAIR Your Headset Before you can use your Headset, you must pair (link) it with your phone. The indicator light flashes to indicate headset is in blue to initiate easy pairing. Step A -
After a few moments, the indicator light will be steadily lit in pairing mode. ENSURE HEADSET IS IN PAIRING MODE Power on headset by removing from charger base. Indicator Light (steadily blue for pairing mode) If the headset does not enter pairing mode, see TROUBLESHOOTING for help. 6 ③ PAIR Your Headset Before you can use your Headset, you must pair (link) it with your phone. The indicator light flashes to indicate headset is in blue to initiate easy pairing. Step A -
User Guide
Page 19
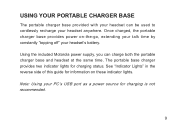
...power on these indicator lights. The portable base charger provides two indicator lights for charging is not recommended. 9 USING YOUR PORTABLE CHARGER BASE The portable charger base provided with your headset can charge both the portable charger base and headset at the same time. ...Note: Using your PC's USB port as a power source for charging status. See "Indicator Lights" in the reverse side of this guide for information on -the-go, extending your talk time by constantly "topping off" your headset anywhere. Using the included Motorola...
...power on these indicator lights. The portable base charger provides two indicator lights for charging is not recommended. 9 USING YOUR PORTABLE CHARGER BASE The portable charger base provided with your headset can charge both the portable charger base and headset at the same time. ...Note: Using your PC's USB port as a power source for charging status. See "Indicator Lights" in the reverse side of this guide for information on -the-go, extending your talk time by constantly "topping off" your headset anywhere. Using the included Motorola...
User Guide
Page 21
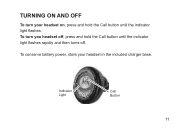
TURNING ON AND OFF To turn you headset off, press and hold the Call button until the indicator light flashes rapidly and then turns off. To conserve battery power, store your headset on, press and hold the Call button until the indicator light flashes. Indicator Light Call Button 11 To turn your headset in the included charger base.
TURNING ON AND OFF To turn you headset off, press and hold the Call button until the indicator light flashes rapidly and then turns off. To conserve battery power, store your headset on, press and hold the Call button until the indicator light flashes. Indicator Light Call Button 11 To turn your headset in the included charger base.
User Guide
Page 30
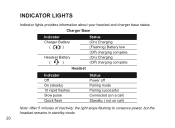
INDICATOR LIGHTS Indicator lights provides information about your headset and charger base status. Charger Base Indicator Charger Battery ( ) Headset Battery ( ) Status (On) Charging (Flashing) Battery low (Off) charging complete (On) Charging (Off) charging complete Headset Indicator Off On (steady) 10 rapid flashes Slow pulse Quick flash Status Power off Pairing mode Pairing successful Connected (on a call) Standby ( not on call) Note: After 5 minutes of inactivity, the light stops flashing to conserve power, but the headset remains in standby mode. 20
INDICATOR LIGHTS Indicator lights provides information about your headset and charger base status. Charger Base Indicator Charger Battery ( ) Headset Battery ( ) Status (On) Charging (Flashing) Battery low (Off) charging complete (On) Charging (Off) charging complete Headset Indicator Off On (steady) 10 rapid flashes Slow pulse Quick flash Status Power off Pairing mode Pairing successful Connected (on a call) Standby ( not on call) Note: After 5 minutes of inactivity, the light stops flashing to conserve power, but the headset remains in standby mode. 20


