User Guide
Page 1
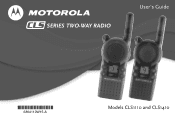
SERIES TWO-WAY RADIO User's Guide @6864110W15@ 1 6864110W15-A Models CLS1110 and CLS1410
SERIES TWO-WAY RADIO User's Guide @6864110W15@ 1 6864110W15-A Models CLS1110 and CLS1410
User Guide
Page 3
...Belt Holster 14 Installing the Batteries 15 Charging the Battery 16 Turning Your Radio On and Off . 19 Adjusting the Volume 20 Factory Default Settings 27 Entering Programming Mode .....28 Cloning Radio Settings 32 Advanced Features 33 Troubleshooting 35 Use and Care 38 Frequencies ...and Bandwidths.....39 Spirit GT Series Programming ... 45 Warranty 46 Reading the Display 20 Talking and Receiving 21 Basic Radio Operation 21 Signal Strength and Channel Busy Indicators......... 21 Talk Range 22 Handsfree Use (VOX) (CLS1410 only 22 Locking the Keypad ...
...Belt Holster 14 Installing the Batteries 15 Charging the Battery 16 Turning Your Radio On and Off . 19 Adjusting the Volume 20 Factory Default Settings 27 Entering Programming Mode .....28 Cloning Radio Settings 32 Advanced Features 33 Troubleshooting 35 Use and Care 38 Frequencies ...and Bandwidths.....39 Spirit GT Series Programming ... 45 Warranty 46 Reading the Display 20 Talking and Receiving 21 Basic Radio Operation 21 Signal Strength and Channel Busy Indicators......... 21 Talk Range 22 Handsfree Use (VOX) (CLS1410 only 22 Locking the Keypad ...
User Guide
Page 4
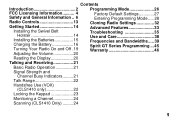
... costeffective communications for businesses such as a world leader in designing and manufacturing communications equipment. Your radio is a product of Motorola's 70 plus years of today's fast-paced industries. Package Contents • _Series Radio • Swivel Belt Holster • Lithium Ion Battery • Drop-In Charger with Transformer • User's Guide • Accessory Brochure...
... costeffective communications for businesses such as a world leader in designing and manufacturing communications equipment. Your radio is a product of Motorola's 70 plus years of today's fast-paced industries. Package Contents • _Series Radio • Swivel Belt Holster • Lithium Ion Battery • Drop-In Charger with Transformer • User's Guide • Accessory Brochure...

User Guide
Page 5
All other product or service names are registered in the Safety and General Information section of their respective owners. © Motorola, Inc. 2003. 3 Introduction For product-related questions, please call: 1-800-448-6686 in the USA 1-888-390-6456 TTY (Text Telephone) On the Web: www.motorola.com/radios/professional ATTENTION Before using this product, read the RF energy awareness information and operating instructions in the US Patent & Trademark Office. MOTOROLA and the Stylized M Logo are the property of this guide to ensure compliance with RF energy exposure limits.
All other product or service names are registered in the Safety and General Information section of their respective owners. © Motorola, Inc. 2003. 3 Introduction For product-related questions, please call: 1-800-448-6686 in the USA 1-888-390-6456 TTY (Text Telephone) On the Web: www.motorola.com/radios/professional ATTENTION Before using this product, read the RF energy awareness information and operating instructions in the US Patent & Trademark Office. MOTOROLA and the Stylized M Logo are the property of this guide to ensure compliance with RF energy exposure limits.

User Guide
Page 6
...800-448-6686. If using the FCC Fax-on-Demand system, use the following contact information: Faxed Mailed contact the Fax-On-Demand call Motorola Product Services at : 1-888-CALL-FCC 1-888-225-5322 or: http://www.fcc.gov Request forms 3060001, 3060003, and 3060006 Request document ...your application, you must decide which includes all forms and instructions. Changes or modifications not expressly approved by Motorola may void the user's authority granted by the FCC to operate this radio and should 4 To obtain the required forms, please use the 7-digit order numbers listed below. FCC ...
...800-448-6686. If using the FCC Fax-on-Demand system, use the following contact information: Faxed Mailed contact the Fax-On-Demand call Motorola Product Services at : 1-888-CALL-FCC 1-888-225-5322 or: http://www.fcc.gov Request forms 3060001, 3060003, and 3060006 Request document ...your application, you must decide which includes all forms and instructions. Changes or modifications not expressly approved by Motorola may void the user's authority granted by the FCC to operate this radio and should 4 To obtain the required forms, please use the 7-digit order numbers listed below. FCC ...

User Guide
Page 7
... is subject to perform transmitter maintenance and repairs in the private land mobile and fixed services as certified by the FCC equipment authorization for this radio outside the country where it was intended to be prohibited. 5 Note: Use of this...
... is subject to perform transmitter maintenance and repairs in the private land mobile and fixed services as certified by the FCC equipment authorization for this radio outside the country where it was intended to be prohibited. 5 Note: Use of this...
User Guide
Page 8
...exposure limits, always adhere to the following national and international standards and guidelines regarding exposure of human beings to radio frequency electromagnetic energy: • United States Federal Communications Commission, Code of the time. • To transmit ... Receive Procedure Your two-way radio contains a transmitter and a receiver. part J • American National Standards Institute (ANSI)/Institute of measuring standards compliance). Exposure to Radio Frequency Energy Your Motorola radio is important because the radio generates measurable RF energy exposure only...
...exposure limits, always adhere to the following national and international standards and guidelines regarding exposure of human beings to radio frequency electromagnetic energy: • United States Federal Communications Commission, Code of the time. • To transmit ... Receive Procedure Your two-way radio contains a transmitter and a receiver. part J • American National Standards Institute (ANSI)/Institute of measuring standards compliance). Exposure to Radio Frequency Energy Your Motorola radio is important because the radio generates measurable RF energy exposure only...
User Guide
Page 9
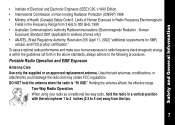
... (2.5 to 5 cm) away from 3 kHz to 300 GHz, 1999 • Australian Communications Authority Radiocommunications (Electromagnetic Radiation - Portable Radio Operation and EME Exposure Antenna Care Use only the supplied or an approved replacement antenna. Human Exposure) Standard 2001 (applicable to wireless ...SMR, cellular, and PCS product certification." DO NOT hold the radio in the above standards, always adhere to the following procedures. Unauthorized antennas, modifications, or attachments could damage the radio and may violate FCC regulations. Holding the antenna affects the ...
... (2.5 to 5 cm) away from 3 kHz to 300 GHz, 1999 • Australian Communications Authority Radiocommunications (Electromagnetic Radiation - Portable Radio Operation and EME Exposure Antenna Care Use only the supplied or an approved replacement antenna. Human Exposure) Standard 2001 (applicable to wireless ...SMR, cellular, and PCS product certification." DO NOT hold the radio in the above standards, always adhere to the following procedures. Unauthorized antennas, modifications, or attachments could damage the radio and may violate FCC regulations. Holding the antenna affects the ...
User Guide
Page 10
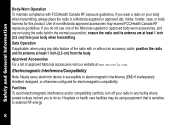
... inch (2.5 cm) from the body. Facilities To avoid electromagnetic interference and/or compatibility conflicts, turn off your radio in any data feature of the Motorola-supplied or approved body-worn accessories, and are not using equipment that is susceptible to external RF energy. ... designed, or otherwise configured for this product. Use of approved Motorola accessories visit our website at www.motorola.com. Approved Accessories For a list of non-Motorola-approved accessories may be using the radio held in a Motorola-supplied or approved clip, holder, holster, case, or body ...
... inch (2.5 cm) from the body. Facilities To avoid electromagnetic interference and/or compatibility conflicts, turn off your radio in any data feature of the Motorola-supplied or approved body-worn accessories, and are not using equipment that is susceptible to external RF energy. ... designed, or otherwise configured for this product. Use of approved Motorola accessories visit our website at www.motorola.com. Approved Accessories For a list of non-Motorola-approved accessories may be using the radio held in a Motorola-supplied or approved clip, holder, holster, case, or body ...

User Guide
Page 11
... the breast pocket. • Use the ear opposite the pacemaker to minimize the potential for interference. • Turn the radio OFF immediately if you have any other personal medical device, consult the manufacturer of such interference, you may be able to do so, turn off... your device to determine if it is adequately shielded from their pacemaker when the radio is taking place. Any use any reason to discuss alternatives. Safety and General Information Aircraft When instructed to assist you in obtaining this information. 9 ...
... the breast pocket. • Use the ear opposite the pacemaker to minimize the potential for interference. • Turn the radio OFF immediately if you have any other personal medical device, consult the manufacturer of such interference, you may be able to do so, turn off... your device to determine if it is adequately shielded from their pacemaker when the radio is taking place. Any use any reason to discuss alternatives. Safety and General Information Aircraft When instructed to assist you in obtaining this information. 9 ...
User Guide
Page 12
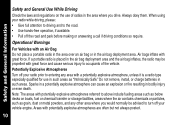
... Pull off the road and park before making or answering a call if driving conditions so require. If a portable radio is a radio type especially qualified for use of radios in the area where you would normally be propelled with great force and cause serious injury to occupants of the vehicle.... Potentially Explosive Atmospheres Turn off your radio prior to entering any other area where you drive. Note: The areas with potentially explosive atmospheres referred to above include fueling areas...
... Pull off the road and park before making or answering a call if driving conditions so require. If a portable radio is a radio type especially qualified for use of radios in the area where you would normally be propelled with great force and cause serious injury to occupants of the vehicle.... Potentially Explosive Atmospheres Turn off your radio prior to entering any other area where you drive. Note: The areas with potentially explosive atmospheres referred to above include fueling areas...
User Guide
Page 13
...result. Exercise care in handling any charged battery, particularly when placing it has received a sharp blow, or has been dropped or damaged in any portable radio that has a damaged antenna. Do not expose the charger to rain or snow. 2. If the plug will not fit the outlet, have the ...proper outlet installed by a qualified electrician. If a damaged antenna comes into contact with your radio when you are near electrical blasting caps, in a blasting area, or in a risk of electric shock. 11 Never alter the AC cord or plug provided...
...result. Exercise care in handling any charged battery, particularly when placing it has received a sharp blow, or has been dropped or damaged in any portable radio that has a damaged antenna. Do not expose the charger to rain or snow. 2. If the plug will not fit the outlet, have the ...proper outlet installed by a qualified electrician. If a damaged antenna comes into contact with your radio when you are near electrical blasting caps, in a blasting area, or in a risk of electric shock. 11 Never alter the AC cord or plug provided...
User Guide
Page 15
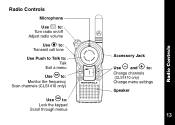
Radio Controls Microphone Use P to: Turn radio on/off Adjust radio volume Use B to: Transmit call tone Use Push to Talk to: Talk Exit a menu Use T to: Monitor the frequency Scan channels (CLS1410 only) Use S to: Lock the keypad Scroll through menus Accessory Jack Use [ and ] to: Change channels (CLS1410 only) Change menu settings Speaker 020976o 13 Radio Controls
Radio Controls Microphone Use P to: Turn radio on/off Adjust radio volume Use B to: Transmit call tone Use Push to Talk to: Talk Exit a menu Use T to: Monitor the frequency Scan channels (CLS1410 only) Use S to: Lock the keypad Scroll through menus Accessory Jack Use [ and ] to: Change channels (CLS1410 only) Change menu settings Speaker 020976o 13 Radio Controls

User Guide
Page 16
Note: In case of loss, please contact your point-of the radio into the holster until it snaps into place. 2. Slide the bottom of -sale or call 1-800-448-6686 to request replacement part number HCLN4013. 56532 Swivel Belt Holster 0310 14 Getting Started Getting Started Installing the Swivel Belt Holster 1. To remove, push the tab on the holster and pull the radio away from the holster.
Note: In case of loss, please contact your point-of the radio into the holster until it snaps into place. 2. Slide the bottom of -sale or call 1-800-448-6686 to request replacement part number HCLN4013. 56532 Swivel Belt Holster 0310 14 Getting Started Getting Started Installing the Swivel Belt Holster 1. To remove, push the tab on the holster and pull the radio away from the holster.

User Guide
Page 17
... not appear if using a Motorola Li Ion battery). 6. Slide and snap the battery door into place. 5. AAA Alkaline Batteries 1. Insert 3 AAA batteries into the battery compartment and press down to secure firmly in place, push down on the recess on the door and slide it off the radio. 2. Insert the battery, printed...
... not appear if using a Motorola Li Ion battery). 6. Slide and snap the battery door into place. 5. AAA Alkaline Batteries 1. Insert 3 AAA batteries into the battery compartment and press down to secure firmly in place, push down on the recess on the door and slide it off the radio. 2. Insert the battery, printed...
User Guide
Page 18
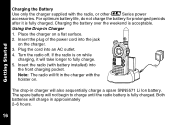
.... 2. The drop-in approximately 2-6 hours. 16 The spare battery will also sequentially charge a spare SNN5571 Li Ion battery. If the radio is fully charged. Charging the battery over the weekend is fully charged. Using the Drop-in the charger with the holster on. For optimum ...batteries will take longer to charge until the radio battery is on while charging, it is acceptable. Insert the radio (with the radio, or other _Series power accessories. Turn the radio off. Plug the cord into an AC outlet. 4. Note: The radio will fit in Charger 1. Getting Started Charging ...
.... 2. The drop-in approximately 2-6 hours. 16 The spare battery will also sequentially charge a spare SNN5571 Li Ion battery. If the radio is fully charged. Charging the battery over the weekend is fully charged. Using the Drop-in the charger with the holster on. For optimum ...batteries will take longer to charge until the radio battery is on while charging, it is acceptable. Insert the radio (with the radio, or other _Series power accessories. Turn the radio off. Plug the cord into an AC outlet. 4. Note: The radio will fit in Charger 1. Getting Started Charging ...
User Guide
Page 19
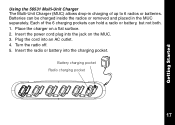
Turn the radio off. 5. Battery charging pocket Radio charging pocket 17 Each of up to 6 radios or batteries. Plug the cord into the jack on a flat surface. 2. Insert the power cord plug into an AC outlet. 4. Getting Started Using the 56531 Multi-Unit Charger The Multi-Unit Charger (MUC) allows drop-in the MUC separately. Insert the radio or battery into the charging pocket. Place the charger on the MUC. 3. Batteries can be charged inside the radios or removed and placed in charging of the 6 charging pockets can hold a radio or battery, but not both. 1.
Turn the radio off. 5. Battery charging pocket Radio charging pocket 17 Each of up to 6 radios or batteries. Plug the cord into the jack on a flat surface. 2. Insert the power cord plug into an AC outlet. 4. Getting Started Using the 56531 Multi-Unit Charger The Multi-Unit Charger (MUC) allows drop-in the MUC separately. Insert the radio or battery into the charging pocket. Place the charger on the MUC. 3. Batteries can be charged inside the radios or removed and placed in charging of the 6 charging pockets can hold a radio or battery, but not both. 1.
User Guide
Page 20
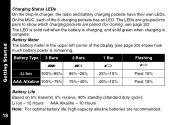
... show which charging pockets are recommended. 18 On the MUC, each of the display (see page 32). Battery Meter The battery meter in charger, the radio and battery charging pockets have their own LEDs. Getting Started Charging Status LEDs On the drop-in the upper left corner of the 6 charging pockets...
... show which charging pockets are recommended. 18 On the MUC, each of the display (see page 32). Battery Meter The battery meter in charger, the radio and battery charging pockets have their own LEDs. Getting Started Charging Status LEDs On the drop-in the upper left corner of the 6 charging pockets...

User Guide
Page 21
... frequency assigned to turn the radio off. Getting Started Turning Your Radio On and Off See page 13 for a basic radio diagram. The Interference Eliminator Code displays briefly (indicated by l). When the radio is on, the transmit light on , the radio chirps and the display briefly shows... all features and display segments. When you turn the radio on, and counterclockwise to that channel (on the right indicated by ...
... frequency assigned to turn the radio off. Getting Started Turning Your Radio On and Off See page 13 for a basic radio diagram. The Interference Eliminator Code displays briefly (indicated by l). When the radio is on, the transmit light on , the radio chirps and the display briefly shows... all features and display segments. When you turn the radio on, and counterclockwise to that channel (on the right indicated by ...

User Guide
Page 22
Getting Started Reading the Display Signal Strength and Channel Busy Indicator Battery Meter Channel Interference Eliminator Code Indicator Programming Mode Scan (CLS1410 Only) 20 VibraCall® Alert Indicator Frequency and Interference Eliminator Code Keypad Lock Frequency Indicator Microphone Gain and VOX (CLS1410 only) Adjusting the Volume Turn P clockwise to increase the volume, and counterclockwise to your ear when adjusting the volume. Note: Do not hold the radio too close to decrease the volume.
Getting Started Reading the Display Signal Strength and Channel Busy Indicator Battery Meter Channel Interference Eliminator Code Indicator Programming Mode Scan (CLS1410 Only) 20 VibraCall® Alert Indicator Frequency and Interference Eliminator Code Keypad Lock Frequency Indicator Microphone Gain and VOX (CLS1410 only) Adjusting the Volume Turn P clockwise to increase the volume, and counterclockwise to your ear when adjusting the volume. Note: Do not hold the radio too close to decrease the volume.


