User Guide
Page 3
...15 Charging the Battery 16 Turning Your Radio On and Off . 19 Adjusting the Volume 20 Factory Default Settings 27 Entering Programming Mode .....28 Cloning Radio Settings 32 Advanced Features 33 Troubleshooting 35 Use and Care 38 Frequencies and Bandwidths.....39 Spirit GT Series ...Programming ... 45 Warranty 46 Reading the Display 20 Talking and Receiving 21 Basic Radio Operation 21 Signal Strength and Channel...
...15 Charging the Battery 16 Turning Your Radio On and Off . 19 Adjusting the Volume 20 Factory Default Settings 27 Entering Programming Mode .....28 Cloning Radio Settings 32 Advanced Features 33 Troubleshooting 35 Use and Care 38 Frequencies and Bandwidths.....39 Spirit GT Series ...Programming ... 45 Warranty 46 Reading the Display 20 Talking and Receiving 21 Basic Radio Operation 21 Signal Strength and Channel...

User Guide
Page 6
...: http://www.fcc.gov Request forms 3060001, 3060003, and 3060006 Request document 000601 Request document 000601 Before filling out your radio frequency, please call Motorola Product Services at 1-800-448-6686. If using the FCC Fax-on FCC Forms 601, schedules D and H, and ...Licensing Information FCC Licensing Information _Series professional two-way radios operate on page 39. Changes or modifications not expressly approved by Motorola may void the user's authority granted by the FCC. See Frequencies and Bandwidths on radio frequencies that are required to have a license issued by...
...: http://www.fcc.gov Request forms 3060001, 3060003, and 3060006 Request document 000601 Request document 000601 Before filling out your radio frequency, please call Motorola Product Services at 1-800-448-6686. If using the FCC Fax-on FCC Forms 601, schedules D and H, and ...Licensing Information FCC Licensing Information _Series professional two-way radios operate on page 39. Changes or modifications not expressly approved by Motorola may void the user's authority granted by the FCC. See Frequencies and Bandwidths on radio frequencies that are required to have a license issued by...
User Guide
Page 8
... • Transmit no more than 50% of Electrical and Electronic Engineers (IEEE) C95. 6 1-1992 Exposure to radio frequency electromagnetic energy: • United States Federal Communications Commission, Code of measuring standards compliance). The information provided in this document... adhere to the following national and international standards and guidelines regarding exposure of human beings to Radio Frequency Energy Your Motorola radio is important because the radio generates measurable RF energy exposure only when transmitting (in user guides published prior to Talk (...
... • Transmit no more than 50% of Electrical and Electronic Engineers (IEEE) C95. 6 1-1992 Exposure to radio frequency electromagnetic energy: • United States Federal Communications Commission, Code of measuring standards compliance). The information provided in this document... adhere to the following national and international standards and guidelines regarding exposure of human beings to Radio Frequency Energy Your Motorola radio is important because the radio generates measurable RF energy exposure only when transmitting (in user guides published prior to Talk (...
User Guide
Page 9
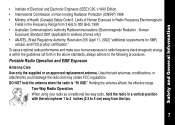
... Use only the supplied or an approved replacement antenna. Human Exposure) Standard 2001 (applicable to radio frequency electromagnetic energy is "IN USE." DO NOT hold the radio in the above standards, always adhere to the following procedures. Holding the antenna affects the effective... (ICNIRP) 1998 • Ministry of Human Exposure to Radio Frequency Electromagnetic Fields in the Frequency Range from the lips. 7 Two-Way Radio Operation When using your radio as a traditional two-way radio, hold the antenna when the radio is within the guidelines set forth in a vertical position...
... Use only the supplied or an approved replacement antenna. Human Exposure) Standard 2001 (applicable to radio frequency electromagnetic energy is "IN USE." DO NOT hold the radio in the above standards, always adhere to the following procedures. Holding the antenna affects the effective... (ICNIRP) 1998 • Ministry of Human Exposure to Radio Frequency Electromagnetic Fields in the Frequency Range from the lips. 7 Two-Way Radio Operation When using your radio as a traditional two-way radio, hold the antenna when the radio is within the guidelines set forth in a vertical position...
User Guide
Page 15
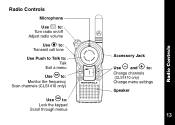
Radio Controls Microphone Use P to: Turn radio on/off Adjust radio volume Use B to: Transmit call tone Use Push to Talk to: Talk Exit a menu Use T to: Monitor the frequency Scan channels (CLS1410 only) Use S to: Lock the keypad Scroll through menus Accessory Jack Use [ and ] to: Change channels (CLS1410 only) Change menu settings Speaker 020976o 13 Radio Controls
Radio Controls Microphone Use P to: Turn radio on/off Adjust radio volume Use B to: Transmit call tone Use Push to Talk to: Talk Exit a menu Use T to: Monitor the frequency Scan channels (CLS1410 only) Use S to: Lock the keypad Scroll through menus Accessory Jack Use [ and ] to: Change channels (CLS1410 only) Change menu settings Speaker 020976o 13 Radio Controls

User Guide
Page 21
... l). Turn P clockwise to turn the radio on, and counterclockwise to that channel (on the right indicated by y), then the current channel remains displayed. 19 The radio then displays the current channel (larger number in the center) and the frequency assigned to turn the radio on the top of the radio flashes every 3 seconds. When you...
... l). Turn P clockwise to turn the radio on, and counterclockwise to that channel (on the right indicated by y), then the current channel remains displayed. 19 The radio then displays the current channel (larger number in the center) and the frequency assigned to turn the radio on the top of the radio flashes every 3 seconds. When you...

User Guide
Page 22
Getting Started Reading the Display Signal Strength and Channel Busy Indicator Battery Meter Channel Interference Eliminator Code Indicator Programming Mode Scan (CLS1410 Only) 20 VibraCall® Alert Indicator Frequency and Interference Eliminator Code Keypad Lock Frequency Indicator Microphone Gain and VOX (CLS1410 only) Adjusting the Volume Turn P clockwise to increase the volume, and counterclockwise to your ear when adjusting the volume. Note: Do not hold the radio too close to decrease the volume.
Getting Started Reading the Display Signal Strength and Channel Busy Indicator Battery Meter Channel Interference Eliminator Code Indicator Programming Mode Scan (CLS1410 Only) 20 VibraCall® Alert Indicator Frequency and Interference Eliminator Code Keypad Lock Frequency Indicator Microphone Gain and VOX (CLS1410 only) Adjusting the Volume Turn P clockwise to increase the volume, and counterclockwise to your ear when adjusting the volume. Note: Do not hold the radio too close to decrease the volume.

User Guide
Page 23
...someone is activity on the channel. Signal Strength and Channel Busy Indicators When there is speaking on a frequency, the radio displays w and the transmit light flashes at a faster rate of the radio is clear to stop monitoring. 2. Note: Obstacles that block the signal path may affect the strength of... activity on the top of once per second. Press and hold Push to 6 (strongest). The transmit LED on the same frequency and code as your radio (your radio is moving out of the incoming signal. 21 To talk, press and hold T to Talk. Talking and Receiving Talking and ...
...someone is activity on the channel. Signal Strength and Channel Busy Indicators When there is speaking on a frequency, the radio displays w and the transmit light flashes at a faster rate of the radio is clear to stop monitoring. 2. Note: Obstacles that block the signal path may affect the strength of... activity on the top of once per second. Press and hold Push to 6 (strongest). The transmit LED on the same frequency and code as your radio (your radio is moving out of the incoming signal. 21 To talk, press and hold T to Talk. Talking and Receiving Talking and ...
User Guide
Page 26
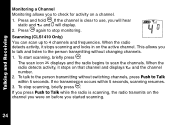
...it stops scanning and locks in on that channel and displays w and the channel number. 2. If the channel is scanning, the radio transmits on the channel you were on before you started scanning. 24 To talk to the person transmitting without switching channels, press ...(CLS1410 Only) You can scan up to scan the channels. If no transmission occurs within 5 seconds. The scan icon h displays and the radio begins to 4 channels and frequencies. To stop monitoring. If you press Push to check for activity on a channel. 1. Talking and Receiving Monitoring a Channel Monitoring allows you ...
...it stops scanning and locks in on that channel and displays w and the channel number. 2. If the channel is scanning, the radio transmits on the channel you were on before you started scanning. 24 To talk to the person transmitting without switching channels, press ...(CLS1410 Only) You can scan up to scan the channels. If no transmission occurs within 5 seconds. The scan icon h displays and the radio begins to 4 channels and frequencies. To stop monitoring. If you press Push to check for activity on a channel. 1. Talking and Receiving Monitoring a Channel Monitoring allows you ...
User Guide
Page 28
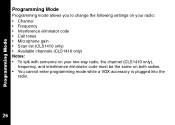
Programming Mode Programming Mode Programming mode allows you to change the following settings on your radio: • Channel • Frequency • Interference eliminator code • Call tones • Microphone gain • Scan list (CLS1410 only) • Available channels (CLS1410 only) Notes: • To talk with someone on your two-way radio, the channel (CLS1410 only), frequency, and interference eliminator code must be the same on both radios. • You cannot enter programming mode while a VOX accessory is plugged into the radio. 26
Programming Mode Programming Mode Programming mode allows you to change the following settings on your radio: • Channel • Frequency • Interference eliminator code • Call tones • Microphone gain • Scan list (CLS1410 only) • Available channels (CLS1410 only) Notes: • To talk with someone on your two-way radio, the channel (CLS1410 only), frequency, and interference eliminator code must be the same on both radios. • You cannot enter programming mode while a VOX accessory is plugged into the radio. 26

User Guide
Page 29
Factory Default Settings Your radio is programmed at the factory to the following settings: Programming Mode Frequency Channel 1 CLS1110 2 CLS1410 2 2 8 3 Not available 5 4 6 Code 1 Call Tone/ VibraCall® Off (0) VOX Not available Off (0) Microphone Gain 2 (medium sensitivity) To restore the factory settings, turn the radio on while holding Push to Talk and S for 3 seconds. 27
Factory Default Settings Your radio is programmed at the factory to the following settings: Programming Mode Frequency Channel 1 CLS1110 2 CLS1410 2 2 8 3 Not available 5 4 6 Code 1 Call Tone/ VibraCall® Off (0) VOX Not available Off (0) Microphone Gain 2 (medium sensitivity) To restore the factory settings, turn the radio on while holding Push to Talk and S for 3 seconds. 27
User Guide
Page 30
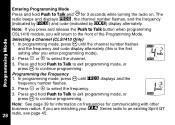
.... 3. If you are matching your _ Series radio to an existing Spirit GT 28 radio, see page 45. Note: See page 39 for communicating with other business radios. In programming mode, press S until the channel number flashes and the frequency and code display alternately (this is the first ...Mode. Programming Mode Entering Programming Mode Press and hold Push to Talk and T for 3 seconds while turning the radio on frequencies for information on . The radio beeps and displays k, the channel number flashes, and the frequency (indicated by l) and code (indicated by y) display alternately.
.... 3. If you are matching your _ Series radio to an existing Spirit GT 28 radio, see page 45. Note: See page 39 for communicating with other business radios. In programming mode, press S until the channel number flashes and the frequency and code display alternately (this is the first ...Mode. Programming Mode Entering Programming Mode Press and hold Push to Talk and T for 3 seconds while turning the radio on frequencies for information on . The radio beeps and displays k, the channel number flashes, and the frequency (indicated by l) and code (indicated by y) display alternately.

User Guide
Page 36
To Do This Press This Button While Turning the Radio On Default Setting Turn Battery Save Mode On/Off Decreases attack time, which is the brief period of time between when the radio receives a transmission on its original factory settings. Push to Talk T [ On Turning battery save mode off decreases battery life by approximately 20%. Restore Factory Defaults Returns radio to its frequency and broadcasts audio. Advanced Features 34 Push to Talk S ---
To Do This Press This Button While Turning the Radio On Default Setting Turn Battery Save Mode On/Off Decreases attack time, which is the brief period of time between when the radio receives a transmission on its original factory settings. Push to Talk T [ On Turning battery save mode off decreases battery life by approximately 20%. Restore Factory Defaults Returns radio to its frequency and broadcasts audio. Advanced Features 34 Push to Talk S ---
User Guide
Page 37
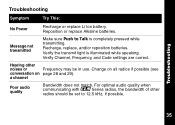
...: No Power Recharge or replace Li Ion battery. Verify the transmit light is completely pressed while transmitting. Verify Channel, Frequency, and Code settings are correct. Reposition or replace Alkaline batteries. Hearing other radios should be in use. a channel Poor audio quality Bandwidth does not match. Message not transmitted Make sure Push to...
...: No Power Recharge or replace Li Ion battery. Verify the transmit light is completely pressed while transmitting. Verify Channel, Frequency, and Code settings are correct. Reposition or replace Alkaline batteries. Hearing other radios should be in use. a channel Poor audio quality Bandwidth does not match. Message not transmitted Make sure Push to...

User Guide
Page 38
... close to another location. Low batteries 36 Recharge or replace batteries. Confirm radios have the same channel, frequency, and interference eliminator code settings (see page 22). They must be at least 5 feet apart. Extreme operating temperatures affect battery life. Verify radio is not in vehicles may decrease range. Check for 3 seconds. Keypad locked...
... close to another location. Low batteries 36 Recharge or replace batteries. Confirm radios have the same channel, frequency, and interference eliminator code settings (see page 22). They must be at least 5 feet apart. Extreme operating temperatures affect battery life. Verify radio is not in vehicles may decrease range. Check for 3 seconds. Keypad locked...

User Guide
Page 41
UHF Frequencies Frequencies and Bandwidths Display Frequency Number (MHz) Bandwidth Display Frequency Number (MHz) Bandwidth 1 464.5000 12.5 2 464.5500 12.5 3 467.7625 12.5 4 467.8125 12.5 5 467.8500 12.5 6 467.8750 12.5 7 ...12.5 12 461.1125 12.5 13 461.1375 12.5 14 461.1625 12.5 39 Frequency Display Number is identical to Spirit M, GT, and S-Series frequency position (where applicable), but bandwidth may be different. Frequencies and Bandwidths These charts provide frequency information and are useful when using Motorola _ Series radios with other business...
UHF Frequencies Frequencies and Bandwidths Display Frequency Number (MHz) Bandwidth Display Frequency Number (MHz) Bandwidth 1 464.5000 12.5 2 464.5500 12.5 3 467.7625 12.5 4 467.8125 12.5 5 467.8500 12.5 6 467.8750 12.5 7 ...12.5 12 461.1125 12.5 13 461.1375 12.5 14 461.1625 12.5 39 Frequency Display Number is identical to Spirit M, GT, and S-Series frequency position (where applicable), but bandwidth may be different. Frequencies and Bandwidths These charts provide frequency information and are useful when using Motorola _ Series radios with other business...
User Guide
Page 47
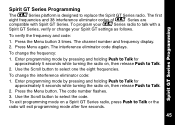
... eliminator code: 1. The code number flashes. 3. To verify the frequency and code: 1. Enter programming mode by pressing and holding Push to Talk for approximately 5 seconds while turning the radio on a Spirit GT Series radio, press Push to Talk. 2. To exit programming mode on , then... GT Series Programming The _Series platform is designed to select one the eight frequencies. Use the Scroll button to replace the Spirit GT Series radio. To change the frequency: 1. The first eight frequencies and 38 interference eliminator codes of _ Series are compatible with a Spirit ...
... eliminator code: 1. The code number flashes. 3. To verify the frequency and code: 1. Enter programming mode by pressing and holding Push to Talk for approximately 5 seconds while turning the radio on a Spirit GT Series radio, press Push to Talk. 2. To exit programming mode on , then... GT Series Programming The _Series platform is designed to select one the eight frequencies. Use the Scroll button to replace the Spirit GT Series radio. To change the frequency: 1. The first eight frequencies and 38 interference eliminator codes of _ Series are compatible with a Spirit ...

User Guide
Page 57
... the Interference Eliminator Code Set Available Channels* * CLS1410 Only Press S until = displays. Press [ or ] to Talk and Qfor 3 seconds while turning the radio on. Press [ or ] to change the frequency. _Series Programming Quick Reference To enter programming mode, press and hold Push to select number of available channels. Press S until y displays.Press...
... the Interference Eliminator Code Set Available Channels* * CLS1410 Only Press S until = displays. Press [ or ] to Talk and Qfor 3 seconds while turning the radio on. Press [ or ] to change the frequency. _Series Programming Quick Reference To enter programming mode, press and hold Push to select number of available channels. Press S until y displays.Press...


