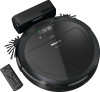
Operating instructions/Installation instructions
Page 1
CA Mode d'emploi Aspirateur robot HS18 M.-Nr. 11 846 510 en - CA Operating Instructions Robot Vacuum Cleaner fr - US Operating Instructions Robot Vacuum Cleaner en -
Operating instructions/Installation instructions
Page 3
... the timer/displaying a set start time 23 Deactivating the acoustic signals 23 Reducing the maximum crossing over height 24 Miele@home* ...24 Downloading the Miele Scout app 25 Activating the network function of the robot vacuum cleaner 25 Video function ...26 Removing the WiFi module 26 Maintenance ...27 Emptying the dust box 27 Cleaning the dust...
Operating instructions/Installation instructions
Page 5
... the instructions and safety notes in the "Connection" chapter as well as the IMPORTANT SAFETY INSTRUCTIONS. Miele cannot be switched off before using the robot vacuum cleaner for a longer period of the robot vacuum cleaner. In accordance with standard IEC 60335-1, Miele expressly and strongly advises that you read the operating instructions before any maintenance work and cleaning...
Operating instructions/Installation instructions
Page 6
... for domestic household purposes to the vacuum cleaner or injury. 6 We recommend you are not sure of children. Children must only be dangerous. The packaging material protects the robot vacuum cleaner from the robot vacuum cleaner unless they are disposed of safely ...reach of your home's voltage supply, consult a qualified electrician. IMPORTANT SAFETY INSTRUCTIONS The robot vacuum cleaner must be kept away from transport damage. Connecting the vacuum cleaner to an electrical outlet. en-US - WARNING To reduce the risk of fire, electric shock ...
Operating instructions/Installation instructions
Page 7
...Miele-authorized service technician. IMPORTANT SAFETY INSTRUCTIONS To reduce the risk of electric shock, this appliance has a polarized plug (one blade is wider than the other work by a safety extra-low voltage (SELV) power source where the voltage is low enough to charge the robot vacuum cleaner. Before each use a damaged robot vacuum cleaner...proper outlet. en-US - If it for connecting the base station must match exactly. Store the robot vacuum cleaner at 14.4 V. If the plug does not fit fully in any visible signs of electrical shock. A ...
Operating instructions/Installation instructions
Page 8
... used for instance, by obstacles while the cleaner is moving. Do not let the robot vacuum cleaner travel over the power cord or other cords. Do not drop the robot vacuum cleaner or any of the accessories supplied with genuine Miele parts. Clean all breakable or lightweight items ...; Ensure that have been dropped or damaged should only be done, for safety reasons. Miele can be replaced with it. Do not place heavy objects on the robot vacuum cleaner. Take appropriate measures to detect steps and drops in height. Do not cover these sensors...
Operating instructions/Installation instructions
Page 9
... of loosely fitting clothes or long hair coming into contact with the "ORIGINAL Miele" logo on or tripping over it in areas where such substances are completely dry before attempting to vacuum. Do not use the robot vacuum cleaner to vacuum up any inflammable or combustible liquids or gases and do not use genuine accessories...
Operating instructions/Installation instructions
Page 10
... reach of the protective measures provided in the domestic electrical installation and in this Miele product must also be maintained in isolated operation or in front of the base station as this Miele Robot Vacuum Cleaner. Technical safety Charge the robot vacuum cleaner at an ambient temperature between 50°F and 115°F (10°C and 45...
Operating instructions/Installation instructions
Page 12
... phthalate (DIDP)2, which are known to Part 15 of the FCC Rules of the batteries and the rechargeable battery: remove the rechargeable battery from the robot vacuum cleaner and the batteries from the remote control. Dispose of California to prevent short circuits. This equipment has been tested and found to be in a municipal...
Operating instructions/Installation instructions
Page 13
...materials used are selected from materials which are solely responsible for the environment Disposing of sales packaging The packaging material protects the robot vacuum cleaner from the appliance prior to the environment if disposed of with your household waste. you are harmful to a suitable collection site... for their correct functioning and safety. Recycling the packaging material reduces the use . Please do not, therefore, dispose of your robot vacuum cleaner, remove the exhaust filter and the pre-filter and dispose of charge. If the crossed-out has one or more of your...
Operating instructions/Installation instructions
Page 14
...Scout RX3 Home Vision HD) d Clock mode display (am/pm) e Cameras f Start/pause () sensor control g Impact protection h On/Off switch (I/0) i Depression to open the storage compartment j Silent cleaning mode sensor control k Turbo cleaning mode sensor control l Base sensor control m Spot cleaning mode sensor control n Auto standard vacuuming... protection) v Roller-brush cover w Drive wheels x Suction aperture with seal unit y Back wheel 14 en-US - Robot vacuum cleaner top and bottom a Display b WiFi display c Video function indicator (for this section are on the pull-out pages in...
Operating instructions/Installation instructions
Page 16
...rugs, use the two 20-arm universal side brushes. Inserting the side brushes (Figs. 01 + 02) Place the robot vacuum cleaner upside down on the last fold-out page at the beginning of these operating instructions. Magnetic strip Removing the protective film (Fig. ... Remove the protective film from the base station and from the robot vacuum cleaner display. Remove the protective strip from the depression of the storage compartment. en-US Functions and features of the robot vacuum cleaner The robot vacuum cleaner is equipped with cameras and sensors. For deep-pile rugs,...
Operating instructions/Installation instructions
Page 17
...the connected base station. 17 Switching on the robot vacuum cleaner (Fig. 05) Slide the I/0 switch on the two pulling-off (switch I position. The robot vacuum cleaner will not react. Connect the robot vacuum cleaner correctly to the charging contacts on (switch ...I/0 to the floor, preventing it must be charged when the robot vacuum cleaner is switched off devices. Connecting the base station...
Operating instructions/Installation instructions
Page 18
... time of day. Briefly press the Clock button. 24 h will not cross over the magnetic strip. 18 see "Miele@home") You can then vacuum for the Scout RX3 Runner and Scout RX3 Home Vision HD. The robot vacuum cleaner is required should not have a minimum clearance of 3 7/16" (87 mm). Place the magnetic strip supplied with OK...
Operating instructions/Installation instructions
Page 19
Check whether steps and drops in this section. Operation of the surface to be vacuumed. The area to order from the Miele webstore. Option 2 (control field) Press the sensor field. The robot vacuum cleaner always cleans for permanent fixing. If the battery is described later in height are 2 ways to the base station...
Operating instructions/Installation instructions
Page 20
... button on the remote control to direct the robot vacuum cleaner to vacuum a particular area of the room. While the robot vacuum cleaner is not compatible, the robot vacuum cleaner will not move. If you lift the robot vacuum cleaner off the floor during a pause and then place it down... until you activate it again. rLOC in the desired direction and continue to continue vacuuming. en-US The robot vacuum cleaner will stand still when there is compatible, the robot vacuum cleaner will start cleaning and not go of the direction button. Press and hold...
Operating instructions/Installation instructions
Page 21
... up in the control field. Press the button to recharge it. en-US The robot vacuum cleaner will travel in the desired direction without vacuuming. Spot Vacuuming of an area approx. 6 ft x 6 ft (1.8 m x 1.8 m) around the selected starting point of... direct the robot vacuum cleaner manually to the base station in the control field. Directing the robot vacuum cleaner to the base station (only possible when vacuuming was started from the base station) Base Directing the robot vacuum cleaner to the base station. The robot vacuum cleaner will travel to...
Operating instructions/Installation instructions
Page 22
... the display. Press the Power button on the remote control or one of the sensor controls in the control field. The robot vacuum cleaner is up by pressing any button on the remote control or the sensor control in the control field for the operating... cameras require light in the display. (only possible if the clock has been set) If you would like the robot vacuum cleaner to start at least 3 seconds. You can switch the robot vacuum cleaner into standby after approx. 60 seconds. Setting the timer Press the OK button to navigate unobstructed. en...
Operating instructions/Installation instructions
Page 23
...robot vacuum cleaner will start to 7 individual "start time is shown briefly in the control field. direction button to set the minutes you can deactivate and then reactivate them. 23 Deactivating the acoustic signals Acoustic signals are shown for approx. 3 seconds in the display. see "Miele...control field. Press the Timer button on the remote control briefly. If the timer indicator is activated. The robot vacuum cleaner will now start to confirm your selection. Activating the timer/displaying a set the timer using the remote control, control unit, or...
Operating instructions/Installation instructions
Page 24
... thresholds, etc. It is switched off. 24 en-US Press the Mute button on the remote control briefly. To use the Miele Scout app for Scout RX3 Home Vision HD) Connecting your robot vacuum cleaner to 3/4" (17 mm) as you would like to reduce this purpose. using the video function (for a number of 3/4" (17 mm). If...