Operating and Installation manual
Page 2
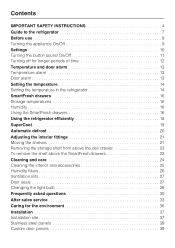
... Temperature alarm 13 Door alarm 13 Setting the temperature 14 Setting the temperature in the refrigerator 14 SmartFresh drawers 16 Storage temperatures 16 Humidity 16 Using the SmartFresh drawers 16 Using the refrigerator efficiently 18 SuperCool 19 Automatic defrost 20 Adjusting the interior fittings 21 Moving the shelves 21 Removing the storage shelf from above the deli drawer 23 To remove the shelf above the SmartFresh drawers 23 Cleaning and care 24 Cleaning the interior and accessories 25 Humidity filters...
... Temperature alarm 13 Door alarm 13 Setting the temperature 14 Setting the temperature in the refrigerator 14 SmartFresh drawers 16 Storage temperatures 16 Humidity 16 Using the SmartFresh drawers 16 Using the refrigerator efficiently 18 SuperCool 19 Automatic defrost 20 Adjusting the interior fittings 21 Moving the shelves 21 Removing the storage shelf from above the deli drawer 23 To remove the shelf above the SmartFresh drawers 23 Cleaning and care 24 Cleaning the interior and accessories 25 Humidity filters...
Operating and Installation manual
Page 4
... (e.g., danger of the appliance can lead to the appliance when all instructions before installation and use only. If there is complete. 4 Improper use the appliance for residential use to electricity. Consult a qualified electrician if in doubt. ~ Before installation or service, disconnect the power supply to the work is any future user. Use only as described in a safe place and pass them on the...
... (e.g., danger of the appliance can lead to the appliance when all instructions before installation and use only. If there is complete. 4 Improper use the appliance for residential use to electricity. Consult a qualified electrician if in doubt. ~ Before installation or service, disconnect the power supply to the work is any future user. Use only as described in a safe place and pass them on the...

Operating and Installation manual
Page 5
... not use . Contact Miele's Technical Service Department. ~ This appliance must be installed and connected in a non-stationary location (e.g. Work by unqualified persons could be used in compliance with too low an ambient temperature, e.g., a garage, as this or any manner. It is completely installed and secured per the installation instructions. ~ This appliance must not be dangerous and may lead to play in, on the door...
... not use . Contact Miele's Technical Service Department. ~ This appliance must be installed and connected in a non-stationary location (e.g. Work by unqualified persons could be used in compliance with too low an ambient temperature, e.g., a garage, as this or any manner. It is completely installed and secured per the installation instructions. ~ This appliance must not be dangerous and may lead to play in, on the door...
Operating and Installation manual
Page 6
... a cooling system that used CFCs (chlorofluorocarbons). IMPORTANT SAFETY INSTRUCTIONS ~ Do not block the ventilation gaps in the plinth or the top of the appliance housing unit, as this CFC refrigerant, you can damage the eyes. ~ Your old refrigerator may not easily climb inside. ~ Consult with your old appliance ~ Before disposing of an old appliance, first make the door...
... a cooling system that used CFCs (chlorofluorocarbons). IMPORTANT SAFETY INSTRUCTIONS ~ Do not block the ventilation gaps in the plinth or the top of the appliance housing unit, as this CFC refrigerant, you can damage the eyes. ~ Your old refrigerator may not easily climb inside. ~ Consult with your old appliance ~ Before disposing of an old appliance, first make the door...
Operating and Installation manual
Page 7
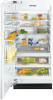
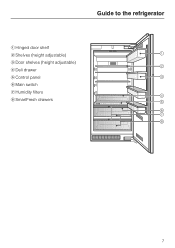
Guide to the refrigerator a Hinged door shelf b Shelves (height adjustable) c Door shelves (height adjustable) d Deli drawer e Control panel f Main switch g Humidity filters h SmartFresh drawers 7
Guide to the refrigerator a Hinged door shelf b Shelves (height adjustable) c Door shelves (height adjustable) d Deli drawer e Control panel f Main switch g Humidity filters h SmartFresh drawers 7

Operating and Installation manual
Page 14
... The display will flash if: - The room temperature and the installation location can be possible for the appliance to reach the lowest temperature. for removing or storing a large amount of coldness is no cause for concern if it is due to the door being set the temperature warmer or colder. Setting the temperature Setting the temperature in the refrigerator The loss of food. ^ Touch the access button...
... The display will flash if: - The room temperature and the installation location can be possible for the appliance to reach the lowest temperature. for removing or storing a large amount of coldness is no cause for concern if it is due to the door being set the temperature warmer or colder. Setting the temperature Setting the temperature in the refrigerator The loss of food. ^ Touch the access button...
Operating and Installation manual
Page 21
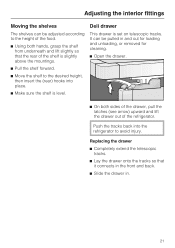
... height of the food. ^ Using both hands, grasp the shelf from underneath and lift slightly so that it connects in the front and back. ^ Slide the drawer in and out for loading and unloading, or removed for cleaning. ^ Open the drawer. ^ On both sides of the drawer, pull the latches (see arrow) upward and lift the drawer out of the refrigerator. Adjusting the interior...
... height of the food. ^ Using both hands, grasp the shelf from underneath and lift slightly so that it connects in the front and back. ^ Slide the drawer in and out for loading and unloading, or removed for cleaning. ^ Open the drawer. ^ On both sides of the drawer, pull the latches (see arrow) upward and lift the drawer out of the refrigerator. Adjusting the interior...
Operating and Installation manual
Page 23
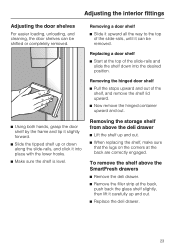
... the slide-rails, and click it into the desired position. Adjusting the interior fittings Adjusting the door shelves For easier loading, unloading, and cleaning, the door shelves can be shifted or completely removed. ^ Using both hands, grasp the door shelf by the frame and tip it slightly forward. ^ Slide the tipped shelf up or down into place with the lower hooks. ^ Make sure the shelf is level.
... the slide-rails, and click it into the desired position. Adjusting the interior fittings Adjusting the door shelves For easier loading, unloading, and cleaning, the door shelves can be shifted or completely removed. ^ Using both hands, grasp the door shelf by the frame and tip it slightly forward. ^ Slide the tipped shelf up or down into place with the lower hooks. ^ Make sure the shelf is level.
Operating and Installation manual
Page 25
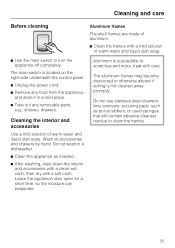
... The shelf frames are made of aluminum. ^ Clean the frames with care. or used sponges that still contain abrasive cleanser residue to turn the appliance off completely. Cleaning the interior and accessories Use a mild solution of warm water and liquid dish soap. ^ Use the main switch to clean the frames. 25 Do not wash in a cool place. ^ Take out any removable parts, e.g., shelves, drawers. scouring pads, such as needed...
... The shelf frames are made of aluminum. ^ Clean the frames with care. or used sponges that still contain abrasive cleanser residue to turn the appliance off completely. Cleaning the interior and accessories Use a mild solution of warm water and liquid dish soap. ^ Use the main switch to clean the frames. 25 Do not wash in a cool place. ^ Take out any removable parts, e.g., shelves, drawers. scouring pads, such as needed...

Operating and Installation manual
Page 26
... the drawer and remove them along with the filters downwards starting from b. ^ Remove the filter mat. ^ Clean the filters by rinsing them with lukewarm water. Cleaning and care Humidity filters The two humidity filters, located above the SmartFresh drawers, must be removed for cleaning. ^ Remove the SmartFresh drawer. ^ Unhook the filter cover a in a dishwasher or washing machine. This will damage the filter. ^ Air-dry the filters. ^ Place the filters back in the filter cover. ^ Put the filter cover...
... the drawer and remove them along with the filters downwards starting from b. ^ Remove the filter mat. ^ Clean the filters by rinsing them with lukewarm water. Cleaning and care Humidity filters The two humidity filters, located above the SmartFresh drawers, must be removed for cleaning. ^ Remove the SmartFresh drawer. ^ Unhook the filter cover a in a dishwasher or washing machine. This will damage the filter. ^ Air-dry the filters. ^ Place the filters back in the filter cover. ^ Put the filter cover...
Operating and Installation manual
Page 28
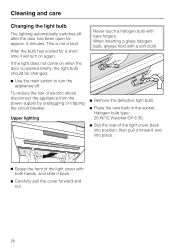
... light cover back into position, then pull it forward and into place. ^ Grasp the front of electric shock, disconnect the appliance from the power supply by unplugging or tripping the circuit breaker. After the bulb has cooled for approx. 5 minutes. Cleaning and care Changing the light bulb The lighting automatically switches off . This is opened briefly, the light bulb should be changed. ^ Use the main switch to turn on when the door...
... light cover back into position, then pull it forward and into place. ^ Grasp the front of electric shock, disconnect the appliance from the power supply by unplugging or tripping the circuit breaker. After the bulb has cooled for approx. 5 minutes. Cleaning and care Changing the light bulb The lighting automatically switches off . This is opened briefly, the light bulb should be changed. ^ Use the main switch to turn on when the door...
Operating and Installation manual
Page 30
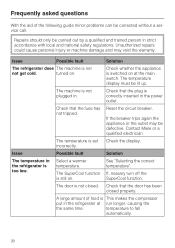
... main switch. temperature to fall automatically. 30 turned on . Check that the door has been closed . Check whether the appliance is set Check the display. The temperature is switched on at run longer, causing the the same time. The door is correctly inserted in the power outlet. Select a warmer temperature. A large amount of the following guide minor problems can be lit up. Unauthorized repairs could...
... main switch. temperature to fall automatically. 30 turned on . Check that the door has been closed . Check whether the appliance is set Check the display. The temperature is switched on at run longer, causing the the same time. The door is correctly inserted in the power outlet. Select a warmer temperature. A large amount of the following guide minor problems can be lit up. Unauthorized repairs could...
Operating and Installation manual
Page 39
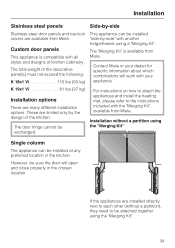
..., please refer to the instructions included with another fridge/freezer using a "Merging Kit". The "Merging Kit" is compatible with your dealer for specific information about which combinations will open and close properly in the kitchen. Contact Miele or your appliance. Installation without a partition), they need to each other (without a partition using the "Merging Kit". 39 Custom door panels This appliance is available from Miele. If the appliances are...
..., please refer to the instructions included with another fridge/freezer using a "Merging Kit". The "Merging Kit" is compatible with your dealer for specific information about which combinations will open and close properly in the kitchen. Contact Miele or your appliance. Installation without a partition), they need to each other (without a partition using the "Merging Kit". 39 Custom door panels This appliance is available from Miele. If the appliances are...

Operating and Installation manual
Page 46
... opening the door, danger of tipping. ^ To protect the base from the back of the appliance. ^ Take the supplied accessories out of the appliance. - The plinth facing must be carefully aligned using a spirit level before installing the appliance. Before installation ,Caution - The housing unit must be at least 5/8" (16 mm) thick. - The side panels of the appliance are securely connected...
... opening the door, danger of tipping. ^ To protect the base from the back of the appliance. ^ Take the supplied accessories out of the appliance. - The plinth facing must be carefully aligned using a spirit level before installing the appliance. Before installation ,Caution - The housing unit must be at least 5/8" (16 mm) thick. - The side panels of the appliance are securely connected...
Operating and Installation manual
Page 47
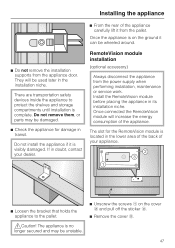
.... They will increase the energy consumption of the appliance. Do not install the appliance if it from the power supply when performing installation, maintenance or service work. Install the RemoteVision module before placing the appliance in doubt, contact your appliance. ^ Loosen the bracket that holds the appliance to protect the shelves and storage compartments until installation is located in transit. The...
.... They will increase the energy consumption of the appliance. Do not install the appliance if it from the power supply when performing installation, maintenance or service work. Install the RemoteVision module before placing the appliance in doubt, contact your appliance. ^ Loosen the bracket that holds the appliance to protect the shelves and storage compartments until installation is located in transit. The...
Operating and Installation manual
Page 48
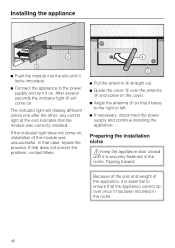
...problem, contact Miele. ^ Pull the antenna d straight out. ^ Guide the cover b over once it has been mounted in the niche. any control light at the end indicates that case, repeat the process. Preparing the installation niche ,Keep the appliance door closed until it locks into place. ^ Connect the appliance to the power supply and turn it on the cover... size and weight of the module was correctly installed. Installing the appliance ^ Push the module into the slot until it is essential to the right or left. ^ If necessary, disconnect the power supply and continue installing...
...problem, contact Miele. ^ Pull the antenna d straight out. ^ Guide the cover b over once it has been mounted in the niche. any control light at the end indicates that case, repeat the process. Preparing the installation niche ,Keep the appliance door closed until it locks into place. ^ Connect the appliance to the power supply and turn it on the cover... size and weight of the module was correctly installed. Installing the appliance ^ Push the module into the slot until it is essential to the right or left. ^ If necessary, disconnect the power supply and continue installing...
Operating and Installation manual
Page 62
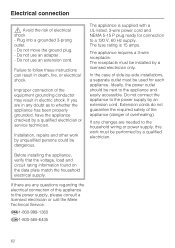
..., or electrical shock. The appliance requires a 3-wire receptacle. The receptacle must be next to the power supply by a qualified electrician or service technician. Extension cords do not guarantee the required safety of the appliance (danger of the equipment grounding conductor may result in electric shock. Do not move the ground plug. - Improper connection of overheating). Installation, repairs and other work must...
..., or electrical shock. The appliance requires a 3-wire receptacle. The receptacle must be next to the power supply by a qualified electrician or service technician. Extension cords do not guarantee the required safety of the appliance (danger of the equipment grounding conductor may result in electric shock. Do not move the ground plug. - Improper connection of overheating). Installation, repairs and other work must...
Vi Refrigerators (36 inch)
Page 1
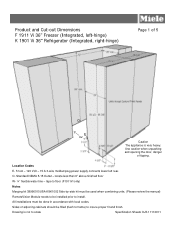
.... Use caution when unpacking and opening the door, danger of tipping. tape to floor (F1911Vi only) Notes Merging kit 38996010USA KSK1002 Side-by-side kit must be installed prior to insure proper fit and finish. O- Standard NEMA 5-15 Outlet - locate less than 9" above finished floor W- ¼" flexible water line - Location Codes E- 5 foot - 120 Volt - 15 A 3-wire molded plug power supply connects lower left -hinge) K 1901 Vi 36" Refrigerator (Integrated, right-hinge...
.... Use caution when unpacking and opening the door, danger of tipping. tape to floor (F1911Vi only) Notes Merging kit 38996010USA KSK1002 Side-by-side kit must be installed prior to insure proper fit and finish. O- Standard NEMA 5-15 Outlet - locate less than 9" above finished floor W- ¼" flexible water line - Location Codes E- 5 foot - 120 Volt - 15 A 3-wire molded plug power supply connects lower left -hinge) K 1901 Vi 36" Refrigerator (Integrated, right-hinge...
Vi Refrigerators (36 inch)
Page 2
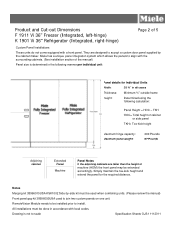
... are designed to install. RemoteVision Module needs to be installed prior to accept a custom door panel supplied by -side kit must be used when combining units. (Please review the manual) Front panel gap kit 38996050USA used to scale Specification Sheets OJS 11112011 Product and Cut-out Dimensions F 1911 Vi 36" Freezer (Integrated, left-hinge) K 1901 Vi 36" Refrigerator (Integrated, right-hinge) Page 2 of 5 Custom Panel Installations These units do not come equipped with local codes. Notes Merging kit 38996010USA KSK1002...
... are designed to install. RemoteVision Module needs to be installed prior to accept a custom door panel supplied by -side kit must be used when combining units. (Please review the manual) Front panel gap kit 38996050USA used to scale Specification Sheets OJS 11112011 Product and Cut-out Dimensions F 1911 Vi 36" Freezer (Integrated, left-hinge) K 1901 Vi 36" Refrigerator (Integrated, right-hinge) Page 2 of 5 Custom Panel Installations These units do not come equipped with local codes. Notes Merging kit 38996010USA KSK1002...
Vi Refrigerators (36 inch)
Page 5
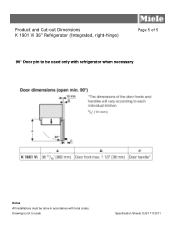
Drawing is not to be used only with refrigerator when necessary Notes All installations must be done in accordance with local codes. Product and Cut-out Dimensions K 1901 Vi 36" Refrigerator (Integrated, right-hinge) Page 5 of 5 90° Door pin to scale Specification Sheets OJS 11112011
Drawing is not to be used only with refrigerator when necessary Notes All installations must be done in accordance with local codes. Product and Cut-out Dimensions K 1901 Vi 36" Refrigerator (Integrated, right-hinge) Page 5 of 5 90° Door pin to scale Specification Sheets OJS 11112011


