Product Manual
Page 2
... the dishwasher 7 Control panel 8 Caring for the environment 9 Energy saving washing 9 Before using for the first time 10 To open the door 10 To close the door 10 Rinse aid 11 Adding rinse aid 11 Rinse aid indicator 11 Deactivating refill indicators 12 Setting the rinse aid dosage 13 Loading the dishwasher 14 Items not recommended for dishwashing 15 Typical load for 10 place settings with cutlery tray 16 Typical load for 16 place settings with cutlery tray 17 Upper basket 18 Lower basket...
... the dishwasher 7 Control panel 8 Caring for the environment 9 Energy saving washing 9 Before using for the first time 10 To open the door 10 To close the door 10 Rinse aid 11 Adding rinse aid 11 Rinse aid indicator 11 Deactivating refill indicators 12 Setting the rinse aid dosage 13 Loading the dishwasher 14 Items not recommended for dishwashing 15 Typical load for 10 place settings with cutlery tray 16 Typical load for 16 place settings with cutlery tray 17 Upper basket 18 Lower basket...

Product Manual
Page 3
... Delay start 31 Buzzer 33 Memory 34 Optimize Standby 35 Factory defaults 36 Frequently Asked Questions 37 Technical faults 37 Faults in the water intake or water drain 38 General problems with the dishwasher 39 Noises 40 Poor cleaning results 41 After sales service 44 User Maintenance Instructions 45 Cleaning and Care 46 Triple filter system 47 Cleaning the drain pump and non-return valve 50 Installation instructions 51 Electrical connection 52 Plumbing 54 Connection to the water supply...
... Delay start 31 Buzzer 33 Memory 34 Optimize Standby 35 Factory defaults 36 Frequently Asked Questions 37 Technical faults 37 Faults in the water intake or water drain 38 General problems with the dishwasher 39 Noises 40 Poor cleaning results 41 After sales service 44 User Maintenance Instructions 45 Cleaning and Care 46 Triple filter system 47 Cleaning the drain pump and non-return valve 50 Installation instructions 51 Electrical connection 52 Plumbing 54 Connection to the water supply...
Product Manual
Page 4
..." the circuit breaker or removing the fuse. ~ Do not use an extension cord to connect this appliance to any doubt, have the electrical system of the appliance (e.g. danger of overheating). ~ Be certain your dishwasher, follow basic precautions, including the following: Read the operating instructions and installation diagram carefully before installation or use the dishwasher without supervision or instruction by a Miele Service technician with the household electrical supply. It is damaged...
..." the circuit breaker or removing the fuse. ~ Do not use an extension cord to connect this appliance to any doubt, have the electrical system of the appliance (e.g. danger of overheating). ~ Be certain your dishwasher, follow basic precautions, including the following: Read the operating instructions and installation diagram carefully before installation or use the dishwasher without supervision or instruction by a Miele Service technician with the household electrical supply. It is damaged...
Product Manual
Page 5
... the appliance. If the supplied toe-kick is dangerous. IMPORTANT SAFETY INSTRUCTIONS Installation ~ The dishwasher must be installed and connected in accordance with the dishwasher. Work by a Miele authorized service technician. Fire hazard! High temperatures from these units may void the warranty. ~ Do not install or use a damaged dishwasher. This hose contains electrical components that the cabinet opening for the dishwasher provides ample space for the plug and cord. Damage of suffocation...
... the appliance. If the supplied toe-kick is dangerous. IMPORTANT SAFETY INSTRUCTIONS Installation ~ The dishwasher must be installed and connected in accordance with the dishwasher. Work by a Miele authorized service technician. Fire hazard! High temperatures from these units may void the warranty. ~ Do not install or use a damaged dishwasher. This hose contains electrical components that the cabinet opening for the dishwasher provides ample space for the plug and cord. Damage of suffocation...

Product Manual
Page 6
... pinched in a hot water system that all panels are cool enough to handle before using the dishwasher. Harmful residues could be present. ~ Do not fill the rinse aid reservoir or salt container with the controls. ~ Do not sit or stand on the door or baskets of the dishwasher. during this time. ~ Be sure that has not been used , remove the doorlock to the wash cabinet to prevent...
... pinched in a hot water system that all panels are cool enough to handle before using the dishwasher. Harmful residues could be present. ~ Do not fill the rinse aid reservoir or salt container with the controls. ~ Do not sit or stand on the door or baskets of the dishwasher. during this time. ~ Be sure that has not been used , remove the doorlock to the wash cabinet to prevent...

Product Manual
Page 8
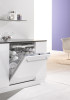
The different dishwasher models are named : Standard = Dishwasher with 31 11/16" (80.5 cm) height (built-in) or 33 1/4" (84.5 cm) height (stand-alone) XXL = Dishwasher with different indicated settings. Guide to the dishwasher Control panel a Check / Refill indicators b Time display c , button with indicator light (Delay start) d Turbo button with indicator light e Program selection f Program button g K button (On/Off) with indicator light This operating instruction manual describes several dishwasher models with 33 1/4" (84.5 cm) height. 8
The different dishwasher models are named : Standard = Dishwasher with 31 11/16" (80.5 cm) height (built-in) or 33 1/4" (84.5 cm) height (stand-alone) XXL = Dishwasher with different indicated settings. Guide to the dishwasher Control panel a Check / Refill indicators b Time display c , button with indicator light (Delay start) d Turbo button with indicator light e Program selection f Program button g K button (On/Off) with indicator light This operating instruction manual describes several dishwasher models with 33 1/4" (84.5 cm) height. 8
Product Manual
Page 11
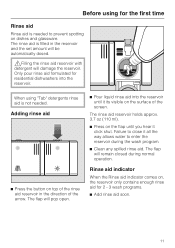
... open. ^ Pour liquid rinse aid into the reservoir. Adding rinse aid ^ Press the button on the surface of the arrow. The flap will damage the reservoir. The rinse aid is filled in the direction of the screen. Rinse aid indicator When the Rinse aid indicator comes on dishes and glassware. When using for 2 - 3 wash programs. ^ Add rinse aid soon. 11 Before using "Tab" detergents rinse aid is not needed to enter the reservoir during normal operation. The rinse aid...
... open. ^ Pour liquid rinse aid into the reservoir. Adding rinse aid ^ Press the button on the surface of the arrow. The flap will damage the reservoir. The rinse aid is filled in the direction of the screen. Rinse aid indicator When the Rinse aid indicator comes on dishes and glassware. When using for 2 - 3 wash programs. ^ Add rinse aid soon. 11 Before using "Tab" detergents rinse aid is not needed to enter the reservoir during normal operation. The rinse aid...

Product Manual
Page 26
... turn the dishwasher on . Selecting a program Choose the program according to the type of the programs and their applications. ^ Use the Program button to start the program. water softening) may be canceled. The time display shows the runtime of the selected program in the first few minutes. The K indicator light and the program indicator light come on . Otherwise important program steps (e.g. Starting a program ^ Close the door...
... turn the dishwasher on . Selecting a program Choose the program according to the type of the programs and their applications. ^ Use the Program button to start the program. water softening) may be canceled. The time display shows the runtime of the selected program in the first few minutes. The K indicator light and the program indicator light come on . Otherwise important program steps (e.g. Starting a program ^ Close the door...

Product Manual
Page 28
... and minutes. Use Time display Before the program starts, the time display shows the time of the selected program in standby mode it will turn the indicator lights back on the temperature of the incoming water, the reactivation cycle, the type of detergent and the quantity and soiling of the dishes. However, fault messages cannot be turned off after the program ends, after the end of the load. Standby...
... and minutes. Use Time display Before the program starts, the time display shows the time of the selected program in standby mode it will turn the indicator lights back on the temperature of the incoming water, the reactivation cycle, the type of detergent and the quantity and soiling of the dishes. However, fault messages cannot be turned off after the program ends, after the end of the load. Standby...

Product Manual
Page 29
... your appliance for an extended period of time, please note that the program runs to use electricity until turned off with the s button. 29 To be enough to reduce the risk of a program ^ Open the door slightly to chip if removed still hot from dropping onto dishes in the lower basket. ^ Turn the dishwasher off the water supply to your washer, etc. This means under the sink for...
... your appliance for an extended period of time, please note that the program runs to use electricity until turned off with the s button. 29 To be enough to reduce the risk of a program ^ Open the door slightly to chip if removed still hot from dropping onto dishes in the lower basket. ^ Turn the dishwasher off the water supply to your washer, etc. This means under the sink for...

Product Manual
Page 35
... time display and the indicator lights are turned off . ^ Press and hold the Program button and simultaneously turn the dishwasher off and only the K indicator light flashes slowly. If refill rinse aid or a fault is displayed while a program is off . 35 "p 1": Optimize Standby is turned on using the K button. "p 0": Optimize Standby is running, the dishwasher will not switch to Standby mode. ^ Open the door. ^ Press the K button to turn the dishwasher on . - The time display and the indicator lights...
... time display and the indicator lights are turned off . ^ Press and hold the Program button and simultaneously turn the dishwasher off and only the K indicator light flashes slowly. If refill rinse aid or a fault is displayed while a program is off . 35 "p 1": Optimize Standby is turned on using the K button. "p 0": Optimize Standby is running, the dishwasher will not switch to Standby mode. ^ Open the door. ^ Press the K button to turn the dishwasher on . - The time display and the indicator lights...

Product Manual
Page 37
... trips again, contact Miele. Use the Program button to turn the dishwasher off. Frequently Asked Questions ,Repairs should only be a technical fault. The buzzer sounds. Technical faults Problem The dishwasher will not start. The circuit breaker has tripped. Reset the circuit breaker (see data plate for the correct fuse rating). - Close the water supply. - All the indicator lights of the program selection flash when the door is reports a fault. If the circuit...
... trips again, contact Miele. Use the Program button to turn the dishwasher off. Frequently Asked Questions ,Repairs should only be a technical fault. The buzzer sounds. Technical faults Problem The dishwasher will not start. The circuit breaker has tripped. Reset the circuit breaker (see data plate for the correct fuse rating). - Close the water supply. - All the indicator lights of the program selection flash when the door is reports a fault. If the circuit...

Product Manual
Page 38
... at the water connection is open . Clean the non-return valve (see "Cleaning and care"). - the program starts. Frequently Asked Questions Faults in the wash cabinet. - Clean the screen in the drain hose. 38 Fault F11: Water drainage fault. Clean the drain pump (see User "Maintenance instructions). - Consult a plumber. Press the K button to turn the dishwasher off. - Remove any kinks or high loops in the water supply valve (see "User maintenance instructions"). - The dishwasher has stopped. The Intake/Drain indicator light flashes when the Fault F12/F13...
... at the water connection is open . Clean the non-return valve (see "Cleaning and care"). - the program starts. Frequently Asked Questions Faults in the wash cabinet. - Clean the screen in the drain hose. 38 Fault F11: Water drainage fault. Clean the drain pump (see User "Maintenance instructions). - Consult a plumber. Press the K button to turn the dishwasher off. - Remove any kinks or high loops in the water supply valve (see "User maintenance instructions"). - The dishwasher has stopped. The Intake/Drain indicator light flashes when the Fault F12/F13...

Product Manual
Page 39
... fault Solution The indicator lights and the time display are wet after a short time. Press the K button to come out of a program. Clean the drain pump or the non-return valve (see cabinet is a kink in the wash cabinet at the end of Standby mode. Only the indicator light K flashes slowly. "Cleaning and care"). The drain pump or non-return valve is dry before adding detergent. Make sure the dispenser is blocked. There is water in the drain Remove...
... fault Solution The indicator lights and the time display are wet after a short time. Press the K button to come out of a program. Clean the drain pump or the non-return valve (see cabinet is a kink in the wash cabinet at the end of Standby mode. Only the indicator light K flashes slowly. "Cleaning and care"). The drain pump or non-return valve is dry before adding detergent. Make sure the dispenser is blocked. There is water in the drain Remove...

Product Manual
Page 40
... the spray arms. Dishware is moving around in doubt, diameter of the water pipe. A foreign object has become lodged in the wash cabinet. Frequently Asked Questions Noises Problem There is a knocking noise in the drain pump. There is a knocking noise from the drain pump (see: Cleaning the drain pump and non-return valve) This may be caused by This has no effect on the the installation or the dishwasher...
... the spray arms. Dishware is moving around in doubt, diameter of the water pipe. A foreign object has become lodged in the wash cabinet. Frequently Asked Questions Noises Problem There is a knocking noise in the drain pump. There is a knocking noise from the drain pump (see: Cleaning the drain pump and non-return valve) This may be caused by This has no effect on the the installation or the dishwasher...

Product Manual
Page 41
... the wash cabinet. Clean the drain pump and the non-return valve (see "Program guide"). program (see "User maintenance instructions"). The spray arms are blocked by turning the spray arms and rearrange the dishes if necessary. Clean the triple filter or insert it correctly. The non-return valve is a bluish sheen on the glasses high. There is stuck in the wash cabinet is set too Reduce the dosage (see "Cleaning and care"). correctly. The spray arm...
... the wash cabinet. Clean the drain pump and the non-return valve (see "Program guide"). program (see "User maintenance instructions"). The spray arms are blocked by turning the spray arms and rearrange the dishes if necessary. Clean the triple filter or insert it correctly. The non-return valve is a bluish sheen on the glasses high. There is stuck in the wash cabinet is set too Reduce the dosage (see "Cleaning and care"). correctly. The spray arm...

Product Manual
Page 46
... avoid faults and problems. ,Abrasive cleaning agents, all-purpose cleaners, thinner or ammonium cleaners should only be used to sir or puddle, this can be cleaned with a dishwasher cleaner such as "Dis Cleaner" available from the spray arms. Control panel ^ The plastic control panels should not be wiped from the sides of the wash cabinet and are not scratch proof. stainless steel cleaners, - Door and the door seal ^ Wipe the door seals...
... avoid faults and problems. ,Abrasive cleaning agents, all-purpose cleaners, thinner or ammonium cleaners should only be used to sir or puddle, this can be cleaned with a dishwasher cleaner such as "Dis Cleaner" available from the spray arms. Control panel ^ The plastic control panels should not be wiped from the sides of the wash cabinet and are not scratch proof. stainless steel cleaners, - Door and the door seal ^ Wipe the door seals...

Product Manual
Page 52
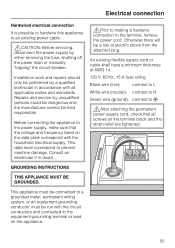
...-6435 Specifications The dishwasher comes equipped with a 4 ft (1.2 m) power cord with all local codes and ordinances. 52 See data plate on the data plate match the household mains supply. GROUNDING INSTRUCTIONS THIS APPLIANCE MUST BE GROUNDED. ,Improper connection of the door. The plug must be replaced with the appliance; In the event of least resistance for connection to the mains. Electrical connection ,Installation, repairs and other work...
...-6435 Specifications The dishwasher comes equipped with a 4 ft (1.2 m) power cord with all local codes and ordinances. 52 See data plate on the data plate match the household mains supply. GROUNDING INSTRUCTIONS THIS APPLIANCE MUST BE GROUNDED. ,Improper connection of the door. The plug must be replaced with the appliance; In the event of least resistance for connection to the mains. Electrical connection ,Installation, repairs and other work...
Product Manual
Page 53
... applicable codes and standards. Before connecting the appliance to an existing power cable. ,CAUTION: Before servicing, disconnect the power supply by either removing the fuse, shutting off the power main or manually "tripping" the circuit breaker. Otherwise there will be a risk of AWG 14. 120 V, 60 Hz, 15 A fuse rating Black wire (live): connect to L White wire (neutral): connect to N Green wire (ground): connect to prevent machine damage. GROUNDING INSTRUCTIONS...
... applicable codes and standards. Before connecting the appliance to an existing power cable. ,CAUTION: Before servicing, disconnect the power supply by either removing the fuse, shutting off the power main or manually "tripping" the circuit breaker. Otherwise there will be a risk of AWG 14. 120 V, 60 Hz, 15 A fuse rating Black wire (live): connect to L White wire (neutral): connect to N Green wire (ground): connect to prevent machine damage. GROUNDING INSTRUCTIONS...

Product Manual
Page 55
.... - The hose can be vented. If the nipple extends more than 2" (50 mm) into the drain hose it should be attached on the discharge side to remove. Use the clamp provided to attach the hose to the dishwashers P trap or disposal connection (see the "Installation Diagram"). ^ Open the dishwasher door and remove the lower basket. ^ Pull the lower spray arm firmly upwards to prevent waste water from Miele. Plumbing Drainage - The hose must...
.... - The hose can be vented. If the nipple extends more than 2" (50 mm) into the drain hose it should be attached on the discharge side to remove. Use the clamp provided to attach the hose to the dishwashers P trap or disposal connection (see the "Installation Diagram"). ^ Open the dishwasher door and remove the lower basket. ^ Pull the lower spray arm firmly upwards to prevent waste water from Miele. Plumbing Drainage - The hose must...


