
Operating and Installation manual
Page 4
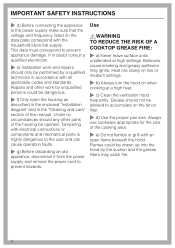
...all applicable codes and standards. Under no circumstances should any other work and repairs should not be dangerous. ~ f) Only open flame beneath the hood. Flames could be allowed to prevent appliance damage. If in doubt consult a qualified electrician. ~ e) Installation work by a qualified technician in...in accordance with the household electrical supply. Always use cookware appropriate for the size of the housing be drawn up into the hood by the suction and the grease filters may ignite. Boilovers cause smoking and greasy spillovers may catch fire. 4 Heat oils slowly...
...all applicable codes and standards. Under no circumstances should any other work and repairs should not be dangerous. ~ f) Only open flame beneath the hood. Flames could be allowed to prevent appliance damage. If in doubt consult a qualified electrician. ~ e) Installation work by a qualified technician in...in accordance with the household electrical supply. Always use cookware appropriate for the size of the housing be drawn up into the hood by the suction and the grease filters may ignite. Boilovers cause smoking and greasy spillovers may catch fire. 4 Heat oils slowly...

Operating and Installation manual
Page 5
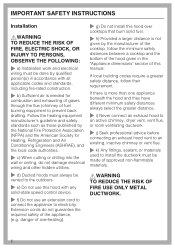
... AND CALL THE FIRE DEPARTMENT. ~ b) NEVER PICK UP A FLAMING PAN - BE CAREFUL TO PREVENT BURNS. when using the cooktop to clean the hood. Do not overheat the cookware, e.g. Steam could penetrate electrical components and cause a short circuit. 5 You may be damaged due to play with a... or infirm. ~ Always turn off when not in use a steam cleaner to prevent damage from the burners and the cookware. ~ Do not use the hood without cookware. a violent steam explosion will result. ~ d) Use a fire extinguisher ONLY if: 1) You have a class ABC extinguisher, and you know how...
... AND CALL THE FIRE DEPARTMENT. ~ b) NEVER PICK UP A FLAMING PAN - BE CAREFUL TO PREVENT BURNS. when using the cooktop to clean the hood. Do not overheat the cookware, e.g. Steam could penetrate electrical components and cause a short circuit. 5 You may be damaged due to play with a... or infirm. ~ Always turn off when not in use a steam cleaner to prevent damage from the burners and the cookware. ~ Do not use the hood without cookware. a violent steam explosion will result. ~ d) Use a fire extinguisher ONLY if: 1) You have a class ABC extinguisher, and you know how...
Operating and Installation manual
Page 6
...National Fire Protection Association (NFPA) and the American Society for combustion and exhausting of gases through the flue (chimney of this hood with all applicable codes and standards, including fire-rated construction. ~ b) Sufficient air is not given by the manufacturer of ...the cooktop, follow their requirement. danger of overheating). ~ g) Do not install this hood over cooktops that burn solid fuel. ~ h) Provided a larger distance is needed for Heating, Refrigeration and Air Conditioning Engineers (ASHRAE), and the local...
...National Fire Protection Association (NFPA) and the American Society for combustion and exhausting of gases through the flue (chimney of this hood with all applicable codes and standards, including fire-rated construction. ~ b) Sufficient air is not given by the manufacturer of ...the cooktop, follow their requirement. danger of overheating). ~ g) Do not install this hood over cooktops that burn solid fuel. ~ h) Provided a larger distance is needed for Heating, Refrigeration and Air Conditioning Engineers (ASHRAE), and the local...
Operating and Installation manual
Page 7
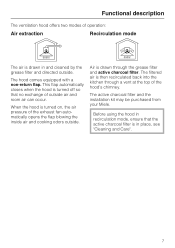
... through the grease filter and active charcoal filter. The filtered air is drawn through a vent at the top of the hood's chimney. Functional description The ventilation hood offers two modes of operation: Air extraction Recirculation mode The air is drawn in place, see "Cleaning and Care". 7...cleaned by the grease filter and directed outside. The active charcoal filter and the installation kit may be purchased from your Miele. Before using the hood in recirculation mode, ensure that no exchange of the exhaust fan automatically opens the flap blowing the inside air and cooking...
... through the grease filter and active charcoal filter. The filtered air is drawn through a vent at the top of the hood's chimney. Functional description The ventilation hood offers two modes of operation: Air extraction Recirculation mode The air is drawn in place, see "Cleaning and Care". 7...cleaned by the grease filter and directed outside. The active charcoal filter and the installation kit may be purchased from your Miele. Before using the hood in recirculation mode, ensure that no exchange of the exhaust fan automatically opens the flap blowing the inside air and cooking...
Operating and Installation manual
Page 11
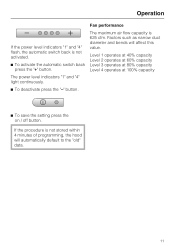
... If the power level indicators "1" and "4" flash, the automatic switch back is 625 cfm. If the procedure is not stored within 4 minutes of programming, the hood will affect this value. The maximum air flow capacity is not activated. ^ To activate the automatic switch back press the "+" button. Factors such as narrow...
... If the power level indicators "1" and "4" flash, the automatic switch back is 625 cfm. If the procedure is not stored within 4 minutes of programming, the hood will affect this value. The maximum air flow capacity is not activated. ^ To activate the automatic switch back press the "+" button. Factors such as narrow...
Operating and Installation manual
Page 13
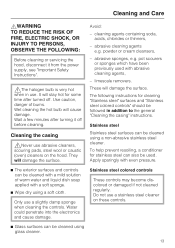
..., scouring pads, steel wool or caustic (oven) cleaners on these controls. ^ Glass surfaces can also be followed in use a stainless steel cleaner on the hood. Stainless steel colored controls These controls may become discolored or damaged if not cleaned regularly. Avoid: - Apply sparingly with even pressure. ^ The exterior surfaces and.... Cleaning and Care ,WARNING TO REDUCE THE RISK OF FIRE, ELECTRIC SHOCK, OR INJURY TO PERSONS, OBSERVE THE FOLLOWING: Before cleaning or servicing the hood, disconnect it off . It will damage the surface. abrasive sponges, e.g.
..., scouring pads, steel wool or caustic (oven) cleaners on these controls. ^ Glass surfaces can also be followed in use a stainless steel cleaner on the hood. Stainless steel colored controls These controls may become discolored or damaged if not cleaned regularly. Avoid: - Apply sparingly with even pressure. ^ The exterior surfaces and.... Cleaning and Care ,WARNING TO REDUCE THE RISK OF FIRE, ELECTRIC SHOCK, OR INJURY TO PERSONS, OBSERVE THE FOLLOWING: Before cleaning or servicing the hood, disconnect it off . It will damage the surface. abrasive sponges, e.g.

Operating and Installation manual
Page 17
... light bulbs ,WARNING TO REDUCE THE RISK OF FIRE, ELECTRIC SHOCK, OR INJURY TO PERSONS, OBSERVE THE FOLLOWING: Before changing the light bulbs, disconnect the hood from the fixture. Use the same bulb type as a replacement. ^ Screw the new halogen bulb into the fixture and press it from the power supply...
... light bulbs ,WARNING TO REDUCE THE RISK OF FIRE, ELECTRIC SHOCK, OR INJURY TO PERSONS, OBSERVE THE FOLLOWING: Before changing the light bulbs, disconnect the hood from the fixture. Use the same bulb type as a replacement. ^ Screw the new halogen bulb into the fixture and press it from the power supply...

Operating and Installation manual
Page 23
dai2479 23 Ductwork ø 6" (150 mm), with reducing collar ø 5" (125 mm) 6) If you plan to have a tiled backsplash or wall panel underneath the exhaust hood, this is the case the filter needs to be turned 180° and inserted the other way round. If this may cause difficulties when changing ...
dai2479 23 Ductwork ø 6" (150 mm), with reducing collar ø 5" (125 mm) 6) If you plan to have a tiled backsplash or wall panel underneath the exhaust hood, this is the case the filter needs to be turned 180° and inserted the other way round. If this may cause difficulties when changing ...

Operating and Installation manual
Page 24
.... - Be sure to follow their requirement. - If local building codes require a greater safety distance, follow the minimum safety distances given by the manufacturer of the hood: Electric Cooktops Electric Barbeques and Fryers Multiburner Gas cooktops < 43,000 BTU (12.6 KW) and no burner > 15,000 BTU (4.5 KW) Single burner (Wok...) < 20,500 BTU (6 KW) All other gas cooktops Miele Cooktops Non-Miele Cooktops 24" (610 mm) 26" (660 mm) 26" (660 mm) 30" (760 mm) 26" (660 mm) 30" (760 mm) 30" (760 mm) ...
.... - Be sure to follow their requirement. - If local building codes require a greater safety distance, follow the minimum safety distances given by the manufacturer of the hood: Electric Cooktops Electric Barbeques and Fryers Multiburner Gas cooktops < 43,000 BTU (12.6 KW) and no burner > 15,000 BTU (4.5 KW) Single burner (Wok...) < 20,500 BTU (6 KW) All other gas cooktops Miele Cooktops Non-Miele Cooktops 24" (610 mm) 26" (660 mm) 26" (660 mm) 30" (760 mm) 26" (660 mm) 30" (760 mm) 30" (760 mm) ...
Operating and Installation manual
Page 25
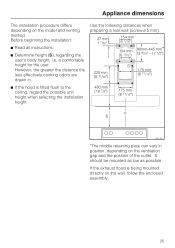
... position, depending on the ventilation gap and the position of the outlet. It should be mounted as low as possible. If the exhaust hood is fitted flush to the ceiling, regard the possible unit height when selecting the installation height. *The middle retaining plate can vary in .... ^ If the hood is being mounted directly on the model and venting method. Before beginning the installation: Use the following distances when preparing a rear wall (screw ø...
... position, depending on the ventilation gap and the position of the outlet. It should be mounted as low as possible. If the exhaust hood is fitted flush to the ceiling, regard the possible unit height when selecting the installation height. *The middle retaining plate can vary in .... ^ If the hood is being mounted directly on the model and venting method. Before beginning the installation: Use the following distances when preparing a rear wall (screw ø...

Operating and Installation manual
Page 29
A lever is covered with a protective film to prevent scratching during transport. ^ Peel off the film before installing the casing parts. Installation Protective film The casing is enclosed for easier removal of the chimney extension. ^ After loosening both of the clamping screws on the installation diagram in the reverse order. Dismantling If the hood needs to be disassembled, follow the instructions on the chimney, slide the lever between the chimney and the chimney extension and gently apply pressure to ease the chimney from its hooks. 29
A lever is covered with a protective film to prevent scratching during transport. ^ Peel off the film before installing the casing parts. Installation Protective film The casing is enclosed for easier removal of the chimney extension. ^ After loosening both of the clamping screws on the installation diagram in the reverse order. Dismantling If the hood needs to be disassembled, follow the instructions on the chimney, slide the lever between the chimney and the chimney extension and gently apply pressure to ease the chimney from its hooks. 29

Operating and Installation manual
Page 30
... to reduce the risk of the building only. Use ductwork with a wide radius. - Make sure all local building codes when installing the hood. If the exhaust is ducted through an outside of personal injury. Where the ductwork is used . 30 If flat ducting is horizontal, it... diameter of the ventilation exhaust. - Please read and follow the "IMPORTANT SAFETY INSTRUCTIONS" to properly exhaust air, the exhaust gases extracted by the hood should be as short and straight as possible. - The exhaust duct must not be harmful or fatal if inhaled. Air extraction ,WARNING Danger of...
... to reduce the risk of the building only. Use ductwork with a wide radius. - Make sure all local building codes when installing the hood. If the exhaust is ducted through an outside of personal injury. Where the ductwork is used . 30 If flat ducting is horizontal, it... diameter of the ventilation exhaust. - Please read and follow the "IMPORTANT SAFETY INSTRUCTIONS" to properly exhaust air, the exhaust gases extracted by the hood should be as short and straight as possible. - The exhaust duct must not be harmful or fatal if inhaled. Air extraction ,WARNING Danger of...

Operating and Installation manual
Page 31
... to an active chimney, dryer vent, flue, or room venting ductwork. Important If the ductwork runs through rooms, ceilings, garages, etc. Never connect an exhaust hood to the flow direction of the flue. Seek professional advice before connecting an exhaust...
... to an active chimney, dryer vent, flue, or room venting ductwork. Important If the ductwork runs through rooms, ceilings, garages, etc. Never connect an exhaust hood to the flow direction of the flue. Seek professional advice before connecting an exhaust...
Operating and Installation manual
Page 32
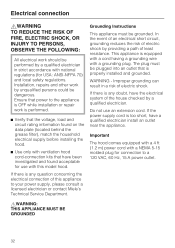
... near the appliance. WARNING - The plug must be plugged into an outlet that have the electrical system of this model hood. Installation, repairs and other work is performed. ^ Verify that the voltage, load and circuit rating information found acceptable for... connection to your power supply, please consult a licensed electrician or contact Miele's Technical Service Department. Grounding Instructions This appliance must be grounded. Important The hood comes equipped with a 4 ft (1.2 m) power cord with a grounding plug. If there ...
... near the appliance. WARNING - The plug must be plugged into an outlet that have the electrical system of this model hood. Installation, repairs and other work is performed. ^ Verify that the voltage, load and circuit rating information found acceptable for... connection to your power supply, please consult a licensed electrician or contact Miele's Technical Service Department. Grounding Instructions This appliance must be grounded. Important The hood comes equipped with a 4 ft (1.2 m) power cord with a grounding plug. If there ...

DA5990W
Page 1
SPECIFICATION SHEETS 010610 NOTE: Drawing is not to blower system inside chimney. Standard 110 Volt Outlet Notes • All installations must be done in accordance with local codes. • 6" duct connects to scale. O - Product Dimensions Decorator Wall Hood DA5990W E O 11 3/8" 10 5/8" 5 1/4" Front Perspective 30 5/16" - 42" 20 1/2" 35 1/4" Location Codes E - 110 Volt - 15 Amp 3-wire power supply connects through top or rear of chimney.
SPECIFICATION SHEETS 010610 NOTE: Drawing is not to blower system inside chimney. Standard 110 Volt Outlet Notes • All installations must be done in accordance with local codes. • 6" duct connects to scale. O - Product Dimensions Decorator Wall Hood DA5990W E O 11 3/8" 10 5/8" 5 1/4" Front Perspective 30 5/16" - 42" 20 1/2" 35 1/4" Location Codes E - 110 Volt - 15 Amp 3-wire power supply connects through top or rear of chimney.

DA5990W
Page 2
Installation Dimensions Decorator Wall Hoods DA5990W Structural member Ceiling Line Duct clearance Area must be reinforced with a minimum of 1/2" plywood. Reinforcing material should be reinforced using a minimum of 1/2" plywood backing ... members NOTE: Drawing is determined by the cooking surface. Minimum distance "S" is: - 24" for electric surfaces - 24" for gas surfaces based on BTU output (see hood instructions for details ) • Area behind mounting plates MUST be affixed to scale. SPECIFICATION SHEETS 010610
Installation Dimensions Decorator Wall Hoods DA5990W Structural member Ceiling Line Duct clearance Area must be reinforced with a minimum of 1/2" plywood. Reinforcing material should be reinforced using a minimum of 1/2" plywood backing ... members NOTE: Drawing is determined by the cooking surface. Minimum distance "S" is: - 24" for electric surfaces - 24" for gas surfaces based on BTU output (see hood instructions for details ) • Area behind mounting plates MUST be affixed to scale. SPECIFICATION SHEETS 010610


