Miele DA 5321 D Support Question
Miele DA 5321 D Support Question
Find answers below for this question about Miele DA 5321 D.Need a Miele DA 5321 D manual? We have 3 online manuals for this item!
Question posted by erikrh33317 on March 27th, 2014
Hood Stop Working?
Hood stop working? No tripped switch at the electrical panel.
Current Answers


Related Miele DA 5321 D Manual Pages
Operating and Installation manual - Page 1
en - Operating and Installation Instructions
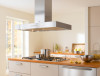
Ventilation System DA 5321 D
To prevent accidents and appliance damage, read these instructions before installation or use.
US, CA
M.-Nr. 07 838 150
Operating and Installation manual - Page 2
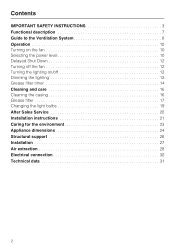
... bulbs 19 After Sales Service 20 Installation instructions 21 Caring for the environment 23 Appliance dimensions 24 Structural support 26 Installation 27 Air extraction 28 Electrical connection 30 Technical data 31
2
Operating and Installation manual - Page 4
... circumstances should any other work and repairs
should not be allowed to the power supply make sure that the voltage and frequency listed on the data plate correspond with the household electrical supply. Tampering with all applicable codes and standards. Grease should only be drawn up into the hood by a qualified technician in...
Operating and Installation manual - Page 5

...including
wet dishcloths or towels - when using
the cooktop to an exit.
* Based on the hood when using a wok. If the flames do not extend beneath the cookware. Turn the burner... FLAMES with or
operate the appliance or its use . Supervise its controls. Steam could penetrate electrical components and cause a short circuit.
5 BE CAREFUL TO PREVENT BURNS. Adjust the burner so...
Operating and Installation manual - Page 6
... ductwork must be done by qualified person(s) in the "Appliance dimensions" section of this hood over
cooktops that burn solid fuel.
~ h) Provided a larger distance is not
given by...
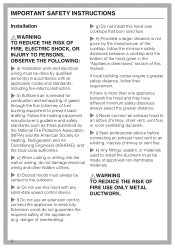
Installation
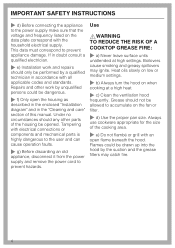
,WARNING TO REDUCE THE RISK OF FIRE, ELECTRIC SHOCK, OR INJURY TO PERSONS, OBSERVE THE FOLLOWING:
~ a) Installation work and electrical
wiring must be made of approved non-flammable materials....
Operating and Installation manual - Page 7

... by air extraction. The air is turned on, the air pressure of outside air and room air can occur. This flap automatically closes when the hood is turned off so that no exchange of the exhaust fan automatically opens the flap blowing the inside air and cooking odors outside.
7 The...
Operating and Installation manual - Page 10
...short period when frying or cooking food with a strong aroma.
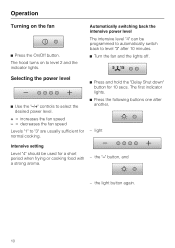
- Automatically switching back the intensive power level
The intensive level "4" can be used for 10 secs. light
Intensive ...setting
Level "4" should be programmed to automatically switch back to level "3" after another,
- the light button again.
10
The hood turns on the fan
^ Press the On/Off button...
Operating and Installation manual - Page 11
...flow capacity is not stored within 4 minutes of programming, the hood will affect this value. If the procedure is 625 cfm. ..."4" light continuously. Operation
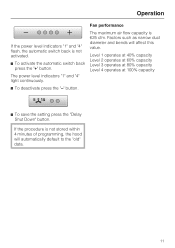
Fan performance
If the power level indicators "1" and "4" flash, the automatic switch back is not activated.
^ To activate the automatic switch back press the "+" button.
Level 1 operates at 40% capacity Level 2 operates at 60% ...
Operating and Installation manual - Page 12

... On/Off button to turn off automatically 10 hours after cooking has been completed, the Delayed Shut Down feature can be selected to allow the hood to turn off the fan
^ Press the On/Off button to continue running . Turning off automatically. The fan will remain on again.
12
The indicator...
Operating and Installation manual - Page 15

....
^ Press the Delayed Shut Down and grease filter button at the same time.
The indicator for the grease filter timer and one of programming the hood will flash.
15 A time of time from the left
= 20 hours = 30 hours = 40 hours = 50 hours
^ Use the "-/+" button to select the desired time...
Operating and Installation manual - Page 16
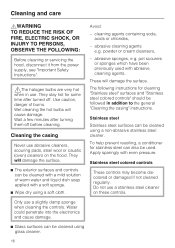
Cleaning the casing
Never use a stainless steel cleaner on the hood. They will damage the surface.
^ The exterior surfaces and controls can be ...Avoid:
-
Cleaning and care
,WARNING TO REDUCE THE RISK OF FIRE, ELECTRIC SHOCK, OR INJURY TO PERSONS, OBSERVE THE FOLLOWING:
Before cleaning or servicing the hood, disconnect it from the power supply, see "Important Safety Instructions".
,The...
Operating and Installation manual - Page 19

... halogen bulb, first gently press the light cover.
Changing the light bulbs
,WARNING TO REDUCE THE RISK OF FIRE, ELECTRIC SHOCK, OR INJURY TO PERSONS, OBSERVE THE FOLLOWING:
Before changing the light bulbs, disconnect the hood from its socket.
^ Using a cloth or glove, insert the new halogen bulb (type 12 V, 20 W, G4...
Operating and Installation manual - Page 20
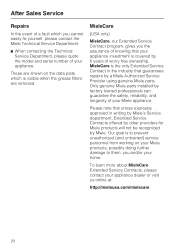
Only genuine Miele parts installed by Miele. Our goal is to prevent unauthorized (and untrained) service personnel from working on the data plate which you the assurance of your appliance dealer or visit us online at:
http://mieleusa.com/mielecare
20
MieleCare is the ...
Operating and Installation manual - Page 25
...flammable materials e.g. upper cabinets.
-
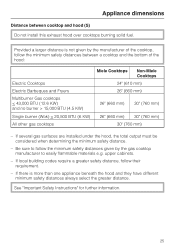
If several gas surfaces are installed under the hood, the total output must be considered when determining the minimum safety distance.
- See....
25
Be sure to follow the minimum safety distances given by the manufacturer of the hood:
Electric Cooktops Electric Barbeques and Fryers Multiburner Gas cooktops < 43,000 BTU (12.6 KW) and no ...
Operating and Installation manual - Page 26
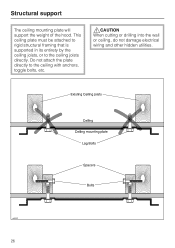
Structural support
The ceiling mounting plate will support the weight of the hood. Do not attach the plate directly to the ceiling joists directly. This ceiling plate must be attached to rigid structural framing that... or to the ceiling with anchors, toggle bolts, etc.
,CAUTION
When cutting or drilling into the wall or ceiling, do not damage electrical wiring and other hidden utilities.
26
Operating and Installation manual - Page 28
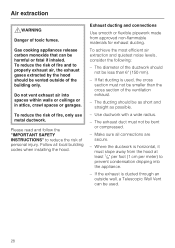
... spaces or garages. Exhaust ducting and connections
Use smooth or flexible pipework made from the hood at least 1/8" per foot (1 cm per meter) to reduce the risk of the building...quietest noise levels, consider the following:
- Make sure all local building codes when installing the hood.
Gas cooking appliances release carbon monoxide that can be used , the cross section must not ...
Operating and Installation manual - Page 29

Never connect an exhaust hood to collect and evaporate any condensate which may occur. Important
If the ductwork runs through rooms, ...that it is available for ducts 5" (125 mm) and 6" (150 mm) in diameter. Seek professional advice before connecting an exhaust hood vent to the flow direction of the flue.
where temperature variations exist, it may also be required to an active chimney, dryer ...
Operating and Installation manual - Page 30
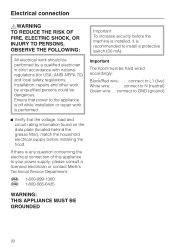
... hood must be hard wired accordingly:
Black/Red wire:. . . . connect to GND (ground)
^ Verify that power to the appliance is off while installation or repair work... and other work should be performed by unqualified persons could be dangerous. Electrical connection
,WARNING TO REDUCE THE RISK OF FIRE, ELECTRIC SHOCK, OR INJURY TO PERSONS, OBSERVE THE FOLLOWING:
All electrical work by a ...
DA5321D - Page 1
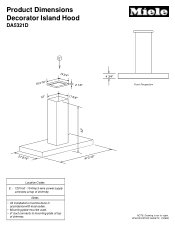
SPECIFICATION SHEETS 010508 NOTE: Drawing is not to mounting plate at top of chimney. Product Dimensions Decorator Island Hood
DA5321D
E
15 3/16" 12"
14 3/4" 2 1/8"
11 5/8"
4 3/4"
Front Perspective
42"
27 9/16"
47 3/16"
Location Codes
E - 120 Volt - 15 Amp 3-wire power supply connects at top
of ...
DA5321D - Page 2
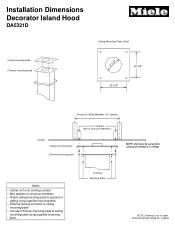
... plate using supplied mounting bolts • External ducting connects to ceiling
mounting plate • Connect chimney mounting plate to scale. Installation Dimensions Decorator Island Hood
DA5321D
Ceiling Mounting Plate Detail
Ceiling mounting plate Chimney mounting plate
8 1/2"
10 1/4" 10 1/4"
Structural Ceiling Members (16" centers)
2 x 4 spacers (bolt to structural members)
Ceiling...
Similar Questions

Hi All Of Sudden My Miele Da3496 Stopped Working Today. I Bought It In 2017 . Ci
(Posted by Uff2208 2 years ago)

Miele Da5190w Hood Has Stopped Working
My Miele DA5190 hood is not going on- fan nor lights. Recently the electric company has been doing s...
My Miele DA5190 hood is not going on- fan nor lights. Recently the electric company has been doing s...
(Posted by Mariasaluta 5 years ago)

Miele Da 249-2 Hood Touch Control Panel Broke
Hello, we use our Miele DA 249-2 hood and we're very happy with it. A short time ago the touch contr...
Hello, we use our Miele DA 249-2 hood and we're very happy with it. A short time ago the touch contr...
(Posted by avernov 8 years ago)

Automatic Switch Issue With Da3460
Our range hood is designed to switch on and off when the unit is pulled out and pushed back in. Ofte...
Our range hood is designed to switch on and off when the unit is pulled out and pushed back in. Ofte...
(Posted by kmunro52 9 years ago)

Miele Da 220-2 Cooker Hood Will Not Switch Off
LIGHTS ARE ON AND FAN IS WORKING BUT TOUCH CONTROL BUTTON LIGHTS ARE ALL OFF AND APPLIANCE WILL NOT ...
LIGHTS ARE ON AND FAN IS WORKING BUT TOUCH CONTROL BUTTON LIGHTS ARE ALL OFF AND APPLIANCE WILL NOT ...
(Posted by wjmcollins 11 years ago)