Operating and Installation manual
Page 1
US, CA M.-Nr. 07 838 150 en - Operating and Installation Instructions Ventilation System DA 5321 D To prevent accidents and appliance damage, read these instructions before installation or use.
US, CA M.-Nr. 07 838 150 en - Operating and Installation Instructions Ventilation System DA 5321 D To prevent accidents and appliance damage, read these instructions before installation or use.
Operating and Installation manual
Page 2
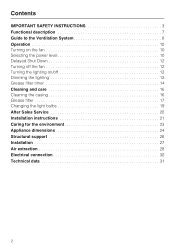
... 7 Guide to the Ventilation System 8 Operation 10 Turning on the fan 10 Selecting the power level 10 Delayed Shut Down 12 Turning off the fan 12 Turning the lighting on/off 13 Dimming the lighting 13 Grease filter timer 14 Cleaning and care 16 Cleaning the casing 16 Grease filter 17 Changing the light bulbs 19 After Sales Service 20 Installation instructions 21 Caring for the environment 23 Appliance dimensions 24 Structural support 26 Installation 27 Air extraction 28 Electrical connection 30...
... 7 Guide to the Ventilation System 8 Operation 10 Turning on the fan 10 Selecting the power level 10 Delayed Shut Down 12 Turning off the fan 12 Turning the lighting on/off 13 Dimming the lighting 13 Grease filter timer 14 Cleaning and care 16 Cleaning the casing 16 Grease filter 17 Changing the light bulbs 19 After Sales Service 20 Installation instructions 21 Caring for the environment 23 Appliance dimensions 24 Structural support 26 Installation 27 Air extraction 28 Electrical connection 30...

Operating and Installation manual
Page 3
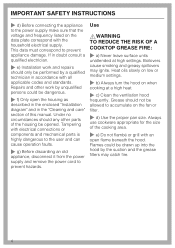
... the house checked by a qualified electrician. 3 Improper use only. Use the appliance only for installation above gas or electric cooking surfaces. ~ This appliance is any doubt, have questions, contact Miele. ~ b) Before servicing or cleaning the appliance, switch power off at the service panel and lock the service disconnecting means to any future user. If you have the electrical system of this appliance, continuity must not be...
... the house checked by a qualified electrician. 3 Improper use only. Use the appliance only for installation above gas or electric cooking surfaces. ~ This appliance is any doubt, have questions, contact Miele. ~ b) Before servicing or cleaning the appliance, switch power off at the service panel and lock the service disconnecting means to any future user. If you have the electrical system of this appliance, continuity must not be...
Operating and Installation manual
Page 4
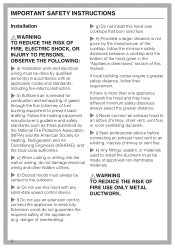
... the data plate correspond with the household electrical supply. Heat oils slowly on low or medium settings. ~ b) Always turn the hood on the fan or filter. ~ d) Use the proper pan size. Use ,WARNING TO REDUCE THE RISK OF A COOKTOP GREASE FIRE: ~ a) Never leave surface units unattended at a high heat. ~ c) Clean the ventilation hood frequently. Repairs and other parts of this manual. Always use cookware appropriate for the size of the cooking area. ~ e) Do...
... the data plate correspond with the household electrical supply. Heat oils slowly on low or medium settings. ~ b) Always turn the hood on the fan or filter. ~ d) Use the proper pan size. Use ,WARNING TO REDUCE THE RISK OF A COOKTOP GREASE FIRE: ~ a) Never leave surface units unattended at a high heat. ~ c) Clean the ventilation hood frequently. Repairs and other parts of this manual. Always use cookware appropriate for the size of the cooking area. ~ e) Do...

Operating and Installation manual
Page 5
... burner. when using the cooktop to clean the hood. You may be damaged due to excessive heat from condensation. ~ Never operate gas burners without the grease filters in place. ~ Do not use a steam cleaner to prevent damage from the burners and the cookware. ~ Do not use the hood without cookware. Steam could penetrate electrical components and cause a short circuit. 5 The hood can fight the...
... burner. when using the cooktop to clean the hood. You may be damaged due to excessive heat from condensation. ~ Never operate gas burners without the grease filters in place. ~ Do not use a steam cleaner to prevent damage from the burners and the cookware. ~ Do not use the hood without cookware. Steam could penetrate electrical components and cause a short circuit. 5 The hood can fight the...
Operating and Installation manual
Page 6
Extension cords do not damage electrical wiring and other hidden utilities. ~ d) Ducted hoods must always be vented to the outdoors. ~ e) Do not use an extension cord to connect the appliance to electricity. If local building codes require a greater safety distance, follow the minimum safety distances between a cooktop and the bottom of the hood given in accordance with any solid-state speed control device. ~ f) Do not use this hood with all applicable...
Extension cords do not damage electrical wiring and other hidden utilities. ~ d) Ducted hoods must always be vented to the outdoors. ~ e) Do not use an extension cord to connect the appliance to electricity. If local building codes require a greater safety distance, follow the minimum safety distances between a cooktop and the bottom of the hood given in accordance with any solid-state speed control device. ~ f) Do not use this hood with all applicable...

Operating and Installation manual
Page 7
This flap automatically closes when the hood is turned off so that no exchange of the exhaust fan automatically opens the flap blowing the inside air and cooking odors outside. 7 Functional description The ventilation hood works by the grease filter and directed outside. The hood comes equipped with a non-return flap. When the hood is drawn in and cleaned by air extraction. The air is turned on, the air pressure of outside air and room air can occur.
This flap automatically closes when the hood is turned off so that no exchange of the exhaust fan automatically opens the flap blowing the inside air and cooking odors outside. 7 Functional description The ventilation hood works by the grease filter and directed outside. The hood comes equipped with a non-return flap. When the hood is drawn in and cleaned by air extraction. The air is turned on, the air pressure of outside air and room air can occur.

Operating and Installation manual
Page 9
... the grease filter timer"). to reset the grease filter timer after either 5 or 15 minutes. 9 j Delayed Shut Down This button activates the Delayed Shut Down feature. to be used : d Grease filter e Control panel f Overhead lighting g Light button This button turns the light on and off automatically after cleaning the grease filter (see "Operation / Grease filter timer"). - Guide to the Ventilation System a Cover frame k Grease filter button b Chimney c Canopy The indicator next to the grease filter button lights when the grease filter needs to change the number of the fan...
... the grease filter timer"). to reset the grease filter timer after either 5 or 15 minutes. 9 j Delayed Shut Down This button activates the Delayed Shut Down feature. to be used : d Grease filter e Control panel f Overhead lighting g Light button This button turns the light on and off automatically after cleaning the grease filter (see "Operation / Grease filter timer"). - Guide to the Ventilation System a Cover frame k Grease filter button b Chimney c Canopy The indicator next to the grease filter button lights when the grease filter needs to change the number of the fan...
Operating and Installation manual
Page 16
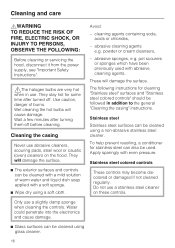
... pads, steel wool or caustic (oven) cleaners on these controls. They stay hot for stainless steel can be used with even pressure. powder or cream cleansers, - Cleaning and care ,WARNING TO REDUCE THE RISK OF FIRE, ELECTRIC SHOCK, OR INJURY TO PERSONS, OBSERVE THE FOLLOWING: Before cleaning or servicing the hood, disconnect it from the power supply, see "Important Safety Instructions". ,The halogen bulbs are very...
... pads, steel wool or caustic (oven) cleaners on these controls. They stay hot for stainless steel can be used with even pressure. powder or cream cleansers, - Cleaning and care ,WARNING TO REDUCE THE RISK OF FIRE, ELECTRIC SHOCK, OR INJURY TO PERSONS, OBSERVE THE FOLLOWING: Before cleaning or servicing the hood, disconnect it from the power supply, see "Important Safety Instructions". ,The halogen bulbs are very...

Operating and Installation manual
Page 18
... a towel to air dry. ^ While the filter is removed, clean any dirt or grease from the casing. ^ After returning the grease filter, press the grease filter button for 6 seconds to reset the counter to zero. ^ After cleaning, the filter can be placed on the detergent, cleaning the grease filter in the lower basket, making sure that the locking clip is not blocked. Cleaning and care Cleaning the grease filter ^ By hand: use a scrub...
... a towel to air dry. ^ While the filter is removed, clean any dirt or grease from the casing. ^ After returning the grease filter, press the grease filter button for 6 seconds to reset the counter to zero. ^ After cleaning, the filter can be placed on the detergent, cleaning the grease filter in the lower basket, making sure that the locking clip is not blocked. Cleaning and care Cleaning the grease filter ^ By hand: use a scrub...

Operating and Installation manual
Page 19
... the light cover. Changing the light bulbs ,WARNING TO REDUCE THE RISK OF FIRE, ELECTRIC SHOCK, OR INJURY TO PERSONS, OBSERVE THE FOLLOWING: Before changing the light bulbs, disconnect the hood from its socket. ^ Using a cloth or glove, insert the new halogen bulb (type 12 V, 20 W, G4). Cleaning and care When in use halogen bulbs become extremely hot, and can now be flipped down. ^ Pull the halogen bulb from the power supply...
... the light cover. Changing the light bulbs ,WARNING TO REDUCE THE RISK OF FIRE, ELECTRIC SHOCK, OR INJURY TO PERSONS, OBSERVE THE FOLLOWING: Before changing the light bulbs, disconnect the hood from its socket. ^ Using a cloth or glove, insert the new halogen bulb (type 12 V, 20 W, G4). Cleaning and care When in use halogen bulbs become extremely hot, and can now be flipped down. ^ Pull the halogen bulb from the power supply...
Operating and Installation manual
Page 20
... Sales Service Repairs In the event of a fault which is visible when the grease filters are shown on your Miele products, possibly doing further damage to prevent unauthorized (and untrained) service personnel from working on the data plate which you cannot easily fix yourself, please contact the Miele Technical Service Department. ^ When contacting the Technical Service Department, please quote the model and serial number...
... Sales Service Repairs In the event of a fault which is visible when the grease filters are shown on your Miele products, possibly doing further damage to prevent unauthorized (and untrained) service personnel from working on the data plate which you cannot easily fix yourself, please contact the Miele Technical Service Department. ^ When contacting the Technical Service Department, please quote the model and serial number...
Operating and Installation manual
Page 25
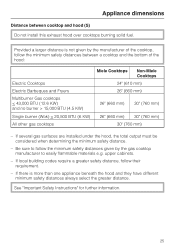
... codes require a greater safety distance, follow the minimum safety distances given by the manufacturer of the cooktop, follow the minimum safety distances between cooktop and hood (S) Do not install this exhaust hood over cooktops burning solid fuel. If several gas surfaces are installed under the hood, the total output must be considered when determining the minimum safety distance. - upper cabinets. - See "Important Safety Instructions...
... codes require a greater safety distance, follow the minimum safety distances given by the manufacturer of the cooktop, follow the minimum safety distances between cooktop and hood (S) Do not install this exhaust hood over cooktops burning solid fuel. If several gas surfaces are installed under the hood, the total output must be considered when determining the minimum safety distance. - upper cabinets. - See "Important Safety Instructions...
Operating and Installation manual
Page 26
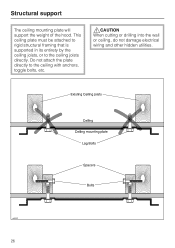
Do not attach the plate directly to the ceiling joists directly. Structural support The ceiling mounting plate will support the weight of the hood. This ceiling plate must be attached to rigid structural framing that is supported in its entirety by the ceiling joists, or to the ceiling with anchors, toggle bolts, etc. ,CAUTION When cutting or drilling into the wall or ceiling, do not damage electrical wiring and other hidden utilities. 26
Do not attach the plate directly to the ceiling joists directly. Structural support The ceiling mounting plate will support the weight of the hood. This ceiling plate must be attached to rigid structural framing that is supported in its entirety by the ceiling joists, or to the ceiling with anchors, toggle bolts, etc. ,CAUTION When cutting or drilling into the wall or ceiling, do not damage electrical wiring and other hidden utilities. 26

Operating and Installation manual
Page 27
... off the film before installing the casing parts. ,CAUTION To avoid risk of hand or other injury, avoid contact with 4 Washers for securing the ceiling plate. (S8 wall anchors included in the packaging are not for use in USA) 2 Screws M 4 x 8 mm for adjusting the chimney. 4 leveling plates for correcting an uneven ceiling. 1 exhaust connector 1 hose clip for securing the ducting. 27 Installation accessories 4 Screws 8 x 60 mm with...
... off the film before installing the casing parts. ,CAUTION To avoid risk of hand or other injury, avoid contact with 4 Washers for securing the ceiling plate. (S8 wall anchors included in the packaging are not for use in USA) 2 Screws M 4 x 8 mm for adjusting the chimney. 4 leveling plates for correcting an uneven ceiling. 1 exhaust connector 1 hose clip for securing the ducting. 27 Installation accessories 4 Screws 8 x 60 mm with...
Operating and Installation manual
Page 28
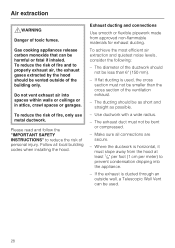
... SAFETY INSTRUCTIONS" to properly exhaust air, the exhaust gases extracted by the hood should be vented outside wall, a Telescopic Wall Vent can be bent or compressed. - The diameter of the building only. To reduce the risk of fire and to reduce the risk of toxic fumes. Do not vent exhaust air into the appliance. - Follow all connections are secure. - Use ductwork with a wide radius. - The exhaust duct...
... SAFETY INSTRUCTIONS" to properly exhaust air, the exhaust gases extracted by the hood should be vented outside wall, a Telescopic Wall Vent can be bent or compressed. - The diameter of the building only. To reduce the risk of fire and to reduce the risk of toxic fumes. Do not vent exhaust air into the appliance. - Follow all connections are secure. - Use ductwork with a wide radius. - The exhaust duct...

Operating and Installation manual
Page 29
Never connect an exhaust hood to an existing, inactive chimney or vent flue. Seek professional advice before connecting an exhaust hood vent to an active chimney, dryer vent, flue, or room venting ductwork. In some cases, a condensate trap may also be required to collect and evaporate any condensate which may need to be expelled parallel to reduce condensation. ^ When installing a condensate trap, ensure that it is available for ducts 5" (125...
Never connect an exhaust hood to an existing, inactive chimney or vent flue. Seek professional advice before connecting an exhaust hood vent to an active chimney, dryer vent, flue, or room venting ductwork. In some cases, a condensate trap may also be required to collect and evaporate any condensate which may need to be expelled parallel to reduce condensation. ^ When installing a condensate trap, ensure that it is available for ducts 5" (125...
Operating and Installation manual
Page 30
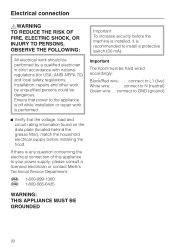
.... Installation, repairs and other work should be performed by unqualified persons could be hard wired accordingly: Black/Red wire:. . . . Ensure that the voltage, load and circuit rating information found on the data plate (located behind the grease filter), match the household electrical supply before the machine is installed, it is recommended to your power supply, please consult a licensed electrician or contact Miele's Technical Service Department. connect...
.... Installation, repairs and other work should be performed by unqualified persons could be hard wired accordingly: Black/Red wire:. . . . Ensure that the voltage, load and circuit rating information found on the data plate (located behind the grease filter), match the household electrical supply before the machine is installed, it is recommended to your power supply, please consult a licensed electrician or contact Miele's Technical Service Department. connect...
DA5321D
Page 1
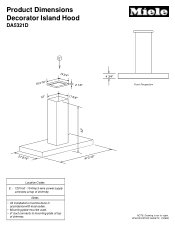
SPECIFICATION SHEETS 010508 Product Dimensions Decorator Island Hood DA5321D E 15 3/16" 12" 14 3/4" 2 1/8" 11 5/8" 4 3/4" Front Perspective 42" 27 9/16" 47 3/16" Location Codes E - 120 Volt - 15 Amp 3-wire power supply connects at top of chimney. NOTE: Drawing is not to mounting plate at top of chimney. Notes • All installations must be done in accordance with local codes. • Mounting plate must be used. • 6" duct connects to scale.
SPECIFICATION SHEETS 010508 Product Dimensions Decorator Island Hood DA5321D E 15 3/16" 12" 14 3/4" 2 1/8" 11 5/8" 4 3/4" Front Perspective 42" 27 9/16" 47 3/16" Location Codes E - 120 Volt - 15 Amp 3-wire power supply connects at top of chimney. NOTE: Drawing is not to mounting plate at top of chimney. Notes • All installations must be done in accordance with local codes. • Mounting plate must be used. • 6" duct connects to scale.
DA5321D
Page 2
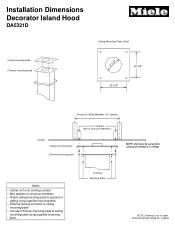
Installation Dimensions Decorator Island Hood DA5321D Ceiling Mounting Plate Detail Ceiling mounting plate Chimney mounting plate 8 1/2" 10 1/4" 10 1/4" Structural Ceiling Members (16" centers) 2 x 4 spacers (bolt to structural members) Ceiling Ceiling mounting plate Chimney mounting plate NOTE: Unit must be secured to scale. Chimney Mounting Bolts NOTE: Drawing is not to structural members in ceiling using supplied mounting bolts • External ducting connects to ceiling mounting plate • Connect chimney mounting plate to ceiling mounting plate using supplied mounting ...
Installation Dimensions Decorator Island Hood DA5321D Ceiling Mounting Plate Detail Ceiling mounting plate Chimney mounting plate 8 1/2" 10 1/4" 10 1/4" Structural Ceiling Members (16" centers) 2 x 4 spacers (bolt to structural members) Ceiling Ceiling mounting plate Chimney mounting plate NOTE: Unit must be secured to scale. Chimney Mounting Bolts NOTE: Drawing is not to structural members in ceiling using supplied mounting bolts • External ducting connects to ceiling mounting plate • Connect chimney mounting plate to ceiling mounting plate using supplied mounting ...


