
Operating manual
Page 4
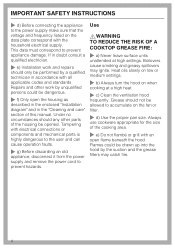
...COOKTOP GREASE FIRE: ~ a) Never leave surface units unattended at a high heat. ~ c) Clean the ventilation hood frequently. Under no circumstances should not be dangerous. ~ f) Only open flame beneath the hood. Tampering with all applicable codes and standards. Heat oils slowly on low or medium settings. ~ b) Always ... smoking and greasy spillovers may catch fire. 4 Always use cookware appropriate for the size of the housing be drawn up into the hood by unqualified persons could be opened. Repairs and other parts of the cooking area. ~ e) Do not flambé or grill ...
...COOKTOP GREASE FIRE: ~ a) Never leave surface units unattended at a high heat. ~ c) Clean the ventilation hood frequently. Under no circumstances should not be dangerous. ~ f) Only open flame beneath the hood. Tampering with all applicable codes and standards. Heat oils slowly on low or medium settings. ~ b) Always ... smoking and greasy spillovers may catch fire. 4 Always use cookware appropriate for the size of the housing be drawn up into the hood by unqualified persons could be opened. Repairs and other parts of the cooking area. ~ e) Do not flambé or grill ...

Operating manual
Page 5
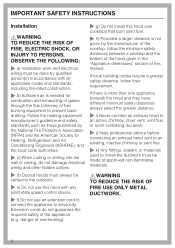
...appliance or its use by the elderly or infirm. ~ Always turn on "Kitchen Firesafety Tips" published by NAFTA ~ Do not allow children to clean the hood. If the flames do not extend beneath the cookware. a violent steam explosion will result. ~ d) Use a fire extinguisher ONLY if: 1) You have ..., including wet dishcloths or towels - when using the cooktop to prevent damage from the burners and the cookware. ~ Do not use the hood without cookware. Steam could penetrate electrical components and cause a short circuit. 5 Adjust the burner so that the flames do not go out immediately...
...appliance or its use by the elderly or infirm. ~ Always turn on "Kitchen Firesafety Tips" published by NAFTA ~ Do not allow children to clean the hood. If the flames do not extend beneath the cookware. a violent steam explosion will result. ~ d) Use a fire extinguisher ONLY if: 1) You have ..., including wet dishcloths or towels - when using the cooktop to prevent damage from the burners and the cookware. ~ Do not use the hood without cookware. Steam could penetrate electrical components and cause a short circuit. 5 Adjust the burner so that the flames do not go out immediately...
Operating manual
Page 6
...local building codes require a greater safety distance, follow the minimum safety distances between a cooktop and the bottom of the hood given in the "Appliance dimensions" section of this hood over cooktops that burn solid fuel. ~ h) Provided a larger distance is needed for Heating, Refrigeration and Air Conditioning...of the appliance, (e.g. Extension cords do not damage electrical wiring and other hidden utilities. ~ d) Ducted hoods must always be vented to the outdoors. ~ e) Do not use this hood with any solid-state speed control device. ~ f) Do not use an extension cord to connect the...
...local building codes require a greater safety distance, follow the minimum safety distances between a cooktop and the bottom of the hood given in the "Appliance dimensions" section of this hood over cooktops that burn solid fuel. ~ h) Provided a larger distance is needed for Heating, Refrigeration and Air Conditioning...of the appliance, (e.g. Extension cords do not damage electrical wiring and other hidden utilities. ~ d) Ducted hoods must always be vented to the outdoors. ~ e) Do not use this hood with any solid-state speed control device. ~ f) Do not use an extension cord to connect the...

Operating manual
Page 7
... panel and the grease filter and directed outside. Before using the hood in place, see "Cleaning and care". 7 Air is drawn through a vent at the top of the hood's chimney. This flap automatically closes when the hood is turned off so that the active charcoal filter is then recirculated...active charcoal filter. The filtered air is in recirculation mode, ensure that no exchange of outside air and room air can occur. The hood offers two modes of operation: Air extraction Functional description Recirculation mode The air is turned on, the air pressure of the exhaust fan ...
... panel and the grease filter and directed outside. Before using the hood in place, see "Cleaning and care". 7 Air is drawn through a vent at the top of the hood's chimney. This flap automatically closes when the hood is turned off so that the active charcoal filter is then recirculated...active charcoal filter. The filtered air is in recirculation mode, ensure that no exchange of outside air and room air can occur. The hood offers two modes of operation: Air extraction Functional description Recirculation mode The air is turned on, the air pressure of the exhaust fan ...
Operating manual
Page 11
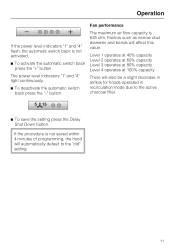
... ^ To activate the automatic switch back press the "+" button. Factors such as narrow duct diameter and bends will also be a slight decrease in airflow for hoods operated in recirculation mode due to the "old" setting. 11 Level 1 operates at 40% capacity Level 2 operates at 60% capacity Level 3 operates at ..."1" and "4" light continuously. ^ To deactivate the automatic switch back press the "-" button. If the procedure is not saved within 4 minutes of programming, the hood will automatically default to the active charcoal filter. ^ To save the setting press the Delay Shut Down button.
... ^ To activate the automatic switch back press the "+" button. Factors such as narrow duct diameter and bends will also be a slight decrease in airflow for hoods operated in recirculation mode due to the "old" setting. 11 Level 1 operates at 40% capacity Level 2 operates at 60% capacity Level 3 operates at ..."1" and "4" light continuously. ^ To deactivate the automatic switch back press the "-" button. If the procedure is not saved within 4 minutes of programming, the hood will automatically default to the active charcoal filter. ^ To save the setting press the Delay Shut Down button.
Operating manual
Page 12
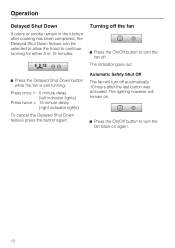
... button to turn the fan off automatically 10 hours after cooking has been completed, the Delayed Shut Down feature can be selected to allow the hood to turn off .
... button to turn the fan off automatically 10 hours after cooking has been completed, the Delayed Shut Down feature can be selected to allow the hood to turn off .
Operating manual
Page 15
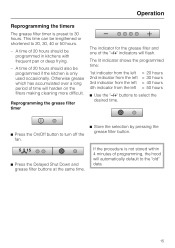
... hours ^ Use the "-/+" buttons to select the desired time. ^ Press the On/Off button to 20, 30, 40 or 50 hours. - A time of programming, the hood will automatically default to 30 hours.
... hours ^ Use the "-/+" buttons to select the desired time. ^ Press the On/Off button to 20, 30, 40 or 50 hours. - A time of programming, the hood will automatically default to 30 hours.

Operating manual
Page 16
Operation Reprogramming the charcoal filter timer The active charcoal filter can not be programmed. ^ Turn off the fan using the hood in recirculation mode and can only be used in recirculation mode, the charcoal filter timer must be used to exhaust fumes. The charcoal filter timer ... ^ Use the "-/+" button to the "old" data. 16 If the procedure is not preset. The indicator for the charcoal filter and one of programming, the hood will flash.
Operation Reprogramming the charcoal filter timer The active charcoal filter can not be programmed. ^ Turn off the fan using the hood in recirculation mode and can only be used in recirculation mode, the charcoal filter timer must be used to exhaust fumes. The charcoal filter timer ... ^ Use the "-/+" button to the "old" data. 16 If the procedure is not preset. The indicator for the charcoal filter and one of programming, the hood will flash.
Operating manual
Page 17
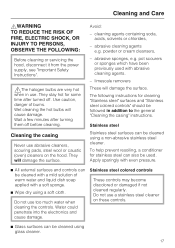
... these controls. ^ Glass surfaces can be cleaned with a mild solution of burns. Cleaning the casing Never use a stainless steel cleaner on the hood. powder or cream cleansers, - Wet cleaning the hot bulbs will damage the surface. The following instructions for some time after turning them off .... Care ,WARNING TO REDUCE THE RISK OF FIRE, ELECTRIC SHOCK, OR INJURY TO PERSONS, OBSERVE THE FOLLOWING: Before cleaning or servicing the hood, disconnect it from the power supply, see "Important Safety Instructions". ,The halogen bulbs are very hot when in addition to the general ...
... these controls. ^ Glass surfaces can be cleaned with a mild solution of burns. Cleaning the casing Never use a stainless steel cleaner on the hood. powder or cream cleansers, - Wet cleaning the hot bulbs will damage the surface. The following instructions for some time after turning them off .... Care ,WARNING TO REDUCE THE RISK OF FIRE, ELECTRIC SHOCK, OR INJURY TO PERSONS, OBSERVE THE FOLLOWING: Before cleaning or servicing the hood, disconnect it from the power supply, see "Important Safety Instructions". ,The halogen bulbs are very hot when in addition to the general ...
Operating manual
Page 19
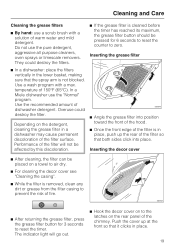
Depending on the detergent, cleaning the grease filter in a dishwasher may cause permanent discoloration of dishwasher detergent. In a Miele dishwasher use the pure detergent, aggressive all purpose cleaners, oven sprays or limescale removers. Use the recommended amount of the filter surface. Push the cover ... up at the front so that it clicks in the lower basket, making sure that both sides click into position toward the front of the hood. ^ Once the front edge of the filter will go out. ^ Hook the decor cover on to the latches on a towel to air dry. ^ For cleaning...
Depending on the detergent, cleaning the grease filter in a dishwasher may cause permanent discoloration of dishwasher detergent. In a Miele dishwasher use the pure detergent, aggressive all purpose cleaners, oven sprays or limescale removers. Use the recommended amount of the filter surface. Push the cover ... up at the front so that it clicks in the lower basket, making sure that both sides click into position toward the front of the hood. ^ Once the front edge of the filter will go out. ^ Hook the decor cover on to the latches on a towel to air dry. ^ For cleaning...

Operating manual
Page 20
... filter timer. Loosen the screw in the connector and remove. ^ Insert the new charcoal filter on the tab at the back of the hood and then firmly press the rear in place. ^ Return the grease filter and decor cover. ^ When the active charcoal filter is designed ... charcoal filter. See "Operation - The charcoal filter is installed for use in air extraction mode. Replacement active charcoal filters can be ordered from Miele. ^ The decor cover must be removed to absorb cooking odors. Reprogramming the charcoal filter timer". 20 Cleaning and Care Active charcoal filters In...
... filter timer. Loosen the screw in the connector and remove. ^ Insert the new charcoal filter on the tab at the back of the hood and then firmly press the rear in place. ^ Return the grease filter and decor cover. ^ When the active charcoal filter is designed ... charcoal filter. See "Operation - The charcoal filter is installed for use in air extraction mode. Replacement active charcoal filters can be ordered from Miele. ^ The decor cover must be removed to absorb cooking odors. Reprogramming the charcoal filter timer". 20 Cleaning and Care Active charcoal filters In...
Operating manual
Page 22
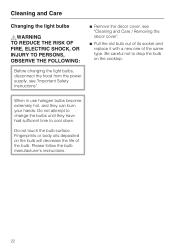
... light bulbs ,WARNING TO REDUCE THE RISK OF FIRE, ELECTRIC SHOCK, OR INJURY TO PERSONS, OBSERVE THE FOLLOWING: Before changing the light bulbs, disconnect the hood from the power supply, see "Important Safety Instructions". ^ Remove the decor cover, see "Cleaning and Care / Removing the decor cover". ^ Pull the old bulb out...
... light bulbs ,WARNING TO REDUCE THE RISK OF FIRE, ELECTRIC SHOCK, OR INJURY TO PERSONS, OBSERVE THE FOLLOWING: Before changing the light bulbs, disconnect the hood from the power supply, see "Important Safety Instructions". ^ Remove the decor cover, see "Cleaning and Care / Removing the decor cover". ^ Pull the old bulb out...
Operating manual
Page 29
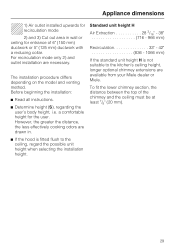
... If the standard unit height H is fitted flush to the kitchen's ceiling height, longer optional chimney extensions are available from your Miele dealer or Miele. However, the greater the distance, the less effectively cooking odors are necessary. Before beginning the installation: ^ Read all instructions. ^...reducing collar. a comfortable height for entrance of the chimney and the ceiling must be at least 7/8" (20 mm). ^ If the hood is not suitable to the ceiling, regard the possible unit height when selecting the installation height. 29 For recirculation mode only 2) and ...
... If the standard unit height H is fitted flush to the kitchen's ceiling height, longer optional chimney extensions are available from your Miele dealer or Miele. However, the greater the distance, the less effectively cooking odors are necessary. Before beginning the installation: ^ Read all instructions. ^...reducing collar. a comfortable height for entrance of the chimney and the ceiling must be at least 7/8" (20 mm). ^ If the hood is not suitable to the ceiling, regard the possible unit height when selecting the installation height. 29 For recirculation mode only 2) and ...
Operating manual
Page 30
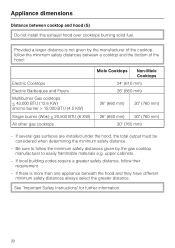
... cooktops < 43,000 BTU (12.6 KW) and no burner > 15,000 BTU (4.5 KW) Single burner (Wok) < 20,500 BTU (6 KW) All other gas cooktops Miele Cooktops Non-Miele Cooktops 24" (610 mm) 26" (660 mm) 26" (660 mm) 30" (760 mm) 26" (660 mm) 30" (760 mm) 30" (760 mm) - upper ...cabinets. - If local building codes require a greater safety distance, follow their requirement. - If several gas surfaces are installed under the hood, the total output must be considered...
... cooktops < 43,000 BTU (12.6 KW) and no burner > 15,000 BTU (4.5 KW) Single burner (Wok) < 20,500 BTU (6 KW) All other gas cooktops Miele Cooktops Non-Miele Cooktops 24" (610 mm) 26" (660 mm) 26" (660 mm) 30" (760 mm) 26" (660 mm) 30" (760 mm) 30" (760 mm) - upper ...cabinets. - If local building codes require a greater safety distance, follow their requirement. - If several gas surfaces are installed under the hood, the total output must be considered...
Operating manual
Page 34
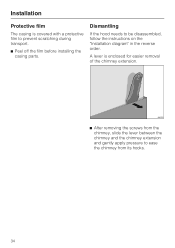
Dismantling If the hood needs to ease the chimney from its hooks. 34 A lever is covered with a protective film to prevent scratching during transport. ^ Peel off the film before installing the casing parts. Installation Protective film The casing is enclosed for easier removal of the chimney extension. ^ After removing the screws from the chimney, slide the lever between the chimney and the chimney extension and gently apply pressure to be disassembled, follow the instructions on the "Installation diagram" in the reverse order.
Dismantling If the hood needs to ease the chimney from its hooks. 34 A lever is covered with a protective film to prevent scratching during transport. ^ Peel off the film before installing the casing parts. Installation Protective film The casing is enclosed for easier removal of the chimney extension. ^ After removing the screws from the chimney, slide the lever between the chimney and the chimney extension and gently apply pressure to be disassembled, follow the instructions on the "Installation diagram" in the reverse order.
Operating manual
Page 35
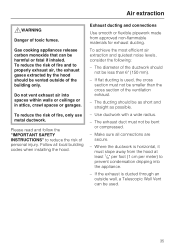
... non-flammable materials for exhaust ducting. To reduce the risk of fire and to properly exhaust air, the exhaust gases extracted by the hood should be vented outside wall, a Telescopic Wall Vent can be bent or compressed. - The diameter of personal injury. Do not vent... To achieve the most efficient air extraction and quietest noise levels, consider the following: - Make sure all local building codes when installing the hood. Please read and follow the "IMPORTANT SAFETY INSTRUCTIONS" to prevent condensation dripping into spaces within walls or ceilings or in attics, crawl spaces ...
... non-flammable materials for exhaust ducting. To reduce the risk of fire and to properly exhaust air, the exhaust gases extracted by the hood should be vented outside wall, a Telescopic Wall Vent can be bent or compressed. - The diameter of personal injury. Do not vent... To achieve the most efficient air extraction and quietest noise levels, consider the following: - Make sure all local building codes when installing the hood. Please read and follow the "IMPORTANT SAFETY INSTRUCTIONS" to prevent condensation dripping into spaces within walls or ceilings or in attics, crawl spaces ...
Operating manual
Page 36
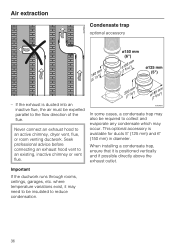
Seek professional advice before connecting an exhaust hood vent to an active chimney, dryer vent, flue, or room venting ductwork. where temperature variations exist, it is positioned vertically and if possible directly above ... This optional accessory is ducted into an inactive flue, the air must be insulated to the flow direction of the flue. Never connect an exhaust hood to an existing, inactive chimney or vent flue. Air extraction Condensate trap optional accessory - If the exhaust is available for ducts 5" (125 mm) and 6" (150...
Seek professional advice before connecting an exhaust hood vent to an active chimney, dryer vent, flue, or room venting ductwork. where temperature variations exist, it is positioned vertically and if possible directly above ... This optional accessory is ducted into an inactive flue, the air must be insulated to the flow direction of the flue. Never connect an exhaust hood to an existing, inactive chimney or vent flue. Air extraction Condensate trap optional accessory - If the exhaust is available for ducts 5" (125 mm) and 6" (150...
Operating manual
Page 37
... and local safety regulations. WARNING - Do not use with this appliance to your power supply, please consult a licensed electrician or call Miele's Technical Service Department. This appliance is properly installed and grounded. The plug must be grounded. If there is any question concerning the... electrical connection of this model hood. If there is too short, have the electrical system of the house checked by a qualified electrician. Improper grounding can result in...
... and local safety regulations. WARNING - Do not use with this appliance to your power supply, please consult a licensed electrician or call Miele's Technical Service Department. This appliance is properly installed and grounded. The plug must be grounded. If there is any question concerning the... electrical connection of this model hood. If there is too short, have the electrical system of the house checked by a qualified electrician. Improper grounding can result in...
DA249
Page 1
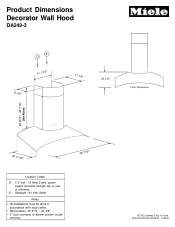
O - SPECIFICATION SHEETS 010405 Product Dimensions Decorator Wall Hood DA249-3 E O 11 1/16" 8 1/2" 11 1/4" 12 1/2" Front Perspective 20 9/16" - 30 7/16" See Notes 19 11/16" Location Codes E - 110 Volt - 15 Amp 3-wire power supply connects through top or rear of chimney. Standard 110 Volt Outlet Notes • All installations must be done in accordance with local codes. • Recirculation: 25 5/16" - 34 3/8" • 6" duct connects to blower system inside chimney. 35 7/16" NOTE: Drawing is not to scale.
O - SPECIFICATION SHEETS 010405 Product Dimensions Decorator Wall Hood DA249-3 E O 11 1/16" 8 1/2" 11 1/4" 12 1/2" Front Perspective 20 9/16" - 30 7/16" See Notes 19 11/16" Location Codes E - 110 Volt - 15 Amp 3-wire power supply connects through top or rear of chimney. Standard 110 Volt Outlet Notes • All installations must be done in accordance with local codes. • Recirculation: 25 5/16" - 34 3/8" • 6" duct connects to blower system inside chimney. 35 7/16" NOTE: Drawing is not to scale.
DA249
Page 2
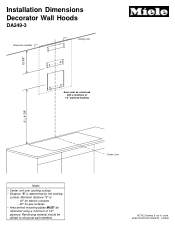
Minimum distance "S" is: - 18" for electric surfaces - 26" for gas surfaces • Area behind mounting plates MUST be reinforced with a minimum of 1/2" plywood. Installation Dimensions Decorator Wall Hoods DA249-3 Structural member Ceiling Line 13 3/8" Area must be reinforced using a minimum of 1/2" plywood backing S + 9 7/8" Notes • Center unit over cooking surface • Distance "S" is determined by the cooking surface. Reinforcing material should be affixed to structural wall members Center Line NOTE: Drawing is not to scale. SPECIFICATION SHEETS 010405
Minimum distance "S" is: - 18" for electric surfaces - 26" for gas surfaces • Area behind mounting plates MUST be reinforced with a minimum of 1/2" plywood. Installation Dimensions Decorator Wall Hoods DA249-3 Structural member Ceiling Line 13 3/8" Area must be reinforced using a minimum of 1/2" plywood backing S + 9 7/8" Notes • Center unit over cooking surface • Distance "S" is determined by the cooking surface. Reinforcing material should be affixed to structural wall members Center Line NOTE: Drawing is not to scale. SPECIFICATION SHEETS 010405


