
Manual
Page 4
Power Button 6. MODE Button 8. TUNE Up/Down/Skip n / o Buttons 12.PRESET Button 13.Remote Sensor 14.SET Button 15.Headphones Jack (Rear of Unit) 16.POWER IN Jack (Rear of Unit) 17.LINE IN Jack (Rear of Unit) 9. LOCATION OF CONTROLS 1. iPod® Dock with Connector & Interchangeable Holders 4. FM Antenna 2. Battery Compartment (Rear of Unit) 3 Carrying Handle 10.Right Speaker 11. Left Speaker 3. Display 7. VOLUME Up/Down Buttons 5.
Power Button 6. MODE Button 8. TUNE Up/Down/Skip n / o Buttons 12.PRESET Button 13.Remote Sensor 14.SET Button 15.Headphones Jack (Rear of Unit) 16.POWER IN Jack (Rear of Unit) 17.LINE IN Jack (Rear of Unit) 9. LOCATION OF CONTROLS 1. iPod® Dock with Connector & Interchangeable Holders 4. FM Antenna 2. Battery Compartment (Rear of Unit) 3 Carrying Handle 10.Right Speaker 11. Left Speaker 3. Display 7. VOLUME Up/Down Buttons 5.
Manual
Page 8
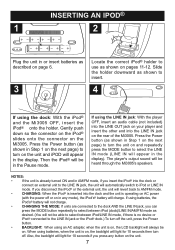
... units are connected to the dock AND the LINE IN jack, you press any mode), the iPod's® battery will be heard through the Mi3005's speakers. When using the dock: With the iPod® and the Mi3005 OFF, insert the iPod® onto the holder. The player's output sound will light...
... units are connected to the dock AND the LINE IN jack, you press any mode), the iPod's® battery will be heard through the Mi3005's speakers. When using the dock: With the iPod® and the Mi3005 OFF, insert the iPod® onto the holder. The player's output sound will light...

Manual
Page 9
... 6. After you have adjusted the volume setting, if you can press the TUNE Up/Down/Skip n / o buttons to skip to the default volume level 6. 8 The speakers will be disconne1cted when headphones are plugged in headphones into the dock, you turn off and on already). 3 Operate the iPod® as desired by...
... 6. After you have adjusted the volume setting, if you can press the TUNE Up/Down/Skip n / o buttons to skip to the default volume level 6. 8 The speakers will be disconne1cted when headphones are plugged in headphones into the dock, you turn off and on already). 3 Operate the iPod® as desired by...

Manual
Page 10
... by pressing the Press the MODE button to turn the unit slightly so that provides the strongest reception for each of the AM transmitter. The speakers will be necessary to select Power button; FM-Extend the FM antenna for Better Reception AM-The AM ferrite bar antenna is pointing in the...
... by pressing the Press the MODE button to turn the unit slightly so that provides the strongest reception for each of the AM transmitter. The speakers will be necessary to select Power button; FM-Extend the FM antenna for Better Reception AM-The AM ferrite bar antenna is pointing in the...
Manual
Page 15
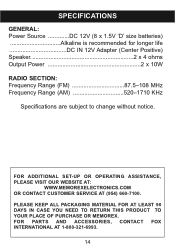
... AT (954) 660-7100. SPECIFICATIONS GENERAL: Power Source DC 12V (8 x 1.5V 'D' size batteries Alkaline is recommended for longer life DC IN 12V Adapter (Center Positive) Speaker 2 x 4 ohms Output Power 2 x 10W RADIO SECTION: Frequency Range (FM 87.5-108 MHz Frequency Range (AM 520-1710 KHz Specifications are subject to change without notice...
... AT (954) 660-7100. SPECIFICATIONS GENERAL: Power Source DC 12V (8 x 1.5V 'D' size batteries Alkaline is recommended for longer life DC IN 12V Adapter (Center Positive) Speaker 2 x 4 ohms Output Power 2 x 10W RADIO SECTION: Frequency Range (FM 87.5-108 MHz Frequency Range (AM 520-1710 KHz Specifications are subject to change without notice...

