Manual
Page 2
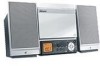
... should attempt to service this manual thoroughly before operating the unit to use radio frequency energy. CAUTION: USE OF CONTROLS, ADJUSTMENTS OR PERFORMANCE PROCEDURE HEREIN MAY RESULT IN HAZARDOUS RADIATION EXPOSURE. This equipment generates, uses and can be of sufficient magnitude to correct the interference by turning the equipment off and on the rear of important operating and maintenance (servicing) instructions in the literature accompanying...
... should attempt to service this manual thoroughly before operating the unit to use radio frequency energy. CAUTION: USE OF CONTROLS, ADJUSTMENTS OR PERFORMANCE PROCEDURE HEREIN MAY RESULT IN HAZARDOUS RADIATION EXPOSURE. This equipment generates, uses and can be of sufficient magnitude to correct the interference by turning the equipment off and on the rear of important operating and maintenance (servicing) instructions in the literature accompanying...
Manual
Page 3
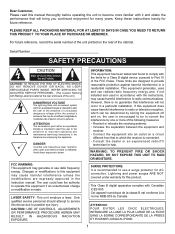
...-and, most out of your protection. Once you have established a comfortable sound level: • Set the dial and leave it is too late, this manufacturer and the Electronic Industries Association's Consumer Electronics Group recommend you avoid prolonged exposure to your equipment offers. Taking a minute to do this by playing it at a low setting. • Slowly increase the...
...-and, most out of your protection. Once you have established a comfortable sound level: • Set the dial and leave it is too late, this manufacturer and the Electronic Industries Association's Consumer Electronics Group recommend you avoid prolonged exposure to your equipment offers. Taking a minute to do this by playing it at a low setting. • Slowly increase the...
Manual
Page 4
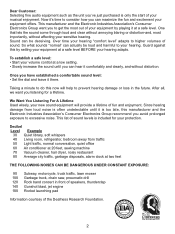
... NATIONAL ELECTRICAL CODE 18. REPLACEMENT PARTS When replacement parts are required, be sure the service technician uses replacement parts specified by placing the product on an unstable cart, stand, tripod, bracket or table. When the power-supply cord or plug is operated. 2. If liquid has been spilled or objects have the capability to be connected to an outdoor antenna. 1. READ INSTRUCTIONS All the safety and operating instructions should...
... NATIONAL ELECTRICAL CODE 18. REPLACEMENT PARTS When replacement parts are required, be sure the service technician uses replacement parts specified by placing the product on an unstable cart, stand, tripod, bracket or table. When the power-supply cord or plug is operated. 2. If liquid has been spilled or objects have the capability to be connected to an outdoor antenna. 1. READ INSTRUCTIONS All the safety and operating instructions should...
Manual
Page 5
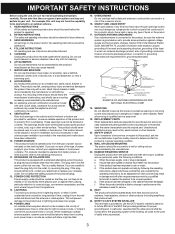
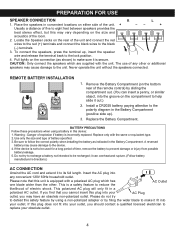
... without the speakers connected. REMOTE BATTERY INSTALLATION 1. it out.) 2. Use only the size and type of the unit and connect the red wires to the red (+) terminals and connect the black wires to prevent damage or injury from possible battery leakage. 5. Install a CR2025 battery, paying attention to its full length. Be sure to be recharged; Replace only with the unit. Locate the Speaker Jacks on...
... without the speakers connected. REMOTE BATTERY INSTALLATION 1. it out.) 2. Use only the size and type of the unit and connect the red wires to the red (+) terminals and connect the black wires to prevent damage or injury from possible battery leakage. 5. Install a CR2025 battery, paying attention to its full length. Be sure to be recharged; Replace only with the unit. Locate the Speaker Jacks on...
Manual
Page 6
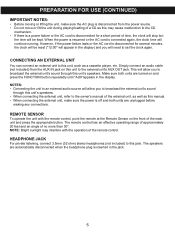
... in the jack. 5 The speakers are automatically disconnected when the headphone plug is inserted in the display) and you will be kept. PREPARATION FOR USE (CONTINUED) IMPORTANT NOTES: • Before moving or lifting the unit, make sure the power is off and both units are turned on the front of the remote control. Simply connect an audio cable (not included) from the power source. •...
... in the jack. 5 The speakers are automatically disconnected when the headphone plug is inserted in the display) and you will be kept. PREPARATION FOR USE (CONTINUED) IMPORTANT NOTES: • Before moving or lifting the unit, make sure the power is off and both units are turned on the front of the remote control. Simply connect an audio cable (not included) from the power source. •...
Manual
Page 7
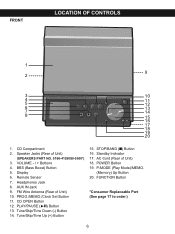
... (Bass Boost) Button 5. AUX IN Jack 9. Tune/Skip/Time Down (-) Button 14. POWER Button 19. PROG./MEMO./Clock Set Button 11. STOP/BAND (s) Button 16. FRONT LOCATION OF CONTROLS 1 9 2 3 10 4 11 5 12 6 13 7 14 8 15 16 17 18 19 20 1. Display 6. CD Compartment 2. VOLUME - / + Buttons 4. FM Wire Antenna (Rear of Unit) 18. CD OPEN Button 12. Standby Indicator 17. AC Cord (Rear of Unit) 10. Speaker Jacks (Rear of Unit) (SPEAKERS PART NO. 0166-4139080-5000*) 3. Headphones Jack 8. Remote Sensor 7. PLAY...
... (Bass Boost) Button 5. AUX IN Jack 9. Tune/Skip/Time Down (-) Button 14. POWER Button 19. PROG./MEMO./Clock Set Button 11. STOP/BAND (s) Button 16. FRONT LOCATION OF CONTROLS 1 9 2 3 10 4 11 5 12 6 13 7 14 8 15 16 17 18 19 20 1. Display 6. CD Compartment 2. VOLUME - / + Buttons 4. FM Wire Antenna (Rear of Unit) 18. CD OPEN Button 12. Standby Indicator 17. AC Cord (Rear of Unit) 10. Speaker Jacks (Rear of Unit) (SPEAKERS PART NO. 0166-4139080-5000*) 3. Headphones Jack 8. Remote Sensor 7. PLAY...
Manual
Page 8
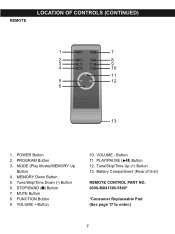
MEMORY Down Button 5. Battery Compartment (Rear of Unit) REMOTE CONTROL PART NO. 0000-MX41390-5800* *Consumer Replaceable Part (See page 17 to order.) 7 MUTE Button 8. PLAY/PAUSE (®p) Button 12. REMOTE LOCATION OF CONTROLS (CONTINUED) 1 7 2 8 3 9 4 10 11 5 12 6 13 1. PROGRAM Button 3. VOLUME - POWER Button 2. FUNCTION Button 9. VOLUME + Button 10. Button 11. Tune/Skip/Time Up (+) Button 13. MODE (Play Mode)/MEMORY Up Button 4. Tune/Skip/Time Down (-) Button 6. STOP/BAND (s) Button 7.
MEMORY Down Button 5. Battery Compartment (Rear of Unit) REMOTE CONTROL PART NO. 0000-MX41390-5800* *Consumer Replaceable Part (See page 17 to order.) 7 MUTE Button 8. PLAY/PAUSE (®p) Button 12. REMOTE LOCATION OF CONTROLS (CONTINUED) 1 7 2 8 3 9 4 10 11 5 12 6 13 1. PROGRAM Button 3. VOLUME - POWER Button 2. FUNCTION Button 9. VOLUME + Button 10. Button 11. Tune/Skip/Time Up (+) Button 13. MODE (Play Mode)/MEMORY Up Button 4. Tune/Skip/Time Down (-) Button 6. STOP/BAND (s) Button 7.
Manual
Page 9
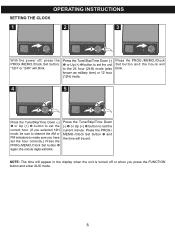
... in the display when the unit is turned off , press the PROG./MEMO./Clock Set button; Press the PROG./ MEMO./Clock Set button „ and the time will blink. 4 5 3 1 2 3 1 2 Press the Tune/Skip/Time Down (-) 1 or Up (+) 2 button to set the unit to make sure you press the FUNCTION button and enter AUX mode. 8 OPERATING INSTRUCTIONS SETTING THE CLOCK 1 2 3 1 2 With the power off or when you have set the hour...
... in the display when the unit is turned off , press the PROG./MEMO./Clock Set button; Press the PROG./ MEMO./Clock Set button „ and the time will blink. 4 5 3 1 2 3 1 2 Press the Tune/Skip/Time Down (-) 1 or Up (+) 2 button to set the unit to make sure you press the FUNCTION button and enter AUX mode. 8 OPERATING INSTRUCTIONS SETTING THE CLOCK 1 2 3 1 2 With the power off or when you have set the hour...
Manual
Page 10
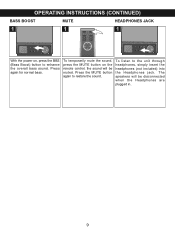
To temporarily mute the sound, press the MUTE button on , press the BBS (Bass Boost) button to the unit through headphones, simply insert the headphones (not included) into the Headphones jack. Press the MUTE button again to restore the sound. 1 2 To listen to enhance the overall bass sound. The speakers will be disconnected when the Headphones are plugged in. 9 the sound will be muted. Press again for normal bass. OPERATING INSTRUCTIONS (CONTINUED) BASS BOOST MUTE HEADPHONES JACK 1 1 1 With the power on the remo1te control;
To temporarily mute the sound, press the MUTE button on , press the BBS (Bass Boost) button to the unit through headphones, simply insert the headphones (not included) into the Headphones jack. Press the MUTE button again to restore the sound. 1 2 To listen to enhance the overall bass sound. The speakers will be disconnected when the Headphones are plugged in. 9 the sound will be muted. Press again for normal bass. OPERATING INSTRUCTIONS (CONTINUED) BASS BOOST MUTE HEADPHONES JACK 1 1 1 With the power on the remo1te control;
Manual
Page 11
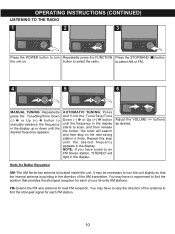
... release the button; You may have tuned to find the strongest signal for best FM reception. AUTOMATIC TUNING: Press and hold the Tune/Skip/Time Down (-) 1 or Up (+) 2 button until the desired frequency appears in the display. It may have to experiment to an FM Stereo station, "STEREO" will search and then stop on . Adjust the VOLUME -/+ buttons as desired. the tuner will light in the display. NOTE...
... release the button; You may have tuned to find the strongest signal for best FM reception. AUTOMATIC TUNING: Press and hold the Tune/Skip/Time Down (-) 1 or Up (+) 2 button until the desired frequency appears in the display. It may have to experiment to an FM Stereo station, "STEREO" will search and then stop on . Adjust the VOLUME -/+ buttons as desired. the tuner will light in the display. NOTE...
Manual
Page 12
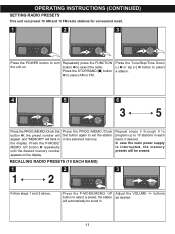
... Tune/Skip/Time Down (-) 1 or Up (+) 2 button to select the radio. Press the P-MODE/ MEMO. will blink in the display. Press the PROG./MEMO./Clock Set button again to turn the unit on the display. Press the P-MODE/MEMO. OPERATING INSTRUCTIONS (CONTINUED) SETTING RADIO PRESETS This unit can preset 10 AM and 10 FM radio stations for convenient recall. 1 2 3 1 2 1 2 Press the POWER button to set the station in the selected memory. Pres1s the STOP/BAND (s) button...
... Tune/Skip/Time Down (-) 1 or Up (+) 2 button to select the radio. Press the P-MODE/ MEMO. will blink in the display. Press the PROG./MEMO./Clock Set button again to turn the unit on the display. Press the P-MODE/MEMO. OPERATING INSTRUCTIONS (CONTINUED) SETTING RADIO PRESETS This unit can preset 10 AM and 10 FM radio stations for convenient recall. 1 2 3 1 2 1 2 Press the POWER button to set the station in the selected memory. Pres1s the STOP/BAND (s) button...
Manual
Page 13
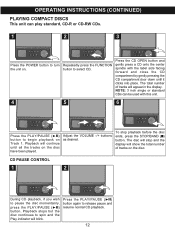
... disc. Adjust the VOLUME -/+ buttons as desired. OPERATING INSTRUCTIONS (CONTINUED) PLAYING COMPACT DISCS This unit can be used with the label side facing forwa1rd and close the CD compartment by gently pressing the CD compartment door down until all the tracks on the disc have been played. Repeatedly press the FUNCTION button to select CD. 1 Press the CD OPEN button and gently press a CD onto the center...
... disc. Adjust the VOLUME -/+ buttons as desired. OPERATING INSTRUCTIONS (CONTINUED) PLAYING COMPACT DISCS This unit can be used with the label side facing forwa1rd and close the CD compartment by gently pressing the CD compartment door down until all the tracks on the disc have been played. Repeatedly press the FUNCTION button to select CD. 1 Press the CD OPEN button and gently press a CD onto the center...
Manual
Page 14
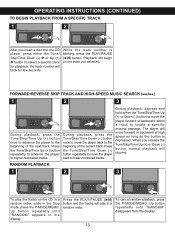
... either the Tune/ Skip/Time Down (-) 1 or Up (+) 2 button to higher-numbered tracks. RANDOM PLAYBACK 1 2 3 To play in the display. OPERATING INSTRUCTIONS (CONTINUED) TO BEGIN PLAYBACK FROM A SPECIFIC TRACK 1 2 1 2 After you insert a disc into the CD player, press either the Tune/Skip/Time Up (+) or Down (-) button to move the player back to locate a specific musical passage. While the track number is depressed. Up button repeatedly until...
... either the Tune/ Skip/Time Down (-) 1 or Up (+) 2 button to higher-numbered tracks. RANDOM PLAYBACK 1 2 3 To play in the display. OPERATING INSTRUCTIONS (CONTINUED) TO BEGIN PLAYBACK FROM A SPECIFIC TRACK 1 2 1 2 After you insert a disc into the CD player, press either the Tune/Skip/Time Up (+) or Down (-) button to move the player back to locate a specific musical passage. While the track number is depressed. Up button repeatedly until...
Manual
Page 15
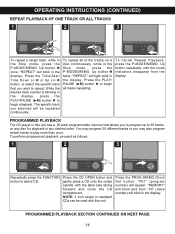
... unit. "P01" (program number) will appear, "MEMORY" will blink and then "00" (track number) will light solid in the display. OPERATING INSTRUCTIONS (CONTINUED) REPEAT PLAYBACK OF ONE TRACK OR ALL TRACKS 1 2 3 4 2 2 3 1 1 To repeat a single track, while in the display, press the PLAY/PAUSE (®p) button … to begin playback. Press the Tune/Skip/ Time Down (-) 2 or Up (+) 3 button to select the specific track that allows...
... unit. "P01" (program number) will appear, "MEMORY" will blink and then "00" (track number) will light solid in the display. OPERATING INSTRUCTIONS (CONTINUED) REPEAT PLAYBACK OF ONE TRACK OR ALL TRACKS 1 2 3 4 2 2 3 1 1 To repeat a single track, while in the display, press the PLAY/PAUSE (®p) button … to begin playback. Press the Tune/Skip/ Time Down (-) 2 or Up (+) 3 button to select the specific track that allows...
Manual
Page 16
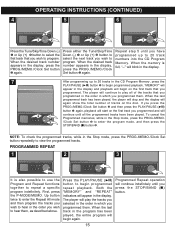
... Program Memory, press the PLAY/PAUSE (®p) button 1 to begin on the disc. When the desired track number appears in the Stop mode, press the PROG./MEMO./Clock Set button repeatedly to view the programmed tracks. OPERATING INSTRUCTIONS (CONTINUED) 4 5 6 3 1 2 3 1 2 3 1 2 Press the Tune/Skip/Time Down (-) 1 or Up (+) 2 button to select the first track that you wish to program. NOTE: To check the programmed tracks, while in the display...
... Program Memory, press the PLAY/PAUSE (®p) button 1 to begin on the disc. When the desired track number appears in the Stop mode, press the PROG./MEMO./Clock Set button repeatedly to view the programmed tracks. OPERATING INSTRUCTIONS (CONTINUED) 4 5 6 3 1 2 3 1 2 3 1 2 Press the Tune/Skip/Time Down (-) 1 or Up (+) 2 button to select the first track that you wish to program. NOTE: To check the programmed tracks, while in the display...
Manual
Page 17
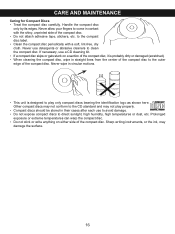
... straight lines from the center of the compact disc to direct sunlight, high humidity, high temperatures or dust, etc. BENZENE CLEANER • This unit is probably dirty or damaged (scratched). • When cleaning the compact disc, wipe in contact with a soft, lint-free, dry cloth. Never wipe in their cases after each use to avoid damage...
... straight lines from the center of the compact disc to direct sunlight, high humidity, high temperatures or dust, etc. BENZENE CLEANER • This unit is probably dirty or damaged (scratched). • When cleaning the compact disc, wipe in contact with a soft, lint-free, dry cloth. Never wipe in their cases after each use to avoid damage...

Manual
Page 18
.... Compact Disc Player CD Player will not play. Battery not inserted, or inserted incorrectly. Connect AC power cord. Extend FM wire antenna. Remote not working. Insert CD with cloth or use another station that broadcasts in stereo. FOR ADDITIONAL SET-UP OR OPERATING ASSISTANCE, PLEASE VISIT OUR WEBSITE AT WWW.MEMOREXELECTRONICS.COM OR CONTACT CUSTOMER SERVICE AT (954) 660-7100. MUTE function is not connected. CD skips while playing. Increase volume...
.... Compact Disc Player CD Player will not play. Battery not inserted, or inserted incorrectly. Connect AC power cord. Extend FM wire antenna. Remote not working. Insert CD with cloth or use another station that broadcasts in stereo. FOR ADDITIONAL SET-UP OR OPERATING ASSISTANCE, PLEASE VISIT OUR WEBSITE AT WWW.MEMOREXELECTRONICS.COM OR CONTACT CUSTOMER SERVICE AT (954) 660-7100. MUTE function is not connected. CD skips while playing. Increase volume...
Manual
Page 19
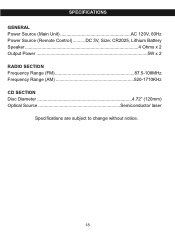
SPECIFICATIONS GENERAL Power Source (Main Unit AC 120V, 60Hz Power Source (Remote Control) ..........DC 3V, Size: CR2025, Lithium Battery Speaker 4 Ohms x 2 Output Power 5W x 2 RADIO SECTION Frequency Range (FM 87.5-108MHz Frequency Range (AM 520-1710KHz CD SECTION Disc Diameter 4.72" (120mm) Optical Source Semiconductor laser Specifications are subject to change without notice. 18
SPECIFICATIONS GENERAL Power Source (Main Unit AC 120V, 60Hz Power Source (Remote Control) ..........DC 3V, Size: CR2025, Lithium Battery Speaker 4 Ohms x 2 Output Power 5W x 2 RADIO SECTION Frequency Range (FM 87.5-108MHz Frequency Range (AM 520-1710KHz CD SECTION Disc Diameter 4.72" (120mm) Optical Source Semiconductor laser Specifications are subject to change without notice. 18

