
User Guide
Page 2
...8226; Language 24 • Go To Zero Search 25 • Counter Search 25 • Index Search 26 • Index Number Search 27 • VCR Options 28 VCR Operation 29 • Loading/Unloading 29 • To Prevent Accidental Erasure 29 • Tape Speed and Max. CONTENTS Contents 1 Important Safety Instructions 2 Precautions... One/All Play 44 • Repeat A-B Play (VCD Only 44 • PBC (VCD Only 45 PICTURE CD Basic Operation 46 Troubleshooting Guide (DVD 47 Troubleshooting Guide (VCR 49 Care and Maintenance 50 Video Head Clogging/Cleaning 51 Specifications 52 1
...8226; Language 24 • Go To Zero Search 25 • Counter Search 25 • Index Search 26 • Index Number Search 27 • VCR Options 28 VCR Operation 29 • Loading/Unloading 29 • To Prevent Accidental Erasure 29 • Tape Speed and Max. CONTENTS Contents 1 Important Safety Instructions 2 Precautions... One/All Play 44 • Repeat A-B Play (VCD Only 44 • PBC (VCD Only 45 PICTURE CD Basic Operation 46 Troubleshooting Guide (DVD 47 Troubleshooting Guide (VCR 49 Care and Maintenance 50 Video Head Clogging/Cleaning 51 Specifications 52 1
User Guide
Page 6
This is normal and not a malfunction. • When the player is a high technology, precision device. TO OBTAIN A CLEAR PICTURE: DVD: The DVD player is not in use, be sure to remove the disc and turn off the power. • To protect the player during the following ... mechanism should be distorted. Do not leave rubber or plastic products in a weak detergent solution, wring well and wipe. They will leave marks on the VCR or use a chemical-saturated cloth to strong vibration. Use in a horizontal (flat) position only. • When you use forced air to remove dust. •...
This is normal and not a malfunction. • When the player is a high technology, precision device. TO OBTAIN A CLEAR PICTURE: DVD: The DVD player is not in use, be sure to remove the disc and turn off the power. • To protect the player during the following ... mechanism should be distorted. Do not leave rubber or plastic products in a weak detergent solution, wring well and wipe. They will leave marks on the VCR or use a chemical-saturated cloth to strong vibration. Use in a horizontal (flat) position only. • When you use forced air to remove dust. •...
User Guide
Page 7
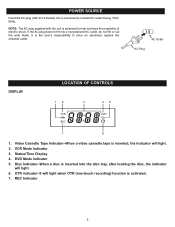
... inserted into the disc tray, after loading the disc, the indicator will light. 6. POWER SOURCE Insert the AC plug (with the unit is activated. 7. VCR Mode Indicator 3. DVD Mode Indicator 5. Disc Indicator-When a disc is inserted, the indicator will light when OTR (one-touch recording) function is polarized to have an electrician...
... inserted into the disc tray, after loading the disc, the indicator will light. 6. POWER SOURCE Insert the AC plug (with the unit is activated. 7. VCR Mode Indicator 3. DVD Mode Indicator 5. Disc Indicator-When a disc is inserted, the indicator will light when OTR (one-touch recording) function is polarized to have an electrician...
User Guide
Page 8
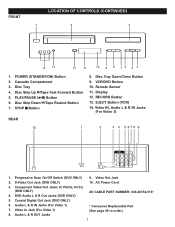
...R IN Jacks (For Video 1) 7. Display 12. EJECT Button (VCR) 14. Component Video Out Jacks (Y, Pb/Cb, Pr/Cr) (DVD ONLY) 4. Disc Skip Up n/Tape Fast Forward Button 5. Remote Sensor 11. S-Video Out Jack (DVD ONLY) 10. PLAY/PAUSE (®p) Button 6. STOP s Button ... (See page 49 to order.) 7 Video Out Jack 2. Coaxial Digital Out Jack (DVD ONLY) 6. POWER (STANDBY/ON) Button 2. DVD Audio L & R Out Jacks (DVD ONLY) AV CABLE PART NUMBER: 043-26152-513* 5. Cassette Compartment 3. VCR/DVD Button 10. RECORD Button 13. FRONT LOCATION OF CONTROLS (CONTINUED) 1.
...R IN Jacks (For Video 1) 7. Display 12. EJECT Button (VCR) 14. Component Video Out Jacks (Y, Pb/Cb, Pr/Cr) (DVD ONLY) 4. Disc Skip Up n/Tape Fast Forward Button 5. Remote Sensor 11. S-Video Out Jack (DVD ONLY) 10. PLAY/PAUSE (®p) Button 6. STOP s Button ... (See page 49 to order.) 7 Video Out Jack 2. Coaxial Digital Out Jack (DVD ONLY) 6. POWER (STANDBY/ON) Button 2. DVD Audio L & R Out Jacks (DVD ONLY) AV CABLE PART NUMBER: 043-26152-513* 5. Cassette Compartment 3. VCR/DVD Button 10. RECORD Button 13. FRONT LOCATION OF CONTROLS (CONTINUED) 1.
User Guide
Page 9
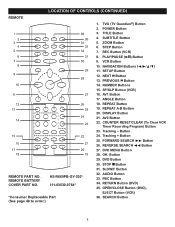
...PREVIOUS o Button 14. AV1 Button 17. REPEAT Button 19. Tracking + Button 25. AUDIO Button 33. RETURN Button (DVD) 35. VCR Button 10. REVERSE SEARCH √√ Button 27. DVD Button 30. TITLE Button 4. NUMBER Buttons 15. REPEAT A-B Button 20. Button 24. ZOOM Button 6. PLAY/PAUSE ... REMOTE REMOTE PART NO. REMOTE BATTERY COVER PART NO. NAVIGATION Buttons 11. REC Button (VCR) 8. DVD MENU Button 28. NEXT n Button 13. STOP s Button 31. OPEN/CLOSE Button (DVD), EJECT Button (VCR) 36. Tracking - HS-R669PB-GY-320* 111-03530-0784* *Consumer Replaceable Part (...
...PREVIOUS o Button 14. AV1 Button 17. REPEAT Button 19. Tracking + Button 25. AUDIO Button 33. RETURN Button (DVD) 35. VCR Button 10. REVERSE SEARCH √√ Button 27. DVD Button 30. TITLE Button 4. NUMBER Buttons 15. REPEAT A-B Button 20. Button 24. ZOOM Button 6. PLAY/PAUSE ... REMOTE REMOTE PART NO. REMOTE BATTERY COVER PART NO. NAVIGATION Buttons 11. REC Button (VCR) 8. DVD MENU Button 28. NEXT n Button 13. STOP s Button 31. OPEN/CLOSE Button (DVD), EJECT Button (VCR) 36. Tracking - HS-R669PB-GY-320* 111-03530-0784* *Consumer Replaceable Part (...
User Guide
Page 11
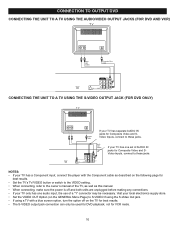
... has one audio input, the use of AUDIO IN jacks for VCR mode. 10 CONNECTION TO OUTPUT DVD CONNECTING THE UNIT TO A TV USING THE AUDIO/VIDEO OUTPUT JACKS (FOR DVD AND VCR) CONNECTING THE UNIT TO A TV USING THE S-VIDEO OUTPUT JACK (FOR DVD ONLY) If your TV has separate AUDIO IN jacks for... option off and both units are unplugged before making any connections. • If your TV only has one set of a "Y" connector may be used for DVD playback, not for Composite Video and SVideo Inputs, connect to these jacks.
... has one audio input, the use of AUDIO IN jacks for VCR mode. 10 CONNECTION TO OUTPUT DVD CONNECTING THE UNIT TO A TV USING THE AUDIO/VIDEO OUTPUT JACKS (FOR DVD AND VCR) CONNECTING THE UNIT TO A TV USING THE S-VIDEO OUTPUT JACK (FOR DVD ONLY) If your TV has separate AUDIO IN jacks for... option off and both units are unplugged before making any connections. • If your TV only has one set of a "Y" connector may be used for DVD playback, not for Composite Video and SVideo Inputs, connect to these jacks.
User Guide
Page 12
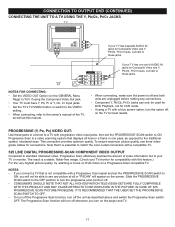
...Progressive Scan effectively doubles the amount of the TV, as well as this feature.) For the very highest picture quality, try watching a movie on DVD-Video on the player and TV. 11 The result is essential to match the color-coded connectors with progressive video input jacks, then set the... SCAN switch to the traditional system, interlaced scan. Progressive Scan is a video scanning system that displays all or "PSCAN" will not be used for DVD Playback, not for VCR mode. • If using the Component Video Out jack. • Your TV must have Y, Pb, Pr or Y, Cb, Cr Input jacks. &#...
...Progressive Scan effectively doubles the amount of the TV, as well as this feature.) For the very highest picture quality, try watching a movie on DVD-Video on the player and TV. 11 The result is essential to match the color-coded connectors with progressive video input jacks, then set the... SCAN switch to the traditional system, interlaced scan. Progressive Scan is a video scanning system that displays all or "PSCAN" will not be used for DVD Playback, not for VCR mode. • If using the Component Video Out jack. • Your TV must have Y, Pb, Pr or Y, Cb, Cr Input jacks. &#...
User Guide
Page 13
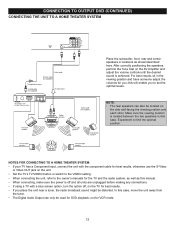
... When connecting, make sure the power is off , on the side wall facing the viewing position and each other. In this case. CONNECTION TO OUTPUT DVD (CONTINUED) CONNECTING THE UNIT TO A HOME THEATER SYSTEM Place the subwoofer, front, rear and center speakers in locations as this will enable you ; For...be located on the TV for best results. • If you place the unit near a tuner, the radio broadcast sound might be used for DVD playback, not for VCR mode. 12 Make sure the viewing position is achieved. NOTES FOR CONNECTING TO A HOME THEATER SYSTEM: • If your TV has a Component ...
... When connecting, make sure the power is off , on the side wall facing the viewing position and each other. In this case. CONNECTION TO OUTPUT DVD (CONTINUED) CONNECTING THE UNIT TO A HOME THEATER SYSTEM Place the subwoofer, front, rear and center speakers in locations as this will enable you ; For...be located on the TV for best results. • If you place the unit near a tuner, the radio broadcast sound might be used for DVD playback, not for VCR mode. 12 Make sure the viewing position is achieved. NOTES FOR CONNECTING TO A HOME THEATER SYSTEM: • If your TV has a Component ...
User Guide
Page 15
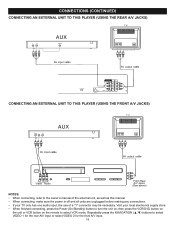
then press the VCR/DVD button on the unit or VCR button on ; Repeatedly press the NAVIGATION (π,†) buttons to select VCR mode. Visit your local electronics supply store. • When finished connecting, press the Power (On/Standby) button to the owner's manual of the external unit, ...
then press the VCR/DVD button on the unit or VCR button on ; Repeatedly press the NAVIGATION (π,†) buttons to select VCR mode. Visit your local electronics supply store. • When finished connecting, press the Power (On/Standby) button to the owner's manual of the external unit, ...
User Guide
Page 29
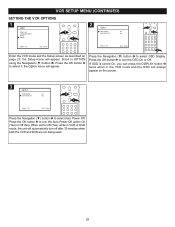
... OSD Display. Press the Navigation (†) button 1 to select it; If OSD is turned On, you can press the DISPLAY button 3 twice when in VCR or DVD mode, the unit will always appear on page 23; Scroll to OPTION using the Navigation (†) button 1. the Option menu will appear. Press the OK... button 2 to turn the OSD On or Off. When set to ON (Yes), while in the VCR mode and the OSD will automatically turn off after 30 minutes when both the VCR and DVD are not being used. 28 Press the OK button 2 to turn the Auto Power Off option On (Yes...
... OSD Display. Press the Navigation (†) button 1 to select it; If OSD is turned On, you can press the DISPLAY button 3 twice when in VCR or DVD mode, the unit will always appear on page 23; Scroll to OPTION using the Navigation (†) button 1. the Option menu will appear. Press the OK... button 2 to turn the OSD On or Off. When set to ON (Yes), while in the VCR mode and the OSD will automatically turn off after 30 minutes when both the VCR and DVD are not being used. 28 Press the OK button 2 to turn the Auto Power Off option On (Yes...
User Guide
Page 30
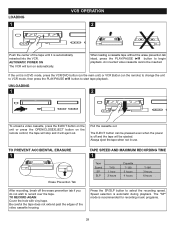
... careful the tape does not extend past the edges of the tape until it will eject out. Pull the cassette out. AUTOMATIC POWER ON The VCR will turn on the remote control; The "SP" mode is automatic during playback. When loading a cassette tape without the erase prevention tab intact, ...6 hours Press the SP/SLP button to begin playback. Always eject the tape when not in DVD mode, press the VCR/DVD button (on the main unit) or VCR Button (on the remote) to change the unit to VCR mode, then press the PLAY/PAUSE ®P button to record over the tape. Speed selection ...
... careful the tape does not extend past the edges of the tape until it will eject out. Pull the cassette out. AUTOMATIC POWER ON The VCR will turn on the remote control; The "SP" mode is automatic during playback. When loading a cassette tape without the erase prevention tab intact, ...6 hours Press the SP/SLP button to begin playback. Always eject the tape when not in DVD mode, press the VCR/DVD button (on the main unit) or VCR Button (on the remote) to change the unit to VCR mode, then press the PLAY/PAUSE ®P button to record over the tape. Speed selection ...
User Guide
Page 31
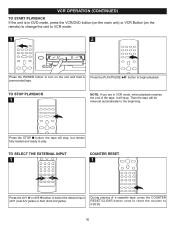
... loaded and ready to turn on the remote) to change the unit to VCR mode. 1 2 Press the POWER button to play. TO STOP PLAYBACK 1 NOTE: If you are in DVD mode, press the VCR/DVD button (on the main unit) or VCR Button (on the unit and load a prerecorded tape. TO SELECT THE EXTERNAL...front A/V jacks). 1 During playing of the tape, it will stop . Press the PLAY/PAUSE ®P button to 0:00:00. 30 VCR OPERATION (CONTINUED) TO START PLAYBACK If the unit is in VCR mode, when playback reaches the end of a cassette tape, press the COUNTER RESET/CLEAR button once to reset the counter...
... loaded and ready to turn on the remote) to change the unit to VCR mode. 1 2 Press the POWER button to play. TO STOP PLAYBACK 1 NOTE: If you are in DVD mode, press the VCR/DVD button (on the main unit) or VCR Button (on the unit and load a prerecorded tape. TO SELECT THE EXTERNAL...front A/V jacks). 1 During playing of the tape, it will stop . Press the PLAY/PAUSE ®P button to 0:00:00. 30 VCR OPERATION (CONTINUED) TO START PLAYBACK If the unit is in VCR mode, when playback reaches the end of a cassette tape, press the COUNTER RESET/CLEAR button once to reset the counter...
User Guide
Page 34
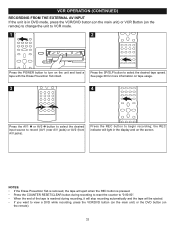
... 2 button to select the desired input source to begin recording; the REC indicator will light in DVD mode, press the VCR/DVD button (on the main unit) or VCR Button (on the remote) to change the unit to VCR mode. 1 2 Press the POWER button to turn on the remote). 33 Press the SP/SLP button... to view a DVD while recording, press the VCR/DVD button (on the main unit) or the DVD button (on the unit and load a tape with the Erase Prevention Tab intact. VCR OPERATION (CONTINUED) RECORDING FROM THE EXTERNAL AV INPUT If the unit is reached...
... 2 button to select the desired input source to begin recording; the REC indicator will light in DVD mode, press the VCR/DVD button (on the main unit) or VCR Button (on the remote) to change the unit to VCR mode. 1 2 Press the POWER button to turn on the remote). 33 Press the SP/SLP button... to view a DVD while recording, press the VCR/DVD button (on the main unit) or the DVD button (on the unit and load a tape with the Erase Prevention Tab intact. VCR OPERATION (CONTINUED) RECORDING FROM THE EXTERNAL AV INPUT If the unit is reached...
User Guide
Page 36
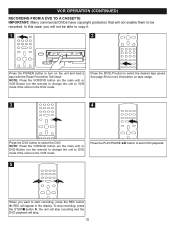
NOTE: Press the VCR/DVD button (on the main unit) or VCR Button (on the remote) to change the unit to VCR mode if the unit is in the VCR mode. NOTE: Press the VCR/DVD button (on the main unit) or DVD Button (on the remote) to change the unit to DVD mode if the unit is... select the desired tape speed. In this case, you want to start DVD playback. 5 1 12 When you will not be recorded. REC will appear in the DVD mod3e. VCR OPERATION (CONTINUED) RECORDING FROM A DVD TO A CASSETTE IMPORTANT: Many commercial DVDs have copyright protection that will not enable them to be able to copy ...
NOTE: Press the VCR/DVD button (on the main unit) or VCR Button (on the remote) to change the unit to VCR mode if the unit is in the VCR mode. NOTE: Press the VCR/DVD button (on the main unit) or DVD Button (on the remote) to change the unit to DVD mode if the unit is... select the desired tape speed. In this case, you want to start DVD playback. 5 1 12 When you will not be recorded. REC will appear in the DVD mod3e. VCR OPERATION (CONTINUED) RECORDING FROM A DVD TO A CASSETTE IMPORTANT: Many commercial DVDs have copyright protection that will not enable them to be able to copy ...
User Guide
Page 53
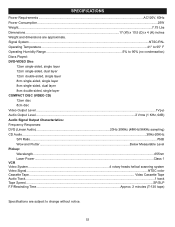
... 12cm disc 8cm disc Video Output Level ...1Vp-p Audio Output Level...2 Vrms (1 KHz, 0dB) Audio Signal Output Characteristics: Frequency Responses: DVD (Linear Audio 20Hz-20KHz (48KHz/96KHz sampling) CD Audio ...20Hz-20KHz S/N Ratio...70dB Wow and Flutter...Below Measurable Level Pickup: Wavelength......655nm Laser Power ...Class 1 VCR Video System 4 rotary heads helical scanning system Video Signal...NTSC color Cassette Tape ...Video Cassette Tape Audio Track...1 track Tape Speed......
... 12cm disc 8cm disc Video Output Level ...1Vp-p Audio Output Level...2 Vrms (1 KHz, 0dB) Audio Signal Output Characteristics: Frequency Responses: DVD (Linear Audio 20Hz-20KHz (48KHz/96KHz sampling) CD Audio ...20Hz-20KHz S/N Ratio...70dB Wow and Flutter...Below Measurable Level Pickup: Wavelength......655nm Laser Power ...Class 1 VCR Video System 4 rotary heads helical scanning system Video Signal...NTSC color Cassette Tape ...Video Cassette Tape Audio Track...1 track Tape Speed......

