
User Guide
Page 2
... the Front A/V Jacks 14 About Discs 15 DVD Setup Menu 17 • General Setup Menu 18 • Speaker Setup Menu 19 • Dolby Digital Setup Menu 19 • Preference Menu 20 • TVG (TV Guardian®) Password 20 • TV Guardian® Feature 21 VCR Setup Menu 23 • Date and Time... 44 • Repeat One/All Play 44 • Repeat A-B Play (VCD Only 44 • PBC (VCD Only 45 PICTURE CD Basic Operation 46 Troubleshooting Guide (DVD 47 Troubleshooting Guide (VCR 49 Care and Maintenance 50 Video Head Clogging/Cleaning 51 Specifications 52 1
... the Front A/V Jacks 14 About Discs 15 DVD Setup Menu 17 • General Setup Menu 18 • Speaker Setup Menu 19 • Dolby Digital Setup Menu 19 • Preference Menu 20 • TVG (TV Guardian®) Password 20 • TV Guardian® Feature 21 VCR Setup Menu 23 • Date and Time... 44 • Repeat One/All Play 44 • Repeat A-B Play (VCD Only 44 • PBC (VCD Only 45 PICTURE CD Basic Operation 46 Troubleshooting Guide (DVD 47 Troubleshooting Guide (VCR 49 Care and Maintenance 50 Video Head Clogging/Cleaning 51 Specifications 52 1
User Guide
Page 6
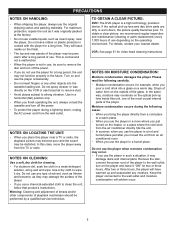
.... • When the player is a high technology, precision device. If the optical pick-up lens inside this player near the player. VCR: See page 51 for example, when you moved the unit from the wall outlet. Moisture condensation occurs during a lightning storm, unplug the ... To protect the player during the following carefully. • Moisture condensation occurs, for video head cleaning instructions. TO OBTAIN A CLEAR PICTURE: DVD: The DVD player is not in a hot and humid place just after a long period of the player to clean the unit, follow that product's ...
.... • When the player is a high technology, precision device. If the optical pick-up lens inside this player near the player. VCR: See page 51 for example, when you moved the unit from the wall outlet. Moisture condensation occurs during a lightning storm, unplug the ... To protect the player during the following carefully. • Moisture condensation occurs, for video head cleaning instructions. TO OBTAIN A CLEAR PICTURE: DVD: The DVD player is not in a hot and humid place just after a long period of the player to clean the unit, follow that product's ...
User Guide
Page 7
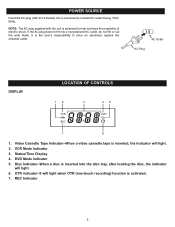
...When a video cassette tape is inserted into the disc tray, after loading the disc, the indicator will light. 6. Status/Time Display 4. DVD Mode Indicator 5. Disc Indicator-When a disc is inserted, the indicator will light when OTR (one-touch recording) function is polarized to have... plug does not fit into a conveniently located AC outlet having 120V, 60Hz. REC Indicator 6 AC Outlet AC Plug DISPLAY LOCATION OF CONTROLS 1. VCR Mode Indicator 3. OTR indicator-It will light. 2. NOTE: The AC plug supplied with the 2 blades) into a nonpolarized AC outlet, do not ...
...When a video cassette tape is inserted into the disc tray, after loading the disc, the indicator will light. 6. Status/Time Display 4. DVD Mode Indicator 5. Disc Indicator-When a disc is inserted, the indicator will light when OTR (one-touch recording) function is polarized to have... plug does not fit into a conveniently located AC outlet having 120V, 60Hz. REC Indicator 6 AC Outlet AC Plug DISPLAY LOCATION OF CONTROLS 1. VCR Mode Indicator 3. OTR indicator-It will light. 2. NOTE: The AC plug supplied with the 2 blades) into a nonpolarized AC outlet, do not ...
User Guide
Page 8
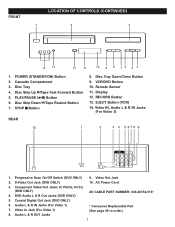
...NUMBER: 043-26152-513* 5. Video In Jack (For Video 1) 8. Disc Tray 4. S-Video Out Jack (DVD ONLY) 10. Cassette Compartment 3. STOP s Button REAR 8. Display 12. Audio L & R IN Jacks (For Video 1) 7. VCR/DVD Button 10. Video IN, Audio L & R IN Jacks (For Video 2) 1. Disc Skip Up n/Tape ...Fast Forward Button 5. Disc Tray Open/Close Button 9. Component Video Out Jacks (Y, Pb/Cb, Pr/Cr) (DVD ONLY) 4. Video Out Jack 2. AC Power Cord 3. Coaxial...
...NUMBER: 043-26152-513* 5. Video In Jack (For Video 1) 8. Disc Tray 4. S-Video Out Jack (DVD ONLY) 10. Cassette Compartment 3. STOP s Button REAR 8. Display 12. Audio L & R IN Jacks (For Video 1) 7. VCR/DVD Button 10. Video IN, Audio L & R IN Jacks (For Video 2) 1. Disc Skip Up n/Tape ...Fast Forward Button 5. Disc Tray Open/Close Button 9. Component Video Out Jacks (Y, Pb/Cb, Pr/Cr) (DVD ONLY) 4. Video Out Jack 2. AC Power Cord 3. Coaxial...
User Guide
Page 9
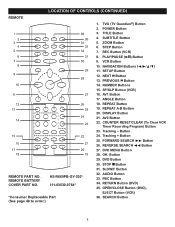
...8730;√ Button 27. DVD MENU Button 28. DVD Button 30. AUDIO Button 33. SEARCH Button 8 HS-R669PB-GY-320* 111-03530-0784* *Consumer Replaceable Part (See page 49 to order.) 1. SUBTITLE Button 5. REC Button (VCR) 8. COUNTER RESET/CLEAR (To Clear VCR Timer Recording Program) Button ... 12. NEXT n Button 13. PREVIOUS o Button 14. AV1 Button 17. Tracking - OPEN/CLOSE Button (DVD), EJECT Button (VCR) 36. LOCATION OF CONTROLS (CONTINUED) REMOTE REMOTE PART NO. SP/SLP Button (VCR) 16. STOP s Button 31. TVG (TV Guardian®) Button 2. ZOOM Button 6. REPEAT Button 19....
...8730;√ Button 27. DVD MENU Button 28. DVD Button 30. AUDIO Button 33. SEARCH Button 8 HS-R669PB-GY-320* 111-03530-0784* *Consumer Replaceable Part (See page 49 to order.) 1. SUBTITLE Button 5. REC Button (VCR) 8. COUNTER RESET/CLEAR (To Clear VCR Timer Recording Program) Button ... 12. NEXT n Button 13. PREVIOUS o Button 14. AV1 Button 17. Tracking - OPEN/CLOSE Button (DVD), EJECT Button (VCR) 36. LOCATION OF CONTROLS (CONTINUED) REMOTE REMOTE PART NO. SP/SLP Button (VCR) 16. STOP s Button 31. TVG (TV Guardian®) Button 2. ZOOM Button 6. REPEAT Button 19....
User Guide
Page 11
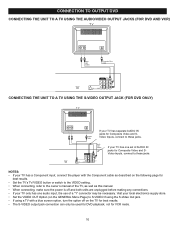
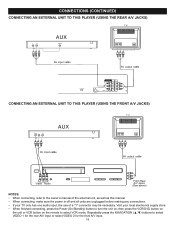
... has one set of a "Y" connector may be used for DVD playback, not for VCR mode. 10 CONNECTION TO OUTPUT DVD CONNECTING THE UNIT TO A TV USING THE AUDIO/VIDEO OUTPUT JACKS (FOR DVD AND VCR) CONNECTING THE UNIT TO A TV USING THE S-VIDEO OUTPUT JACK (FOR DVD ONLY) If your TV has separate AUDIO IN jacks...
... has one set of a "Y" connector may be used for DVD playback, not for VCR mode. 10 CONNECTION TO OUTPUT DVD CONNECTING THE UNIT TO A TV USING THE AUDIO/VIDEO OUTPUT JACKS (FOR DVD AND VCR) CONNECTING THE UNIT TO A TV USING THE S-VIDEO OUTPUT JACK (FOR DVD ONLY) If your TV has separate AUDIO IN jacks...
User Guide
Page 12
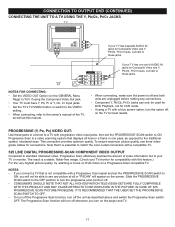
...off whenever you turn the progressive scan function off the unit as this feature.) For the very highest picture quality, try watching a movie on DVD-Video on the TV for connections. Slide the PROGRESSIVE SCAN switch to the OFF position to these jacks. NOTES FOR CONNECTING: • Set ... the VIDEO setting. • When connecting, refer to see any connections. • Component Y, Pb/Cb, Pr/Cr Jacks can only be used for DVD Playback, not for VCR mode. • If using a TV with this manual. • When connecting, make sure the power is a stable, flicker-free image. (Check ...
...off whenever you turn the progressive scan function off the unit as this feature.) For the very highest picture quality, try watching a movie on DVD-Video on the TV for connections. Slide the PROGRESSIVE SCAN switch to the OFF position to these jacks. NOTES FOR CONNECTING: • Set ... the VIDEO setting. • When connecting, refer to see any connections. • Component Y, Pb/Cb, Pr/Cr Jacks can only be used for DVD Playback, not for VCR mode. • If using a TV with this manual. • When connecting, make sure the power is a stable, flicker-free image. (Check ...
User Guide
Page 13
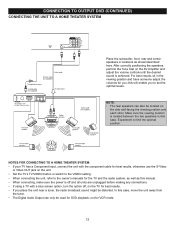
... audio system, as well as shown/described here. For best results, sit in the viewing position and have someone adjust the volumes for VCR mode. 12 CONNECTION TO OUTPUT DVD (CONTINUED) CONNECTING THE UNIT TO A HOME THEATER SYSTEM Place the subwoofer, front, rear and center speakers in this case. After correctly positioning... other. In this will enable you ; this case, move the unit away from the tuner. • The Digital Audio Output can also be used for DVD playback, not for you to set the optimal levels.
... audio system, as well as shown/described here. For best results, sit in the viewing position and have someone adjust the volumes for VCR mode. 12 CONNECTION TO OUTPUT DVD (CONTINUED) CONNECTING THE UNIT TO A HOME THEATER SYSTEM Place the subwoofer, front, rear and center speakers in this case. After correctly positioning... other. In this will enable you ; this case, move the unit away from the tuner. • The Digital Audio Output can also be used for DVD playback, not for you to set the optimal levels.
User Guide
Page 15
... to turn the unit on the remote to select VIDEO 1 for the rear A/V input or select VIDEO 2 for the front A/V input. 14 then press the VCR/DVD button on the unit or VCR button on ; Repeatedly press the NAVIGATION (π,†) buttons to select...
... to turn the unit on the remote to select VIDEO 1 for the rear A/V input or select VIDEO 2 for the front A/V input. 14 then press the VCR/DVD button on the unit or VCR button on ; Repeatedly press the NAVIGATION (π,†) buttons to select...
User Guide
Page 29
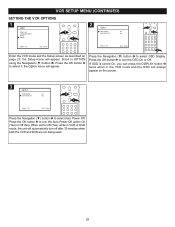
..., the unit will always appear on page 23; When set to ON (Yes), while in the VCR mode and the OSD will automatically turn off after 30 minutes when both the VCR and DVD are not being used. 28 Scroll to select it; Press the OK button 2 to OPTION using the ...Navigation (†) button 1. the Option menu will appear. VCR SETUP MENU (CONTINUED) SETTING THE VCR OPTIONS 1 2 2 2 1 1 3 Enter the VCR mode and the Setup screen as described...
..., the unit will always appear on page 23; When set to ON (Yes), while in the VCR mode and the OSD will automatically turn off after 30 minutes when both the VCR and DVD are not being used. 28 Scroll to select it; Press the OK button 2 to OPTION using the ...Navigation (†) button 1. the Option menu will appear. VCR SETUP MENU (CONTINUED) SETTING THE VCR OPTIONS 1 2 2 2 1 1 3 Enter the VCR mode and the Setup screen as described...
User Guide
Page 30
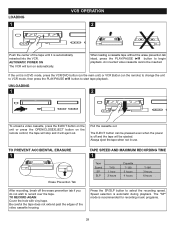
Always eject the tape when not in DVD mode, press the VCR/DVD button (on the main unit) or VCR Button (on the remote) to change the unit to VCR mode, then press the PLAY/PAUSE ®P button to record over the tape. TAPE SPEED AND MAXIMUM RECORDING TIME 1 Tape Speed SP SLP T-60 1 hour 2 ... unload a video cassette, press the EJECT button on the unit or press the OPEN/CLOSE/EJECT button on the remote control; AUTOMATIC POWER ON The VCR will eject out. Pull the cassette out. Be careful the tape does not extend past the edges of the tape until it will turn on...
Always eject the tape when not in DVD mode, press the VCR/DVD button (on the main unit) or VCR Button (on the remote) to change the unit to VCR mode, then press the PLAY/PAUSE ®P button to record over the tape. TAPE SPEED AND MAXIMUM RECORDING TIME 1 Tape Speed SP SLP T-60 1 hour 2 ... unload a video cassette, press the EJECT button on the unit or press the OPEN/CLOSE/EJECT button on the remote control; AUTOMATIC POWER ON The VCR will eject out. Pull the cassette out. Be careful the tape does not extend past the edges of the tape until it will turn on...
User Guide
Page 31
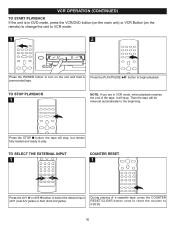
... once to reset the counter to 0:00:00. 30 Press the PLAY/PAUSE ®P button to turn on the remote) to change the unit to VCR mode. 1 2 Press the POWER button to begin playback. Then the tape will be rewound automatically to the beginning. 1 Press the STOP s button, the ...jacks) or AV2 (front A/V jacks). 1 During playing of the tape, it will stop. TO STOP PLAYBACK 1 NOTE: If you are in DVD mode, press the VCR/DVD button (on the main unit) or VCR Button (on the unit and load a prerecorded tape. TO SELECT THE EXTERNAL INPUT 1 COUNTER RESET 1 1 2 Press the AV1 1 or AV2...
... once to reset the counter to 0:00:00. 30 Press the PLAY/PAUSE ®P button to turn on the remote) to change the unit to VCR mode. 1 2 Press the POWER button to begin playback. Then the tape will be rewound automatically to the beginning. 1 Press the STOP s button, the ...jacks) or AV2 (front A/V jacks). 1 During playing of the tape, it will stop. TO STOP PLAYBACK 1 NOTE: If you are in DVD mode, press the VCR/DVD button (on the main unit) or VCR Button (on the unit and load a prerecorded tape. TO SELECT THE EXTERNAL INPUT 1 COUNTER RESET 1 1 2 Press the AV1 1 or AV2...
User Guide
Page 34
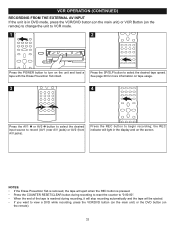
... will be ejected. • If you want to view a DVD while recording, press the VCR/DVD button (on the main unit) or the DVD button (on the remote). 33 Press the SP/SLP button to... to select the desired input source to select the desired tape speed. Press the REC button to begin recording; VCR OPERATION (CONTINUED) RECORDING FROM THE EXTERNAL AV INPUT If the unit is in the display and on the screen.... automatically and the tape will light in DVD mode, press the VCR/DVD button (on the main unit) or VCR Button (on the remote) to change the unit to VCR mode. 1 2 Press the POWER button...
... will be ejected. • If you want to view a DVD while recording, press the VCR/DVD button (on the main unit) or the DVD button (on the remote). 33 Press the SP/SLP button to... to select the desired input source to select the desired tape speed. Press the REC button to begin recording; VCR OPERATION (CONTINUED) RECORDING FROM THE EXTERNAL AV INPUT If the unit is in the display and on the screen.... automatically and the tape will light in DVD mode, press the VCR/DVD button (on the main unit) or VCR Button (on the remote) to change the unit to VCR mode. 1 2 Press the POWER button...
User Guide
Page 36
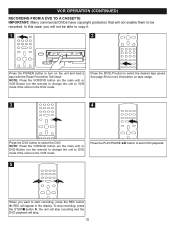
...35 To stop recording, press the STOP X button 2, the unit will stop recording and the DVD playback will appear in the VCR mode. In this case, you want to select the DVD. See page 29 for more information on the unit and load a tape with the Erase ...2 Press the POWER button to turn on tape usage. 3 4 Press the DVD button to start DVD playback. 5 1 12 When you will not be recorded. VCR OPERATION (CONTINUED) RECORDING FROM A DVD TO A CASSETTE IMPORTANT: Many commercial DVDs have copyright protection that will not enable them to select the desired tape speed. ...
...35 To stop recording, press the STOP X button 2, the unit will stop recording and the DVD playback will appear in the VCR mode. In this case, you want to select the DVD. See page 29 for more information on the unit and load a tape with the Erase ...2 Press the POWER button to turn on tape usage. 3 4 Press the DVD button to start DVD playback. 5 1 12 When you will not be recorded. VCR OPERATION (CONTINUED) RECORDING FROM A DVD TO A CASSETTE IMPORTANT: Many commercial DVDs have copyright protection that will not enable them to select the desired tape speed. ...
User Guide
Page 53
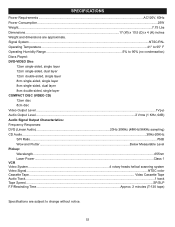
... 12cm disc 8cm disc Video Output Level ...1Vp-p Audio Output Level...2 Vrms (1 KHz, 0dB) Audio Signal Output Characteristics: Frequency Responses: DVD (Linear Audio 20Hz-20KHz (48KHz/96KHz sampling) CD Audio ...20Hz-20KHz S/N Ratio...70dB Wow and Flutter...Below Measurable Level Pickup: Wavelength......655nm Laser Power ...Class 1 VCR Video System 4 rotary heads helical scanning system Video Signal...NTSC color Cassette Tape ...Video Cassette Tape Audio Track...1 track Tape Speed......
... 12cm disc 8cm disc Video Output Level ...1Vp-p Audio Output Level...2 Vrms (1 KHz, 0dB) Audio Signal Output Characteristics: Frequency Responses: DVD (Linear Audio 20Hz-20KHz (48KHz/96KHz sampling) CD Audio ...20Hz-20KHz S/N Ratio...70dB Wow and Flutter...Below Measurable Level Pickup: Wavelength......655nm Laser Power ...Class 1 VCR Video System 4 rotary heads helical scanning system Video Signal...NTSC color Cassette Tape ...Video Cassette Tape Audio Track...1 track Tape Speed......

