
User Guide
Page 2
...8226; Forward/Reverse Search 42 • Repeat Play 42 • MP3 FAQs 42 CD/VCD Basic Operation 43 • Playback of the Remote Control Transmitter 9 Connection to Output DVD 10 • Connecting the Unit to a TV Using the Audio/Video Output Jacks 10 • Connecting the Unit to a TV Using the...• Dolby Digital Setup Menu 19 • Preference Menu 20 • TVG (TV Guardian®) Password 20 • TV Guardian® Feature 21 VCR Setup Menu 23 • Date and Time 23 • Language 24 • Go To Zero Search 25 • Counter Search 25 • Index Search...
...8226; Forward/Reverse Search 42 • Repeat Play 42 • MP3 FAQs 42 CD/VCD Basic Operation 43 • Playback of the Remote Control Transmitter 9 Connection to Output DVD 10 • Connecting the Unit to a TV Using the Audio/Video Output Jacks 10 • Connecting the Unit to a TV Using the...• Dolby Digital Setup Menu 19 • Preference Menu 20 • TVG (TV Guardian®) Password 20 • TV Guardian® Feature 21 VCR Setup Menu 23 • Date and Time 23 • Language 24 • Go To Zero Search 25 • Counter Search 25 • Index Search...
User Guide
Page 8
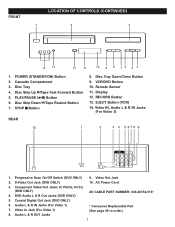
... page 49 to order.) 7 Disc Skip Down o/Tape Rewind Button 7. Component Video Out Jacks (Y, Pb/Cb, Pr/Cr) (DVD ONLY) 4. Disc Skip Up n/Tape Fast Forward Button 5. RECORD Button 13. PLAY/PAUSE (®p) Button 6. Display 12. EJECT Button... (VCR) 14. Video IN, Audio L & R IN Jacks (For Video 2) 1. Coaxial Digital Out Jack (DVD ONLY) 6. Audio L & R IN Jacks (For Video 1) 7. Cassette Compartment 3. Disc Tray 4. POWER (STANDBY/ON) Button 2. Video Out Jack 2. FRONT LOCATION OF CONTROLS (CONTINUED) 1. Remote Sensor 11. AC Power Cord 3. VCR/DVD Button 10...
... page 49 to order.) 7 Disc Skip Down o/Tape Rewind Button 7. Component Video Out Jacks (Y, Pb/Cb, Pr/Cr) (DVD ONLY) 4. Disc Skip Up n/Tape Fast Forward Button 5. RECORD Button 13. PLAY/PAUSE (®p) Button 6. Display 12. EJECT Button... (VCR) 14. Video IN, Audio L & R IN Jacks (For Video 2) 1. Coaxial Digital Out Jack (DVD ONLY) 6. Audio L & R IN Jacks (For Video 1) 7. Cassette Compartment 3. Disc Tray 4. POWER (STANDBY/ON) Button 2. Video Out Jack 2. FRONT LOCATION OF CONTROLS (CONTINUED) 1. Remote Sensor 11. AC Power Cord 3. VCR/DVD Button 10...
User Guide
Page 9
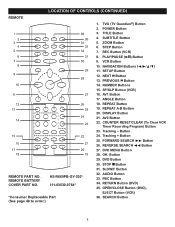
LOCATION OF CONTROLS (CONTINUED) REMOTE REMOTE PART NO. STEP Button 7. VCR Button 10. REVERSE SEARCH √√ Button 27. DVD MENU Button 28. SLOW/F Button 32. OPEN/CLOSE Button (DVD), EJECT Button (VCR) 36. SEARCH Button 8 HS-R669PB-GY-320* 111-03530-0784* *Consumer Replaceable Part ...1. SUBTITLE Button 5. ZOOM Button 6. REPEAT Button 19. OK Button 29. REMOTE BATTERY COVER PART NO. NAVIGATION Buttons 11. NEXT n Button 13. SP/SLP Button (VCR) 16. DISPLAY Button 21. DVD Button 30. PBC Button 34. TVG (TV Guardian®) Button 2. POWER...
LOCATION OF CONTROLS (CONTINUED) REMOTE REMOTE PART NO. STEP Button 7. VCR Button 10. REVERSE SEARCH √√ Button 27. DVD MENU Button 28. SLOW/F Button 32. OPEN/CLOSE Button (DVD), EJECT Button (VCR) 36. SEARCH Button 8 HS-R669PB-GY-320* 111-03530-0784* *Consumer Replaceable Part ...1. SUBTITLE Button 5. ZOOM Button 6. REPEAT Button 19. OK Button 29. REMOTE BATTERY COVER PART NO. NAVIGATION Buttons 11. NEXT n Button 13. SP/SLP Button (VCR) 16. DISPLAY Button 21. DVD Button 30. PBC Button 34. TVG (TV Guardian®) Button 2. POWER...

User Guide
Page 10
... different types of batteries specified. 2. they can overheat and rupture. (Follow battery manufacturer's directions.) EFFECTIVE DISTANCE OF THE REMOTE CONTROL TRANSMITTER 20ft 45 45 NOTES: • When there is not to prevent damage or injury from possible battery leakage. 5. BATTERY INSTALLATION...to the device. 3. Alkaline, Rechargeable and Carbon-zinc) or old batteries with fresh ones. 4. REMOTE CONTROL 1. BATTERY PRECAUTIONS Follow these precautions when using batteries in on the REMOTE SENSOR of time, remove the batteries to be used for a long period of the unit, the...
... different types of batteries specified. 2. they can overheat and rupture. (Follow battery manufacturer's directions.) EFFECTIVE DISTANCE OF THE REMOTE CONTROL TRANSMITTER 20ft 45 45 NOTES: • When there is not to prevent damage or injury from possible battery leakage. 5. BATTERY INSTALLATION...to the device. 3. Alkaline, Rechargeable and Carbon-zinc) or old batteries with fresh ones. 4. REMOTE CONTROL 1. BATTERY PRECAUTIONS Follow these precautions when using batteries in on the REMOTE SENSOR of time, remove the batteries to be used for a long period of the unit, the...
User Guide
Page 30
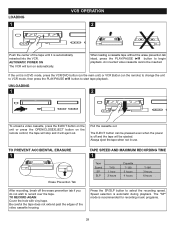
...is automatically retracted into the VCR. UNLOADING 1 2 To unload a video cassette, press the EJECT button on the unit or press the OPEN/CLOSE/EJECT button on automatically. the tape will turn on the remote control; Always eject the tape when not in DVD mode, press the VCR/DVD button (on the main unit...) or VCR Button (on the remote) to change the unit to VCR mode, then press the PLAY/PAUSE ®P button to record ...
...is automatically retracted into the VCR. UNLOADING 1 2 To unload a video cassette, press the EJECT button on the unit or press the OPEN/CLOSE/EJECT button on automatically. the tape will turn on the remote control; Always eject the tape when not in DVD mode, press the VCR/DVD button (on the main unit...) or VCR Button (on the remote) to change the unit to VCR mode, then press the PLAY/PAUSE ®P button to record ...
User Guide
Page 48
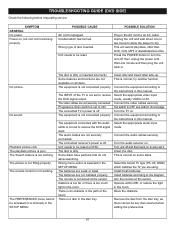
...Remove the disc from the disc tray, as there cannot be reset. Press the POWER button to an AC outlet. Playback picture rolls. The remote control is set it is off , then unplug the power cord. Progressive Scan switch is not working . The audio cables are weak or dead. ...then back on some discs. try another function. Set switch to ON. Select the appropriate audio input mode. Install fresh batteries. TROUBLESHOOTING GUIDE (DVD SIDE) Check the following before requesting service: SYMPTOM GENERAL No power. Unplug the unit and wait about one minute and then plug the unit...
...Remove the disc from the disc tray, as there cannot be reset. Press the POWER button to an AC outlet. Playback picture rolls. The remote control is set it is off , then unplug the power cord. Progressive Scan switch is not working . The audio cables are weak or dead. ...then back on some discs. try another function. Set switch to ON. Select the appropriate audio input mode. Install fresh batteries. TROUBLESHOOTING GUIDE (DVD SIDE) Check the following before requesting service: SYMPTOM GENERAL No power. Unplug the unit and wait about one minute and then plug the unit...


