
User Guide
Page 2
...23 • Language 24 • Go To Zero Search 25 • Counter Search 25 • Index Search 26 • Index Number Search 27 • VCR Options 28 VCR Operation 29 • Loading/Unloading 29 • To Prevent Accidental Erasure 29 • Tape Speed and Max. Recording Time 29 • Start/Stop Playback...44 • Repeat One/All Play 44 • Repeat A-B Play (VCD Only 44 • PBC (VCD Only 45 PICTURE CD Basic Operation 46 Troubleshooting Guide (DVD 47 Troubleshooting Guide (VCR 49 Care and Maintenance 50 Video Head Clogging/Cleaning 51 Specifications 52 1
...23 • Language 24 • Go To Zero Search 25 • Counter Search 25 • Index Search 26 • Index Number Search 27 • VCR Options 28 VCR Operation 29 • Loading/Unloading 29 • To Prevent Accidental Erasure 29 • Tape Speed and Max. Recording Time 29 • Start/Stop Playback...44 • Repeat One/All Play 44 • Repeat A-B Play (VCD Only 44 • PBC (VCD Only 45 PICTURE CD Basic Operation 46 Troubleshooting Guide (DVD 47 Troubleshooting Guide (VCR 49 Care and Maintenance 50 Video Head Clogging/Cleaning 51 Specifications 52 1
User Guide
Page 6
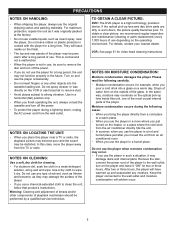
... directly hits the unit. • In summer, when you pour a cold drink into the cassette-loading slot. TO OBTAIN A CLEAR PICTURE: DVD: The DVD player is not in use depending on the optical pick-up lens inside this unit, one of the most crucial internal parts of the glass... and maintenance (cleaning or parts replacement) every 1,000 hours of use , be performed by a qualified service technician. For details, contact your nearest dealer. VCR: See page 51 for example, when you use a chemical-saturated cloth to clean the unit, follow that product's instructions. After two or three hours,...
... directly hits the unit. • In summer, when you pour a cold drink into the cassette-loading slot. TO OBTAIN A CLEAR PICTURE: DVD: The DVD player is not in use depending on the optical pick-up lens inside this unit, one of the most crucial internal parts of the glass... and maintenance (cleaning or parts replacement) every 1,000 hours of use , be performed by a qualified service technician. For details, contact your nearest dealer. VCR: See page 51 for example, when you use a chemical-saturated cloth to clean the unit, follow that product's instructions. After two or three hours,...
User Guide
Page 7
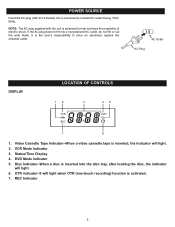
...: The AC plug supplied with the 2 blades) into a conveniently located AC outlet having 120V, 60Hz. AC Outlet AC Plug DISPLAY LOCATION OF CONTROLS 1. VCR Mode Indicator 3. Disc Indicator-When a disc is activated. 7. REC Indicator 6 If the AC plug does not fit into the disc tray, after ...loading the disc, the indicator will light. 6. DVD Mode Indicator 5. POWER SOURCE Insert the AC plug (with the unit is the user's responsibility to help minimize the possibility of electric shock. OTR ...
...: The AC plug supplied with the 2 blades) into a conveniently located AC outlet having 120V, 60Hz. AC Outlet AC Plug DISPLAY LOCATION OF CONTROLS 1. VCR Mode Indicator 3. Disc Indicator-When a disc is activated. 7. REC Indicator 6 If the AC plug does not fit into the disc tray, after ...loading the disc, the indicator will light. 6. DVD Mode Indicator 5. POWER SOURCE Insert the AC plug (with the unit is the user's responsibility to help minimize the possibility of electric shock. OTR ...
User Guide
Page 8
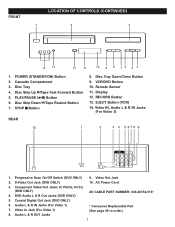
... OF CONTROLS (CONTINUED) 1. Disc Skip Up n/Tape Fast Forward Button 5. Progressive Scan On/Off Switch (DVD ONLY) 9. Audio L & R IN Jacks (For Video 1) 7. AC Power Cord 3. Display 12. VCR/DVD Button 10. S-Video Out Jack (DVD ONLY) 10. Component Video Out Jacks (Y, Pb/Cb, Pr/Cr) (DVD ONLY) 4. STOP s Button REAR 8. Disc Tray Open/Close Button 9.
... OF CONTROLS (CONTINUED) 1. Disc Skip Up n/Tape Fast Forward Button 5. Progressive Scan On/Off Switch (DVD ONLY) 9. Audio L & R IN Jacks (For Video 1) 7. AC Power Cord 3. Display 12. VCR/DVD Button 10. S-Video Out Jack (DVD ONLY) 10. Component Video Out Jacks (Y, Pb/Cb, Pr/Cr) (DVD ONLY) 4. STOP s Button REAR 8. Disc Tray Open/Close Button 9.
User Guide
Page 9
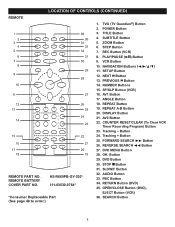
... STEP Button 7. NAVIGATION Buttons 11. SETUP Button 12. DISPLAY Button 21. SLOW/F Button 32. OPEN/CLOSE Button (DVD), EJECT Button (VCR) 36. SUBTITLE Button 5. REC Button (VCR) 8. VCR Button 10. NEXT n Button 13. NUMBER Buttons 15. Tracking - REVERSE SEARCH √√ Button 27. PLAY/... 9. PREVIOUS o Button 14. SEARCH Button 8 RETURN Button (DVD) 35. REPEAT Button 19. COUNTER RESET/CLEAR (To Clear VCR Timer Recording Program) Button 23. Tracking + Button 25. PBC Button 34. Button 24. DVD MENU Button 28. OK Button 29. STOP s Button 31...
... STEP Button 7. NAVIGATION Buttons 11. SETUP Button 12. DISPLAY Button 21. SLOW/F Button 32. OPEN/CLOSE Button (DVD), EJECT Button (VCR) 36. SUBTITLE Button 5. REC Button (VCR) 8. VCR Button 10. NEXT n Button 13. NUMBER Buttons 15. Tracking - REVERSE SEARCH √√ Button 27. PLAY/... 9. PREVIOUS o Button 14. SEARCH Button 8 RETURN Button (DVD) 35. REPEAT Button 19. COUNTER RESET/CLEAR (To Clear VCR Timer Recording Program) Button 23. Tracking + Button 25. PBC Button 34. Button 24. DVD MENU Button 28. OK Button 29. STOP s Button 31...
User Guide
Page 11
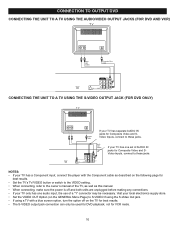
... THE UNIT TO A TV USING THE AUDIO/VIDEO OUTPUT JACKS (FOR DVD AND VCR) CONNECTING THE UNIT TO A TV USING THE S-VIDEO OUTPUT JACK (FOR DVD ONLY) If your TV has separate AUDIO IN jacks for VCR mode. 10 If your TV only has one set of AUDIO IN jacks for best results. •...; Set the TV's TV/VIDEO button or switch to the VIDEO setting. • When connecting, refer to the owner's manual of a "Y" connector may be used for DVD playback, not for...
... THE UNIT TO A TV USING THE AUDIO/VIDEO OUTPUT JACKS (FOR DVD AND VCR) CONNECTING THE UNIT TO A TV USING THE S-VIDEO OUTPUT JACK (FOR DVD ONLY) If your TV has separate AUDIO IN jacks for VCR mode. 10 If your TV only has one set of AUDIO IN jacks for best results. •...; Set the TV's TV/VIDEO button or switch to the VIDEO setting. • When connecting, refer to the owner's manual of a "Y" connector may be used for DVD playback, not for...
User Guide
Page 12
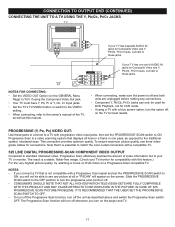
...to see any connections. • Component Y, Pb/Cb, Pr/Cr Jacks can only be used for DVD Playback, not for VCR mode. • If using the Component Video Out jack. • Your TV must have Y, Pb,...TV, as well as this feature.) For the very highest picture quality, try watching a movie on DVD-Video on the screen. To ensure maximum picture quality, use three videograde cables for Composite Video and Y,...COMPATIBLE WITH THIS PRODUCT AND MAY CAUSE ARTIFACTS TO BE DISPLAYED IN THE PICTURE. CONNECTION TO OUTPUT DVD (CONTINUED) CONNECTING THE UNIT TO A TV USING THE Y, Pb/Cb, Pr/Cr JACKS ...
...to see any connections. • Component Y, Pb/Cb, Pr/Cr Jacks can only be used for DVD Playback, not for VCR mode. • If using the Component Video Out jack. • Your TV must have Y, Pb,...TV, as well as this feature.) For the very highest picture quality, try watching a movie on DVD-Video on the screen. To ensure maximum picture quality, use three videograde cables for Composite Video and Y,...COMPATIBLE WITH THIS PRODUCT AND MAY CAUSE ARTIFACTS TO BE DISPLAYED IN THE PICTURE. CONNECTION TO OUTPUT DVD (CONTINUED) CONNECTING THE UNIT TO A TV USING THE Y, Pb/Cb, Pr/Cr JACKS ...
User Guide
Page 13
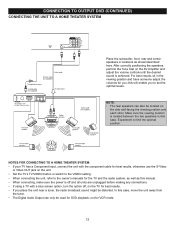
CONNECTION TO OUTPUT DVD (CONTINUED) CONNECTING THE UNIT TO A HOME THEATER SYSTEM Place the subwoofer, front, rear and center speakers in...in locations as this case, move the unit away from the tuner. • The Digital Audio Output can only be used for DVD playback, not for best results. • If you place the unit near a tuner, the radio broadcast sound might be distorted....the component cable for best results, otherwise use the S-Video or Video OUT jack on the TV for VCR mode. 12 Experiment to the owner's manuals for the TV and the audio system, as well as shown/described here.
CONNECTION TO OUTPUT DVD (CONTINUED) CONNECTING THE UNIT TO A HOME THEATER SYSTEM Place the subwoofer, front, rear and center speakers in...in locations as this case, move the unit away from the tuner. • The Digital Audio Output can only be used for DVD playback, not for best results. • If you place the unit near a tuner, the radio broadcast sound might be distorted....the component cable for best results, otherwise use the S-Video or Video OUT jack on the TV for VCR mode. 12 Experiment to the owner's manuals for the TV and the audio system, as well as shown/described here.
User Guide
Page 15
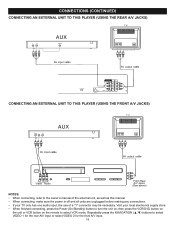
... select VIDEO 1 for the rear A/V input or select VIDEO 2 for the front A/V input. 14 then press the VCR/DVD button on the unit or VCR button on ; Repeatedly press the NAVIGATION (π,†) buttons to select VCR mode. CONNECTIONS (CONTINUED) CONNECTING AN EXTERNAL UNIT TO THIS PLAYER (USING THE REAR A/V JACKS) CONNECTING AN EXTERNAL...
... select VIDEO 1 for the rear A/V input or select VIDEO 2 for the front A/V input. 14 then press the VCR/DVD button on the unit or VCR button on ; Repeatedly press the NAVIGATION (π,†) buttons to select VCR mode. CONNECTIONS (CONTINUED) CONNECTING AN EXTERNAL UNIT TO THIS PLAYER (USING THE REAR A/V JACKS) CONNECTING AN EXTERNAL...
User Guide
Page 16
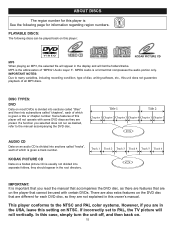
...as they are not explained in this setting on NTSC. Some features of "MPEG1 Audio Layer 3". There are also extra features on most DVDs is important that are different for information regarding region numbers. PLAYABLE DISCS: The following page for each of which is given a title ...or chapter number. DISC TYPES: DVD Data on the DVD disc that you selected does not run as desired, refer to many variables, including recording condition, type of all MP3 discs. If ...
...as they are not explained in this setting on NTSC. Some features of "MPEG1 Audio Layer 3". There are also extra features on most DVDs is important that are different for information regarding region numbers. PLAYABLE DISCS: The following page for each of which is given a title ...or chapter number. DISC TYPES: DVD Data on the DVD disc that you selected does not run as desired, refer to many variables, including recording condition, type of all MP3 discs. If ...

User Guide
Page 17
... does not correspond to the Region Management Information that is recorded on a DVD disc. DVD video discs are copy protected, and any recordings made for home and other limited viewing uses only, unless otherwise authorized by Macrovision Corporation. Use of ..., broadcast, show, broadcast on this player cannot play in public and rent copyrighted material without permission. You may not be able to play back some DVD video discs on cable, play that is protected by Macrovision Corporation and other intellectual property rights owned by method claims of this player, this player...
... does not correspond to the Region Management Information that is recorded on a DVD disc. DVD video discs are copy protected, and any recordings made for home and other limited viewing uses only, unless otherwise authorized by Macrovision Corporation. Use of ..., broadcast, show, broadcast on this player cannot play in public and rent copyrighted material without permission. You may not be able to play back some DVD video discs on cable, play that is protected by Macrovision Corporation and other intellectual property rights owned by method claims of this player, this player...

User Guide
Page 18
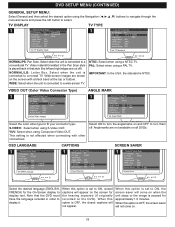
While in the DVD mode (DVD button pressed first), enter the SETUP MENU by allowing you to select the highlighted option. To Exit the SETUP MENU, press the SETUP button 1. DVD SETUP MENU The SETUP MENU lets you customize the DVD section by pressing the SETUP button 1. NOTE: All of television screen you have and more. Use the Navigation buttons 2 to navigate through the menus/screens and press the OK button 3 to select various language preferences, turn captions and screen saver on and off, adjust what type of the Setup screens below are for the DVD mode only. 3 2 1 17
While in the DVD mode (DVD button pressed first), enter the SETUP MENU by allowing you to select the highlighted option. To Exit the SETUP MENU, press the SETUP button 1. DVD SETUP MENU The SETUP MENU lets you customize the DVD section by pressing the SETUP button 1. NOTE: All of television screen you have and more. Use the Navigation buttons 2 to navigate through the menus/screens and press the OK button 3 to select various language preferences, turn captions and screen saver on and off, adjust what type of the Setup screens below are for the DVD mode only. 3 2 1 17
User Guide
Page 19
...PAL TV. Note that style (the left and right edges are cut off . When this option is set to turn the anglemarks on all DVDs. Select when the unit is connected to ON, the screen saver will not appear. IMPORTANT: In the USA, the standard is played back .... When this option is connected to display it. Wide-screen images are not available on and OFF to ON, closed captions will come on the DVD). WIDE: Select when the unit is set to a conventional TV. OSD LANGUAGE CAPTIONS SCREEN SAVER 1 1 1 Select the desired language (ENGLISH, FRENCH) for ...
...PAL TV. Note that style (the left and right edges are cut off . When this option is set to turn the anglemarks on all DVDs. Select when the unit is connected to ON, the screen saver will not appear. IMPORTANT: In the USA, the standard is played back .... When this option is connected to display it. Wide-screen images are not available on and OFF to ON, closed captions will come on the DVD). WIDE: Select when the unit is set to a conventional TV. OSD LANGUAGE CAPTIONS SCREEN SAVER 1 1 1 Select the desired language (ENGLISH, FRENCH) for ...

User Guide
Page 20
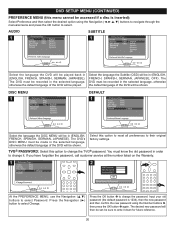
... it will reproduce the right mono signal to the Left and Right channels. DUAL MONO 1 STEREO: Select this to reproduce both channels mixed together. 19 DVD SETUP MENU (CONTINUED) SPEAKER SETUP MENU: Select Audio and then select the desired option using the Navigation buttons to navigate through the menus/screens and...
... it will reproduce the right mono signal to the Left and Right channels. DUAL MONO 1 STEREO: Select this to reproduce both channels mixed together. 19 DVD SETUP MENU (CONTINUED) SPEAKER SETUP MENU: Select Audio and then select the desired option using the Navigation buttons to navigate through the menus/screens and...
User Guide
Page 21
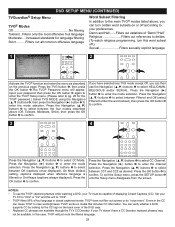
.... DISC MENU 1 DEFAULT 1 Select the language the DISC MENU will be in the selected language, otherwise the default language of the DVD will be shown. The DVD's DISC MENU must know the old password in order to change it down for future reference. 1 20 Select this option to reset... (the default password is inserted): Select Preference and then select the desired option using the Number buttons 2, then press the OK button 1 again. DVD SETUP MENU (CONTINUED) PREFERENCE MENU (this menu cannot be accessed if a disc is 1234), then the new password and then confirm the new password...
.... DISC MENU 1 DEFAULT 1 Select the language the DISC MENU will be in the selected language, otherwise the default language of the DVD will be shown. The DVD's DISC MENU must know the old password in order to change it down for future reference. 1 20 Select this option to reset... (the default password is inserted): Select Preference and then select the desired option using the Number buttons 2, then press the OK button 1 again. DVD SETUP MENU (CONTINUED) PREFERENCE MENU (this menu cannot be accessed if a disc is 1234), then the new password and then confirm the new password...
User Guide
Page 22
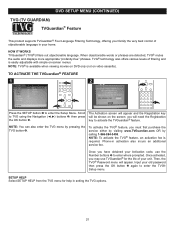
DVD SETUP MENU (CONTINUED) TVG (TV GUARDIAN) TVGuardian® Feature ThTihsispprrodduucct tsuspuppoprtos rTtsVGTuVarGdiuana®rdFioaunl ®LaFngouualgeLaFniltgeruinaggTeecFhinltoelorignyg, oTffeecrihngnoyolougr fya,moilfyfethrienvgeryyobuerstfacomntirlyol tohfe very best control of filtering ...
DVD SETUP MENU (CONTINUED) TVG (TV GUARDIAN) TVGuardian® Feature ThTihsispprrodduucct tsuspuppoprtos rTtsVGTuVarGdiuana®rdFioaunl ®LaFngouualgeLaFniltgeruinaggTeecFhinltoelorignyg, oTffeecrihngnoyolougr fya,moilfyfethrienvgeryyobuerstfacomntirlyol tohfe very best control of filtering ...
User Guide
Page 23
...Strict), then press the OK button 2 to enter the mode selection. If you have a CC Decoder, replaced phrases may not be capable of the DVD case. • Replaced CC phrases are available through the TV's CC Decoder. If your TV must be available. Press the Navigation (π,†) ...buttons 1 to select between the four modes described above , you can then use the TVG® captioning feature while watching a DVD, your TV doesn't have selected any TVG mode except Off, you can turn this word subset off according to "CC2". • TVG® ...
...Strict), then press the OK button 2 to enter the mode selection. If you have a CC Decoder, replaced phrases may not be capable of the DVD case. • Replaced CC phrases are available through the TV's CC Decoder. If your TV must be available. Press the Navigation (π,†) ...buttons 1 to select between the four modes described above , you can then use the TVG® captioning feature while watching a DVD, your TV doesn't have selected any TVG mode except Off, you can turn this word subset off according to "CC2". • TVG® ...
User Guide
Page 29
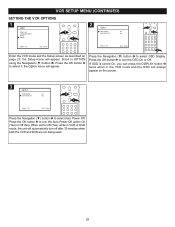
... (CONTINUED) SETTING THE VCR OPTIONS 1 2 2 2 1 1 3 Enter the VCR mode and the Setup screen as described on the screen. 3 2 1 Press the Navigation (†) button 1 to select Auto Power Off. the Setup menu will appear. ... OPTION using the Navigation (†) button 1. Press the Navigation (†) button 1 to ON (Yes), while in the VCR mode and the OSD will automatically turn off after 30 minutes when both the VCR and DVD are not being used. 28 If OSD is turned On, you can press the DISPLAY button 3 twice when...
... (CONTINUED) SETTING THE VCR OPTIONS 1 2 2 2 1 1 3 Enter the VCR mode and the Setup screen as described on the screen. 3 2 1 Press the Navigation (†) button 1 to select Auto Power Off. the Setup menu will appear. ... OPTION using the Navigation (†) button 1. Press the Navigation (†) button 1 to ON (Yes), while in the VCR mode and the OSD will automatically turn off after 30 minutes when both the VCR and DVD are not being used. 28 If OSD is turned On, you can press the DISPLAY button 3 twice when...
User Guide
Page 30
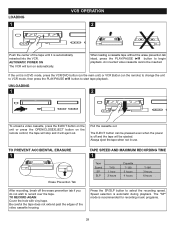
... "SP" mode is automatic during playback. LOADING 1 VCR OPERATION 2 Push the center of the video cassette housing. If the unit is off the erase prevention tab if you do not wish to start tape playback. Always eject the tape when not in DVD mode, press the VCR/DVD button (on the main unit) or... VCR Button (on the remote) to change the unit to VCR mode, then press the PLAY/PAUSE ®P button to record over the tape. Pull the cassette...
... "SP" mode is automatic during playback. LOADING 1 VCR OPERATION 2 Push the center of the video cassette housing. If the unit is off the erase prevention tab if you do not wish to start tape playback. Always eject the tape when not in DVD mode, press the VCR/DVD button (on the main unit) or... VCR Button (on the remote) to change the unit to VCR mode, then press the PLAY/PAUSE ®P button to record over the tape. Pull the cassette...
User Guide
Page 31
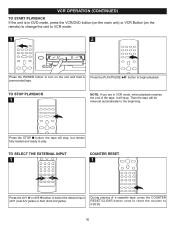
...1 During playing of the tape, it will stop . TO STOP PLAYBACK 1 NOTE: If you are in DVD mode, press the VCR/DVD button (on the main unit) or VCR Button (on the remote) to change the unit to VCR mode. 1 2 Press the POWER button to play. Press the PLAY/PAUSE ®P button to 0:00:...button, the tape will stop , but remain fully loaded and ready to turn on the unit and load a prerecorded tape. VCR OPERATION (CONTINUED) TO START PLAYBACK If the unit is in VCR mode, when playback reaches the end of a cassette tape, press the COUNTER RESET/CLEAR button once to reset the counter...
...1 During playing of the tape, it will stop . TO STOP PLAYBACK 1 NOTE: If you are in DVD mode, press the VCR/DVD button (on the main unit) or VCR Button (on the remote) to change the unit to VCR mode. 1 2 Press the POWER button to play. Press the PLAY/PAUSE ®P button to 0:00:...button, the tape will stop , but remain fully loaded and ready to turn on the unit and load a prerecorded tape. VCR OPERATION (CONTINUED) TO START PLAYBACK If the unit is in VCR mode, when playback reaches the end of a cassette tape, press the COUNTER RESET/CLEAR button once to reset the counter...


