
User Guide
Page 3
... ONLY. These limits are trademarks of Dolby Laboratories. 2 LASER WARNING: This unit employs a laser. The lightning flash with the instructions, may be determined by turning the equipment off and on a circuit different from Dolby Laboratories. DO NOT STARE INTO BEAM. This Class B digital apparatus complies with the limits for compliance...
... ONLY. These limits are trademarks of Dolby Laboratories. 2 LASER WARNING: This unit employs a laser. The lightning flash with the instructions, may be determined by turning the equipment off and on a circuit different from Dolby Laboratories. DO NOT STARE INTO BEAM. This Class B digital apparatus complies with the limits for compliance...
User Guide
Page 6
.... • When the DVD player is the user's responsibility to a warm place. • When you use the DVD player in a room where you just turned on the DVD player and leave it may occur. • If you use a chemical-saturated cloth to wipe it was originally packed at the factory... that product's instructions. NOTES ON MOISTURE CONDENSATION: Moisture condensation damages the DVD player. It is not in use, be sure to the wall outlet, turn off the power. • If you moved the unit from the TV, radio or VCR. In this DVD player near the DVD player. Remove the...
.... • When the DVD player is the user's responsibility to a warm place. • When you use the DVD player in a room where you just turned on the DVD player and leave it may occur. • If you use a chemical-saturated cloth to wipe it was originally packed at the factory... that product's instructions. NOTES ON MOISTURE CONDENSATION: Moisture condensation damages the DVD player. It is not in use, be sure to the wall outlet, turn off the power. • If you moved the unit from the TV, radio or VCR. In this DVD player near the DVD player. Remove the...
User Guide
Page 7
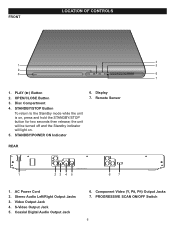
... Indicator 6. S-Video Output Jack 5. Display 7. Coaxial Digital Audio Output Jack 6. Stereo Audio Left/Right Output Jacks 3. PROGRESSIVE SCAN ON/OFF Switch 6 the unit will be turned off and the Standby indicator will light on , press and hold the STANDBY/STOP button for two seconds then release; AC Power Cord 2. STANDBY/STOP...
... Indicator 6. S-Video Output Jack 5. Display 7. Coaxial Digital Audio Output Jack 6. Stereo Audio Left/Right Output Jacks 3. PROGRESSIVE SCAN ON/OFF Switch 6 the unit will be turned off and the Standby indicator will light on , press and hold the STANDBY/STOP button for two seconds then release; AC Power Cord 2. STANDBY/STOP...
User Guide
Page 11
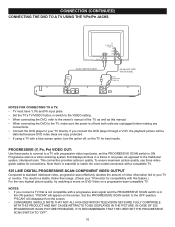
... for connections. The result is off , on the screen. PROGRESSIVE (Y, PB, PR) VIDEO OUT: Use these jacks to connect to a TV with a blue screen option, turn the option off and both units are copy protected. • If using a TV with progressive video input jacks, set the PROGRESSIVE SCAN switch to ON...
... for connections. The result is off , on the screen. PROGRESSIVE (Y, PB, PR) VIDEO OUT: Use these jacks to connect to a TV with a blue screen option, turn the option off and both units are copy protected. • If using a TV with progressive video input jacks, set the PROGRESSIVE SCAN switch to ON...
User Guide
Page 12
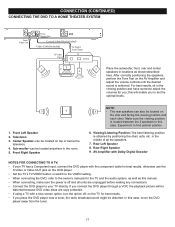
... wall facing the viewing position and each other. In this case. Center Speaker-can be distorted. Rear Left Speaker 8. AV Amplifier with a blue screen option, turn the option off and all the speakers. 7. After correctly positioning the speakers, perform the Tone Test on the TV for best results. • If you...
... wall facing the viewing position and each other. In this case. Center Speaker-can be distorted. Rear Left Speaker 8. AV Amplifier with a blue screen option, turn the option off and all the speakers. 7. After correctly positioning the speakers, perform the Tone Test on the TV for best results. • If you...
User Guide
Page 13
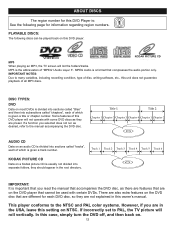
... is important that you read the manual that accompanies the DVD disc, as there are features that are in the USA, leave this case, simply turn the DVD off, and then back on a Kodak picture CD is given a track number. KODAK PICTURE CD Data on . 12 This player conforms to the...
... is important that you read the manual that accompanies the DVD disc, as there are features that are in the USA, leave this case, simply turn the DVD off, and then back on a Kodak picture CD is given a track number. KODAK PICTURE CD Data on . 12 This player conforms to the...
User Guide
Page 15
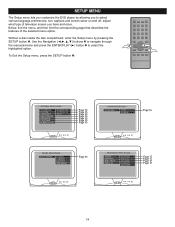
... have and more. Use the Navigation buttons 2 to navigate through the menus/screens and press the ENTER/PLAY (®) button 3 to select various language preferences, turn captions and screen saver on and off, adjust what type of the selected menu option.
... have and more. Use the Navigation buttons 2 to navigate through the menus/screens and press the ENTER/PLAY (®) button 3 to select various language preferences, turn captions and screen saver on and off, adjust what type of the selected menu option.

User Guide
Page 16
... left and right edges are cut off . NORMAL/LB: Letter Box. This setting is paused for the On-Screen display to turn them off ). When this option is connected to turn the anglemarks on when the unit stops or the image is not affected when connecting with a black band at the top...
... left and right edges are cut off . NORMAL/LB: Letter Box. This setting is paused for the On-Screen display to turn them off ). When this option is connected to turn the anglemarks on when the unit stops or the image is not affected when connecting with a black band at the top...
User Guide
Page 20
... (®) button 2 to access a function that cannot be lit). Use the Navigation buttons 2 to select the desired option and the ENTER/PLAY (®) button 3 to turn on the unit. • " " will appear on the TV screen during operation if you read the manual that accompanies the DVD disc as there are... this owner's manual. • When the unit is on and in the Stop mode for additional information. • Resuming playback may take a few seconds to turn on the TV screen, press the Navigation buttons to close the disc tray.
... (®) button 2 to access a function that cannot be lit). Use the Navigation buttons 2 to select the desired option and the ENTER/PLAY (®) button 3 to turn on the unit. • " " will appear on the TV screen during operation if you read the manual that accompanies the DVD disc as there are... this owner's manual. • When the unit is on and in the Stop mode for additional information. • Resuming playback may take a few seconds to turn on the TV screen, press the Navigation buttons to close the disc tray.
User Guide
Page 23
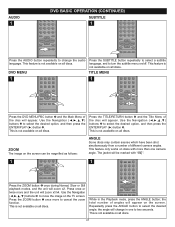
... available on all discs. Press once or twice more than one to two seconds. Press the SUBTITLE button repeatedly to select a subtitle language, and to turn the subtitle menu on the screen can be marked with more and the unit will change the audio language. Use the Navigation buttons 2 to select...
... available on all discs. Press once or twice more than one to two seconds. Press the SUBTITLE button repeatedly to select a subtitle language, and to turn the subtitle menu on the screen can be marked with more and the unit will change the audio language. Use the Navigation buttons 2 to select...

User Guide
Page 24
Press the STOP (s) button 3 to turn on the unit; Also, the display will blink which indicate the total tracks number is more than 99 tracks, the tracks number on the screen ...
Press the STOP (s) button 3 to turn on the unit; Also, the display will blink which indicate the total tracks number is more than 99 tracks, the tracks number on the screen ...

User Guide
Page 26
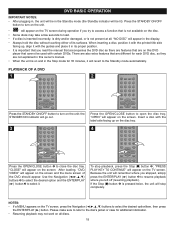
... OPEN/CLOSE button to resume playback. Insert a disc with the label side facing up on the disc tray. 3 4 3 1 31 2 1 Press the OPEN/CLOSE button to turn on the screen. Press the ENTER/PLAY (®) button 2 to open the disc tray, "OPEN" will be played. 25
... OPEN/CLOSE button to resume playback. Insert a disc with the label side facing up on the disc tray. 3 4 3 1 31 2 1 Press the OPEN/CLOSE button to turn on the screen. Press the ENTER/PLAY (®) button 2 to open the disc tray, "OPEN" will be played. 25
User Guide
Page 28
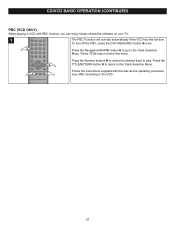
To turn off the PBC, press the DVD MENU/PBC button 1 once. Some VCDs may differ according to the VCD. 27 Press the TITLE/RETURN button 4 to ...
To turn off the PBC, press the DVD MENU/PBC button 1 once. Some VCDs may differ according to the VCD. 27 Press the TITLE/RETURN button 4 to ...

User Guide
Page 29
.../ON indicator will start automatically, press the Navigation (π,†) button 3 to select the desired picture and then press the ENTER/PLAY (®) button 4 to turn on the unit; PICTURE CD BASIC OPERATION 1 2 Press the STANDBY ON/OFF button to begin playback.
.../ON indicator will start automatically, press the Navigation (π,†) button 3 to select the desired picture and then press the ENTER/PLAY (®) button 4 to turn on the unit; PICTURE CD BASIC OPERATION 1 2 Press the STANDBY ON/OFF button to begin playback.

User Guide
Page 30
.... Wait one to two hours to allow searching. The battery is not installed properly. The battery is weak or dead. There is not fitting properly. Turn unit off . Unit needs to auto set to OFF, see bottom of disc inserted. The picture is a disc in the path of the TV is... audio cable is not set to the instructions in this manual. Connect the equipment according to receive the DVD signal input. Turn the TV on , but unit not functioning properly. Turn the audio receiver on to be any disc inserted when setting the preferences. 29 Select the correct TV type (PS, LB...
.... Wait one to two hours to allow searching. The battery is not installed properly. The battery is weak or dead. There is not fitting properly. Turn unit off . Unit needs to auto set to OFF, see bottom of disc inserted. The picture is a disc in the path of the TV is... audio cable is not set to the instructions in this manual. Connect the equipment according to receive the DVD signal input. Turn the TV on , but unit not functioning properly. Turn the audio receiver on to be any disc inserted when setting the preferences. 29 Select the correct TV type (PS, LB...
User Guide
Page 31
...in the display. Clean the disc. This is normal; FOR PARTS AND ACCESSORIES, CONTACT FOX INTERNATIONAL AT 1-800-321-6993. 30 Subtitles not turned on the disc tray correctly inside the guide. Place the disc on . This is normal; Some features and functions are not working properly. try...7100 PLEASE KEEP ALL PACKAGING MATERIAL FOR AT LEAST 90 DAYS IN CASE YOU NEED TO RETURN THIS PRODUCT TO YOUR PLACE OF PURCHASE OR MEMOREX. Selected language is not compatible with a progressive scan signal and set is not placed in the subtitles, or spoken. The disc is ...
...in the display. Clean the disc. This is normal; FOR PARTS AND ACCESSORIES, CONTACT FOX INTERNATIONAL AT 1-800-321-6993. 30 Subtitles not turned on the disc tray correctly inside the guide. Place the disc on . This is normal; Some features and functions are not working properly. try...7100 PLEASE KEEP ALL PACKAGING MATERIAL FOR AT LEAST 90 DAYS IN CASE YOU NEED TO RETURN THIS PRODUCT TO YOUR PLACE OF PURCHASE OR MEMOREX. Selected language is not compatible with a progressive scan signal and set is not placed in the subtitles, or spoken. The disc is ...


