Manual
Page 7
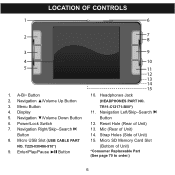
Navigation ▼/Volume Down Button 6. Power/Lock Switch 7. Micro SD Memory Card Slot (Bottom of Unit) 13. Micro USB Slot (USB CABLE PART NO. Headphones Jack (HEADPHONES PART NO. Reset Hole (Rear of Unit) *Consumer Replaceable Part (See page 70 to order.) 6 Navigation Right/Skip-Search n Button 8. ...
Navigation ▼/Volume Down Button 6. Power/Lock Switch 7. Micro SD Memory Card Slot (Bottom of Unit) 13. Micro USB Slot (USB CABLE PART NO. Headphones Jack (HEADPHONES PART NO. Reset Hole (Rear of Unit) *Consumer Replaceable Part (See page 70 to order.) 6 Navigation Right/Skip-Search n Button 8. ...
Manual
Page 8
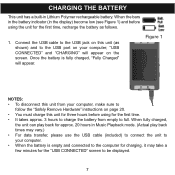
...Polymer rechargeable battery. Figure 1 NOTES: • To disconnect this unit from empty to the USB port on the screen. Connect the USB cable to the USB jack on this unit for three hours before using for the "USB CONNECTED" screen to be displayed. 7 When fully charged, the unit can play back for approx.... 20 hours in Music Playback mode. (Actual play back times may vary.) • For data transfer, please use the USB cable (included) to connect the unit to follow the "Safely Remove Hardware" instructions on page 20. • You must charge this unit (as follows...
...Polymer rechargeable battery. Figure 1 NOTES: • To disconnect this unit from empty to the USB port on the screen. Connect the USB cable to the USB jack on this unit for three hours before using for the "USB CONNECTED" screen to be displayed. 7 When fully charged, the unit can play back for approx.... 20 hours in Music Playback mode. (Actual play back times may vary.) • For data transfer, please use the USB cable (included) to connect the unit to follow the "Safely Remove Hardware" instructions on page 20. • You must charge this unit (as follows...
Manual
Page 9
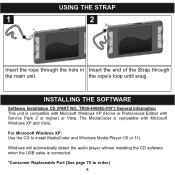
... XP (Home or Professional Edition with Microsoft Windows XP and Vista. Windows will automatically detect the audio player without installing the CD software when the USB cable is compatible with Service Pack 2 or higher) or Vista. the rope's loop until snug. For Microsoft Windows XP: Use the CD to order.) 8 The MediaCoder...
... XP (Home or Professional Edition with Microsoft Windows XP and Vista. Windows will automatically detect the audio player without installing the CD software when the USB cable is compatible with Service Pack 2 or higher) or Vista. the rope's loop until snug. For Microsoft Windows XP: Use the CD to order.) 8 The MediaCoder...
Manual
Page 21
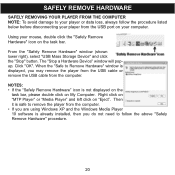
Using your computer. NOTES: • If the "Safely Remove Hardware" icon is displayed, you may remove the player from the USB cable or remove the USB cable from the USB port on your mouse, double click the "Safely Remove Hardware" icon on the task bar. Then it is safe to remove ...Player" or "Media Player" and left click on My Computer. Click "OK". From the "Safely Remove Hardware" window (shown lower right), select "USB Mass Storage Device" and click the "Stop" button. When the "Safe to follow the procedure listed below before disconnecting your player from the computer. SAFELY...
Using your computer. NOTES: • If the "Safely Remove Hardware" icon is displayed, you may remove the player from the USB cable or remove the USB cable from the USB port on your mouse, double click the "Safely Remove Hardware" icon on the task bar. Then it is safe to remove ...Player" or "Media Player" and left click on My Computer. Click "OK". From the "Safely Remove Hardware" window (shown lower right), select "USB Mass Storage Device" and click the "Stop" button. When the "Safe to follow the procedure listed below before disconnecting your player from the computer. SAFELY...
Manual
Page 68
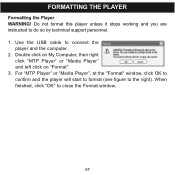
Do not format this player unless it stops working and you are instructed to close the Format window. 67 When finished, click "OK" to do so by technical support personnel. 1. Use the USB cable to the right). For "MTP Player" or "Media Player", at the "Format" window, click OK to confirm and the player will start to format (see figure to connect the player and the computer. 2. FORMATTING THE PLAYER Formatting the Player WARNING! Double click on My Computer, then right click "MTP Player" or "Media Player" and left click on "Format". 3.
Do not format this player unless it stops working and you are instructed to close the Format window. 67 When finished, click "OK" to do so by technical support personnel. 1. Use the USB cable to the right). For "MTP Player" or "Media Player", at the "Format" window, click OK to confirm and the player will start to format (see figure to connect the player and the computer. 2. FORMATTING THE PLAYER Formatting the Player WARNING! Double click on My Computer, then right click "MTP Player" or "Media Player" and left click on "Format". 3.


