
Manual
Page 2
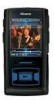
...-003 du Canada. 2 You should exercise extreme caution or discontinue use in a location subject to operate this equipment may result in the instruction manual. The user could lose the authority to direct sunlight, excessive dust, sand, moisture, rain or mechanical shock; SAFETY: • ...play your headset at a high volume while walking, especially at pedestrian crossings. This Class B digital apparatus complies with the windows closed during walking or exercising will not affect the player. ROAD SAFETY: • Do not use radio frequency energy. It may generate or use headphones...
...-003 du Canada. 2 You should exercise extreme caution or discontinue use in a location subject to operate this equipment may result in the instruction manual. The user could lose the authority to direct sunlight, excessive dust, sand, moisture, rain or mechanical shock; SAFETY: • ...play your headset at a high volume while walking, especially at pedestrian crossings. This Class B digital apparatus complies with the windows closed during walking or exercising will not affect the player. ROAD SAFETY: • Do not use radio frequency energy. It may generate or use headphones...
Manual
Page 3
... not cause harmful interference, and 2) This device must accept any interference received, including interference that to correct the interference by the party responsible for a Class B digital device, pursuant to Part 15 of the FCC rules. These limits are designed to operate the equipment. Shield cable must be determined by turning the... the equipment and receiver. • Connect the equipment into an outlet on a circuit different from that may cause harmful interference to ensure compliance with the instructions, may cause undesired operation.
... not cause harmful interference, and 2) This device must accept any interference received, including interference that to correct the interference by the party responsible for a Class B digital device, pursuant to Part 15 of the FCC rules. These limits are designed to operate the equipment. Shield cable must be determined by turning the... the equipment and receiver. • Connect the equipment into an outlet on a circuit different from that may cause harmful interference to ensure compliance with the instructions, may cause undesired operation.
Manual
Page 7
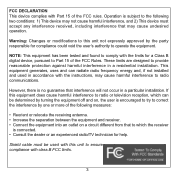
...) and to the USB port on page 33. • It takes approx. 3 hours to charge the battery from empty to follow the "Safely Remove Hardware" instructions on your computer; Connect the USB cable to the USB jack on the bottom of this unit from your computer. • "Low Battery Voltages" will...
...) and to the USB port on page 33. • It takes approx. 3 hours to charge the battery from empty to follow the "Safely Remove Hardware" instructions on your computer; Connect the USB cable to the USB jack on the bottom of this unit from your computer. • "Low Battery Voltages" will...
Manual
Page 13
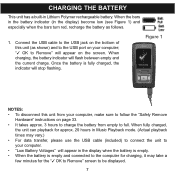
When finished, click "Next". 8. Click "Finish" to view the Statement, if desired. Read the instructions and tick the check boxes as desired. 9. Click on More Options and tick the check boxes as desired. Then click on Privacy Statement to finish the installation of Windows Media Player 10. 13 WINDOWS MEDIA PLAYER 10 INSTALLATION 7.
When finished, click "Next". 8. Click "Finish" to view the Statement, if desired. Read the instructions and tick the check boxes as desired. 9. Click on More Options and tick the check boxes as desired. Then click on Privacy Statement to finish the installation of Windows Media Player 10. 13 WINDOWS MEDIA PLAYER 10 INSTALLATION 7.
Manual
Page 16
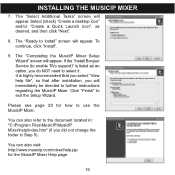
... for how to enable TiVo support)" is highly recommended that you select "View help file", so that after installation, you do NOT need to further instructions regarding the MusicIP Mixer. You can also refer to exit the Setup Wizard. To continue, click "Install". 9.
... for how to enable TiVo support)" is highly recommended that you select "View help file", so that after installation, you do NOT need to further instructions regarding the MusicIP Mixer. You can also refer to exit the Setup Wizard. To continue, click "Install". 9.

Manual
Page 47
...to create a djMix. • For MyDJ information, enter the MyDJ menu as described on page 34. Follow the Browse Music (All Songs, Albums, Artists) instructions on page 38 to select a desired track. Scroll to djMix using the Navigation Up 1 and/or Down 2 buttons, followed by the Enter/Play/ Pause ...®p button 3 to select it . 47 The player will create a playlist based on that song. Press the Enter/Play/Pause ®p button 3 (or the Navigation Right/Skip-Search n button) and djMix will...
...to create a djMix. • For MyDJ information, enter the MyDJ menu as described on page 34. Follow the Browse Music (All Songs, Albums, Artists) instructions on page 38 to select a desired track. Scroll to djMix using the Navigation Up 1 and/or Down 2 buttons, followed by the Enter/Play/ Pause ...®p button 3 to select it . 47 The player will create a playlist based on that song. Press the Enter/Play/Pause ®p button 3 (or the Navigation Right/Skip-Search n button) and djMix will...

Manual
Page 68
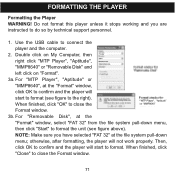
SETTINGS MENU (CONTINUED) TO FORMAT THE PLAYER WARNING! Select Settings using your computer, please see page 71. Scroll to "Format" using the Navigation Up 1 and/or Down 2 buttons, followed by the Enter/... described on page 34. Press the Enter/Play/Pause ®p button 1 to do so by the Enter/Play/Pause ®p button 2. Do not format this player unless it . 3 2 1 NOTES: • If you are instructed to format the device and erase all content.
SETTINGS MENU (CONTINUED) TO FORMAT THE PLAYER WARNING! Select Settings using your computer, please see page 71. Scroll to "Format" using the Navigation Up 1 and/or Down 2 buttons, followed by the Enter/... described on page 34. Press the Enter/Play/Pause ®p button 1 to do so by the Enter/Play/Pause ®p button 2. Do not format this player unless it . 3 2 1 NOTES: • If you are instructed to format the device and erase all content.
Manual
Page 71
... technical support personnel. 1. Use the USB cable to close the "MTP Player", "Aptitude" or "MMP8640" Format window. 3b. NOTE: Make sure you are instructed to format. otherwise, after formatting, the player will start to format (see figure above). Do not format this player unless it stops working and you have selected "FAT 32" at the...
... technical support personnel. 1. Use the USB cable to close the "MTP Player", "Aptitude" or "MMP8640" Format window. 3b. NOTE: Make sure you are instructed to format. otherwise, after formatting, the player will start to format (see figure above). Do not format this player unless it stops working and you have selected "FAT 32" at the...

