
User Guide
Page 1
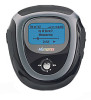
MMP8564 User's Guide 256MB MP3/WMA Digital Audio Player Before operating this product, please read these instructions completely.
MMP8564 User's Guide 256MB MP3/WMA Digital Audio Player Before operating this product, please read these instructions completely.

User Guide
Page 2
... player. This Class B digital apparatus complies with DRM or WAV tracks without permission is a violation of international copyright laws. PRECAUTIONS COPYRIGHT: • Distributing copies of MP3, WMA with Canadian ICES-003. or in damage or sound distortion. • Avoid spilling any motorized vehicle. The user could lose the authority to this...
... player. This Class B digital apparatus complies with DRM or WAV tracks without permission is a violation of international copyright laws. PRECAUTIONS COPYRIGHT: • Distributing copies of MP3, WMA with Canadian ICES-003. or in damage or sound distortion. • Avoid spilling any motorized vehicle. The user could lose the authority to this...

User Guide
Page 12
... the Installation CD-Rom into the CD Drive, then the installation screen will begin. 3. Once you have installed Windows Media Player 10, you can transfer MP3 files, WMA files, WMA files with Windows XP only. For Windows ME and Windows 2000, please install Windows Media Player 9. Installation will appear. Read the...
... the Installation CD-Rom into the CD Drive, then the installation screen will begin. 3. Once you have installed Windows Media Player 10, you can transfer MP3 files, WMA files, WMA files with Windows XP only. For Windows ME and Windows 2000, please install Windows Media Player 9. Installation will appear. Read the...

User Guide
Page 15
... 3. Then, follow the procedure on page 17 to transfer music files to your player, simply drag and drop MP3 or WMA files from the Internet or use Windows Media Player 10 to the USB port on your computer using the... the player is connected. DOWNLOADING AND TRANSFERRING FILES TRANSFERRING FILES You can transfer music files (MP3, WMA, WMA files with DRM 9 or DRM 10 will not play back if you directly drag and drop it... into MP3 or WMA format. For Windows ME, Windows 2000, Windows 98 or Windows XP (without Windows Media ...
... 3. Then, follow the procedure on page 17 to transfer music files to your player, simply drag and drop MP3 or WMA files from the Internet or use Windows Media Player 10 to the USB port on your computer using the... the player is connected. DOWNLOADING AND TRANSFERRING FILES TRANSFERRING FILES You can transfer music files (MP3, WMA, WMA files with DRM 9 or DRM 10 will not play back if you directly drag and drop it... into MP3 or WMA format. For Windows ME, Windows 2000, Windows 98 or Windows XP (without Windows Media ...

User Guide
Page 17
... the player to your computer. the Option setting menu will appear. Click on Rip Music and set the desired format for the newly ripped music (MP3 format or Windows Media Audio format). To add the transferred/ripped music files/songs to your player simply drag and drop the.../or WMA files into the CD-Rom drive of your computer. Then, set the Rip Music to the desired location on an audio CD into MP3 or WMA format as desired. DOWNLOADING AND TRANSFERRING FILES (CONT.) For Windows XP, you can also utilize the previously installed Windows Media Player 10 software...
... the player to your computer. the Option setting menu will appear. Click on Rip Music and set the desired format for the newly ripped music (MP3 format or Windows Media Audio format). To add the transferred/ripped music files/songs to your player simply drag and drop the.../or WMA files into the CD-Rom drive of your computer. Then, set the Rip Music to the desired location on an audio CD into MP3 or WMA format as desired. DOWNLOADING AND TRANSFERRING FILES (CONT.) For Windows XP, you can also utilize the previously installed Windows Media Player 10 software...
User Guide
Page 18
... Media Player 10. Before beginning the procedure please turn the unit on and connect the unit to the player. 4. DOWNLOADING AND TRANSFERRING FILES (CONT.) TRANSFERRING MP3/WMA FILES AND WMA FILES WITH DRM 9 OR DRM 10 USING THE WINDOWS MEDIA PLAYER 10 (FOR WINDOWS XP ONLY) To transfer... MP3 files/WMA files/WMA files with DRM 9 or 10 to the player, follow the "Safely Remove Hardware" procedure on the next page. Click "Start Sync" ...
... Media Player 10. Before beginning the procedure please turn the unit on and connect the unit to the player. 4. DOWNLOADING AND TRANSFERRING FILES (CONT.) TRANSFERRING MP3/WMA FILES AND WMA FILES WITH DRM 9 OR DRM 10 USING THE WINDOWS MEDIA PLAYER 10 (FOR WINDOWS XP ONLY) To transfer... MP3 files/WMA files/WMA files with DRM 9 or 10 to the player, follow the "Safely Remove Hardware" procedure on the next page. Click "Start Sync" ...
User Guide
Page 20
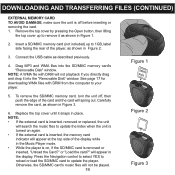
... sure the unit is off , then push the edge of the card and the card will not be played. 19 Figure 1 sliadbeel Figure 2 Figure 3 Drag MP3 and WMA files into the "Removable Disk" window. Replace the top cover until it into the SD/MMC memory card's "Removable Disk" window.
... sure the unit is off , then push the edge of the card and the card will not be played. 19 Figure 1 sliadbeel Figure 2 Figure 3 Drag MP3 and WMA files into the "Removable Disk" window. Replace the top cover until it into the SD/MMC memory card's "Removable Disk" window.

User Guide
Page 21
Then the Music Player menu will appear and the MP3/WMA track's information will appear in the display. 20 The unit will turn off , press and hold the Power On/Off/Stop button; This is .../OFF 1 LOCK SWITCH 1 Turn the unit on the number of songs that you transferred to the player. the Memorex start screen will appear in the display. With the unit on the player, the "Memorex" start screen will appear in the display; Do not release the Power On/Off/Stop button until LOCKED...
Then the Music Player menu will appear and the MP3/WMA track's information will appear in the display. 20 The unit will turn off , press and hold the Power On/Off/Stop button; This is .../OFF 1 LOCK SWITCH 1 Turn the unit on the number of songs that you transferred to the player. the Memorex start screen will appear in the display. With the unit on the player, the "Memorex" start screen will appear in the display; Do not release the Power On/Off/Stop button until LOCKED...

User Guide
Page 22
... Radio mode for the next strong station. Press the VOLUME +/- Extend the headphone wire for FM. the Memorex start screen will appear in the display. Then the Music Player menu will appear and the MP3/WMA's track information will appear in . 3 41 1 2 1 Select a station by pressing the Power On/Off/Stop button...
... Radio mode for the next strong station. Press the VOLUME +/- Extend the headphone wire for FM. the Memorex start screen will appear in the display. Then the Music Player menu will appear and the MP3/WMA's track information will appear in . 3 41 1 2 1 Select a station by pressing the Power On/Off/Stop button...

User Guide
Page 25
...w 2, th1en press the Navigation control 2; To stop playback, press the Power On/Off/Stop button 3; OPERATION (CONTINUED) TO LISTEN TO MP3s/WMAs/WAVs 1 2 1 2 Turn the unit on or you enter the Music Player mode again, this unit. 1 NOTE (AUTO RESUME... it . NOTE: • See pages 8-17 for information on uploading MP3, WMA and WAV files to three. Then the Music Player menu will appear and the MP3/WMA's track information will appear in the display. 1 If the unit ... 3 3 2 1 Press the Play/Pause ®p button 1 to increase or decrease the volume. the Memorex start playback;
...w 2, th1en press the Navigation control 2; To stop playback, press the Power On/Off/Stop button 3; OPERATION (CONTINUED) TO LISTEN TO MP3s/WMAs/WAVs 1 2 1 2 Turn the unit on or you enter the Music Player mode again, this unit. 1 NOTE (AUTO RESUME... it . NOTE: • See pages 8-17 for information on uploading MP3, WMA and WAV files to three. Then the Music Player menu will appear and the MP3/WMA's track information will appear in the display. 1 If the unit ... 3 3 2 1 Press the Play/Pause ®p button 1 to increase or decrease the volume. the Memorex start playback;

User Guide
Page 35
... Navigation control towards ®/l for two seconds and then release; the timer will then start the timer; To reset all the timers. NOTE: • The MP3/WMA files can still be reset. Press the Navigation control to reset all the timers, push the Navigation control towards √/m twice to exit the...
... Navigation control towards ®/l for two seconds and then release; the timer will then start the timer; To reset all the timers. NOTE: • The MP3/WMA files can still be reset. Press the Navigation control to reset all the timers, push the Navigation control towards √/m twice to exit the...

User Guide
Page 36
The MP3 or WMA files Download uncorrupted are not Insert headphones. WMA files with DRM. 35 securely connected. No sound. Replace battery. button to turn on . Volume + ...
The MP3 or WMA files Download uncorrupted are not Insert headphones. WMA files with DRM. 35 securely connected. No sound. Replace battery. button to turn on . Volume + ...

User Guide
Page 40
... (D) inches 1.6 ounces (without notice. 39 SPECIFICATIONS Audio Frequency Range Headphones Output S/N Ratio 20Hz - 20KHz 5mW, 32ohm (Max. Vol) 85db (MP3) File Support MP3 WMA Bit Rate MPEG 1/2/2.5 Layer 3 Windows Media Audio (WMA file with Backlight 256MB Approx. 18 hours Win ME, 2000, XP and Mac OSX ...1 x AAA battery Specifications are subject to change without battery) USB 2.0 Full Graphic with DRM9 or DRM 10) 32kbps-320kbps (MP3) 32kbps-192kbps (WMA) FM Tuner FM Frequency Range Antenna 87.5MHz-108MHz Headphones/Earphones Cord Antenna General Dimension Weight USB LCD Built-...
... (D) inches 1.6 ounces (without notice. 39 SPECIFICATIONS Audio Frequency Range Headphones Output S/N Ratio 20Hz - 20KHz 5mW, 32ohm (Max. Vol) 85db (MP3) File Support MP3 WMA Bit Rate MPEG 1/2/2.5 Layer 3 Windows Media Audio (WMA file with Backlight 256MB Approx. 18 hours Win ME, 2000, XP and Mac OSX ...1 x AAA battery Specifications are subject to change without battery) USB 2.0 Full Graphic with DRM9 or DRM 10) 32kbps-320kbps (MP3) 32kbps-192kbps (WMA) FM Tuner FM Frequency Range Antenna 87.5MHz-108MHz Headphones/Earphones Cord Antenna General Dimension Weight USB LCD Built-...


