
Manual
Page 3
... the LCD TV Key Features ...5 Package Contents ...6 Setting Your LCD TV...7 Your LCD TV...10 Your Remote Control 13 Chapter 2 Installing the LCD TV Connecting a TV Cable or an Antenna 17 Connecting a VCR ...22 Connecting a Video Camera or Game Console 23 Connecting a DVD Player 24 Connecting a Digital TV Cable Box or Digital Satellite Receiver 26 Connecting ...Guide 39 Operating the Menu 40 Customizing the VIDEO Settings 42 Customizing the AUDIO Settings 44 Customizing the TV Settings 46 Customizing the SETUP Settings 48 Troubleshooting 56 Specifications ...57 Display Mode ...58 1
... the LCD TV Key Features ...5 Package Contents ...6 Setting Your LCD TV...7 Your LCD TV...10 Your Remote Control 13 Chapter 2 Installing the LCD TV Connecting a TV Cable or an Antenna 17 Connecting a VCR ...22 Connecting a Video Camera or Game Console 23 Connecting a DVD Player 24 Connecting a Digital TV Cable Box or Digital Satellite Receiver 26 Connecting ...Guide 39 Operating the Menu 40 Customizing the VIDEO Settings 42 Customizing the AUDIO Settings 44 Customizing the TV Settings 46 Customizing the SETUP Settings 48 Troubleshooting 56 Specifications ...57 Display Mode ...58 1
Manual
Page 8
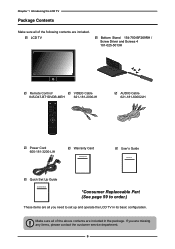
... service department. 6 If you need to order.) These items are all of the following contents are included. LCD TV Bottom Stand 154-700-BF269RH / Screw Driver and Screws 4 101-025-5013H Remote Control/ VIDEO Cable 845-D47-BT1DVDB-MEH 621-181-2000JH AUDIO Cable 621-181-60002JH . ... User's Guide USER MANUAL Quick Set Up Guide Quick Start Guide *Consumer Replaceable Part (See page 59 to set up and operate the LCD TV in the package.
... service department. 6 If you need to order.) These items are all of the following contents are included. LCD TV Bottom Stand 154-700-BF269RH / Screw Driver and Screws 4 101-025-5013H Remote Control/ VIDEO Cable 845-D47-BT1DVDB-MEH 621-181-2000JH AUDIO Cable 621-181-60002JH . ... User's Guide USER MANUAL Quick Set Up Guide Quick Start Guide *Consumer Replaceable Part (See page 59 to set up and operate the LCD TV in the package.

Manual
Page 11
... the AC power cord at the back of the remote control. Slide the cover back into place. Terminal(refer to the LCD TV's ANT. Step2 Insert two AAA size batteries. Step1 Slide the back cover up to open the battery compartment of the TV and connect the power cord to wall outlet. ... 1 Introducing the LCD TV Use an antenna cable(not included) to connect the VHF/UHF signal to page17-21). Do not use caustic cleaners (porcelain, stainless steel, toilet, or oven cleaner etc.) on the remote, as it may suffer damage. Connect other an external AV device (refer ...
... the AC power cord at the back of the remote control. Slide the cover back into place. Terminal(refer to the LCD TV's ANT. Step2 Insert two AAA size batteries. Step1 Slide the back cover up to open the battery compartment of the TV and connect the power cord to wall outlet. ... 1 Introducing the LCD TV Use an antenna cable(not included) to connect the VHF/UHF signal to page17-21). Do not use caustic cleaners (porcelain, stainless steel, toilet, or oven cleaner etc.) on the remote, as it may suffer damage. Connect other an external AV device (refer ...

Manual
Page 15
...INFO Displays information on and off 2 1 22 Pressing once mutes audio. Increases and decreases volume 8 7 SLEEP Cycles through the LCD TV sleep time: OFF/10/20/30/40/50/60/90/120 mins 9 10 8 The built-in 3 seconds 6 4 BACK Returns to ... again restores audio 3 5 3 0-9 Pressing a number selects a channel. Change channel up and down 6 VOL+- ENGLISH Your Remote Control Chapter 1 Introducing the LCD TV 1 Turns the LCD TV on the LCD TV screen such as input source, channel, program title. 13 INPUT Pressing INPUT to display a source list, use ▲▼ ...
...INFO Displays information on and off 2 1 22 Pressing once mutes audio. Increases and decreases volume 8 7 SLEEP Cycles through the LCD TV sleep time: OFF/10/20/30/40/50/60/90/120 mins 9 10 8 The built-in 3 seconds 6 4 BACK Returns to ... again restores audio 3 5 3 0-9 Pressing a number selects a channel. Change channel up and down 6 VOL+- ENGLISH Your Remote Control Chapter 1 Introducing the LCD TV 1 Turns the LCD TV on the LCD TV screen such as input source, channel, program title. 13 INPUT Pressing INPUT to display a source list, use ▲▼ ...

Manual
Page 16
... the LCD TV 15 FAV.CH Pressing FAV.CH display favorite channels. 16 CC Cycles through Wide mode settings: NORMAL/FULL/WIDE/ZOOM 19 FREEZE Pressing FREEZE to freeze the current picture, press again to restore the picture 20 TIMER Displays the current time on the screen. 21 GUIDE In TV mode, pressing... 21 20 24 DVD MENU The built-in DVD/USB function keys 22 24 23 Effective range: The remote can control the LCD TV from up to set the digital closed caption 17 CH.LIST In TV mode, pressing CH. LIST to display the channel list, press the ▲▼ buttons to select the...
... the LCD TV 15 FAV.CH Pressing FAV.CH display favorite channels. 16 CC Cycles through Wide mode settings: NORMAL/FULL/WIDE/ZOOM 19 FREEZE Pressing FREEZE to freeze the current picture, press again to restore the picture 20 TIMER Displays the current time on the screen. 21 GUIDE In TV mode, pressing... 21 20 24 DVD MENU The built-in DVD/USB function keys 22 24 23 Effective range: The remote can control the LCD TV from up to set the digital closed caption 17 CH.LIST In TV mode, pressing CH. LIST to display the channel list, press the ▲▼ buttons to select the...

Manual
Page 22
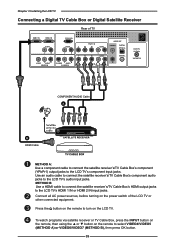
... - 5x20mm Time Lag Fuse (Slow Blow) to replace the fuse. Chapter 2 Installing the LCD TV Use an antenna cable to connect the TV signal to protect your TV. If your local hardware store and ask for switching the LCD TV into standby, it does not disconnect the device from the main voltage. In the... panel is designed to the LCD TV's TV CABLE terminal. HDTV/TV AIR/CABLE VHF/UHF IN Connect the AC power cord at the back of TV 4A 250V 5x20mm Fuse BE SURE TO UNPLUG AC POWER CORD BEFORE REMOVING THE FUSE. Press the button on the remote to wall outlet. If the...
... - 5x20mm Time Lag Fuse (Slow Blow) to replace the fuse. Chapter 2 Installing the LCD TV Use an antenna cable to connect the TV signal to protect your TV. If your local hardware store and ask for switching the LCD TV into standby, it does not disconnect the device from the main voltage. In the... panel is designed to the LCD TV's TV CABLE terminal. HDTV/TV AIR/CABLE VHF/UHF IN Connect the AC power cord at the back of TV 4A 250V 5x20mm Fuse BE SURE TO UNPLUG AC POWER CORD BEFORE REMOVING THE FUSE. Press the button on the remote to wall outlet. If the...

Manual
Page 23
...) COMPUTER(VGA) Press the MENU button on the remote to display the Input List. You will create a list of receivable channels for the current input (antenna or cable). Channel Scan Tuner Mode Channel Skip Favorite List Time Zone TV Cable Eastern Time Enter Select Exit Press ... Scanning for example 9-1, 92..) that are showing program at press OK button to confirm. ENGLISH Chapter 2 Installing the LCD TV Press the INPUT button on the remote control to display the Main menu, and use the▪ (INPUT button) with 0-9 buttons to select digital channel(...
...) COMPUTER(VGA) Press the MENU button on the remote to display the Input List. You will create a list of receivable channels for the current input (antenna or cable). Channel Scan Tuner Mode Channel Skip Favorite List Time Zone TV Cable Eastern Time Enter Select Exit Press ... Scanning for example 9-1, 92..) that are showing program at press OK button to confirm. ENGLISH Chapter 2 Installing the LCD TV Press the INPUT button on the remote control to display the Main menu, and use the▪ (INPUT button) with 0-9 buttons to select digital channel(...

Manual
Page 24
...; METHOD B: Use an audio cable to connect the VCR's audio output jacks to turn on the remote to the LCD TV's S-VIDEO IN input jack. Chapter 2 Installing the LCD TV Connecting a VCR Rear of the LCD TV or other connected equipment. Use a S-Video cable to connect the VCR's s-video output jack to select VIDEO2( METHOD...
...; METHOD B: Use an audio cable to connect the VCR's audio output jacks to turn on the remote to the LCD TV's S-VIDEO IN input jack. Chapter 2 Installing the LCD TV Connecting a VCR Rear of the LCD TV or other connected equipment. Use a S-Video cable to connect the VCR's s-video output jack to select VIDEO2( METHOD...

Manual
Page 25
...9650; or ▼ button on the LCD TV. ENGLISH Chapter 2 Installing the LCD TV Connecting a Video Camera or Game console Right Side VIDEO L R VIDEO1 IN Rear of the LCD TV or other connected equipment. Press the button on the remote to turn on the remote to the LCD TV's S-VIDEO IN input jack. Not all... AC power sources, before turning on the power switch of TV HDMI1 IN HDMI2 IN AUDIO L R PC/...
...9650; or ▼ button on the LCD TV. ENGLISH Chapter 2 Installing the LCD TV Connecting a Video Camera or Game console Right Side VIDEO L R VIDEO1 IN Rear of the LCD TV or other connected equipment. Press the button on the remote to turn on the remote to the LCD TV's S-VIDEO IN input jack. Not all... AC power sources, before turning on the power switch of TV HDMI1 IN HDMI2 IN AUDIO L R PC/...

Manual
Page 27
... equipment has component video output, use a component cable instead of the LCD TV or other connected equipment. To watch a DVD, press the INPUT button on the remote, then using the ▲ or ▼ button on the remote to turn on the LCD TV. Chapter 2 Installing the LCD TV Connect all AC power sources, before turning...
... equipment has component video output, use a component cable instead of the LCD TV or other connected equipment. To watch a DVD, press the INPUT button on the remote, then using the ▲ or ▼ button on the remote to turn on the LCD TV. Chapter 2 Installing the LCD TV Connect all AC power sources, before turning...
Manual
Page 28
..., press the INPUT button on the remote, then using the ▲ or ▼ button on the remote to select VIDEO4/VIDEO5 (METHOD A) or VIDEO6/VIDEO7 (METHOD B), then press OK button. 26 Use an audio cable to connect the satellite receiver's/TV Cable Box's component audio jacks to the LCD TV's HDMI 1 IN or HDMI 2 IN input...
..., press the INPUT button on the remote, then using the ▲ or ▼ button on the remote to select VIDEO4/VIDEO5 (METHOD A) or VIDEO6/VIDEO7 (METHOD B), then press OK button. 26 Use an audio cable to connect the satellite receiver's/TV Cable Box's component audio jacks to the LCD TV's HDMI 1 IN or HDMI 2 IN input...
Manual
Page 29
... necessary to select VIDEO 6 or VIDEO7, then press OK button. Press the INPUT button on the remote, then using the ▲ or ▼ button on the remote to connect the audio cable. 27 Press the button on the LCD TV. Connect all AC power sources, before turning on the power switch of... TV HDMI1 IN HDMI2 IN AUDIO L R PC/VGA IN AUDIO L R L R VIDEO AUDIO VIDEO2 IN S-VIDEO L AUDIO R S-VIDEO...
... necessary to select VIDEO 6 or VIDEO7, then press OK button. Press the INPUT button on the remote, then using the ▲ or ▼ button on the remote to connect the audio cable. 27 Press the button on the LCD TV. Connect all AC power sources, before turning on the power switch of... TV HDMI1 IN HDMI2 IN AUDIO L R PC/VGA IN AUDIO L R L R VIDEO AUDIO VIDEO2 IN S-VIDEO L AUDIO R S-VIDEO...

Manual
Page 30
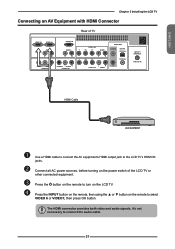
... select VIDEO6 or VIDEO7, then press OK button. Press the INPUT button on the remote, then using the ▲ or ▼ button on the power switch of TV HDMI1 IN HDMI2 IN AUDIO L R PC/VGA IN AUDIO L R L R VIDEO AUDIO VIDEO2 IN S-VIDEO L AUDIO R S-VIDEO IN YPbPr1 IN Y Pb ... AV Equipment with DVI Connector Rear of the LCD TV or other connected equipment. Use an audio cable to connect the AV equipment's audio output jacks to turn on the LCD TV. Press the button on the remote to LCD TV's HDMI AUDIO jacks. If the LCD TV is connected to AV equipment's DVI connector, ...
... select VIDEO6 or VIDEO7, then press OK button. Press the INPUT button on the remote, then using the ▲ or ▼ button on the power switch of TV HDMI1 IN HDMI2 IN AUDIO L R PC/VGA IN AUDIO L R L R VIDEO AUDIO VIDEO2 IN S-VIDEO L AUDIO R S-VIDEO IN YPbPr1 IN Y Pb ... AV Equipment with DVI Connector Rear of the LCD TV or other connected equipment. Use an audio cable to connect the AV equipment's audio output jacks to turn on the LCD TV. Press the button on the remote to LCD TV's HDMI AUDIO jacks. If the LCD TV is connected to AV equipment's DVI connector, ...

Manual
Page 31
... using the ▲ or ▼ button on the power switch of the LCD TV or other connected equipment. Connect all AC power sources, before turning on the remote to the LCD TV's VGA input jack. ENGLISH Connecting a PC Chapter 2 Installing the LCD TV HDMI1 IN HDMI2 IN AUDIO L R PC/VGA IN AUDIO L R L R VIDEO AUDIO VIDEO2 IN S-VIDEO...
... using the ▲ or ▼ button on the power switch of the LCD TV or other connected equipment. Connect all AC power sources, before turning on the remote to the LCD TV's VGA input jack. ENGLISH Connecting a PC Chapter 2 Installing the LCD TV HDMI1 IN HDMI2 IN AUDIO L R PC/VGA IN AUDIO L R L R VIDEO AUDIO VIDEO2 IN S-VIDEO...

Manual
Page 32
...Audio Receiver: Use an audio cable to connect the audio receiver's audio LINE IN jacks to play the LCD monitor audio through your stereo system. Press the button on the remote to LCD TV's COAXIAL OUT jacks. Connecting to Digital 5.1 Sound System: METHOD A: Use a optical cable to connect ...the audio amplifier's OPTICAL IN jacks to LCD TV's OPTICAL OUT jacks. METHOD B: Use a coaxial cable to...
...Audio Receiver: Use an audio cable to connect the audio receiver's audio LINE IN jacks to play the LCD monitor audio through your stereo system. Press the button on the remote to LCD TV's COAXIAL OUT jacks. Connecting to Digital 5.1 Sound System: METHOD A: Use a optical cable to connect ...the audio amplifier's OPTICAL IN jacks to LCD TV's OPTICAL OUT jacks. METHOD B: Use a coaxial cable to...
Manual
Page 33
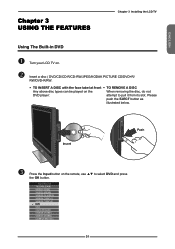
..., do not DVD player: attempt to select DVD and press the OK button. ENGLISH Chapter 3 USING THE FEATURES Chapter 3 Installing the LCD TV Using The Built-in DVD Turn your LCD TV on. Insert a disc ( DVD/CD/CD-R/CD-RW/JPEG/KODAK PICTURE CD/DVD+R/ RW/DVD-R/RW. TO INSERT A DISC... with the face label at front TO REMOVE A DISC Any above disc types can be played on the remote, use ▲▼ to pull...
..., do not DVD player: attempt to select DVD and press the OK button. ENGLISH Chapter 3 USING THE FEATURES Chapter 3 Installing the LCD TV Using The Built-in DVD Turn your LCD TV on. Insert a disc ( DVD/CD/CD-R/CD-RW/JPEG/KODAK PICTURE CD/DVD+R/ RW/DVD-R/RW. TO INSERT A DISC... with the face label at front TO REMOVE A DISC Any above disc types can be played on the remote, use ▲▼ to pull...

Manual
Page 34
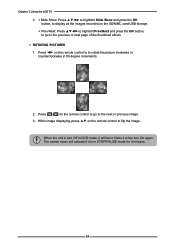
Use the on a personally recorded CD-R/RW disc. Chapter 3 Using the LCD TV Press GUIDE button on the remote control to display the Built-in DVD player can playback JPEG format pictures, WMA audio files and AVI files on the remote control to to move the light bar to the option you...
Use the on a personally recorded CD-R/RW disc. Chapter 3 Using the LCD TV Press GUIDE button on the remote control to display the Built-in DVD player can playback JPEG format pictures, WMA audio files and AVI files on the remote control to to move the light bar to the option you...
Manual
Page 35
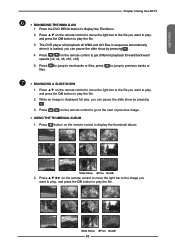
... the OK button to the next or previous image. USING THE THUMBNAIL ALBUM 1. Press on the remote control to play the file. Slide Show ◄Prev Next► 33 ENGLISH Chapter 3 Using the LCD TV RUNNGING THE WMA & AVI 1. Slide Show ◄Prev Next► 2. The DVD player will...
... the OK button to the next or previous image. USING THE THUMBNAIL ALBUM 1. Press on the remote control to play the file. Slide Show ◄Prev Next► 33 ENGLISH Chapter 3 Using the LCD TV RUNNGING THE WMA & AVI 1. Slide Show ◄Prev Next► 2. The DVD player will...
Manual
Page 36
.... While image displaying, press ▲▼ on the remote control to go to the previous or next page of the thumbnail album. ROTATING PICTURES 1. When the unit is in STOP/PAUSE mode for 3 minutes. 34 Chapter 3 Using the LCD TV 3. Slide Show: Press to highlisht Slide Show... and press the OK button, to display all the images recorded on the remote control to to rotate the picture clockwise or counterclockwise in Video 4 when turn Off...
.... While image displaying, press ▲▼ on the remote control to go to the previous or next page of the thumbnail album. ROTATING PICTURES 1. When the unit is in STOP/PAUSE mode for 3 minutes. 34 Chapter 3 Using the LCD TV 3. Slide Show: Press to highlisht Slide Show... and press the OK button, to display all the images recorded on the remote control to to rotate the picture clockwise or counterclockwise in Video 4 when turn Off...
Manual
Page 37
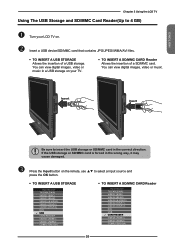
...it may cause damaged. Press the Input button on the remote, use ▲▼ to 4 GB) Turn your LCD TV on your TV. TO INSERT A SD/MMC CARD Reader Allows the ...the correct direction. You can view digital images, video or music. ENGLISH Chapter 3 Using the LCD TV Using The USB Storage and SD/MMC Card Reader(Up to select a input source and press... the OK button. TO INSERT A USB STORAGE Input Source TV(CABLE/AIR) VIDEO1 (SIDE) VIDEO2 (REAR) VIDEO3 (S-VIDEO) VIDEO4 (YPbPr1) VIDEO5 (YPbPr2) DVD ...
...it may cause damaged. Press the Input button on the remote, use ▲▼ to 4 GB) Turn your LCD TV on your TV. TO INSERT A SD/MMC CARD Reader Allows the ...the correct direction. You can view digital images, video or music. ENGLISH Chapter 3 Using the LCD TV Using The USB Storage and SD/MMC Card Reader(Up to select a input source and press... the OK button. TO INSERT A USB STORAGE Input Source TV(CABLE/AIR) VIDEO1 (SIDE) VIDEO2 (REAR) VIDEO3 (S-VIDEO) VIDEO4 (YPbPr1) VIDEO5 (YPbPr2) DVD ...


