User Guide
Page 2
... Location of Controls ...5 • Front...5 • Rear Panel ...6 • Remote...6 Remote Control...7 • Battery Installation ...7 • Effective Distance of the Remote Control Transmitter ...7 Cable (CATV)/Satellite Connections ...8 Outdoor Antenna Connections ...9 VCR Connections ...10 DVD Connections ...12 Computer Connection ...13 Setting the Menu...14 • Turning the Main Power On ...14 • Setting the Video...14 • Picture in Picture...15 • Image Setup...16 • Audio Setup ...18 • Feature Setup ...20 Setting the System and Setting the Channels...
... Location of Controls ...5 • Front...5 • Rear Panel ...6 • Remote...6 Remote Control...7 • Battery Installation ...7 • Effective Distance of the Remote Control Transmitter ...7 Cable (CATV)/Satellite Connections ...8 Outdoor Antenna Connections ...9 VCR Connections ...10 DVD Connections ...12 Computer Connection ...13 Setting the Menu...14 • Turning the Main Power On ...14 • Setting the Video...14 • Picture in Picture...15 • Image Setup...16 • Audio Setup ...18 • Feature Setup ...20 Setting the System and Setting the Channels...
User Guide
Page 4
.... Use only with arrowhead symbol within the product's enclosure that they may not have been adhered to cords at plugs, convenience receptacles, and the point where they exit from battery power, or other similar surface. HEED WARNINGS All warnings on an unstable cart, stand, tripod, bracket or table. CLEANING Unplug this unit may cause hazards. 7. IMPORTANT SAFETY INSTRUCTIONS...
.... Use only with arrowhead symbol within the product's enclosure that they may not have been adhered to cords at plugs, convenience receptacles, and the point where they exit from battery power, or other similar surface. HEED WARNINGS All warnings on an unstable cart, stand, tripod, bracket or table. CLEANING Unplug this unit may cause hazards. 7. IMPORTANT SAFETY INSTRUCTIONS...
User Guide
Page 5
... overhead power lines or other hazards. IMPORTANT SAFETY INSTRUCTIONS (CONTINUED) 13. OBJECT AND LIQUID ENTRY Never push objects of liquid on the product. 17. WALL OR CEILING MOUNTING The product should be mounted to its normal operation. f. Never spill or spray any type of any service or repairs to this product yourself as opening or removing covers EXAMPLE OF ANTENNA GROUNDING...
... overhead power lines or other hazards. IMPORTANT SAFETY INSTRUCTIONS (CONTINUED) 13. OBJECT AND LIQUID ENTRY Never push objects of liquid on the product. 17. WALL OR CEILING MOUNTING The product should be mounted to its normal operation. f. Never spill or spray any type of any service or repairs to this product yourself as opening or removing covers EXAMPLE OF ANTENNA GROUNDING...
User Guide
Page 6
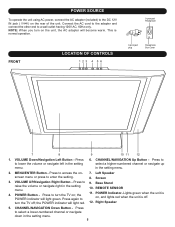
... setting menu. 5 CHANNEL/NAVIGATION Down Button - Left Speaker screen menu or press to access the on ; Base Stand raise the volume or navigate right in the setting menu. 6. Press again to the DC 12V IN jack (z) on , and lights red when the unit is normal operation. 3-pronged Receptacle FRONT LOCATION OF CONTROLS 123 4 56 3-pronged plug Receptacle Box Cover 7 8 9 10 11 12 1. POWER SOURCE When using a 3-pronged plug To operate the unit using AC power, connect the AC adapter...
... setting menu. 5 CHANNEL/NAVIGATION Down Button - Left Speaker screen menu or press to access the on ; Base Stand raise the volume or navigate right in the setting menu. 6. Press again to the DC 12V IN jack (z) on , and lights red when the unit is normal operation. 3-pronged Receptacle FRONT LOCATION OF CONTROLS 123 4 56 3-pronged plug Receptacle Box Cover 7 8 9 10 11 12 1. POWER SOURCE When using a 3-pronged plug To operate the unit using AC power, connect the AC adapter...
User Guide
Page 11
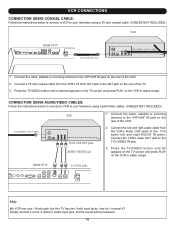
.../VIDEO button until a channel appears on the TV screen and press PLAY on the VCR to watch a tape. Simply connect it to the "L (Mono)" Audio input jack, but this TV has two Audio input jacks, how do I connect it? Connect the cable, satellite or incoming antenna to the VHF/UHF IN jack on the rear of the TV. 3. CONNECTION USING AUDIO/VIDEO CABLES: Follow the instructions below to connect a VCR to your television using...
.../VIDEO button until a channel appears on the TV screen and press PLAY on the VCR to watch a tape. Simply connect it to the "L (Mono)" Audio input jack, but this TV has two Audio input jacks, how do I connect it? Connect the cable, satellite or incoming antenna to the VHF/UHF IN jack on the rear of the TV. 3. CONNECTION USING AUDIO/VIDEO CABLES: Follow the instructions below to connect a VCR to your television using...
User Guide
Page 14
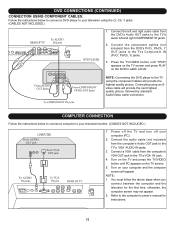
... to the computer's owner's manual for the first time, otherwise, the computer screen may not appear. 2. COMPUTER CONNECTION Follow the instructions below to connect a DVD player to your television/monitor. (CABLES NOT INCLUDED.) 1. DVD CONNECTIONS (CONTINUED) CONNECTION USING COMPONENT CABLES: Follow the instructions below to connect a computer to your television using an Svideo cable will appear. Press the TV/VIDEO button until PC appears on the TV screen. 5. Turn on the DVD to the TVs Component IN (Pr/Cr...
... to the computer's owner's manual for the first time, otherwise, the computer screen may not appear. 2. COMPUTER CONNECTION Follow the instructions below to connect a DVD player to your television/monitor. (CABLES NOT INCLUDED.) 1. DVD CONNECTIONS (CONTINUED) CONNECTION USING COMPONENT CABLES: Follow the instructions below to connect a computer to your television using an Svideo cable will appear. Press the TV/VIDEO button until PC appears on the TV screen. 5. Turn on the DVD to the TVs Component IN (Pr/Cr...
User Guide
Page 15
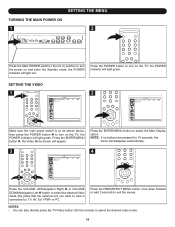
... the desired Video mode (the jacks that the external unit you want to view is on as shown above, then press the POWER button 1 to turn on and enter the Standby mode; the POWER indicator will light red. Press the FREEZE/EXIT MENU button once when finished or wait 2 seconds to select the Main Display option. SETTING THE MENU TURNING THE MAIN POWER ON 1 2 Press the Main POWER switch to the...
... the desired Video mode (the jacks that the external unit you want to view is on as shown above, then press the POWER button 1 to turn on and enter the Standby mode; the POWER indicator will light red. Press the FREEZE/EXIT MENU button once when finished or wait 2 seconds to select the Main Display option. SETTING THE MENU TURNING THE MAIN POWER ON 1 2 Press the Main POWER switch to the...
User Guide
Page 17
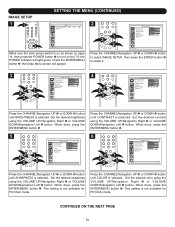
... Smart Theme donSeta,ndparrdess the ENTER/MENU button 5. 6 Smart Theme Standard 5 4 2 1 3 Smart Theme Standard Smart Theme Standard Press the CHANNEL/Navigation UP 1 or DOWN 2 button until BRIGHTNESS is selected. This setting is not available for PC(VGA) mode. IMAGE SETUP 1 1 SETTING THE MENU (CONTINUED) 2 2 Make sure the main power switch is selected. the Video Menu screen will light green. Smart Theme Standard 3 4 Smart Theme Standard Smart...
... Smart Theme donSeta,ndparrdess the ENTER/MENU button 5. 6 Smart Theme Standard 5 4 2 1 3 Smart Theme Standard Smart Theme Standard Press the CHANNEL/Navigation UP 1 or DOWN 2 button until BRIGHTNESS is selected. This setting is not available for PC(VGA) mode. IMAGE SETUP 1 1 SETTING THE MENU (CONTINUED) 2 2 Make sure the main power switch is selected. the Video Menu screen will light green. Smart Theme Standard 3 4 Smart Theme Standard Smart...
User Guide
Page 18
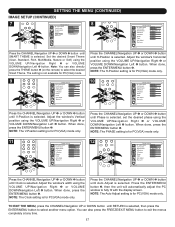
... directly press the THEME button 5 (on the remote) to fully fit with the display screen. The setting is not available for PC(VGA) mode only. 10 5 4 2 1 3 Smart Theme H-Position V-Position Phase Clock Auto Adjust Multimedia Press the CHANNEL/Navigation UP 1 or DOWN 2 button until Auto Adjust is selected. NOTE: The PHASE setting is for PC(VGA) mode only. Press the ENTER/MENU button 3, then the unit...
... directly press the THEME button 5 (on the remote) to fully fit with the display screen. The setting is not available for PC(VGA) mode only. 10 5 4 2 1 3 Smart Theme H-Position V-Position Phase Clock Auto Adjust Multimedia Press the CHANNEL/Navigation UP 1 or DOWN 2 button until Auto Adjust is selected. NOTE: The PHASE setting is for PC(VGA) mode only. Press the ENTER/MENU button 3, then the unit...
User Guide
Page 19
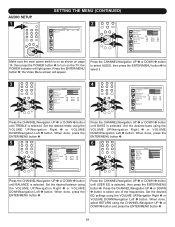
... Video Menu screen will light green. When done,Mopnoress the ENTER/MENU button 5. When done, select RETURN using the VOLUME UP/Navigation RightUser EQ 3 or VOLUME DOWN/Navigation Left 4 button. Press the ENTER/MENU button 2; When done, Mpornoess the ENTER/MENU button 5. 6 5 4 2 1 3 User EQ User EQ Mono Mono 5 4 2 1 3 User EQ Mono Press the CHANNEL/Navigation UP 1 or DOWN 2 button until USER EQ is on as shown on the TV; AUDIO SETUP 11 SETTING THE MENU...
... Video Menu screen will light green. When done,Mopnoress the ENTER/MENU button 5. When done, select RETURN using the VOLUME UP/Navigation RightUser EQ 3 or VOLUME DOWN/Navigation Left 4 button. Press the ENTER/MENU button 2; When done, Mpornoess the ENTER/MENU button 5. 6 5 4 2 1 3 User EQ User EQ Mono Mono 5 4 2 1 3 User EQ Mono Press the CHANNEL/Navigation UP 1 or DOWN 2 button until USER EQ is on as shown on the TV; AUDIO SETUP 11 SETTING THE MENU...
User Guide
Page 20
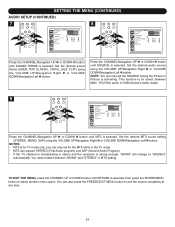
...'s audio output. 9 User EQ User EQ Mono 4 1 User EQ Mono 2 3 Mono Press the CHANNEL/Navigation UP 1 User EQ or DOWN 2 button until SOURCE is selected. you can support STEREO (First Audio program) and SAP (Second Audio ProMgornoam). • If the TV channel is broadcasting in the TV mode. • MTS can only set the SOURCE during theMoPnoicture in MTS setting. TO EXIT THE MENU, press the CHANNEL UP or DOWN button...
...'s audio output. 9 User EQ User EQ Mono 4 1 User EQ Mono 2 3 Mono Press the CHANNEL/Navigation UP 1 User EQ or DOWN 2 button until SOURCE is selected. you can support STEREO (First Audio program) and SAP (Second Audio ProMgornoam). • If the TV channel is broadcasting in the TV mode. • MTS can only set the SOURCE during theMoPnoicture in MTS setting. TO EXIT THE MENU, press the CHANNEL UP or DOWN button...
User Guide
Page 21
... main power switch is selected. Press the ENTER/MENU button 2; NOTE: This setting is not available for PC(VGA) mode. the Video Menu screen will light green. At the next screen, Color Temp will not be selected. Set the aspect ratio (Full, Letter Box, LB to Full, Zoom out, Zoom In 1 or Zoom In 2) using the CHANNEL/Navigation UP 1 or DOWN 2 button and press the ENTER/MENU button 3. 6 4 2 1 3 Press the CHANNEL...
... main power switch is selected. Press the ENTER/MENU button 2; NOTE: This setting is not available for PC(VGA) mode. the Video Menu screen will light green. At the next screen, Color Temp will not be selected. Set the aspect ratio (Full, Letter Box, LB to Full, Zoom out, Zoom In 1 or Zoom In 2) using the CHANNEL/Navigation UP 1 or DOWN 2 button and press the ENTER/MENU button 3. 6 4 2 1 3 Press the CHANNEL...
User Guide
Page 22
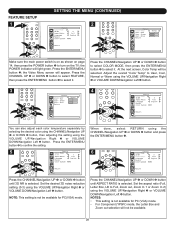
... any time. TV SETUP System: See page 22. You can also press the FREEZE/EXIT MENU button to the default settings, press the ENTER/MENU button 3. 9 The information under RECALL is just for reference and cannot be changed. Press the CHANNEL/Navigation UP 1 or DOWN 2 button until RECALL is no video input, it will show the value of "Resolution, H sync, V sync". Adding/Skipping Channels: See page 23. Closed Captions...
... any time. TV SETUP System: See page 22. You can also press the FREEZE/EXIT MENU button to the default settings, press the ENTER/MENU button 3. 9 The information under RECALL is just for reference and cannot be changed. Press the CHANNEL/Navigation UP 1 or DOWN 2 button until RECALL is no video input, it will show the value of "Resolution, H sync, V sync". Adding/Skipping Channels: See page 23. Closed Captions...
User Guide
Page 23
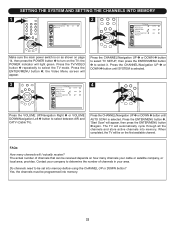
... the ENTER/MENU button 3 again. Press the ENTER/MENU button 3, "Start Scan" will appear. Press the TV/VIDEO button 2 repeatedly to determine the number of channels that can be received depends on how many channels will light green. The TV will be on the first available channel. Do channels need to turn on the TV; SETTING THE SYSTEM AND SETTING THE CHANNELS INTO MEMORY 1 2 1 3 2 Make sure the main power switch is on...
... the ENTER/MENU button 3 again. Press the ENTER/MENU button 3, "Start Scan" will appear. Press the TV/VIDEO button 2 repeatedly to determine the number of channels that can be received depends on how many channels will light green. The TV will be on the first available channel. Do channels need to turn on the TV; SETTING THE SYSTEM AND SETTING THE CHANNELS INTO MEMORY 1 2 1 3 2 Make sure the main power switch is on...
User Guide
Page 24
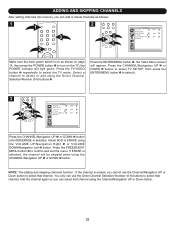
... turn on page 14, then press the POWER button 1 to delete or add using the Channel/Navigation UP or Down button. 23 Press the CHANNEL/Navigation UP 2 or DOWN 3 button to select TV SETUP, then press the ENTER/MENU button 1 to confirm and exit the menu. Press the TV/VIDEO button 2 repeatedly to select that channel using the Direct Channel Selection/Number (0-9) buttons 3. the POWER indicator will appear. the Video Menu screen will light green...
... turn on page 14, then press the POWER button 1 to delete or add using the Channel/Navigation UP or Down button. 23 Press the CHANNEL/Navigation UP 2 or DOWN 3 button to select TV SETUP, then press the ENTER/MENU button 1 to confirm and exit the menu. Press the TV/VIDEO button 2 repeatedly to select that channel using the Direct Channel Selection/Number (0-9) buttons 3. the POWER indicator will appear. the Video Menu screen will light green...

User Guide
Page 25
... the two digits in order. • For Channels 100 through your cable company. 24 This will light green. Use these channels through 125, press the 1-- button 4, then the remaining two digits. Press the TV/VIDEO button 2 repeatedly to turn on the screen by pressing the VOLUME UP/Navigation Right 1 or VOLUME DOWN/Navigation Left 2 button. For proper operation, before selecting channels, they must subscribe to these buttons to 125...
... the two digits in order. • For Channels 100 through your cable company. 24 This will light green. Use these channels through 125, press the 1-- button 4, then the remaining two digits. Press the TV/VIDEO button 2 repeatedly to turn on the screen by pressing the VOLUME UP/Navigation Right 1 or VOLUME DOWN/Navigation Left 2 button. For proper operation, before selecting channels, they must subscribe to these buttons to 125...
User Guide
Page 26
... sleep time between "MONO" and "STEREO" in stereo. The sound can support STEREO (First Audio program) and SAP (Second Audio Program). • If the TV channel is broadcasting in the TV mode. • MTS can be turned back on the screen. NOTE: • For PC mode, if "PC No Signal" appears on the screen, please refer to select the desired EQ setting ( USER, POP, CLASSIC, VOICE, JAZZ, FLAT...
... sleep time between "MONO" and "STEREO" in stereo. The sound can support STEREO (First Audio program) and SAP (Second Audio Program). • If the TV channel is broadcasting in the TV mode. • MTS can be turned back on the screen. NOTE: • For PC mode, if "PC No Signal" appears on the screen, please refer to select the desired EQ setting ( USER, POP, CLASSIC, VOICE, JAZZ, FLAT...
User Guide
Page 28
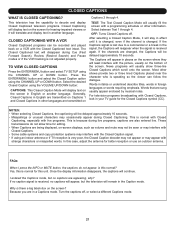
... no caption signal is there a big black box on Captions 2 through 4. After selecting a Closed Caption Mode, it will usually fill the screen with the Closed Captioned text intact. Because you are changed . TO VIEW CLOSED CAPTIONS Press the ENTER/MENU button and select TV SETUP using the CHANNEL UP or DOWN button. Most other information. For television programs broadcasting with live programs. This is normal for better reception or use an outdoor antenna. Once the display information...
... no caption signal is there a big black box on Captions 2 through 4. After selecting a Closed Caption Mode, it will usually fill the screen with the Closed Captioned text intact. Because you are changed . TO VIEW CLOSED CAPTIONS Press the ENTER/MENU button and select TV SETUP using the CHANNEL UP or DOWN button. Most other information. For television programs broadcasting with live programs. This is normal for better reception or use an outdoor antenna. Once the display information...
User Guide
Page 29
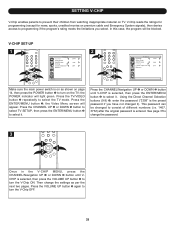
... the VOLUME UP button 3 to turn the V-Chip ON. Press the ENTER/MENU button 3; Press the CHANNEL UP 4 or DOWN 5 button to select TV SETUP, then press the ENTER/MENU button 3 to turn the V-Chip OFF. 28 See page 31to change the settings as shown on the TV; SETTING V-CHIP V-Chip enables parents to select the TV mode. the POWER indicator will appear. the Video Menu screen will light green. Then change the password...
... the VOLUME UP button 3 to turn the V-Chip ON. Press the ENTER/MENU button 3; Press the CHANNEL UP 4 or DOWN 5 button to select TV SETUP, then press the ENTER/MENU button 3 to turn the V-Chip OFF. 28 See page 31to change the settings as shown on the TV; SETTING V-CHIP V-Chip enables parents to select the TV mode. the POWER indicator will appear. the Video Menu screen will light green. Then change the password...

User Guide
Page 33
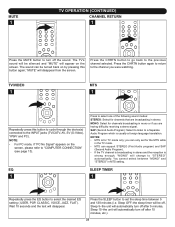
... not adjusted. No reception above ch13. Press MUTE button again. Sleep Timer is pressed. Remote control does not operate. The batteries are weak or installed incorrectly. Possible local interference. Cable TV service interrupted. MUTE button is set to a new channel. Replace the batteries or install correctly. Parental control protection is not closed captioned. Check CATV connection or VHF/UHF antenna. TV station experiencing problems. Try another channel. program tuned is not working . TROUBLESHOOTING GUIDE Check...
... not adjusted. No reception above ch13. Press MUTE button again. Sleep Timer is pressed. Remote control does not operate. The batteries are weak or installed incorrectly. Possible local interference. Cable TV service interrupted. MUTE button is set to a new channel. Replace the batteries or install correctly. Parental control protection is not closed captioned. Check CATV connection or VHF/UHF antenna. TV station experiencing problems. Try another channel. program tuned is not working . TROUBLESHOOTING GUIDE Check...


