User Guide
Page 2
CONTENTS Contents ...1 Important Safety Instructions...2 Power Source...5 Location of Controls ...5 • Front...5 • Rear Panel ...6 • Remote...6 Remote Control...7 • Battery Installation ...7 • Effective Distance of the Remote Control Transmitter ...7 Cable (CATV)/Satellite Connections ...8 Outdoor Antenna Connections ...9 VCR Connections ...10 DVD Connections ...12 Computer Connection ...13 Setting the Menu...14 • Turning the ...
CONTENTS Contents ...1 Important Safety Instructions...2 Power Source...5 Location of Controls ...5 • Front...5 • Rear Panel ...6 • Remote...6 Remote Control...7 • Battery Installation ...7 • Effective Distance of the Remote Control Transmitter ...7 Cable (CATV)/Satellite Connections ...8 Outdoor Antenna Connections ...9 VCR Connections ...10 DVD Connections ...12 Computer Connection ...13 Setting the Menu...14 • Turning the ...
User Guide
Page 6
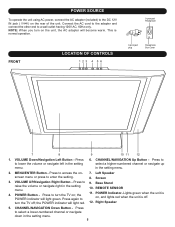
... the unit is normal operation. 3-pronged Receptacle FRONT LOCATION OF CONTROLS 123 4 56 3-pronged plug Receptacle Box Cover 7 8 9 10 11 12 1. MENU/ENTER Button - Screen 3. REMOTE SENSOR 4. turn on ; the POWER indicator will light green. Left Speaker screen menu or press to a wall outlet having 120V AC, 60Hz only. VOLUME UP...
... the unit is normal operation. 3-pronged Receptacle FRONT LOCATION OF CONTROLS 123 4 56 3-pronged plug Receptacle Box Cover 7 8 9 10 11 12 1. MENU/ENTER Button - Screen 3. REMOTE SENSOR 4. turn on ; the POWER indicator will light green. Left Speaker screen menu or press to a wall outlet having 120V AC, 60Hz only. VOLUME UP...
User Guide
Page 7
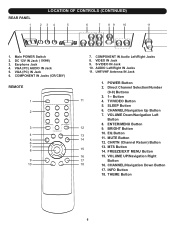
... Button 5. ENTER/MENU Button 12 9. CHANNEL/Navigation Down Button 17. LOCATION OF CONTROLS (CONTINUED) REAR PANEL 1 23 4 5 6 7 89 10 11 1. COMPONENT IN Jacks (CR/CB/Y) REMOTE 1 2 3 4 5 6 7 8 9 10 7. AUDIO Left/Right IN Jacks 11. VGA (PC) IN Jack 6. Direct Channel Selection/Number (0-9) Buttons 3. 1-- CHANNEL/Navigation Up Button 7. BRIGHT Button 13 14 10...
... Button 5. ENTER/MENU Button 12 9. CHANNEL/Navigation Down Button 17. LOCATION OF CONTROLS (CONTINUED) REAR PANEL 1 23 4 5 6 7 89 10 11 1. COMPONENT IN Jacks (CR/CB/Y) REMOTE 1 2 3 4 5 6 7 8 9 10 7. AUDIO Left/Right IN Jacks 11. VGA (PC) IN Jack 6. Direct Channel Selection/Number (0-9) Buttons 3. 1-- CHANNEL/Navigation Up Button 7. BRIGHT Button 13 14 10...
User Guide
Page 8
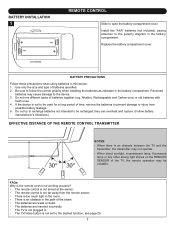
...not mix different types of batteries specified. 2. they can overheat and rupture. (Follow battery manufacturer's directions.) EFFECTIVE DISTANCE OF THE REMOTE CONTROL TRANSMITTER 15 ft 30° 30° NOTES: • When there is too far away from possible battery leakage. 5. Reversed ... may not operate. • When direct sunlight, incandescent lamp, fluorescent lamp or any other strong light shines on the REMOTE SENSOR of time, remove the batteries to follow the correct polarity when installing the batteries as indicated in the battery compartment. Install two...
...not mix different types of batteries specified. 2. they can overheat and rupture. (Follow battery manufacturer's directions.) EFFECTIVE DISTANCE OF THE REMOTE CONTROL TRANSMITTER 15 ft 30° 30° NOTES: • When there is too far away from possible battery leakage. 5. Reversed ... may not operate. • When direct sunlight, incandescent lamp, fluorescent lamp or any other strong light shines on the REMOTE SENSOR of time, remove the batteries to follow the correct polarity when installing the batteries as indicated in the battery compartment. Install two...
User Guide
Page 15
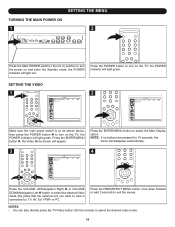
.... 14 the POWER indicator will light green. Press the ENTER/MENU button 2; NOTES: • You can also directly press the TV/Video button (On the remote) to turn on as shown above, then press the POWER button 1 to ): TV, AV, SV, YPbPr or PC.
.... 14 the POWER indicator will light green. Press the ENTER/MENU button 2; NOTES: • You can also directly press the TV/Video button (On the remote) to turn on as shown above, then press the POWER button 1 to ): TV, AV, SV, YPbPr or PC.
User Guide
Page 18
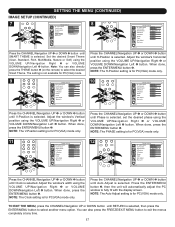
... Clock is selected, then press the ENTER/MENU button to select the desired Smart Theme. You can also directly press the THEME button 5 (on the remote) to select another menu option. Adjust the window's horizontal position using the VOLUME UP/Navigation Right 3 or VOLUME DOWN/Navigation Left 4 button. When done, press...
... Clock is selected, then press the ENTER/MENU button to select the desired Smart Theme. You can also directly press the THEME button 5 (on the remote) to select another menu option. Adjust the window's horizontal position using the VOLUME UP/Navigation Right 3 or VOLUME DOWN/Navigation Left 4 button. When done, press...

User Guide
Page 33
...room. Parental control protection is scrambled. Set ratings as desired. 32 Check for source of the beam and/or aim the remote or remote is not connected. TV SYSTEM option set to minimum. TV station experiencing problems. Try another channel. MUTE button is not...option to On (I ) position. TV shuts off . The batteries are weak or installed incorrectly. Press Main Power switch to CATV. Remote control does not operate. No reception above ch13. TV BROADCAST RECEPTION TV station experiencing problems. Try another channel. Check picture control adjustments...
...room. Parental control protection is scrambled. Set ratings as desired. 32 Check for source of the beam and/or aim the remote or remote is not connected. TV SYSTEM option set to minimum. TV station experiencing problems. Try another channel. MUTE button is not...option to On (I ) position. TV shuts off . The batteries are weak or installed incorrectly. Press Main Power switch to CATV. Remote control does not operate. No reception above ch13. TV BROADCAST RECEPTION TV station experiencing problems. Try another channel. Check picture control adjustments...

